Info BUICK ENCORE GX 2023 Owners Manual
[x] Cancel search | Manufacturer: BUICK, Model Year: 2023, Model line: ENCORE GX, Model: BUICK ENCORE GX 2023Pages: 367, PDF Size: 5.99 MB
Page 245 of 367

Buick Encore GX Owner Manual (GMNA-Localizing-U.S./Canada/Mexico-
16263917) - 2023 - CRC - 2/24/22
244 Driving and Operating
Gross Combined Weight Rating (GCWR)
GCWR is the total allowable weight of the
completely loaded vehicle and trailer
including any fuel, passengers, cargo,
equipment, and accessories. Do not exceed
the GCWR for your vehicle. The GCWR for
the vehicle is on the tow rating chart later
in this section.
To check that the weight of the vehicle and
trailer are within the GCWR for the vehicle,
follow these steps:1. Start with the "curb weight" from the Trailering Information label.
2. Add the weight of the trailer loaded with cargo and ready for the trip.
3. Add the weight of all passengers.
4. Add the weight of all cargo in the vehicle.
5. Add the weight of hitch hardware such as a draw bar, ball, load equalizer bars,
or sway bars.
6. Add the weight of any accessories or aftermarket equipment added to the
vehicle.
The resulting weight cannot exceed the
GCWR value on the Trailering Information
label. The gross combined weight can also be
confirmed by weighing the truck and trailer
on a public scale. The truck and trailer
should be loaded for the trip with
passengers and cargo.
Gross Vehicle Weight Rating (GVWR)
For information about the vehicle's
maximum load capacity, see
Vehicle Load
Limits 0191. When calculating the GVWR
with a trailer attached, the trailer tongue
weight must be included as part of the
weight the vehicle is carrying.
Maximum Trailer Weight Rating
The maximum trailer weight rating is
calculated assuming the tow vehicle has a
driver, a front seat passenger, and all
required trailering equipment. Weight of
additional optional equipment, passengers,
and cargo in the tow vehicle must be
subtracted from the trailer weight rating.
Use the tow rating chart to determine how
much the trailer can weigh, based on the
vehicle model, powertrain and trailering
options.
Page 247 of 367

Buick Encore GX Owner Manual (GMNA-Localizing-U.S./Canada/Mexico-
16263917) - 2023 - CRC - 2/24/22
246 Driving and Operating
The trailer tongue weight (1) should be 10–
15% of the loaded trailer weight (2). Some
specific trailer types, such as boat trailers,
fall outside of this range. Always refer to
the trailer owner’s manual for the
recommended trailer tongue weight for each
trailer. Never exceed the maximum loads for
your vehicle, hitch and trailer.
After loading the trailer, separately weigh
the trailer and then the trailer tongue and
calculate the trailer load balance percentage
to see if the weights and distribution are
appropriate for your vehicle. If the trailer
weight is too high, it may be possible to
transfer some of the cargo into your vehicle.If the trailer tongue weight is too high or
too low, it may be possible to rearrange
some of the cargo inside of the trailer.
Do not exceed the maximum allowable
tongue weight for your vehicle. Use the
shortest hitch extension available to position
the hitch ball closer to your vehicle. This will
help reduce the effect of the trailer tongue
weight on the trailer hitch and the rear axle.
If a cargo carrier is used in the trailer hitch
receiver, choose a carrier that positions the
load as close to the vehicle as possible.
Make sure the total weight, including the
carrier, is no more than half of the
maximum allowable tongue weight for the
vehicle.
Ask your dealer for trailering information or
assistance.
Towing Equipment
Hitches
Always use the correct hitch equipment for
your vehicle. Crosswinds, large trucks going
by, and rough roads can affect the trailer
and the hitch.
Proper hitch equipment for your vehicle
helps maintain control of the vehicle-trailer
combination. Many trailers can be towedusing a weight-carrying hitch which has a
coupler latched to the hitch ball, or a tow
eye latched to a pintle hook. Other trailers
may require a weight-distributing hitch that
uses spring bars to distribute the trailer
tongue weight between your vehicle and
trailer axles. See
“Maximum Trailer Tongue
Weight” underTrailer Towing 0243 for
weight limits with various hitch types.
Never attach rental hitches or other
bumper-type hitches. Only use
frame-mounted hitches that do not attach to
the bumper.
Tires
.Do not tow a trailer while using a
compact spare tire on the vehicle.
.Tires must be properly inflated to support
loads while towing a trailer. See Tires
0 285 for instructions on proper tire
inflation.
Safety Chains
Always attach chains between the vehicle
and the trailer, and attach the chains to the
holes on the trailer hitch platform.
Instructions about safety chains may be
provided by the hitch manufacturer or by
the trailer manufacturer.
Page 249 of 367

Buick Encore GX Owner Manual (GMNA-Localizing-U.S./Canada/Mexico-
16263917) - 2023 - CRC - 2/24/22
248 Driving and Operating
Conversions and Add-Ons
Add-On Electrical Equipment
{Warning
The Data Link Connector (DLC) is used
for vehicle service and Emission
Inspection/Maintenance testing. See
Malfunction Indicator Lamp (Check Engine
Light)0100. A device connected to the
DLC —such as an aftermarket fleet or
driver-behavior tracking device —may
interfere with vehicle systems. This could
affect vehicle operation and cause a
crash. Such devices may also access
information stored in the vehicle’s
systems.
Caution
Some electrical equipment can damage
the vehicle or cause components to not
work and would not be covered by the
vehicle warranty. Always check with your
dealer before adding electrical equipment. Add-on equipment can drain the vehicle's
12-volt battery, even if the vehicle is not
operating.
The vehicle has an airbag system. Before
attempting to add anything electrical to the
vehicle, see
Servicing the Airbag-Equipped
Vehicle 060 and
Adding Equipment to the Airbag-Equipped
Vehicle 061.
Page 250 of 367
Buick Encore GX Owner Manual (GMNA-Localizing-U.S./Canada/Mexico-
16263917) - 2023 - CRC - 2/24/22
Vehicle Care 249
Vehicle Care
General Information
General Information . . . . . . . . . . . . . . . . . . . 250
California Perchlorate MaterialsRequirements . . . . . . . . . . . . . . . . . . . . . . . . 250
Accessories and Modifications . . . . . . . . . 250
Vehicle Checks
Doing Your Own Service Work . . . . . . . . . 251
Hood . . . . . . . . . . . . . . . . . . . . . . . . . . . . . . . . . . 251
Engine Compartment Overview . . . . . . . . 253
Engine Oil . . . . . . . . . . . . . . . . . . . . . . . . . . . . . 256
Engine Oil Life System . . . . . . . . . . . . . . . . 258
Automatic Transmission Fluid . . . . . . . . . 258
Engine Air Filter Life System . . . . . . . . . . 259
Engine Air Cleaner/Filter . . . . . . . . . . . . . . 259
Cooling System . . . . . . . . . . . . . . . . . . . . . . . 260
Engine Overheating . . . . . . . . . . . . . . . . . . . 264
Washer Fluid . . . . . . . . . . . . . . . . . . . . . . . . . . 265
Brakes . . . . . . . . . . . . . . . . . . . . . . . . . . . . . . . . 266
Brake Pad Life System . . . . . . . . . . . . . . . . 266
Brake Fluid . . . . . . . . . . . . . . . . . . . . . . . . . . . . 267
Battery - North America . . . . . . . . . . . . . . . 268
All-Wheel Drive . . . . . . . . . . . . . . . . . . . . . . . . 270
Automatic Transmission Shift Lock Control Function Check . . . . . . . . . . . . . . 270
Park Brake and P (Park) Mechanism Check . . . . . . . . . . . . . . . . . . . . . . . . . . . . . . . . 270
Wiper Blade Replacement . . . . . . . . . . . . . 270 Windshield Replacement . . . . . . . . . . . . . . . 271
Gas Strut(s) . . . . . . . . . . . . . . . . . . . . . . . . . . . . 271
Headlamp Aiming
Front Headlamp Aiming . . . . . . . . . . . . . . . 272
Bulb Replacement
Bulb Replacement . . . . . . . . . . . . . . . . . . . . . 272
Halogen Bulbs . . . . . . . . . . . . . . . . . . . . . . . . . 273
LED Lighting . . . . . . . . . . . . . . . . . . . . . . . . . . . 273
Headlamps and Sidemarker Lamps . . . . . 273
Front Turn Signal and Fog Lamps . . . . . . 274
Taillamps, Turn Signal, Sidemarker,
Stoplamps, and Back-Up Lamps (Base
Level) . . . . . . . . . . . . . . . . . . . . . . . . . . . . . . . . 275
Taillamps, Turn Signal, Sidemarker, Stoplamps, and Back-Up Lamps
(Uplevel) . . . . . . . . . . . . . . . . . . . . . . . . . . . . . 277
Electrical System
Electrical System Overload . . . . . . . . . . . . 278
Fuses and Circuit Breakers . . . . . . . . . . . . . 279
Where To Find Fuse Maps for YourVehicle . . . . . . . . . . . . . . . . . . . . . . . . . . . . . . 280
Where To Find Fuse Maps for Your Vehicle . . . . . . . . . . . . . . . . . . . . . . . . . . . . . . 280
Engine Compartment Fuse Block . . . . . . 280
Instrument Panel Fuse Block . . . . . . . . . . . 283
Rear Compartment Fuse Block . . . . . . . . . 284
Wheels and Tires
Tires . . . . . . . . . . . . . . . . . . . . . . . . . . . . . . . . . . . 285
All-Season Tires . . . . . . . . . . . . . . . . . . . . . . . 286
Winter Tires . . . . . . . . . . . . . . . . . . . . . . . . . . . 286
Tire Sidewall Labeling . . . . . . . . . . . . . . . . . 287
Tire Designations . . . . . . . . . . . . . . . . . . . . . . 288
Tire Terminology and Definitions . . . . . . 289
Tire Pressure . . . . . . . . . . . . . . . . . . . . . . . . . . 291
Tire Pressure Monitor System . . . . . . . . . 292
Tire Pressure Monitor Operation . . . . . . 293
Tire Inspection . . . . . . . . . . . . . . . . . . . . . . . . 296
Tire Rotation . . . . . . . . . . . . . . . . . . . . . . . . . . 296
When It Is Time for New Tires . . . . . . . . 297
Buying New Tires . . . . . . . . . . . . . . . . . . . . . 298
Different Size Tires and Wheels . . . . . . . 299
Uniform Tire Quality Grading . . . . . . . . . 299
Wheel Alignment and Tire Balance . . . . 300
Wheel Replacement . . . . . . . . . . . . . . . . . . . 301
Tire Chains . . . . . . . . . . . . . . . . . . . . . . . . . . . . 301
If a Tire Goes Flat . . . . . . . . . . . . . . . . . . . . . 301
Tire Changing . . . . . . . . . . . . . . . . . . . . . . . . . 303
Compact Spare Tire . . . . . . . . . . . . . . . . . . . 307
Jump Starting
Jump Starting - North America . . . . . . . . 307
Towing the Vehicle
Transporting a Disabled Vehicle . . . . . . . 310
Recreational Vehicle Towing . . . . . . . . . . . . 311
Page 251 of 367

Buick Encore GX Owner Manual (GMNA-Localizing-U.S./Canada/Mexico-
16263917) - 2023 - CRC - 2/24/22
250 Vehicle Care
Appearance Care
Exterior Care . . . . . . . . . . . . . . . . . . . . . . . . . . . 314
Interior Care . . . . . . . . . . . . . . . . . . . . . . . . . . . 317
Floor Mats . . . . . . . . . . . . . . . . . . . . . . . . . . . . . 321General Information
For service and parts needs, visit your
dealer. You will receive genuine GM parts
and GM-trained and supported service
people.
Genuine GM parts have one of these marks:
California Perchlorate Materials
Requirements
Certain types of automotive applications,
such as airbag initiators, seat belt
pretensioners, and lithium batteries
contained in electronic keys, may contain
perchlorate materials. Perchlorate Material–special handling may apply. See
www.dtsc.ca.gov/hazardouswaste/
perchlorate.
Accessories and Modifications
Adding non-dealer accessories or making
modifications to the vehicle can affect
vehicle performance and safety, including
such things as airbags, braking, stability,
ride and handling, emissions systems,
aerodynamics, durability, Driver Assistance
Systems, and electronic systems like antilock
brakes, traction control, and stability control.
These accessories or modifications could
even cause malfunction or damage not
covered by the vehicle warranty.
Damage to suspension components caused
by modifying vehicle height outside of
factory settings will not be covered by the
vehicle warranty.
Damage to vehicle components resulting
from modifications or the installation or use
of non-GM certified parts, including control
module or software modifications, is not
covered under the terms of the vehicle
warranty and may affect remaining
warranty coverage for affected parts.
Page 252 of 367
Buick Encore GX Owner Manual (GMNA-Localizing-U.S./Canada/Mexico-
16263917) - 2023 - CRC - 2/24/22
Vehicle Care 251
GM Accessories are designed to complement
and function with other systems on the
vehicle. See your dealer to accessorize the
vehicle using genuine GM Accessories
installed by a dealer technician.
Also, seeAdding Equipment to the
Airbag-Equipped Vehicle 061.
Vehicle Checks
Doing Your Own Service Work
{Warning
It can be dangerous to work on your
vehicle if you do not have the proper
knowledge, service manual, tools,
or parts. Always follow owner’s manual
procedures and consult the service
manual for your vehicle before doing any
service work.
If doing some of your own service work, use
the proper service manual. It tells you much
more about how to service the vehicle than
this manual can. To order the proper service
manual, see Publication Ordering
Information 0342. This vehicle has an airbag system. Before
attempting to do your own service work,
see
Servicing the Airbag-Equipped Vehicle
0 60.
If equipped with remote vehicle start, open
the hood before performing any service
work to prevent remote starting the vehicle
accidentally. See Remote Vehicle Start 014.
Keep a record with all parts receipts and list
the mileage and the date of any service
work performed. See Maintenance Records
0 330.Caution
Even small amounts of contamination can
cause damage to vehicle systems. Do not
allow contaminants to contact the fluids,
reservoir caps, or dipsticks.
Hood
{Warning
For vehicles with auto engine stop/start,
turn the vehicle off before opening the
hood. If the vehicle is on, the engine will
start when the hood is opened. You or
others could be injured.
{Warning
Components under the hood can get hot
from running the engine. To help avoid
the risk of burning unprotected skin,
never touch these components until they
have cooled, and always use a glove or
towel to avoid direct skin contact.
Clear any snow from the hood before
opening.
Page 257 of 367
Buick Encore GX Owner Manual (GMNA-Localizing-U.S./Canada/Mexico-
16263917) - 2023 - CRC - 2/24/22
256 Vehicle Care
9.Battery - North America 0268.
10. Engine Compartment Fuse Block 0280.
11. Remote Negative (-) Battery Terminal. SeeJump Starting - North America 0307
Engine Oil
To ensure proper engine performance and
long life, careful attention must be paid to
engine oil. Following these simple, but
important steps will help protect your
investment:
.Use engine oil approved to the proper
specification and of the proper viscosity
grade. See “Selecting the Right Engine
Oil” in this section.
.Check the engine oil level regularly and
maintain the proper oil level. See
“Checking Engine Oil” and“When to Add
Engine Oil” in this section.
.Change the engine oil at the appropriate
time. SeeEngine Oil Life System 0258.
.Always dispose of engine oil properly. See
“What to Do with Used Oil” in this
section.
Checking Engine Oil
Check the engine oil level regularly, every
650 km (400 mi), especially prior to a long
trip. The engine oil dipstick handle is a loop.
See Engine Compartment Overview 0253 for
the location.
{Warning
The engine oil dipstick handle may be
hot; it could burn you. Use a towel or
glove to touch the dipstick handle.
If a low oil Driver Information Center (DIC)
message displays, check the oil level.
Follow these guidelines:
.To get an accurate reading, park the
vehicle on level ground. Check the engine
oil level after the engine has been off for
at least two hours. Checking the engine
oil level on steep grades or too soon after
engine shutoff can result in incorrect
readings. Accuracy improves when
checking a cold engine prior to starting.
Remove the dipstick and check the level.
.If unable to wait two hours, the engine
must be off for at least 15 minutes if the
engine is warm, or at least 30 minutes if
the engine is not warm. Pull out the dipstick, wipe it with a clean paper towel
or cloth, then push it back in all the way.
Remove it again, keeping the tip down,
and check the level.
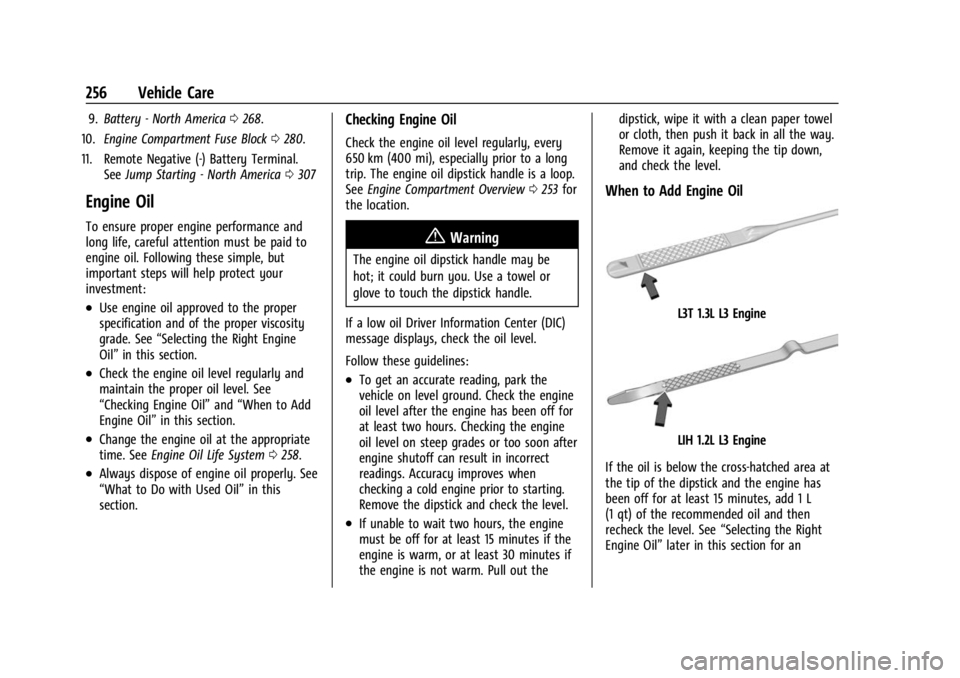
When to Add Engine Oil
L3T 1.3L L3 Engine
LIH 1.2L L3 Engine
If the oil is below the cross-hatched area at
the tip of the dipstick and the engine has
been off for at least 15 minutes, add 1 L
(1 qt) of the recommended oil and then
recheck the level. See “Selecting the Right
Engine Oil” later in this section for an
Page 259 of 367
Buick Encore GX Owner Manual (GMNA-Localizing-U.S./Canada/Mexico-
16263917) - 2023 - CRC - 2/24/22
258 Vehicle Care
Used oil can be a threat to the environment.
If you change your own oil, be sure to drain
all the oil from the filter before disposal.
Never dispose of oil by putting it in the
trash or pouring it on the ground, into
sewers, or into streams or bodies of water.
Recycle it by taking it to a place that
collects used oil.
Engine Oil Life System
When to Change Engine Oil
This vehicle has a computer system that
indicates when to change the engine oil and
filter. This is based on a combination of
factors which include engine revolutions,
engine temperature, and miles driven. Based
on driving conditions, the mileage at which
an oil change is indicated can vary
considerably. For the oil life system to work
properly, the system must be reset every
time the oil is changed.
When the system has calculated that oil life
has been diminished, it indicates that an oil
change is necessary. A CHANGE ENGINE OIL
SOON message comes on. Change the oil as
soon as possible within the next 1 000 km
(600 mi). It is possible that, if driving under
the best conditions, the oil life system
might indicate that an oil change is notnecessary for up to a year. The engine oil
and filter must be changed at least once a
year and, at this time, the system must be
reset. Your dealer has trained service people
who will perform this work and reset the
system. It is also important to check the oil
regularly over the course of an oil drain
interval and keep it at the proper level.
If the system is ever reset accidentally, the
oil must be changed at 5 000 km (3,000 mi)
since the last oil change. Remember to reset
the oil life system whenever the oil is
changed.
How to Reset the Engine Oil Life System
Reset the system whenever the engine oil is
changed so that the system can calculate
the next engine oil change. To reset the
system:
1. Display the REMAINING OIL LIFE on the DIC. See Driver Information Center (DIC)
(Base Level) 0108 or
Driver Information Center (DIC) (Uplevel)
0 110. This display shows an estimate of
the oil’s remaining useful life. If 10% is
displayed, that means that 10% of the
current oil life remains. 2. Press and hold
lor the thumbwheel
while the Oil Life display is active. The
oil life will change to 100%.
If the CHANGE ENGINE OIL SOON message
comes back on when the vehicle is started,
the engine oil life system has not been
reset. Repeat the procedure.
Automatic Transmission Fluid
How to Check Automatic Transmission
Fluid
It is not necessary to check the transmission
fluid level. A transmission fluid leak is the
only reason for fluid loss. If a leak occurs,
take the vehicle to your dealer and have it
repaired as soon as possible.
There is a special procedure for checking and
changing the transmission fluid. Because this
procedure is difficult, you should have this
done at your dealer.
Change the fluid at the intervals listed in
Maintenance Schedule 0323, and be sure to
use the fluid listed in Recommended Fluids
and Lubricants 0327.
Page 260 of 367
Buick Encore GX Owner Manual (GMNA-Localizing-U.S./Canada/Mexico-
16263917) - 2023 - CRC - 2/24/22
Vehicle Care 259
Engine Air Filter Life System
If equipped, this feature provides the engine
air filter’s remaining life and best timing for
a change. The timing to change an engine
air filter depends on driving and
environmental conditions.
When to Change the Engine Air Filter
When the Driver Information Center (DIC)
displays a message to replace the engine air
filter at the next oil change, follow this
timing.
When the DIC displays a message to replace
the engine air filter soon, replace the engine
air filter at the earliest convenience.
The system must be reset after the engine
air filter is changed.
If the DIC displays a message to check the
engine air filter system, see your dealer.
How to Reset the Engine Air Filter Life
System
To reset:1. Place the vehicle in P (Park). 2. Select Engine Air Filter Life on the DIC
menu. See Driver Information Center
(DIC) (Base Level) 0108 or
Driver Information Center (DIC) (Uplevel)
0 110.
3. Press
lor the thumbwheel to move to
the Reset/Disable display area. Select
Reset then press
lor press the
thumbwheel. Then press Yes to confirm
the reset.
4. 100% AIR FILTER LIFE will be displayed when the Engine Air Filter Life System is
successfully reset.
Engine Air Cleaner/Filter
The engine air cleaner/filter is in the engine
compartment on the passenger side of the
vehicle. See Engine Compartment Overview
0 253.
When to Inspect the Engine Air Cleaner/
Filter
If the vehicle is not equipped with the
engine air filter life system, see
Maintenance Schedule 0323 for intervals on
inspecting and replacing the engine air
cleaner/filter.
How to Inspect the Engine Air Cleaner/
Filter
Do not start the engine or have the engine
running with the engine air cleaner/filter
housing open. Before removing the engine
air cleaner/filter, make sure that the engine
air cleaner/filter housing and nearby
components are free of dirt and debris. Do
not clean the engine air cleaner/filter with
water or compressed air.
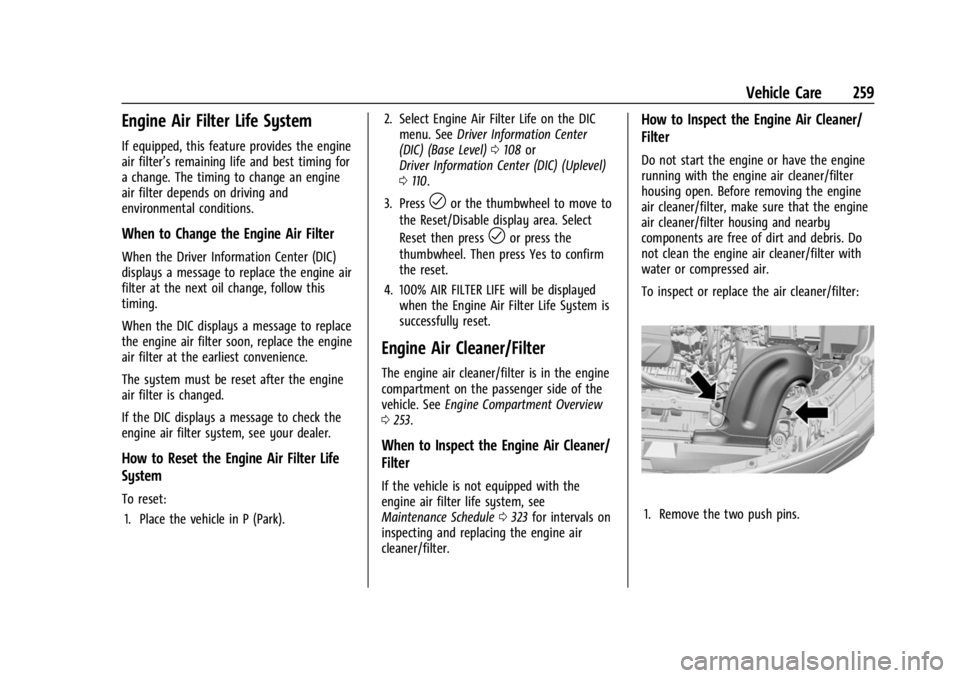
To inspect or replace the air cleaner/filter:
1. Remove the two push pins.
Page 267 of 367
Buick Encore GX Owner Manual (GMNA-Localizing-U.S./Canada/Mexico-
16263917) - 2023 - CRC - 2/24/22
266 Vehicle Care
Caution (Continued)
.When using concentrated washer fluid,
follow the manufacturer instructions
for adding water.
.Fill the washer fluid tank only
three-quarters full when it is very cold.
This allows for fluid expansion if
freezing occurs, which could damage
the tank if it is completely full.
Brakes
Disc brake linings have built-in wear
indicators that make a high-pitched warning
sound when the brake linings are worn and
new linings are needed. The sound can come
and go or can be heard all the time when
the vehicle is moving, except when applying
the brake pedal firmly.
{Warning
The brake wear warning sound means
that soon the brakes will not work well.
That could lead to a crash. When the
brake wear warning sound is heard, have
the vehicle serviced.
Caution
Continuing to drive with worn-out brake
linings could result in costly brake
repairs.
Some driving conditions or climates can
cause a brake squeal when the brakes are
first applied, clearing up following several
applications. This does not mean something
is wrong with the brakes.
Properly torqued wheel nuts are necessary
to help prevent brake pulsation. When tires
are rotated, inspect brake linings for wear
and evenly tighten wheel nuts in the proper
sequence to torque specifications. See
Capacities and Specifications 0332.
Brake pads should be replaced as complete
axle sets.
Brake Pedal Travel
See your dealer if the brake pedal does not
return to normal height, or if there is a
rapid increase in pedal travel. This could be
a sign that brake service may be required.
Replacing Brake System Parts
Always replace brake system parts with
new, approved replacement parts. If this is
not done, the brakes may not work
properly. The braking performance can
change in many ways if the wrong brake
parts are installed or if parts are improperly
installed.
Brake Pad Life System
When to Change Brake Pads
If equipped, this system estimates the
remaining life of the front and rear brake
pads. Brake pad life is displayed in the
Driver Information Center (DIC), along with
a percentage for each axle. The system must
be reset every time the brake pads are
changed.
When the system has determined that the
brake pads need to be replaced, a message
will display.
Brake pads should always be replaced as
complete axle sets.