turn signal BUICK ENCORE GX 2023 Owner's Guide
[x] Cancel search | Manufacturer: BUICK, Model Year: 2023, Model line: ENCORE GX, Model: BUICK ENCORE GX 2023Pages: 367, PDF Size: 5.99 MB
Page 243 of 367
Buick Encore GX Owner Manual (GMNA-Localizing-U.S./Canada/Mexico-
16263917) - 2023 - CRC - 2/24/22
242 Driving and Operating
Passing
More passing distance is needed when
towing a trailer. The combination will not
accelerate as quickly and is much longer so
it is necessary to go much farther beyond
the passed vehicle before returning to the
lane. Pass on level roadways. Avoid passing
on hills if possible.
Backing Up
Hold the bottom of the steering wheel with
one hand. To move the trailer to the left,
move that hand to the left. To move the
trailer to the right, move that hand to the
right.
Always back up slowly and, if possible, have
someone guide you.
Making TurnsCaution
Turn more slowly and make wider arcs
when towing a trailer to prevent damage
to your vehicle. Making very sharp turns
could cause the trailer to contact the
vehicle. Make wider turns than normal when towing,
so trailer will not go over soft shoulders,
over curbs, or strike road signs, trees,
or other objects. Always signal turns well in
advance. Do not steer or brake suddenly.
Driving on Grades
Reduce speed and shift to a lower gear
before starting down a long or steep
downhill grade. If the transmission is not
shifted down, the brakes may overheat and
result in reduced braking efficiency.
The vehicle can tow in D (Drive). Shift the
transmission to a lower gear if the
transmission shifts too often under heavy
loads and/or hilly conditions.
When towing at higher altitudes, engine
coolant will boil at a lower temperature
than at lower altitudes. If the engine is
turned off immediately after towing at high
altitude on steep uphill grades, the vehicle
could show signs similar to engine
overheating. To avoid this, let the engine
run, preferably on level ground, with the
transmission in P (Park) for a few minutes
before turning the engine off. If the
overheat warning comes on, see
Engine
Overheating 0264.
Parking on Hills
{Warning
To prevent serious injury or death,
always park your vehicle and trailer on a
level surface when possible.
When parking your vehicle and your trailer
on a hill: 1. Press the brake pedal, but do not shift into P (Park) yet. Turn the wheels into
the curb if facing downhill or into traffic
if facing uphill.
2. Have someone place chocks under the trailer wheels.
3. When the wheel chocks are in place, gradually release the brake pedal to
allow the chocks to absorb the load of
the trailer.
4. Reapply the brake pedal. Then apply the parking brake and shift into P (Park).
5. Release the brake pedal.
Leaving After Parking on a Hill
1. Apply and hold the brake pedal.
.Start the engine.
.Shift into a gear.
.Release the parking brake.
Page 248 of 367
Buick Encore GX Owner Manual (GMNA-Localizing-U.S./Canada/Mexico-
16263917) - 2023 - CRC - 2/24/22
Driving and Operating 247
Cross the safety chains under the tongue of
the trailer to help prevent the tongue from
contacting the road if it becomes separated
from the hitch. Always leave just enough
slack so the combination can turn. Never
allow safety chains to drag on the ground.
Trailer Brakes
Loaded trailers over 450 kg (1,000 lb) must
be equipped with brake systems and with
brakes for each axle. Trailer braking
equipment conforming to Canadian
Standards Association (CSA) requirement
CAN3-D313, or its equivalent, is
recommended.
State or local regulations may require
trailers to have their own braking system if
the loaded weight of the trailer exceeds
certain minimums that can vary from state
to state. Read and follow the instructions for
the trailer brakes so they are installed,
adjusted, and maintained properly. Never
attempt to tap into your vehicle's hydraulic
brake system. If you do, both the vehicle
anti-lock brakes and the trailer brakes may
not function, which could result in a crash.
Trailer Lamps
Always check all trailer lamps are working at
the beginning of each trip, and periodically
on longer trips.
Turn Signals When Towing a Trailer
When properly connected, the trailer turn
signals should will illuminate to indicate the
vehicle is turning, changing lanes,
or stopping. When towing a trailer, the
arrows on the instrument cluster will
illuminate even if the trailer is not properly
connected or the bulbs are burned out.
Trailer Tires
Special Trailer (ST) tires differ from vehicle
tires. Trailer tires are designed with stiff
sidewalls to help prevent sway and to
support heavy loads. These features can
make it difficult to determine if the trailer
tire pressures are low only based on a visual
inspection.
Always check all trailer tire pressures before
each trip when the tires are cool. Low trailer
tire pressure is a leading cause of trailer tire
blow-outs.Trailer tires deteriorate over time. The trailer
tire sidewall will show the week and year
the tire was manufactured. Many trailer tire
manufacturers recommend replacing tires
more than six years old.
Overloading is another leading cause of
trailer tire blow-outs. Never load your trailer
with more weight than the tires are
designed to support. The load rating is
located on the trailer tire sidewall.
Always know the maximum speed rating for
the trailer tires before driving. This may be
significantly lower than the vehicle tire
speed rating. The speed rating may be on
the trailer tire sidewall. If the speed rating is
not shown, the default trailer tire speed
rating is 105 km/h (65 mph).
Page 250 of 367
Buick Encore GX Owner Manual (GMNA-Localizing-U.S./Canada/Mexico-
16263917) - 2023 - CRC - 2/24/22
Vehicle Care 249
Vehicle Care
General Information
General Information . . . . . . . . . . . . . . . . . . . 250
California Perchlorate MaterialsRequirements . . . . . . . . . . . . . . . . . . . . . . . . 250
Accessories and Modifications . . . . . . . . . 250
Vehicle Checks
Doing Your Own Service Work . . . . . . . . . 251
Hood . . . . . . . . . . . . . . . . . . . . . . . . . . . . . . . . . . 251
Engine Compartment Overview . . . . . . . . 253
Engine Oil . . . . . . . . . . . . . . . . . . . . . . . . . . . . . 256
Engine Oil Life System . . . . . . . . . . . . . . . . 258
Automatic Transmission Fluid . . . . . . . . . 258
Engine Air Filter Life System . . . . . . . . . . 259
Engine Air Cleaner/Filter . . . . . . . . . . . . . . 259
Cooling System . . . . . . . . . . . . . . . . . . . . . . . 260
Engine Overheating . . . . . . . . . . . . . . . . . . . 264
Washer Fluid . . . . . . . . . . . . . . . . . . . . . . . . . . 265
Brakes . . . . . . . . . . . . . . . . . . . . . . . . . . . . . . . . 266
Brake Pad Life System . . . . . . . . . . . . . . . . 266
Brake Fluid . . . . . . . . . . . . . . . . . . . . . . . . . . . . 267
Battery - North America . . . . . . . . . . . . . . . 268
All-Wheel Drive . . . . . . . . . . . . . . . . . . . . . . . . 270
Automatic Transmission Shift Lock Control Function Check . . . . . . . . . . . . . . 270
Park Brake and P (Park) Mechanism Check . . . . . . . . . . . . . . . . . . . . . . . . . . . . . . . . 270
Wiper Blade Replacement . . . . . . . . . . . . . 270 Windshield Replacement . . . . . . . . . . . . . . . 271
Gas Strut(s) . . . . . . . . . . . . . . . . . . . . . . . . . . . . 271
Headlamp Aiming
Front Headlamp Aiming . . . . . . . . . . . . . . . 272
Bulb Replacement
Bulb Replacement . . . . . . . . . . . . . . . . . . . . . 272
Halogen Bulbs . . . . . . . . . . . . . . . . . . . . . . . . . 273
LED Lighting . . . . . . . . . . . . . . . . . . . . . . . . . . . 273
Headlamps and Sidemarker Lamps . . . . . 273
Front Turn Signal and Fog Lamps . . . . . . 274
Taillamps, Turn Signal, Sidemarker,
Stoplamps, and Back-Up Lamps (Base
Level) . . . . . . . . . . . . . . . . . . . . . . . . . . . . . . . . 275
Taillamps, Turn Signal, Sidemarker, Stoplamps, and Back-Up Lamps
(Uplevel) . . . . . . . . . . . . . . . . . . . . . . . . . . . . . 277
Electrical System
Electrical System Overload . . . . . . . . . . . . 278
Fuses and Circuit Breakers . . . . . . . . . . . . . 279
Where To Find Fuse Maps for YourVehicle . . . . . . . . . . . . . . . . . . . . . . . . . . . . . . 280
Where To Find Fuse Maps for Your Vehicle . . . . . . . . . . . . . . . . . . . . . . . . . . . . . . 280
Engine Compartment Fuse Block . . . . . . 280
Instrument Panel Fuse Block . . . . . . . . . . . 283
Rear Compartment Fuse Block . . . . . . . . . 284
Wheels and Tires
Tires . . . . . . . . . . . . . . . . . . . . . . . . . . . . . . . . . . . 285
All-Season Tires . . . . . . . . . . . . . . . . . . . . . . . 286
Winter Tires . . . . . . . . . . . . . . . . . . . . . . . . . . . 286
Tire Sidewall Labeling . . . . . . . . . . . . . . . . . 287
Tire Designations . . . . . . . . . . . . . . . . . . . . . . 288
Tire Terminology and Definitions . . . . . . 289
Tire Pressure . . . . . . . . . . . . . . . . . . . . . . . . . . 291
Tire Pressure Monitor System . . . . . . . . . 292
Tire Pressure Monitor Operation . . . . . . 293
Tire Inspection . . . . . . . . . . . . . . . . . . . . . . . . 296
Tire Rotation . . . . . . . . . . . . . . . . . . . . . . . . . . 296
When It Is Time for New Tires . . . . . . . . 297
Buying New Tires . . . . . . . . . . . . . . . . . . . . . 298
Different Size Tires and Wheels . . . . . . . 299
Uniform Tire Quality Grading . . . . . . . . . 299
Wheel Alignment and Tire Balance . . . . 300
Wheel Replacement . . . . . . . . . . . . . . . . . . . 301
Tire Chains . . . . . . . . . . . . . . . . . . . . . . . . . . . . 301
If a Tire Goes Flat . . . . . . . . . . . . . . . . . . . . . 301
Tire Changing . . . . . . . . . . . . . . . . . . . . . . . . . 303
Compact Spare Tire . . . . . . . . . . . . . . . . . . . 307
Jump Starting
Jump Starting - North America . . . . . . . . 307
Towing the Vehicle
Transporting a Disabled Vehicle . . . . . . . 310
Recreational Vehicle Towing . . . . . . . . . . . . 311
Page 274 of 367
Buick Encore GX Owner Manual (GMNA-Localizing-U.S./Canada/Mexico-
16263917) - 2023 - CRC - 2/24/22
Vehicle Care 273
Halogen Bulbs
{Warning
Halogen bulbs have pressurized gas inside
and can burst if you drop or scratch the
bulb. You or others could be injured. Be
sure to read and follow the instructions
on the bulb package.
LED Lighting
This vehicle has several LED lamps. For
replacement of any LED lighting assembly,
contact your dealer.
Headlamps and Sidemarker Lamps
Base Level Headlamp Assembly
The base model vehicle has halogen
high-beam and low-beam headlamps, an LED
turn signal lamp, and a DRL and parking
lamp on the headlamp assembly.
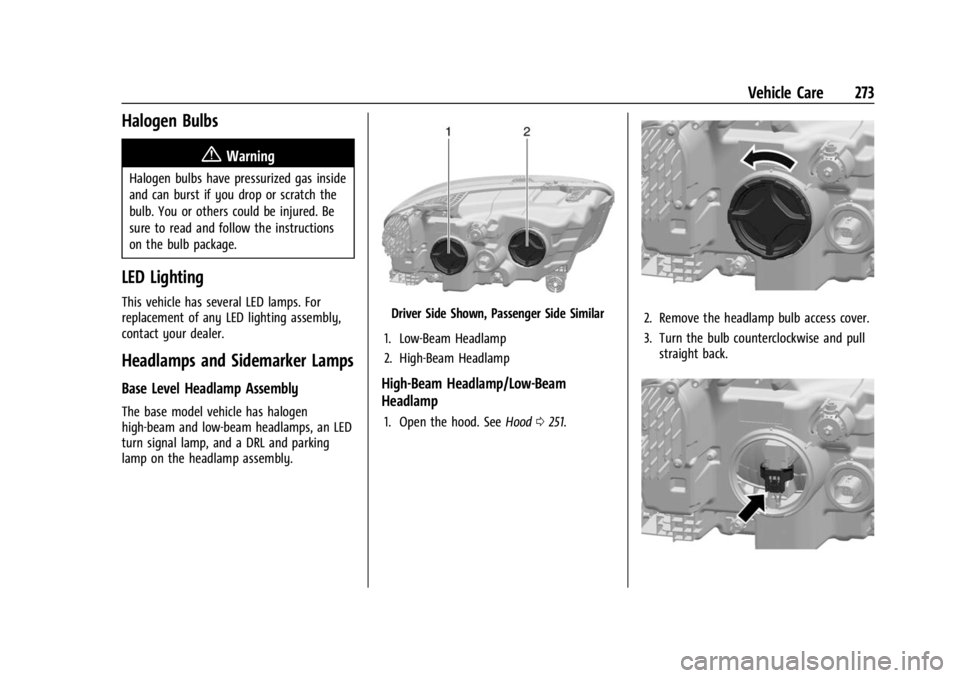
Driver Side Shown, Passenger Side Similar
1. Low-Beam Headlamp
2. High-Beam Headlamp
High-Beam Headlamp/Low-Beam
Headlamp
1. Open the hood. See Hood0251.
2. Remove the headlamp bulb access cover.
3. Turn the bulb counterclockwise and pull
straight back.
Page 275 of 367
Buick Encore GX Owner Manual (GMNA-Localizing-U.S./Canada/Mexico-
16263917) - 2023 - CRC - 2/24/22
274 Vehicle Care
4. Disconnect the wiring harness connectorfrom the bulb.
5. Install the new bulb in the headlamp assembly by turning clockwise.
6. Reconnect the wiring harness connector.
7. Install the headlamp bulb access cover.
Uplevel Headlamp Assembly
The uplevel model vehicle has LED
high-beam and low-beam headlamps, a DRL
and parking lamp, and a DRL position lamp
on the headlamp assembly.
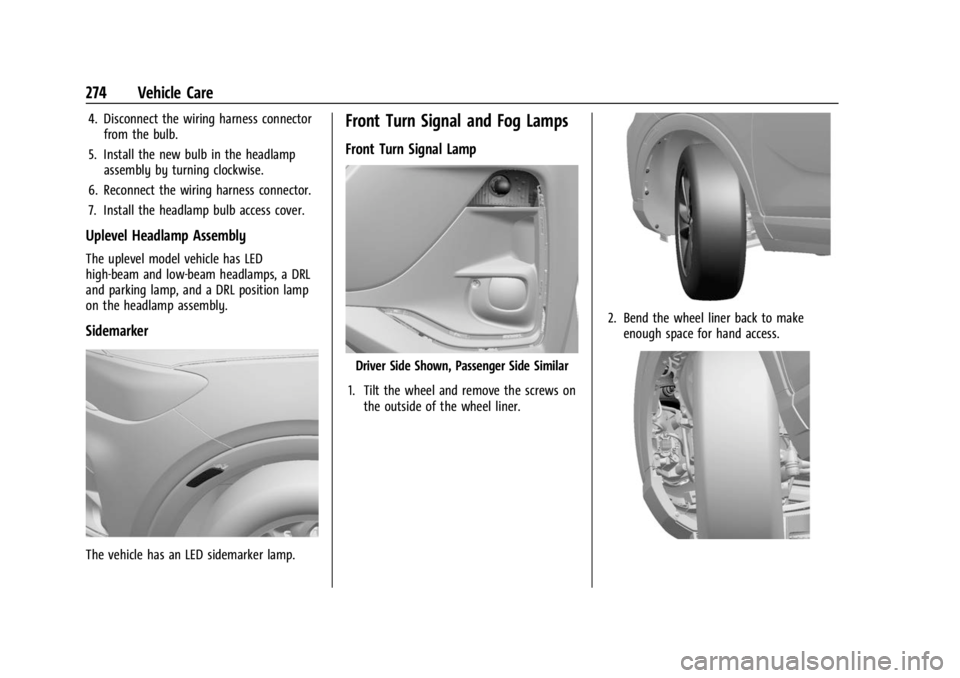
Sidemarker
The vehicle has an LED sidemarker lamp.
Front Turn Signal and Fog Lamps
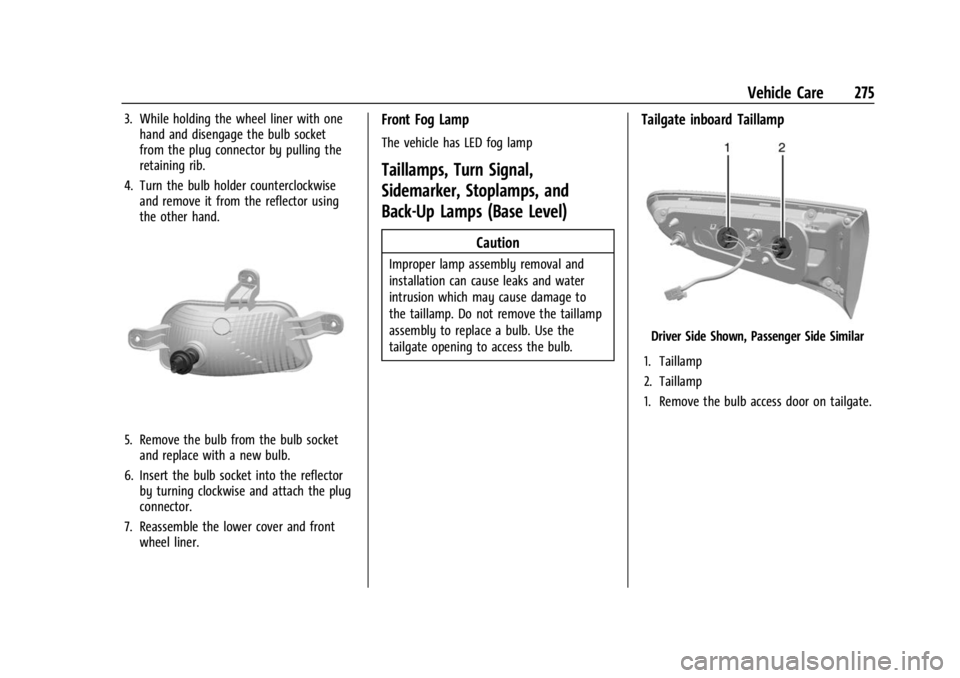
Front Turn Signal Lamp
Driver Side Shown, Passenger Side Similar
1. Tilt the wheel and remove the screws on the outside of the wheel liner.
2. Bend the wheel liner back to makeenough space for hand access.
Page 276 of 367
Buick Encore GX Owner Manual (GMNA-Localizing-U.S./Canada/Mexico-
16263917) - 2023 - CRC - 2/24/22
Vehicle Care 275
3. While holding the wheel liner with onehand and disengage the bulb socket
from the plug connector by pulling the
retaining rib.
4. Turn the bulb holder counterclockwise and remove it from the reflector using
the other hand.
5. Remove the bulb from the bulb socketand replace with a new bulb.
6. Insert the bulb socket into the reflector by turning clockwise and attach the plug
connector.
7. Reassemble the lower cover and front wheel liner.
Front Fog Lamp
The vehicle has LED fog lamp
Taillamps, Turn Signal,
Sidemarker, Stoplamps, and
Back-Up Lamps (Base Level)
Caution
Improper lamp assembly removal and
installation can cause leaks and water
intrusion which may cause damage to
the taillamp. Do not remove the taillamp
assembly to replace a bulb. Use the
tailgate opening to access the bulb.
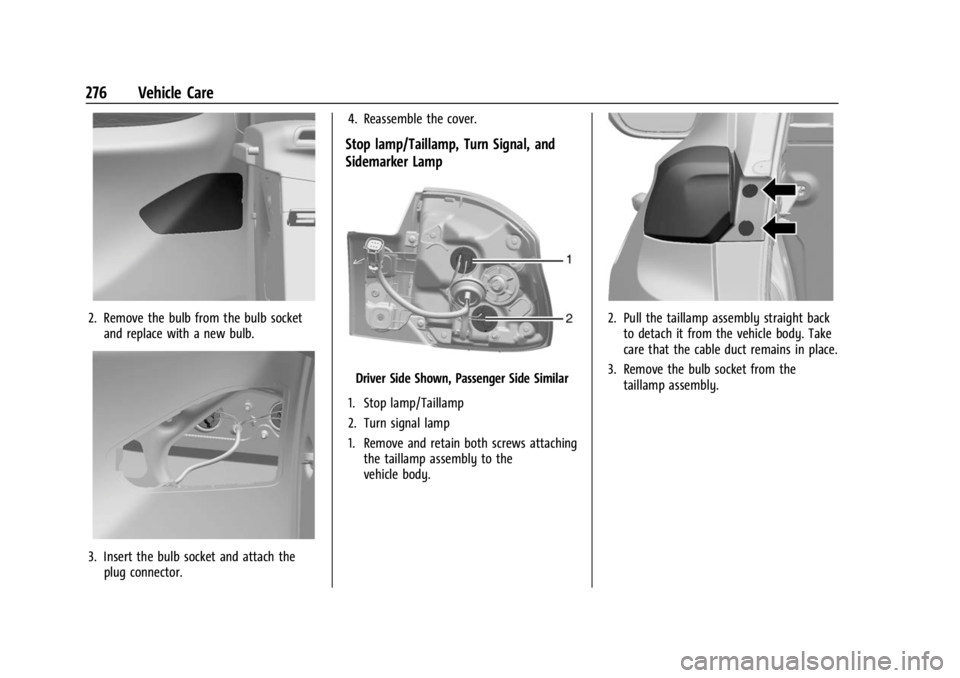
Tailgate inboard Taillamp
Driver Side Shown, Passenger Side Similar
1. Taillamp
2. Taillamp
1. Remove the bulb access door on tailgate.
Page 277 of 367
Buick Encore GX Owner Manual (GMNA-Localizing-U.S./Canada/Mexico-
16263917) - 2023 - CRC - 2/24/22
276 Vehicle Care
2. Remove the bulb from the bulb socketand replace with a new bulb.
3. Insert the bulb socket and attach theplug connector. 4. Reassemble the cover.
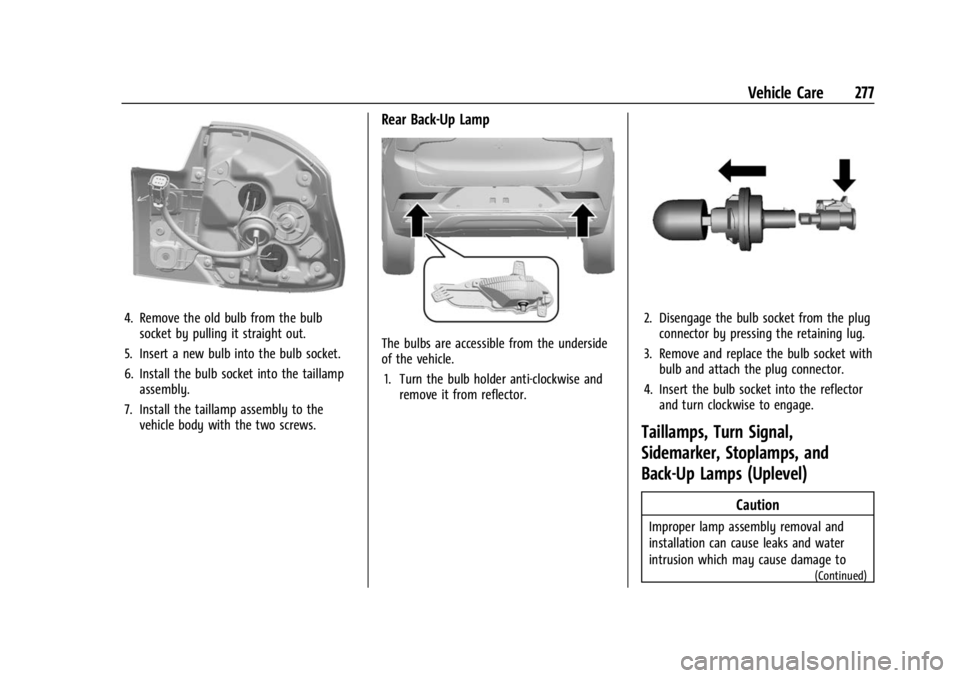
Stop lamp/Taillamp, Turn Signal, and
Sidemarker Lamp
Driver Side Shown, Passenger Side Similar
1. Stop lamp/Taillamp
2. Turn signal lamp
1. Remove and retain both screws attaching the taillamp assembly to the
vehicle body.
2. Pull the taillamp assembly straight backto detach it from the vehicle body. Take
care that the cable duct remains in place.
3. Remove the bulb socket from the taillamp assembly.
Page 278 of 367
Buick Encore GX Owner Manual (GMNA-Localizing-U.S./Canada/Mexico-
16263917) - 2023 - CRC - 2/24/22
Vehicle Care 277
4. Remove the old bulb from the bulbsocket by pulling it straight out.
5. Insert a new bulb into the bulb socket.
6. Install the bulb socket into the taillamp assembly.
7. Install the taillamp assembly to the vehicle body with the two screws.
Rear Back-Up Lamp
The bulbs are accessible from the underside
of the vehicle.
1. Turn the bulb holder anti-clockwise and remove it from reflector.
2. Disengage the bulb socket from the plugconnector by pressing the retaining lug.
3. Remove and replace the bulb socket with bulb and attach the plug connector.
4. Insert the bulb socket into the reflector and turn clockwise to engage.
Taillamps, Turn Signal,
Sidemarker, Stoplamps, and
Back-Up Lamps (Uplevel)
Caution
Improper lamp assembly removal and
installation can cause leaks and water
intrusion which may cause damage to
(Continued)
Page 279 of 367
Buick Encore GX Owner Manual (GMNA-Localizing-U.S./Canada/Mexico-
16263917) - 2023 - CRC - 2/24/22
278 Vehicle Care
Caution (Continued)
the taillamp. Do not remove the taillamp
assembly to replace a bulb. Use the
tailgate opening to access the bulb.
The stoplamp/taillamp/turn signal lamp/side
marker lamp and tailgate inboard taillamp
are LEDs. To replace, see your dealer.
Electrical System
Electrical System Overload
The vehicle has fuses and circuit breakers to
protect against an electrical system
overload.
When the current electrical load is too
heavy, the circuit breaker opens and closes,
protecting the circuit until the current load
returns to normal or the problem is fixed.
This greatly reduces the chance of circuit
overload and fire caused by electrical
problems.
Fuses and circuit breakers protect power
devices in the vehicle. If there is a problem on the road and a fuse
needs to be replaced, the same amperage
fuse can be borrowed. Choose some feature
of the vehicle that is not needed to use and
replace it as soon as possible.
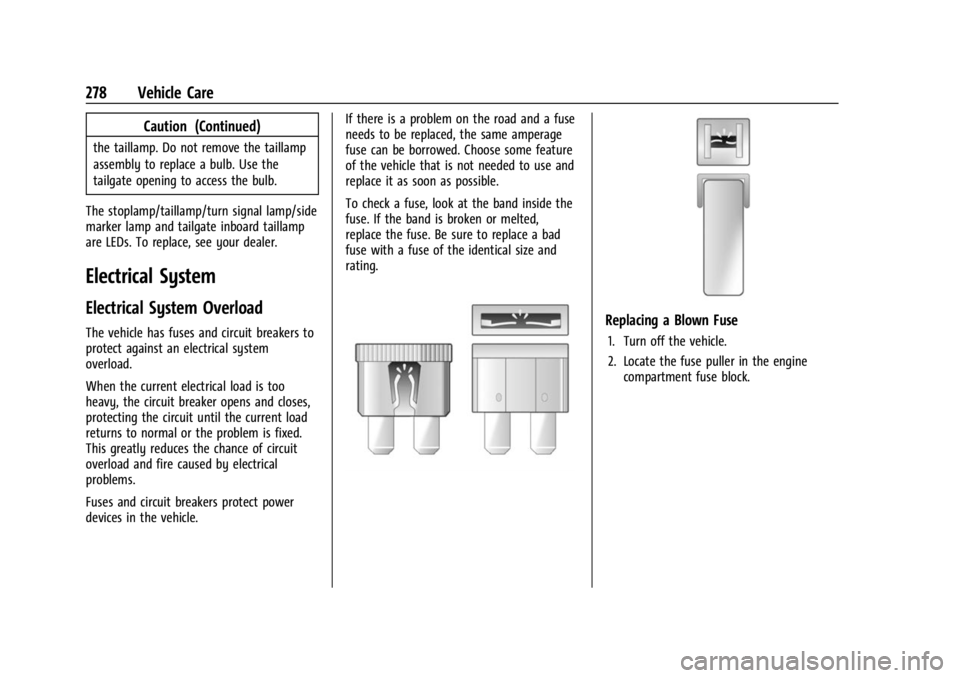
To check a fuse, look at the band inside the
fuse. If the band is broken or melted,
replace the fuse. Be sure to replace a bad
fuse with a fuse of the identical size and
rating.Replacing a Blown Fuse
1. Turn off the vehicle.
2. Locate the fuse puller in the engine
compartment fuse block.
Page 295 of 367

Buick Encore GX Owner Manual (GMNA-Localizing-U.S./Canada/Mexico-
16263917) - 2023 - CRC - 2/24/22
294 Vehicle Care
remainder of the ignition cycle. A DIC
warning message may also display. The
malfunction light and DIC warning message,
if equipped, come on at each ignition cycle
until the problem is corrected. Some of the
conditions that can cause these to come
on are:
.One of the road tires has been replaced
with the spare tire. The spare tire does
not have a TPMS sensor. The malfunction
light and the DIC message, if equipped,
should go off after the road tire is
replaced and the sensor matching process
is performed successfully. See "TPMS
Sensor Matching Process" later in this
section.
.The TPMS sensor matching process was
not done or not completed successfully
after rotating the tires. The malfunction
light and the DIC message, if equipped,
should go off after successfully
completing the sensor matching process.
See "TPMS Sensor Matching Process" later
in this section.
.One or more TPMS sensors are missing or
damaged. The malfunction light and the
DIC message, if equipped, should go off
when the TPMS sensors are installed and
the sensor matching process is performed
successfully. See your dealer for service.
.Replacement tires or wheels do not match
the original equipment tires or wheels.
Tires and wheels other than those
recommended could prevent the TPMS
from functioning properly. SeeBuying
New Tires 0298.
.Operating electronic devices or being near
facilities using radio wave frequencies
similar to the TPMS could cause the TPMS
sensors to malfunction.
If the TPMS is not functioning properly, it
cannot detect or signal a low tire pressure
condition. See your dealer for service if the
TPMS malfunction light and DIC message,
if equipped, come on and stay on.
Tire Fill Alert (If Equipped)
This feature provides visual and audible
alerts outside the vehicle to help when
inflating an underinflated tire to the
recommended cold tire pressure.
When the low tire pressure warning light
comes on: 1. Park the vehicle in a safe, level place.
2. Set the parking brake firmly.
3. Place the vehicle in P (Park). 4. Add air to the tire that is underinflated.
The turn signal lamp will flash. When
the recommended pressure is reached,
the horn sounds once and the turn signal
lamp will stop flashing and briefly turn
solid.
Repeat these steps for all underinflated tires
that have illuminated the low tire pressure
warning light.
{Warning
Overinflating a tire could cause the tire
to rupture and you or others could be
injured. Do not exceed the maximum
pressure listed on the tire sidewall.
See Tire Sidewall Labeling 0287 and
Vehicle Load Limits 0191.
If the tire is overinflated by more than
35 kPa (5 psi), the horn will sound multiple
times and the turn signal lamp will continue
to flash for several seconds after filling
stops.
To release and correct the pressure, while
the turn signal lamp is still flashing, briefly
press the center of the valve stem. When
the recommended pressure is reached, the
horn sounds once.