tow BUICK ENCORE GX 2023 Workshop Manual
[x] Cancel search | Manufacturer: BUICK, Model Year: 2023, Model line: ENCORE GX, Model: BUICK ENCORE GX 2023Pages: 367, PDF Size: 5.99 MB
Page 252 of 367
Buick Encore GX Owner Manual (GMNA-Localizing-U.S./Canada/Mexico-
16263917) - 2023 - CRC - 2/24/22
Vehicle Care 251
GM Accessories are designed to complement
and function with other systems on the
vehicle. See your dealer to accessorize the
vehicle using genuine GM Accessories
installed by a dealer technician.
Also, seeAdding Equipment to the
Airbag-Equipped Vehicle 061.
Vehicle Checks
Doing Your Own Service Work
{Warning
It can be dangerous to work on your
vehicle if you do not have the proper
knowledge, service manual, tools,
or parts. Always follow owner’s manual
procedures and consult the service
manual for your vehicle before doing any
service work.
If doing some of your own service work, use
the proper service manual. It tells you much
more about how to service the vehicle than
this manual can. To order the proper service
manual, see Publication Ordering
Information 0342. This vehicle has an airbag system. Before
attempting to do your own service work,
see
Servicing the Airbag-Equipped Vehicle
0 60.
If equipped with remote vehicle start, open
the hood before performing any service
work to prevent remote starting the vehicle
accidentally. See Remote Vehicle Start 014.
Keep a record with all parts receipts and list
the mileage and the date of any service
work performed. See Maintenance Records
0 330.Caution
Even small amounts of contamination can
cause damage to vehicle systems. Do not
allow contaminants to contact the fluids,
reservoir caps, or dipsticks.
Hood
{Warning
For vehicles with auto engine stop/start,
turn the vehicle off before opening the
hood. If the vehicle is on, the engine will
start when the hood is opened. You or
others could be injured.
{Warning
Components under the hood can get hot
from running the engine. To help avoid
the risk of burning unprotected skin,
never touch these components until they
have cooled, and always use a glove or
towel to avoid direct skin contact.
Clear any snow from the hood before
opening.
Page 253 of 367
Buick Encore GX Owner Manual (GMNA-Localizing-U.S./Canada/Mexico-
16263917) - 2023 - CRC - 2/24/22
252 Vehicle Care
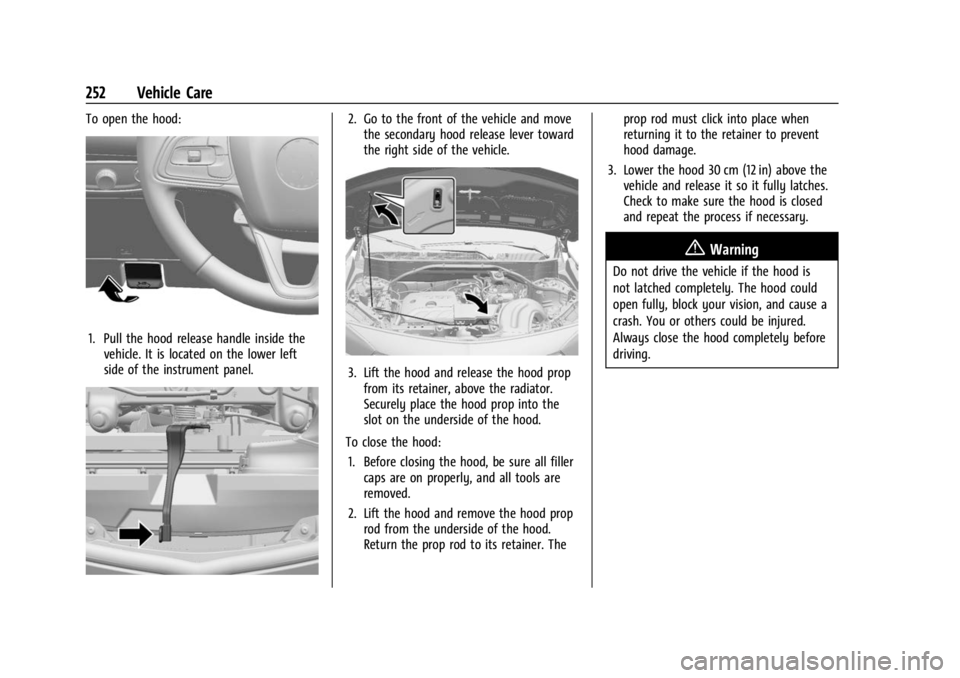
To open the hood:
1. Pull the hood release handle inside thevehicle. It is located on the lower left
side of the instrument panel.
2. Go to the front of the vehicle and movethe secondary hood release lever toward
the right side of the vehicle.
3. Lift the hood and release the hood propfrom its retainer, above the radiator.
Securely place the hood prop into the
slot on the underside of the hood.
To close the hood: 1. Before closing the hood, be sure all filler caps are on properly, and all tools are
removed.
2. Lift the hood and remove the hood prop rod from the underside of the hood.
Return the prop rod to its retainer. The prop rod must click into place when
returning it to the retainer to prevent
hood damage.
3. Lower the hood 30 cm (12 in) above the vehicle and release it so it fully latches.
Check to make sure the hood is closed
and repeat the process if necessary.
{Warning
Do not drive the vehicle if the hood is
not latched completely. The hood could
open fully, block your vision, and cause a
crash. You or others could be injured.
Always close the hood completely before
driving.
Page 257 of 367
Buick Encore GX Owner Manual (GMNA-Localizing-U.S./Canada/Mexico-
16263917) - 2023 - CRC - 2/24/22
256 Vehicle Care
9.Battery - North America 0268.
10. Engine Compartment Fuse Block 0280.
11. Remote Negative (-) Battery Terminal. SeeJump Starting - North America 0307
Engine Oil
To ensure proper engine performance and
long life, careful attention must be paid to
engine oil. Following these simple, but
important steps will help protect your
investment:
.Use engine oil approved to the proper
specification and of the proper viscosity
grade. See “Selecting the Right Engine
Oil” in this section.
.Check the engine oil level regularly and
maintain the proper oil level. See
“Checking Engine Oil” and“When to Add
Engine Oil” in this section.
.Change the engine oil at the appropriate
time. SeeEngine Oil Life System 0258.
.Always dispose of engine oil properly. See
“What to Do with Used Oil” in this
section.
Checking Engine Oil
Check the engine oil level regularly, every
650 km (400 mi), especially prior to a long
trip. The engine oil dipstick handle is a loop.
See Engine Compartment Overview 0253 for
the location.
{Warning
The engine oil dipstick handle may be
hot; it could burn you. Use a towel or
glove to touch the dipstick handle.
If a low oil Driver Information Center (DIC)
message displays, check the oil level.
Follow these guidelines:
.To get an accurate reading, park the
vehicle on level ground. Check the engine
oil level after the engine has been off for
at least two hours. Checking the engine
oil level on steep grades or too soon after
engine shutoff can result in incorrect
readings. Accuracy improves when
checking a cold engine prior to starting.
Remove the dipstick and check the level.
.If unable to wait two hours, the engine
must be off for at least 15 minutes if the
engine is warm, or at least 30 minutes if
the engine is not warm. Pull out the dipstick, wipe it with a clean paper towel
or cloth, then push it back in all the way.
Remove it again, keeping the tip down,
and check the level.
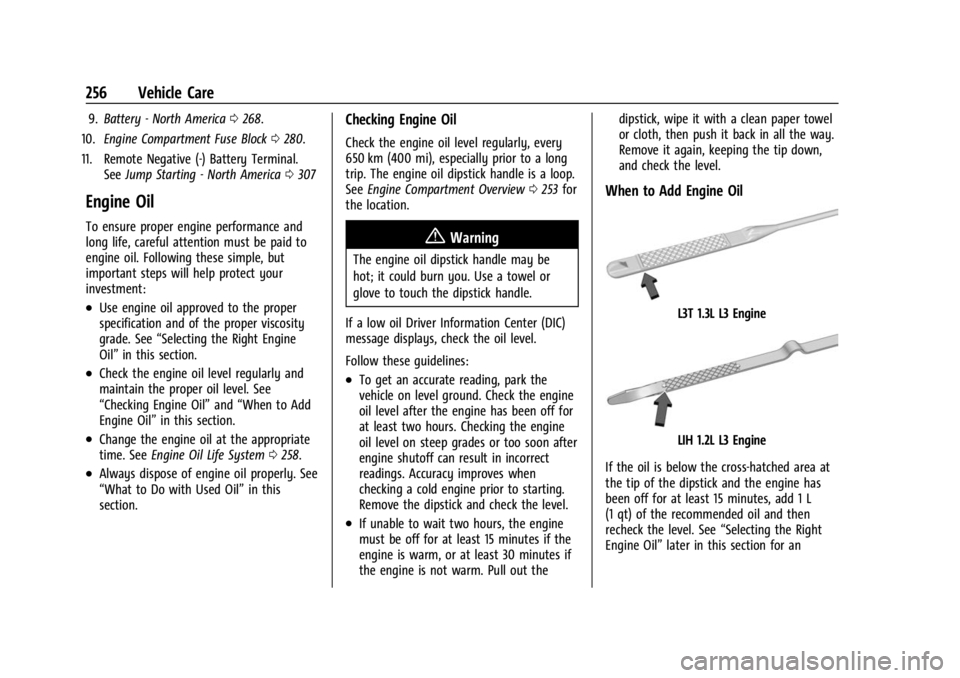
When to Add Engine Oil
L3T 1.3L L3 Engine
LIH 1.2L L3 Engine
If the oil is below the cross-hatched area at
the tip of the dipstick and the engine has
been off for at least 15 minutes, add 1 L
(1 qt) of the recommended oil and then
recheck the level. See “Selecting the Right
Engine Oil” later in this section for an
Page 298 of 367
Buick Encore GX Owner Manual (GMNA-Localizing-U.S./Canada/Mexico-
16263917) - 2023 - CRC - 2/24/22
Vehicle Care 297
Adjust the front and rear tires to the
recommended inflation pressure on the
Tire and Loading Information label after
the tires have been rotated. SeeTire
Pressure 0291 and
Vehicle Load Limits 0191.
Reset the Tire Pressure Monitor System.
See Tire Pressure Monitor Operation
0 293.
Check that all wheel nuts are properly
tightened. See “Wheel Nut Torque”
under Capacities and Specifications
0 332, and “Removing the Flat Tire and
Installing the Spare Tire” underTire
Changing 0303.
{Warning
Rust or dirt on a wheel, or on the
parts to which it is fastened, can
cause wheel nuts to become loose
over time. The wheel could come off
and cause a crash. When changing a
wheel, remove any rust or dirt from
places where the wheel attaches to
the vehicle. In an emergency, a cloth
(Continued)
Warning (Continued)
or paper towel can be used; however,
use a scraper or wire brush later to
remove all rust or dirt.
Lightly coat the inner diameter of the
wheel hub opening with wheel bearing
grease after a wheel change or tire
rotation to prevent corrosion or rust
buildup.
{Warning
Do not apply grease to the wheel
mounting surface, wheel conical
seats, or the wheel nuts or bolts.
Grease applied to these areas could
cause a wheel to become loose or
come off, resulting in a crash.
When It Is Time for New Tires
Factors, such as maintenance, temperatures,
driving speeds, vehicle loading, and road
conditions affect the wear rate of the tires.
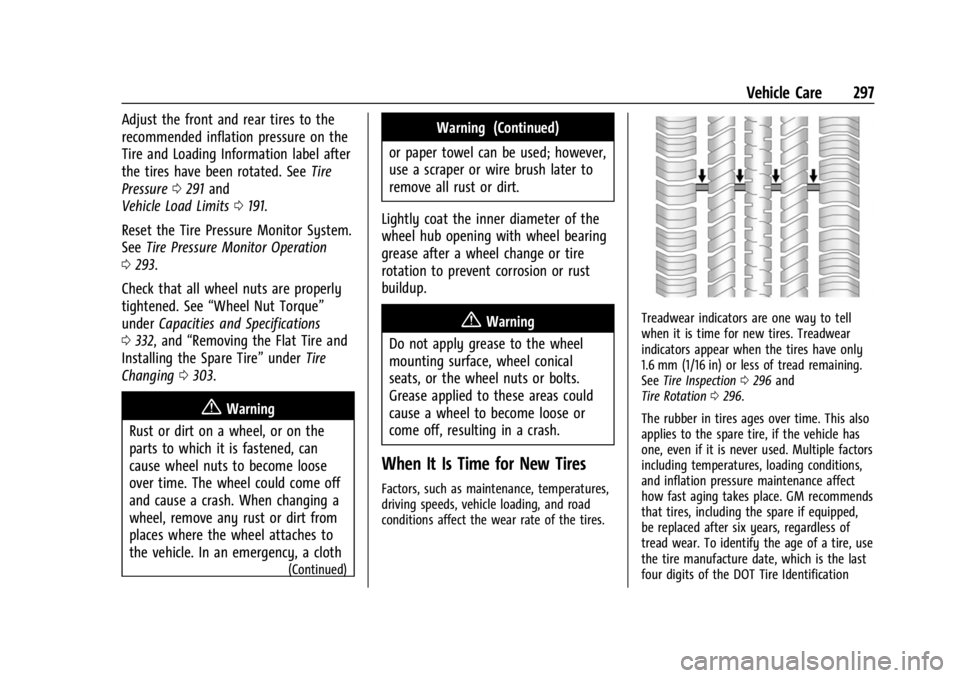
Treadwear indicators are one way to tell
when it is time for new tires. Treadwear
indicators appear when the tires have only
1.6 mm (1/16 in) or less of tread remaining.
See Tire Inspection 0296 and
Tire Rotation 0296.
The rubber in tires ages over time. This also
applies to the spare tire, if the vehicle has
one, even if it is never used. Multiple factors
including temperatures, loading conditions,
and inflation pressure maintenance affect
how fast aging takes place. GM recommends
that tires, including the spare if equipped,
be replaced after six years, regardless of
tread wear. To identify the age of a tire, use
the tire manufacture date, which is the last
four digits of the DOT Tire Identification
Page 303 of 367

Buick Encore GX Owner Manual (GMNA-Localizing-U.S./Canada/Mexico-
16263917) - 2023 - CRC - 2/24/22
302 Vehicle Care
slowly. But if there is ever a blowout, here
are a few tips about what to expect and
what to do:
If a front tire fails, the flat tire creates a
drag that pulls the vehicle toward that side.
Take your foot off the accelerator pedal and
grip the steering wheel firmly. Steer to
maintain lane position, and then gently
brake to a stop, well off the road,
if possible.
A rear blowout, particularly on a curve, acts
much like a skid and may require the same
correction as used in a skid. Stop pressing
the accelerator pedal and steer to straighten
the vehicle. It may be very bumpy and
noisy. Gently brake to a stop, well off the
road, if possible.
{Warning
Driving on a flat tire will cause
permanent damage to the tire.
Re-inflating a tire after it has been driven
on while severely underinflated or flat
may cause a blowout and a serious crash.
Never attempt to re-inflate a tire that has
been driven on while severely(Continued)
Warning (Continued)
underinflated or flat. Have your dealer or
an authorized tire service center repair or
replace the flat tire as soon as possible.
{Warning
Lifting a vehicle and getting under it to
do maintenance or repairs is dangerous
without the appropriate safety equipment
and training. If a jack is provided with
the vehicle, it is designed only for
changing a flat tire. If it is used for
anything else, you or others could be
badly injured or killed if the vehicle slips
off the jack. If a jack is provided with the
vehicle, only use it for changing a
flat tire.
If a tire goes flat, avoid further tire and
wheel damage by driving slowly to a level
place, well off the road, if possible. Turn on
the hazard warning flashers. See Hazard
Warning Flashers 0124.
If your vehicle is loaded at or near
maximum cargo capacity, it may be difficult
to fit the jack under the vehicle due to the
environment (shoulder slope, road debris, etc.). Removal of some weight may improve
the ability to fit the jack under the vehicle
at the correct jacking location.
{Warning
Changing a tire can be dangerous. The
vehicle can slip off the jack and roll over
or fall causing injury or death. Find a
level place to change the tire. To help
prevent the vehicle from moving:
1. Set the parking brake firmly.
2. Put the vehicle in P (Park).
3. Turn the vehicle off and do not restart the vehicle while it is raised.
4. Do not allow passengers to remain in the vehicle.
5. Place wheel blocks, if equipped, on both sides of the tire at the opposite
corner of the tire being changed.
When the vehicle has a flat tire (2), use the
following example as a guide to assist in the
placement of the wheel blocks (1),
if equipped.
Page 304 of 367

Buick Encore GX Owner Manual (GMNA-Localizing-U.S./Canada/Mexico-
16263917) - 2023 - CRC - 2/24/22
Vehicle Care 303
1. Wheel Block (If Equipped)
2. Flat Tire
The following information explains how to
repair or change a tire.
Tire Changing
Removing the Spare Tire and Tools
The spare tire and tools are located under
the load floor in the rear of the vehicle.
Without Subwoofer
1. Tow Eye
2. Jack
3. Wrench
4. Strap
5. FunnelWith Subwoofer
1. Tow Eye
2. Wrench
3. Jack
4. Strap
5. Wing Nut
6. Funnel
To access the spare tire and tools: 1. Open the liftgate. See Liftgate019.
2. Remove the load floor.
3. Turn the wing nut counterclockwise and remove the spare tire. Place the spare
tire next to the tire being changed.
Page 306 of 367
Buick Encore GX Owner Manual (GMNA-Localizing-U.S./Canada/Mexico-
16263917) - 2023 - CRC - 2/24/22
Vehicle Care 305
{Warning
Lifting a vehicle and getting under it to
do maintenance or repairs is dangerous
without the appropriate safety equipment
and training. If a jack is provided with
the vehicle, it is designed only for
changing a flat tire. If it is used for
anything else, you or others could be
badly injured or killed if the vehicle slips
off the jack. If a jack is provided with the
vehicle, only use it for changing a
flat tire.
6. Turn the wheel wrench clockwise to raise the vehicle far enough off the ground so
there is enough room for the spare tire
to fit underneath the wheel well.
7. Turn the wheel nuts counterclockwise to remove them.
8. Remove the flat tire.
{Warning
Rust or dirt on a wheel, or on the
parts to which it is fastened, can
cause wheel nuts to become loose
over time. The wheel could come off
(Continued)
Warning (Continued)
and cause a crash. When changing a
wheel, remove any rust or dirt from
places where the wheel attaches to
the vehicle. In an emergency, a cloth
or paper towel can be used; however,
use a scraper or wire brush later to
remove all rust or dirt.
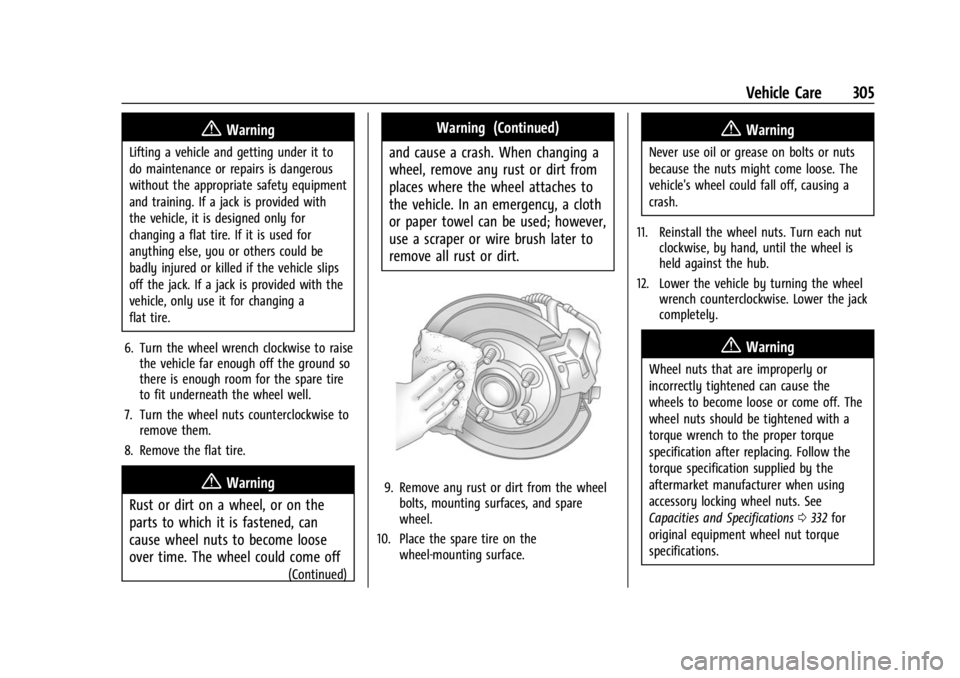
9. Remove any rust or dirt from the wheel bolts, mounting surfaces, and spare
wheel.
10. Place the spare tire on the wheel-mounting surface.
{Warning
Never use oil or grease on bolts or nuts
because the nuts might come loose. The
vehicle's wheel could fall off, causing a
crash.
11. Reinstall the wheel nuts. Turn each nut clockwise, by hand, until the wheel is
held against the hub.
12. Lower the vehicle by turning the wheel wrench counterclockwise. Lower the jack
completely.
{Warning
Wheel nuts that are improperly or
incorrectly tightened can cause the
wheels to become loose or come off. The
wheel nuts should be tightened with a
torque wrench to the proper torque
specification after replacing. Follow the
torque specification supplied by the
aftermarket manufacturer when using
accessory locking wheel nuts. See
Capacities and Specifications 0332 for
original equipment wheel nut torque
specifications.
Page 311 of 367

Buick Encore GX Owner Manual (GMNA-Localizing-U.S./Canada/Mexico-
16263917) - 2023 - CRC - 2/24/22
310 Vehicle Care
Towing the Vehicle
Transporting a Disabled Vehicle
Caution
Incorrectly transporting a disabled vehicle
may cause damage to the vehicle. Use
proper tire straps to secure the vehicle to
the flatbed tow truck. Do not strap or
hook to any frame, underbody,
or suspension component not specified
below. Do not move vehicles with drive
axle tires on the ground. Damage is not
covered by the vehicle warranty.
Caution
The vehicle may be equipped with an
electric parking brake and/or a
mechanical transmission range select
shifter. In the event of a loss of 12-volt
battery power, the electric parking brake
cannot be released, and the vehicle
cannot be shifted to N (Neutral). Tire
skates or dollies must be used under the
non-rolling tires to prevent damage while
(Continued)
Caution (Continued)
loading/unloading the vehicle. Dragging
the vehicle will cause damage not
covered by the vehicle warranty.
Caution
The vehicle may be equipped with a tow
eye. Improper use of the tow eye may
cause damage to the vehicle and is not
covered by the vehicle warranty.
If equipped, use the tow eye to load the
vehicle onto a flatbed tow truck from a
flat road surface, or to move the vehicle
a very short distance at a walking pace.
The tow eye is not designed for off-road
recovery. The vehicle must be in
N (Neutral) with the electric parking
brake released when using the tow eye.
Contact a professional towing service if the
disabled vehicle must be transported. GM
recommends a flatbed tow truck to
transport a disabled vehicle. Use ramps to
help reduce approach angles, if necessary. If equipped, a tow eye may be located near
the spare tire or emergency jack. Do not use
the tow eye to pull the vehicle from the
snow, mud, sand, or ditch. Tow eye threads
may have right or left-hand threads. Use
caution when installing or removing the
tow eye.
The vehicle must be in N (Neutral) and the
electric parking brake must be released
when loading the vehicle onto a flatbed tow
truck.
.If the 12-volt battery is dead and/or
electric parking brake is not released, the
vehicle will not move. Try to jump start
the vehicle with a known good 12-volt
battery, shift the car into N (Neutral), and
release the electric parking brake. Refer to
Jump Starting - North America
0307.
.If unsuccessful, the vehicle will not move.
Tire skates or dollies must be used under
the non-rolling tires to prevent vehicle
damage.
Page 312 of 367

Buick Encore GX Owner Manual (GMNA-Localizing-U.S./Canada/Mexico-
16263917) - 2023 - CRC - 2/24/22
Vehicle Care 311
Front Attachment Points
The vehicle is equipped with specific
attachment points to be used by the towing
provider. These holes may be used to pull
the vehicle from a flat road surface onto the
flatbed tow truck.
Recreational Vehicle Towing
Recreational vehicle towing means towing
the vehicle behind another vehicle, such as
behind a motor home. The two most
common types of recreational vehicle
towing are known as dinghy towing and
dolly towing. Dinghy towing is towing the
vehicle with all four wheels on the ground.Dolly towing is towing the vehicle with two
wheels on the ground and two wheels up
on a device known as a dolly.
Here are some important things to consider
before recreational vehicle towing:
.What is the towing capacity of the
towing vehicle? Be sure to read the tow
vehicle manufacturer's recommendations.
.What is the distance that will be
traveled? Some vehicles have restrictions
on how far and how long they can tow.
.Is the proper towing equipment going to
be used? See your dealer or trailering
professional for additional advice and
equipment recommendations.
.Is the vehicle ready to be towed? Just as
preparing the vehicle for a long trip,
make sure the vehicle is prepared to be
towed.
Caution
Use of a shield mounted in front of the
vehicle grille could restrict airflow and
cause damage to the transmission. The
repairs would not be covered by the
vehicle warranty. If using a shield, only
use one that attaches to the towing
vehicle.
Dinghy Towing (Front-Wheel-Drive
Vehicles)
Caution
If the vehicle is towed with all four
wheels on the ground, the drivetrain
components could be damaged. The
repairs would not be covered by the
vehicle warranty. Do not tow the vehicle
with all four wheels on the ground.
The vehicle was not designed to be towed
with all four wheels on the ground.
Page 313 of 367

Buick Encore GX Owner Manual (GMNA-Localizing-U.S./Canada/Mexico-
16263917) - 2023 - CRC - 2/24/22
312 Vehicle Care
Dinghy Towing (All-Wheel-Drive
Vehicles Only)
To dinghy tow the vehicle from the front
with all four wheels on the ground:1. Position the vehicle behind the tow vehicle, lining it up with the tow bar.
2. Leave the vehicle running. Shift the transmission to N (Neutral).
3. Apply the parking brake to prevent vehicle rollaway.
4. Connect the vehicle to the tow bar hardware.
5. Release the parking brake. 6. Leave the transmission in N (Neutral) and
turn the vehicle off. You may hear a
continuous chime, which is normal.
7. Open the hood and disconnect the negative battery terminal. See Battery -
North America 0268.
8. Cover the negative battery post with a non-conductive material to prevent any
contact with the negative battery
terminal.
Caution
If 113 km/h (70 mph) is exceeded while
towing the vehicle, it could be damaged.
Never exceed 113 km/h (70 mph) while
towing the vehicle.
To disconnect the towed vehicle: 1. Park on a level surface.
2. Make sure that the ignition is off.
3. Remove any tape, glue, or excess material from the negative battery post.
4. Connect the battery. See “Negative
Battery Cable Reconnection” under
Battery - North America 0268. 5. Apply the parking brake.
6. Disconnect the vehicle from the tow
vehicle.
7. Release the parking brake.
Dolly Towing (All-Wheel-Drive Vehicles)
All-wheel-drive vehicles must not be towed
with two wheels on the ground.