flat tow BUICK ENCORE GX 2023 Owners Manual
[x] Cancel search | Manufacturer: BUICK, Model Year: 2023, Model line: ENCORE GX, Model: BUICK ENCORE GX 2023Pages: 367, PDF Size: 5.99 MB
Page 15 of 367
Buick Encore GX Owner Manual (GMNA-Localizing-U.S./Canada/Mexico-
16263917) - 2023 - CRC - 2/24/22
14 Keys, Doors, and Windows
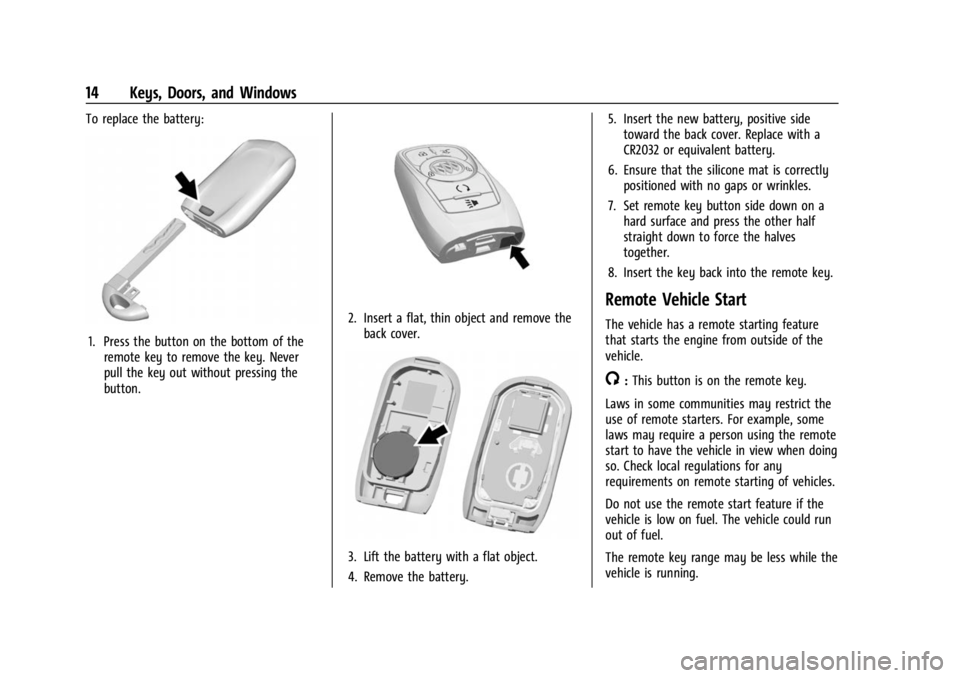
To replace the battery:
1. Press the button on the bottom of theremote key to remove the key. Never
pull the key out without pressing the
button.
2. Insert a flat, thin object and remove theback cover.
3. Lift the battery with a flat object.
4. Remove the battery. 5. Insert the new battery, positive side
toward the back cover. Replace with a
CR2032 or equivalent battery.
6. Ensure that the silicone mat is correctly positioned with no gaps or wrinkles.
7. Set remote key button side down on a hard surface and press the other half
straight down to force the halves
together.
8. Insert the key back into the remote key.
Remote Vehicle Start
The vehicle has a remote starting feature
that starts the engine from outside of the
vehicle.
/: This button is on the remote key.
Laws in some communities may restrict the
use of remote starters. For example, some
laws may require a person using the remote
start to have the vehicle in view when doing
so. Check local regulations for any
requirements on remote starting of vehicles.
Do not use the remote start feature if the
vehicle is low on fuel. The vehicle could run
out of fuel.
The remote key range may be less while the
vehicle is running.
Page 43 of 367
Buick Encore GX Owner Manual (GMNA-Localizing-U.S./Canada/Mexico-
16263917) - 2023 - CRC - 2/24/22
42 Seats and Restraints
Remote Start Heated Seats
When it is cold outside, the heated seats
can be turned on automatically during a
remote vehicle start. The heated seats will
be canceled when the ignition is turned on.
Press the heated seat controls to use the
heated seats after the vehicle is started.
The heated seat indicator lights on the
control do not turn on during a remote
start.
The temperature performance of an
unoccupied seat may be reduced. This is
normal.
To enable or disable remote start heated
seats, select Settings > Vehicle > Remote
Lock, Unlock, and Start > Remote Start Auto
Heat Seats > ON or OFF.
SeeRemote Vehicle Start 014.
Folding Seatback
The front passenger seatback may fold flat.
{Warning
If you fold the seatback forward to carry
longer objects, such as skis, be sure any
such cargo is not near an airbag. In a
(Continued)
Warning (Continued)
crash, an inflating airbag might force that
object toward a person. This could cause
severe injury or even death. Secure
objects away from the area in which an
airbag would inflate.Where Are the
Airbags? 053. Vehicle Load Limits 0191.
{Warning
Things you put on this seatback can
strike and injure people in a sudden stop
or turn, or in a crash. Remove or secure
all items before driving.
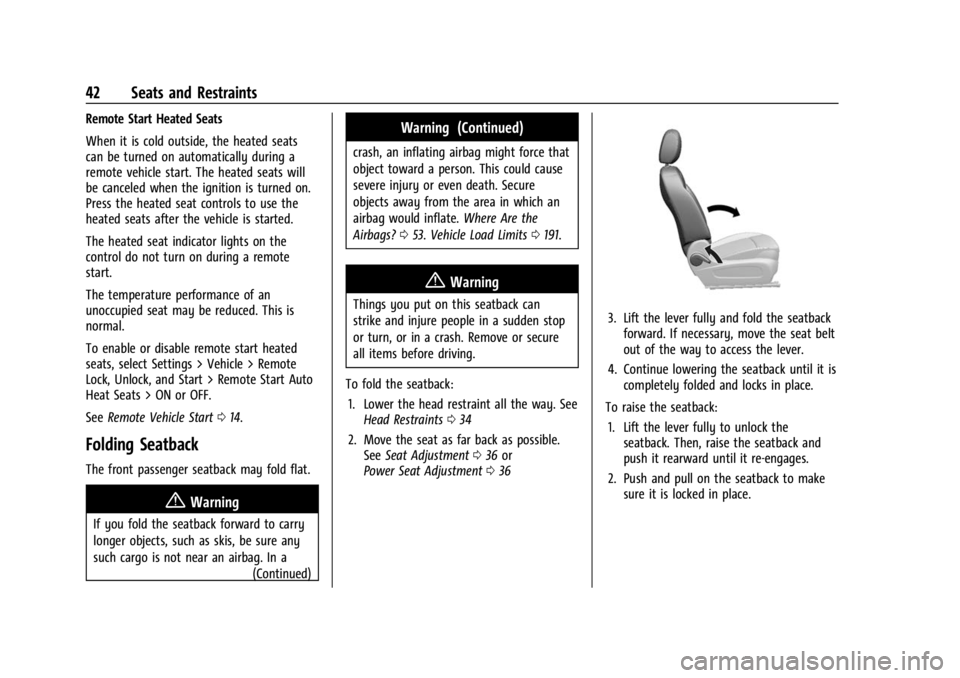
To fold the seatback: 1. Lower the head restraint all the way. See Head Restraints 034
2. Move the seat as far back as possible. See Seat Adjustment 036 or
Power Seat Adjustment 0363. Lift the lever fully and fold the seatback
forward. If necessary, move the seat belt
out of the way to access the lever.
4. Continue lowering the seatback until it is completely folded and locks in place.
To raise the seatback: 1. Lift the lever fully to unlock the seatback. Then, raise the seatback and
push it rearward until it re-engages.
2. Push and pull on the seatback to make sure it is locked in place.
Page 49 of 367
Buick Encore GX Owner Manual (GMNA-Localizing-U.S./Canada/Mexico-
16263917) - 2023 - CRC - 2/24/22
48 Seats and Restraints
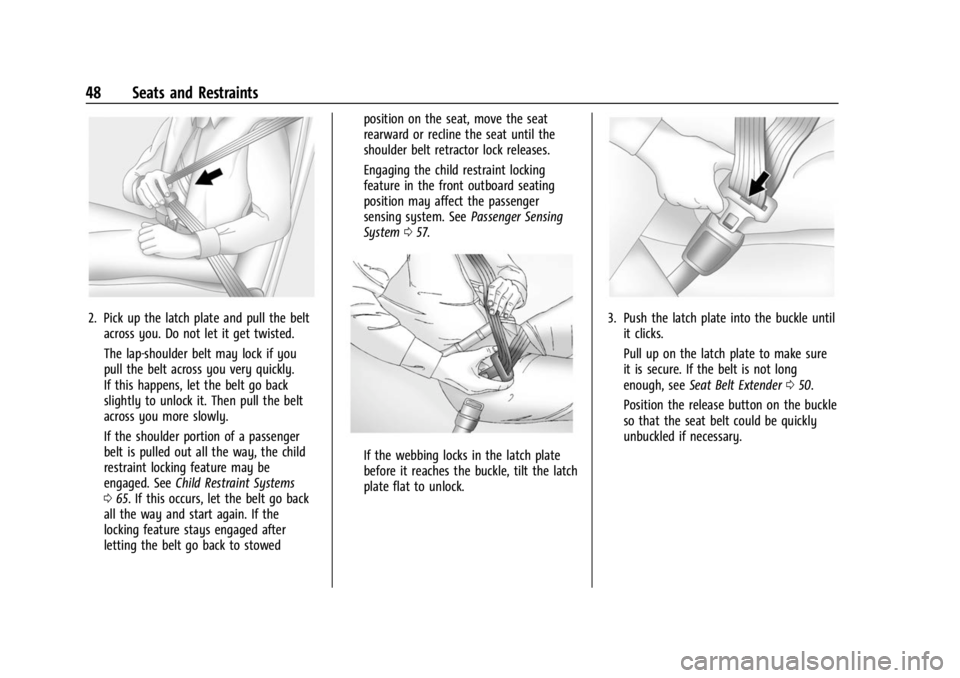
2. Pick up the latch plate and pull the beltacross you. Do not let it get twisted.
The lap-shoulder belt may lock if you
pull the belt across you very quickly.
If this happens, let the belt go back
slightly to unlock it. Then pull the belt
across you more slowly.
If the shoulder portion of a passenger
belt is pulled out all the way, the child
restraint locking feature may be
engaged. See Child Restraint Systems
0 65. If this occurs, let the belt go back
all the way and start again. If the
locking feature stays engaged after
letting the belt go back to stowed position on the seat, move the seat
rearward or recline the seat until the
shoulder belt retractor lock releases.
Engaging the child restraint locking
feature in the front outboard seating
position may affect the passenger
sensing system. See
Passenger Sensing
System 057.
If the webbing locks in the latch plate
before it reaches the buckle, tilt the latch
plate flat to unlock.
3. Push the latch plate into the buckle until
it clicks.
Pull up on the latch plate to make sure
it is secure. If the belt is not long
enough, see Seat Belt Extender 050.
Position the release button on the buckle
so that the seat belt could be quickly
unbuckled if necessary.
Page 57 of 367
Buick Encore GX Owner Manual (GMNA-Localizing-U.S./Canada/Mexico-
16263917) - 2023 - CRC - 2/24/22
56 Seats and Restraints
Rollover capable roof-rail airbags are
designed to help contain the head and chest
of occupants in the outboard seating
positions in the first and second rows. The
rollover capable roof-rail airbags are
designed to help reduce the risk of full or
partial ejection in rollover events, although
no system can prevent all such ejections.
But airbags would not help in many types
of collisions, primarily because the
occupant's motion is not toward those
airbags. SeeWhen Should an Airbag Inflate?
0 54.
Airbags should never be regarded as
anything more than a supplement to seat
belts.
What Will You See after an
Airbag Inflates?
After frontal, knee, and seat-mounted side
impact airbags inflate, they quickly deflate,
so quickly that some people may not even
realize the airbags inflated. Roof-rail airbags
may still be at least partially inflated for
some time after they inflate. Some
components of the airbag module may be
hot for several minutes. For location of the
airbags, see Where Are the Airbags? 053. The parts of the airbag that come into
contact with you may be warm, but not too
hot to touch. There may be some smoke
and dust coming from the vents in the
deflated airbags. Airbag inflation does not
prevent the driver from seeing out of the
windshield or being able to steer the
vehicle, nor does it prevent people from
leaving the vehicle.
{Warning
When an airbag inflates, there may be
dust in the air. This dust could cause
breathing problems for people with a
history of asthma or other breathing
trouble. To avoid this, everyone in the
vehicle should get out as soon as it is
safe to do so. If you have breathing
problems but cannot get out of the
vehicle after an airbag inflates, then get
fresh air by opening a window or a door.
If you experience breathing problems
following an airbag deployment, you
should seek medical attention.
The vehicle has a feature that may
automatically unlock the doors, turn on the
interior lamps and hazard warning flashers,
and shut off the fuel system after the airbags inflate. The feature may also
activate, without airbag inflation, after an
event that exceeds a predetermined
threshold. After turning the ignition off and
then on again, the fuel system will return to
normal operation; the doors can be locked,
the interior lamps can be turned off, and
the hazard warning flashers can be turned
off using the controls for those features.
If any of these systems are damaged in the
crash they may not operate as normal.{Warning
A crash severe enough to inflate the
airbags may have also damaged
important functions in the vehicle, such
as the fuel system, brake and steering
systems, etc. Even if the vehicle appears
to be drivable after a moderate crash,
there may be concealed damage that
could make it difficult to safely operate
the vehicle.
Use caution if you should attempt to
restart the engine after a crash has
occurred.
Page 61 of 367

Buick Encore GX Owner Manual (GMNA-Localizing-U.S./Canada/Mexico-
16263917) - 2023 - CRC - 2/24/22
60 Seats and Restraints
6. Restart the vehicle and have the personremain in this position for two to
three minutes after the ON indicator
is lit.
{Warning
If the front outboard passenger airbag is
turned off for an adult-sized occupant,
the airbag will not be able to inflate and
help protect that person in a crash,
resulting in an increased risk of serious
injury or even death. An adult-sized
occupant should not ride in the front
outboard passenger seat, if the passenger
airbag OFF indicator is lit.
Additional Factors Affecting System
Operation
Seat belts help keep the passenger in
position on the seat during vehicle
maneuvers and braking, which helps the
passenger sensing system maintain the
passenger airbag status. See “Seat Belts”
and “Child Restraints” in the Index for
additional information about the importance
of proper restraint use. A thick layer of additional material, such as
a blanket or cushion, or aftermarket
equipment such as seat covers, seat heaters,
and seat massagers can affect how well the
passenger sensing system operates. We
recommend that you not use seat covers or
other aftermarket equipment except when
approved by GM for your specific vehicle.
See
Adding Equipment to the
Airbag-Equipped Vehicle 061 for more
information about modifications that can
affect how the system operates.
The ON indicator may be lit if an object,
such as a briefcase, handbag, grocery bag,
laptop, or other electronic device, is put on
an unoccupied seat. If this is not desired,
remove the object from the seat.{Warning
Stowing articles under the passenger seat
or between the passenger seat cushion
and seatback may interfere with the
proper operation of the passenger
sensing system.
Servicing the Airbag-Equipped
Vehicle
Airbags affect how the vehicle should be
serviced. There are parts of the airbag
system in several places around the vehicle.
Your dealer and the service manual have
information about servicing the vehicle and
the airbag system. To purchase a service
manual, see Publication Ordering
Information 0342.
{Warning
For up to 10 seconds after the vehicle is
turned off and the battery is
disconnected, an airbag can still inflate
during improper service. You can be
injured if you are close to an airbag
when it inflates. Avoid yellow connectors.
They are probably part of the airbag
system. Be sure to follow proper service
procedures, and make sure the person
performing work for you is qualified to
do so.
Page 247 of 367

Buick Encore GX Owner Manual (GMNA-Localizing-U.S./Canada/Mexico-
16263917) - 2023 - CRC - 2/24/22
246 Driving and Operating
The trailer tongue weight (1) should be 10–
15% of the loaded trailer weight (2). Some
specific trailer types, such as boat trailers,
fall outside of this range. Always refer to
the trailer owner’s manual for the
recommended trailer tongue weight for each
trailer. Never exceed the maximum loads for
your vehicle, hitch and trailer.
After loading the trailer, separately weigh
the trailer and then the trailer tongue and
calculate the trailer load balance percentage
to see if the weights and distribution are
appropriate for your vehicle. If the trailer
weight is too high, it may be possible to
transfer some of the cargo into your vehicle.If the trailer tongue weight is too high or
too low, it may be possible to rearrange
some of the cargo inside of the trailer.
Do not exceed the maximum allowable
tongue weight for your vehicle. Use the
shortest hitch extension available to position
the hitch ball closer to your vehicle. This will
help reduce the effect of the trailer tongue
weight on the trailer hitch and the rear axle.
If a cargo carrier is used in the trailer hitch
receiver, choose a carrier that positions the
load as close to the vehicle as possible.
Make sure the total weight, including the
carrier, is no more than half of the
maximum allowable tongue weight for the
vehicle.
Ask your dealer for trailering information or
assistance.
Towing Equipment
Hitches
Always use the correct hitch equipment for
your vehicle. Crosswinds, large trucks going
by, and rough roads can affect the trailer
and the hitch.
Proper hitch equipment for your vehicle
helps maintain control of the vehicle-trailer
combination. Many trailers can be towedusing a weight-carrying hitch which has a
coupler latched to the hitch ball, or a tow
eye latched to a pintle hook. Other trailers
may require a weight-distributing hitch that
uses spring bars to distribute the trailer
tongue weight between your vehicle and
trailer axles. See
“Maximum Trailer Tongue
Weight” underTrailer Towing 0243 for
weight limits with various hitch types.
Never attach rental hitches or other
bumper-type hitches. Only use
frame-mounted hitches that do not attach to
the bumper.
Tires
.Do not tow a trailer while using a
compact spare tire on the vehicle.
.Tires must be properly inflated to support
loads while towing a trailer. See Tires
0 285 for instructions on proper tire
inflation.
Safety Chains
Always attach chains between the vehicle
and the trailer, and attach the chains to the
holes on the trailer hitch platform.
Instructions about safety chains may be
provided by the hitch manufacturer or by
the trailer manufacturer.
Page 250 of 367
Buick Encore GX Owner Manual (GMNA-Localizing-U.S./Canada/Mexico-
16263917) - 2023 - CRC - 2/24/22
Vehicle Care 249
Vehicle Care
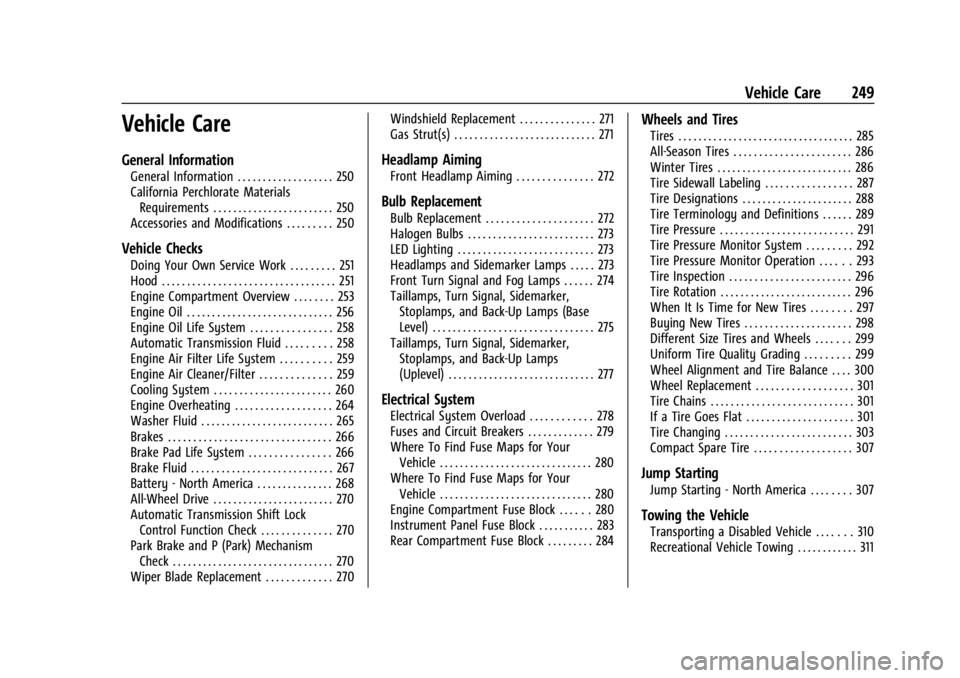
General Information
General Information . . . . . . . . . . . . . . . . . . . 250
California Perchlorate MaterialsRequirements . . . . . . . . . . . . . . . . . . . . . . . . 250
Accessories and Modifications . . . . . . . . . 250
Vehicle Checks
Doing Your Own Service Work . . . . . . . . . 251
Hood . . . . . . . . . . . . . . . . . . . . . . . . . . . . . . . . . . 251
Engine Compartment Overview . . . . . . . . 253
Engine Oil . . . . . . . . . . . . . . . . . . . . . . . . . . . . . 256
Engine Oil Life System . . . . . . . . . . . . . . . . 258
Automatic Transmission Fluid . . . . . . . . . 258
Engine Air Filter Life System . . . . . . . . . . 259
Engine Air Cleaner/Filter . . . . . . . . . . . . . . 259
Cooling System . . . . . . . . . . . . . . . . . . . . . . . 260
Engine Overheating . . . . . . . . . . . . . . . . . . . 264
Washer Fluid . . . . . . . . . . . . . . . . . . . . . . . . . . 265
Brakes . . . . . . . . . . . . . . . . . . . . . . . . . . . . . . . . 266
Brake Pad Life System . . . . . . . . . . . . . . . . 266
Brake Fluid . . . . . . . . . . . . . . . . . . . . . . . . . . . . 267
Battery - North America . . . . . . . . . . . . . . . 268
All-Wheel Drive . . . . . . . . . . . . . . . . . . . . . . . . 270
Automatic Transmission Shift Lock Control Function Check . . . . . . . . . . . . . . 270
Park Brake and P (Park) Mechanism Check . . . . . . . . . . . . . . . . . . . . . . . . . . . . . . . . 270
Wiper Blade Replacement . . . . . . . . . . . . . 270 Windshield Replacement . . . . . . . . . . . . . . . 271
Gas Strut(s) . . . . . . . . . . . . . . . . . . . . . . . . . . . . 271
Headlamp Aiming
Front Headlamp Aiming . . . . . . . . . . . . . . . 272
Bulb Replacement
Bulb Replacement . . . . . . . . . . . . . . . . . . . . . 272
Halogen Bulbs . . . . . . . . . . . . . . . . . . . . . . . . . 273
LED Lighting . . . . . . . . . . . . . . . . . . . . . . . . . . . 273
Headlamps and Sidemarker Lamps . . . . . 273
Front Turn Signal and Fog Lamps . . . . . . 274
Taillamps, Turn Signal, Sidemarker,
Stoplamps, and Back-Up Lamps (Base
Level) . . . . . . . . . . . . . . . . . . . . . . . . . . . . . . . . 275
Taillamps, Turn Signal, Sidemarker, Stoplamps, and Back-Up Lamps
(Uplevel) . . . . . . . . . . . . . . . . . . . . . . . . . . . . . 277
Electrical System
Electrical System Overload . . . . . . . . . . . . 278
Fuses and Circuit Breakers . . . . . . . . . . . . . 279
Where To Find Fuse Maps for YourVehicle . . . . . . . . . . . . . . . . . . . . . . . . . . . . . . 280
Where To Find Fuse Maps for Your Vehicle . . . . . . . . . . . . . . . . . . . . . . . . . . . . . . 280
Engine Compartment Fuse Block . . . . . . 280
Instrument Panel Fuse Block . . . . . . . . . . . 283
Rear Compartment Fuse Block . . . . . . . . . 284
Wheels and Tires
Tires . . . . . . . . . . . . . . . . . . . . . . . . . . . . . . . . . . . 285
All-Season Tires . . . . . . . . . . . . . . . . . . . . . . . 286
Winter Tires . . . . . . . . . . . . . . . . . . . . . . . . . . . 286
Tire Sidewall Labeling . . . . . . . . . . . . . . . . . 287
Tire Designations . . . . . . . . . . . . . . . . . . . . . . 288
Tire Terminology and Definitions . . . . . . 289
Tire Pressure . . . . . . . . . . . . . . . . . . . . . . . . . . 291
Tire Pressure Monitor System . . . . . . . . . 292
Tire Pressure Monitor Operation . . . . . . 293
Tire Inspection . . . . . . . . . . . . . . . . . . . . . . . . 296
Tire Rotation . . . . . . . . . . . . . . . . . . . . . . . . . . 296
When It Is Time for New Tires . . . . . . . . 297
Buying New Tires . . . . . . . . . . . . . . . . . . . . . 298
Different Size Tires and Wheels . . . . . . . 299
Uniform Tire Quality Grading . . . . . . . . . 299
Wheel Alignment and Tire Balance . . . . 300
Wheel Replacement . . . . . . . . . . . . . . . . . . . 301
Tire Chains . . . . . . . . . . . . . . . . . . . . . . . . . . . . 301
If a Tire Goes Flat . . . . . . . . . . . . . . . . . . . . . 301
Tire Changing . . . . . . . . . . . . . . . . . . . . . . . . . 303
Compact Spare Tire . . . . . . . . . . . . . . . . . . . 307
Jump Starting
Jump Starting - North America . . . . . . . . 307
Towing the Vehicle
Transporting a Disabled Vehicle . . . . . . . 310
Recreational Vehicle Towing . . . . . . . . . . . . 311
Page 298 of 367
Buick Encore GX Owner Manual (GMNA-Localizing-U.S./Canada/Mexico-
16263917) - 2023 - CRC - 2/24/22
Vehicle Care 297
Adjust the front and rear tires to the
recommended inflation pressure on the
Tire and Loading Information label after
the tires have been rotated. SeeTire
Pressure 0291 and
Vehicle Load Limits 0191.
Reset the Tire Pressure Monitor System.
See Tire Pressure Monitor Operation
0 293.
Check that all wheel nuts are properly
tightened. See “Wheel Nut Torque”
under Capacities and Specifications
0 332, and “Removing the Flat Tire and
Installing the Spare Tire” underTire
Changing 0303.
{Warning
Rust or dirt on a wheel, or on the
parts to which it is fastened, can
cause wheel nuts to become loose
over time. The wheel could come off
and cause a crash. When changing a
wheel, remove any rust or dirt from
places where the wheel attaches to
the vehicle. In an emergency, a cloth
(Continued)
Warning (Continued)
or paper towel can be used; however,
use a scraper or wire brush later to
remove all rust or dirt.
Lightly coat the inner diameter of the
wheel hub opening with wheel bearing
grease after a wheel change or tire
rotation to prevent corrosion or rust
buildup.
{Warning
Do not apply grease to the wheel
mounting surface, wheel conical
seats, or the wheel nuts or bolts.
Grease applied to these areas could
cause a wheel to become loose or
come off, resulting in a crash.
When It Is Time for New Tires
Factors, such as maintenance, temperatures,
driving speeds, vehicle loading, and road
conditions affect the wear rate of the tires.
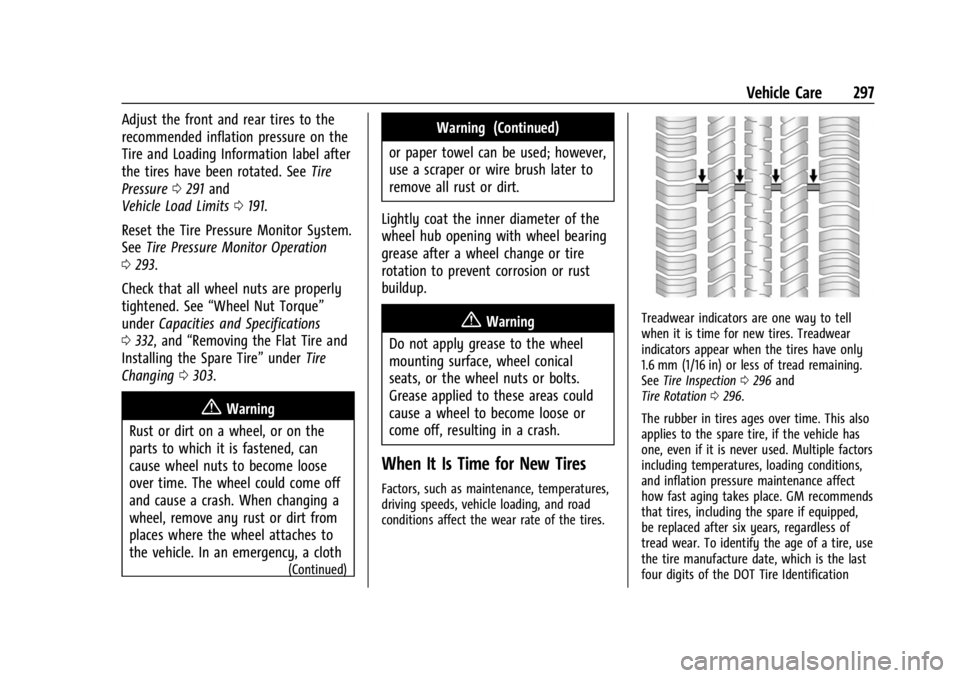
Treadwear indicators are one way to tell
when it is time for new tires. Treadwear
indicators appear when the tires have only
1.6 mm (1/16 in) or less of tread remaining.
See Tire Inspection 0296 and
Tire Rotation 0296.
The rubber in tires ages over time. This also
applies to the spare tire, if the vehicle has
one, even if it is never used. Multiple factors
including temperatures, loading conditions,
and inflation pressure maintenance affect
how fast aging takes place. GM recommends
that tires, including the spare if equipped,
be replaced after six years, regardless of
tread wear. To identify the age of a tire, use
the tire manufacture date, which is the last
four digits of the DOT Tire Identification
Page 303 of 367

Buick Encore GX Owner Manual (GMNA-Localizing-U.S./Canada/Mexico-
16263917) - 2023 - CRC - 2/24/22
302 Vehicle Care
slowly. But if there is ever a blowout, here
are a few tips about what to expect and
what to do:
If a front tire fails, the flat tire creates a
drag that pulls the vehicle toward that side.
Take your foot off the accelerator pedal and
grip the steering wheel firmly. Steer to
maintain lane position, and then gently
brake to a stop, well off the road,
if possible.
A rear blowout, particularly on a curve, acts
much like a skid and may require the same
correction as used in a skid. Stop pressing
the accelerator pedal and steer to straighten
the vehicle. It may be very bumpy and
noisy. Gently brake to a stop, well off the
road, if possible.
{Warning
Driving on a flat tire will cause
permanent damage to the tire.
Re-inflating a tire after it has been driven
on while severely underinflated or flat
may cause a blowout and a serious crash.
Never attempt to re-inflate a tire that has
been driven on while severely(Continued)
Warning (Continued)
underinflated or flat. Have your dealer or
an authorized tire service center repair or
replace the flat tire as soon as possible.
{Warning
Lifting a vehicle and getting under it to
do maintenance or repairs is dangerous
without the appropriate safety equipment
and training. If a jack is provided with
the vehicle, it is designed only for
changing a flat tire. If it is used for
anything else, you or others could be
badly injured or killed if the vehicle slips
off the jack. If a jack is provided with the
vehicle, only use it for changing a
flat tire.
If a tire goes flat, avoid further tire and
wheel damage by driving slowly to a level
place, well off the road, if possible. Turn on
the hazard warning flashers. See Hazard
Warning Flashers 0124.
If your vehicle is loaded at or near
maximum cargo capacity, it may be difficult
to fit the jack under the vehicle due to the
environment (shoulder slope, road debris, etc.). Removal of some weight may improve
the ability to fit the jack under the vehicle
at the correct jacking location.
{Warning
Changing a tire can be dangerous. The
vehicle can slip off the jack and roll over
or fall causing injury or death. Find a
level place to change the tire. To help
prevent the vehicle from moving:
1. Set the parking brake firmly.
2. Put the vehicle in P (Park).
3. Turn the vehicle off and do not restart the vehicle while it is raised.
4. Do not allow passengers to remain in the vehicle.
5. Place wheel blocks, if equipped, on both sides of the tire at the opposite
corner of the tire being changed.
When the vehicle has a flat tire (2), use the
following example as a guide to assist in the
placement of the wheel blocks (1),
if equipped.
Page 304 of 367

Buick Encore GX Owner Manual (GMNA-Localizing-U.S./Canada/Mexico-
16263917) - 2023 - CRC - 2/24/22
Vehicle Care 303
1. Wheel Block (If Equipped)
2. Flat Tire
The following information explains how to
repair or change a tire.
Tire Changing
Removing the Spare Tire and Tools
The spare tire and tools are located under
the load floor in the rear of the vehicle.
Without Subwoofer
1. Tow Eye
2. Jack
3. Wrench
4. Strap
5. FunnelWith Subwoofer
1. Tow Eye
2. Wrench
3. Jack
4. Strap
5. Wing Nut
6. Funnel
To access the spare tire and tools: 1. Open the liftgate. See Liftgate019.
2. Remove the load floor.
3. Turn the wing nut counterclockwise and remove the spare tire. Place the spare
tire next to the tire being changed.