clock BUICK ENCORE GX 2024 Owners Manual
[x] Cancel search | Manufacturer: BUICK, Model Year: 2024, Model line: ENCORE GX, Model: BUICK ENCORE GX 2024Pages: 330, PDF Size: 6.72 MB
Page 15 of 330
Buick Encore GX Owner Manual (GMNA-Localizing-U.S./Canada/Mexico-
16897608) - 2024 - CRC - 1/23/23
14 Keys, Doors, and Windows
5. Remove the remote key from the remotekey pocket and press the remote key
K
orQbutton.
To program additional remote keys,
repeat Steps 3–5.
When all additional remote keys are
programmed, press and hold ENGINE
START/STOP for 12 seconds to exit
programming mode.
6. Put the key back into the remote key.
7. Replace the key lock cylinder cap. See Door Locks 018.
Programming without Recognized
Remote Keys
If two currently recognized remote keys are
not available, follow this procedure to
program up to eight remote keys. This
feature is not available in Canada. This
procedure will take approximately
30 minutes to complete. The vehicle must
be off and all of the remote keys you wish
to program must be with you. 1. Remove the key lock cylinder cap on the driver door handle. See Door Locks018.
Insert the vehicle key of the remote key
into the key lock cylinder on the driver door handle and turn the key,
counterclockwise, to the unlock position
five times within 10 seconds.
The DIC displays REMOTE LEARN
PENDING, PLEASE WAIT.
2. Wait for 10 minutes until the DIC displays PRESS ENGINE START BUTTON TO
LEARN and then press ENGINE
START/STOP.
The DIC display will again show REMOTE
LEARN PENDING, PLEASE WAIT.
3. Repeat Step 2 two additional times. After the third time all previously known
remote keys will no longer work with
the vehicle. Remaining remote keys can
be relearned during the next steps.
The DIC display should now show READY
FOR REMOTE # 1.
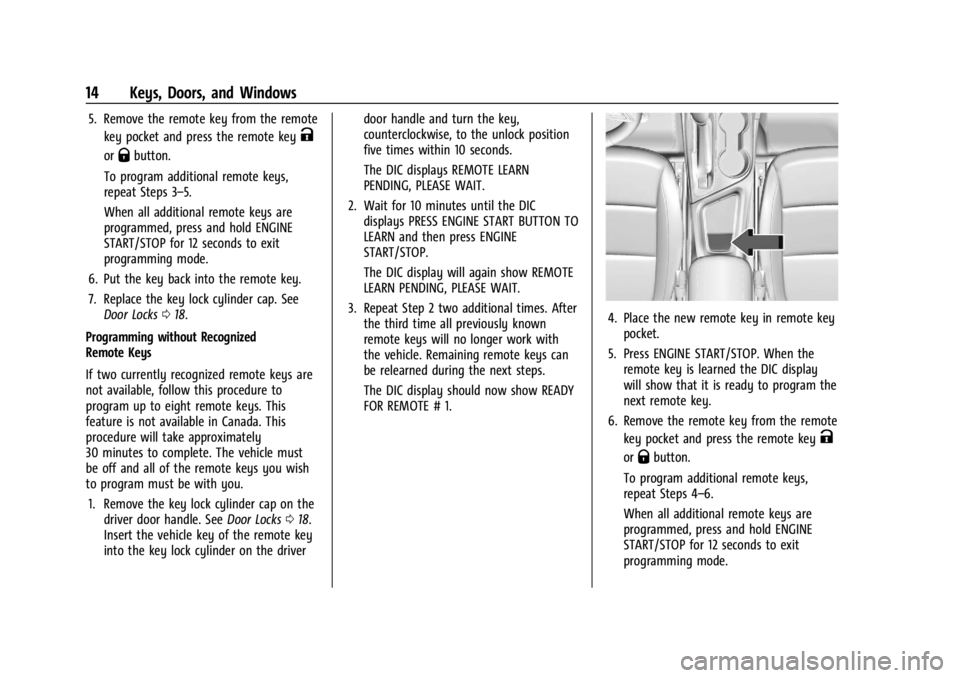
4. Place the new remote key in remote keypocket.
5. Press ENGINE START/STOP. When the remote key is learned the DIC display
will show that it is ready to program the
next remote key.
6. Remove the remote key from the remote key pocket and press the remote key
K
orQbutton.
To program additional remote keys,
repeat Steps 4–6.
When all additional remote keys are
programmed, press and hold ENGINE
START/STOP for 12 seconds to exit
programming mode.
Page 89 of 330
Buick Encore GX Owner Manual (GMNA-Localizing-U.S./Canada/Mexico-
16897608) - 2024 - CRC - 1/23/23
88 Instruments and Controls
Instruments and Controls
Controls
Steering Wheel Adjustment . . . . . . . . . . . . 89
Heated Steering Wheel . . . . . . . . . . . . . . . . . 89
Horn . . . . . . . . . . . . . . . . . . . . . . . . . . . . . . . . . . . 89
Windshield Wiper/Washer . . . . . . . . . . . . . 89
Rear Window Wiper/Washer . . . . . . . . . . . 91
Compass . . . . . . . . . . . . . . . . . . . . . . . . . . . . . . . 92
Clock . . . . . . . . . . . . . . . . . . . . . . . . . . . . . . . . . . . 92
Power Outlets . . . . . . . . . . . . . . . . . . . . . . . . . . 92
Wireless Charging . . . . . . . . . . . . . . . . . . . . . . 94
Warning Lights, Gauges, and Indicators
Warning Lights, Gauges, andIndicators . . . . . . . . . . . . . . . . . . . . . . . . . . . . 96
Instrument Cluster . . . . . . . . . . . . . . . . . . . . . 97
Speedometer . . . . . . . . . . . . . . . . . . . . . . . . . . . 98
Odometer . . . . . . . . . . . . . . . . . . . . . . . . . . . . . . 98
Trip Odometer . . . . . . . . . . . . . . . . . . . . . . . . . 98
Tachometer . . . . . . . . . . . . . . . . . . . . . . . . . . . . 98
Fuel Gauge . . . . . . . . . . . . . . . . . . . . . . . . . . . . . 98
Engine Coolant Temperature Gauge . . . . 99
Seat Belt Reminders . . . . . . . . . . . . . . . . . . . 100
Airbag Readiness Light . . . . . . . . . . . . . . . . 100
Passenger Airbag Status Indicator . . . . . . 101
Charging System Light . . . . . . . . . . . . . . . . . 101
Malfunction Indicator Lamp (Check Engine Light) . . . . . . . . . . . . . . . . . . . . . . . . 102
Brake System Warning Light . . . . . . . . . . 103 Electric Parking Brake Light . . . . . . . . . . . . 104
Service Electric Parking Brake Light . . . . 104
Antilock Brake System (ABS) Warning
Light . . . . . . . . . . . . . . . . . . . . . . . . . . . . . . . . . 104
All-Wheel-Drive Light . . . . . . . . . . . . . . . . . . 105
Lane Keep Assist (LKA) Light . . . . . . . . . . . 105
Automatic Emergency Braking (AEB)
Disabled Light . . . . . . . . . . . . . . . . . . . . . . . 105
Vehicle Ahead Indicator . . . . . . . . . . . . . . . 105
Pedestrian Ahead Indicator . . . . . . . . . . . . 106
Traction Off Light . . . . . . . . . . . . . . . . . . . . . 106
Traction Control System (TCS)/ Electronic Stability Control Light . . . . . 106
Electronic Stability Control (ESC) Off Light . . . . . . . . . . . . . . . . . . . . . . . . . . . . . . . . 106
Engine Coolant Temperature Warning Light . . . . . . . . . . . . . . . . . . . . . . . . . . . . . . . . . 107
Tire Pressure Light . . . . . . . . . . . . . . . . . . . . . 107
Engine Oil Pressure Light . . . . . . . . . . . . . . 107
Low Fuel Warning Light . . . . . . . . . . . . . . . 108
Auto Stop Indicator . . . . . . . . . . . . . . . . . . . 108
Security Light . . . . . . . . . . . . . . . . . . . . . . . . . 108
High-Beam On Light . . . . . . . . . . . . . . . . . . . 108
Lamps On Reminder . . . . . . . . . . . . . . . . . . . 109
Cruise Control Light . . . . . . . . . . . . . . . . . . . 109
Adaptive Cruise Control Light . . . . . . . . . . 109
Door Ajar Light . . . . . . . . . . . . . . . . . . . . . . . . 109
Information Displays
Driver Information Center (DIC) . . . . . . . 109
Vehicle Status . . . . . . . . . . . . . . . . . . . . . . . . . . 111
Vehicle Messages
Vehicle Messages . . . . . . . . . . . . . . . . . . . . . . 113
Engine Power Messages . . . . . . . . . . . . . . . . 113
Vehicle Speed Messages . . . . . . . . . . . . . . . 114
Universal Remote System
Universal Remote System . . . . . . . . . . . . . . 114
Universal Remote System Programming . . . . . . . . . . . . . . . . . . . . . . . . 114
Universal Remote System Operation . . . 116
Page 93 of 330
Buick Encore GX Owner Manual (GMNA-Localizing-U.S./Canada/Mexico-
16897608) - 2024 - CRC - 1/23/23
92 Instruments and Controls
Reverse Gear Wipes
If the rear wiper control is off, the rear
wiper will automatically operate
continuously when the vehicle is in
R (Reverse) and the front windshield wiper is
performing low or high speed wipes. If the
rear wiper control is off, the vehicle is in
R (Reverse), and the front windshield wiper
is performing interval wipes, then the rear
wiper automatically performs interval wipes.
This feature can be turned on or off. Go to
Settings > Vehicle > Comfort and
Convenience > Reverse Gear Wipes > Select
ON or OFF.
The windshield washer reservoir is used for
the windshield and the rear window. Check
the fluid level in the reservoir if either
washer is not working. SeeWasher Fluid
0 230. Rear Camera Washer
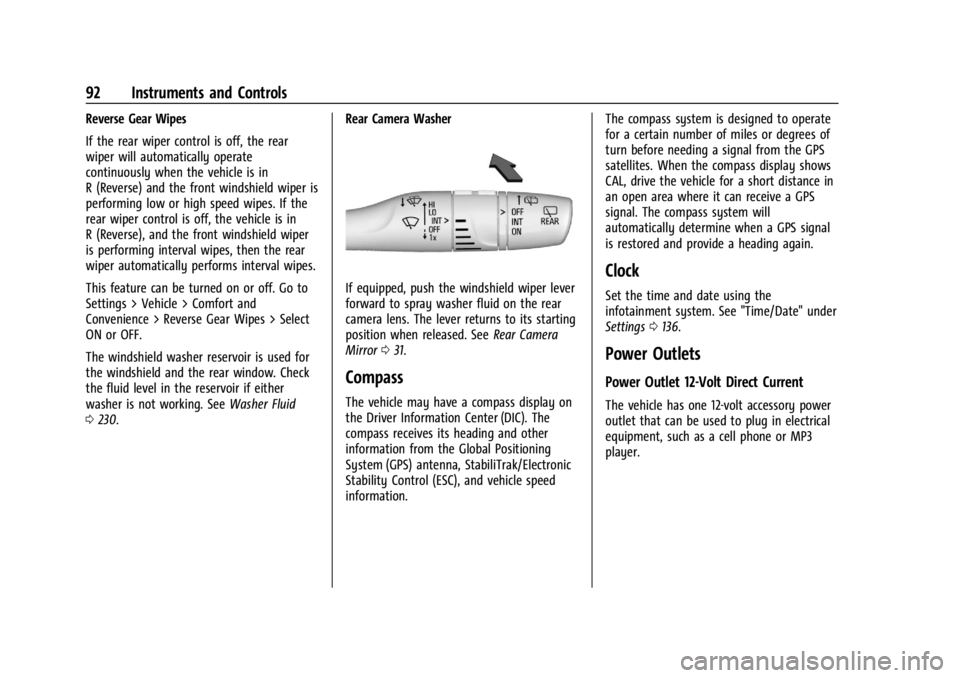
If equipped, push the windshield wiper lever
forward to spray washer fluid on the rear
camera lens. The lever returns to its starting
position when released. See
Rear Camera
Mirror 031.
Compass
The vehicle may have a compass display on
the Driver Information Center (DIC). The
compass receives its heading and other
information from the Global Positioning
System (GPS) antenna, StabiliTrak/Electronic
Stability Control (ESC), and vehicle speed
information. The compass system is designed to operate
for a certain number of miles or degrees of
turn before needing a signal from the GPS
satellites. When the compass display shows
CAL, drive the vehicle for a short distance in
an open area where it can receive a GPS
signal. The compass system will
automatically determine when a GPS signal
is restored and provide a heading again.
Clock
Set the time and date using the
infotainment system. See "Time/Date" under
Settings
0136.
Power Outlets
Power Outlet 12-Volt Direct Current
The vehicle has one 12-volt accessory power
outlet that can be used to plug in electrical
equipment, such as a cell phone or MP3
player.
Page 121 of 330
Buick Encore GX Owner Manual (GMNA-Localizing-U.S./Canada/Mexico-
16897608) - 2024 - CRC - 1/23/23
120 Lighting
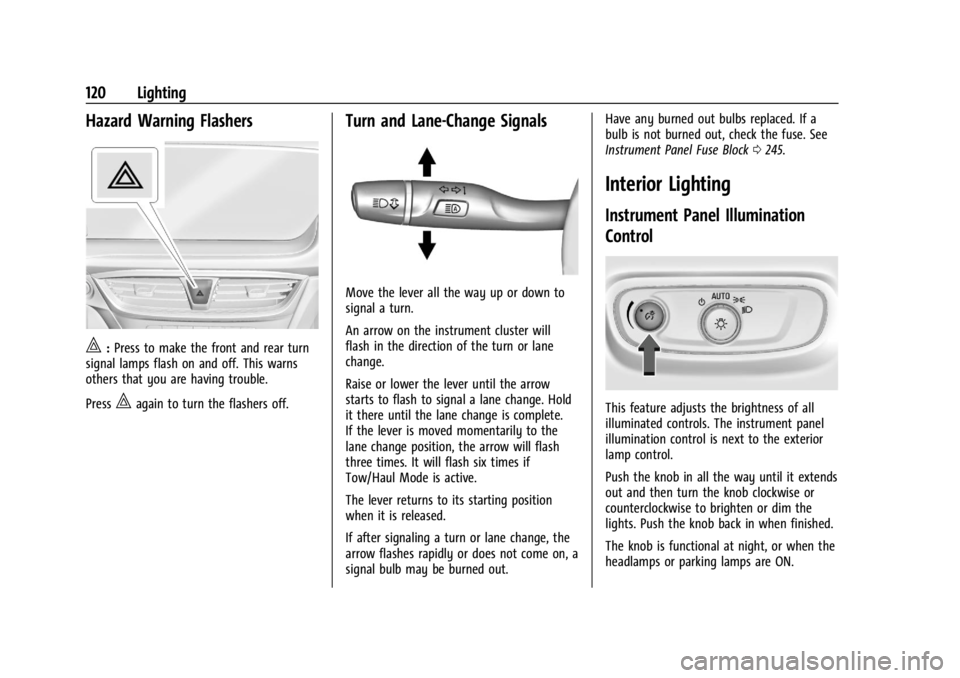
Hazard Warning Flashers
|:Press to make the front and rear turn
signal lamps flash on and off. This warns
others that you are having trouble.
Press
|again to turn the flashers off.
Turn and Lane-Change Signals
Move the lever all the way up or down to
signal a turn.
An arrow on the instrument cluster will
flash in the direction of the turn or lane
change.
Raise or lower the lever until the arrow
starts to flash to signal a lane change. Hold
it there until the lane change is complete.
If the lever is moved momentarily to the
lane change position, the arrow will flash
three times. It will flash six times if
Tow/Haul Mode is active.
The lever returns to its starting position
when it is released.
If after signaling a turn or lane change, the
arrow flashes rapidly or does not come on, a
signal bulb may be burned out. Have any burned out bulbs replaced. If a
bulb is not burned out, check the fuse. See
Instrument Panel Fuse Block
0245.
Interior Lighting
Instrument Panel Illumination
Control
This feature adjusts the brightness of all
illuminated controls. The instrument panel
illumination control is next to the exterior
lamp control.
Push the knob in all the way until it extends
out and then turn the knob clockwise or
counterclockwise to brighten or dim the
lights. Push the knob back in when finished.
The knob is functional at night, or when the
headlamps or parking lamps are ON.
Page 138 of 330
Buick Encore GX Owner Manual (GMNA-Localizing-U.S./Canada/Mexico-
16897608) - 2024 - CRC - 1/23/23
Infotainment System 137
4. Touch the options on the infotainmentdisplay to change a setting.
5. Touch
Sto go back.
The Settings menu may contain the
following:
System
The menu may contain the following:
Time / Date
Allows setting of the clock.
Language
Sets the display language used on the
infotainment display. It may also use the
selected language for voice recognition and
audio feedback.
Phones
Allows connecting to a different cell phone
or mobile device source, disconnect a cell
phone or media device, or delete a cell
phone or media device.
Wi-Fi Networks
Shows connected and available Wi-Fi
networks. Wi-Fi Hotspot
Allows adjustment of different Wi-Fi
features.
Vehicle-to-Phone Sharing
Allows authorization of projection apps like
CarPlay and Android to access your
vehicle data.
Display
Allows adjustment of the infotainment
display.
Sounds
Allows adjustment of the infotainment
system sounds.
Vehicle Software
Shows Updates, About, and Reset Options.
Vehicle
The menu may contain the following:
Teen Driver
See
Teen Driver 0138.
Rear Seat Reminder
Allows for a chime and a message when the
rear door has been opened before or during
operation of the vehicle. Buckle to Drive
This feature can prevent shifting out of Park
when the driver, and if applicable the front
passenger, seat belt is not buckled.
Climate and Air Quality
Adjusts different climate settings.
Collision/Detection Systems
Adjusts different driver assistance system
settings.
Comfort and Convenience
Adjusts different comfort and convenience
settings.
Lighting
Adjusts different lighting settings.
Power Door Locks
Adjusts different door lock settings.
Remote Lock, Unlock, and Start
Adjusts different remote lock settings.
Seating Position
Adjusts different seating position settings.
Page 146 of 330

Buick Encore GX Owner Manual (GMNA-Localizing-U.S./Canada/Mexico-
16897608) - 2024 - CRC - 1/23/23
Climate Controls 145
3. MAX Defrost
4. Rear Window Defogger
5. Fan Control
6. Driver and Passenger Heated Seats (IfEquipped)
7. Recirculation
8. A/C (Air Conditioning)
Climate Control Display
1. Temperature Display
2. Fan Control
3. Recirculation
4. A/C (Air Conditioning)
5. Air Delivery Mode Controls 6. On/Off (Power)
7. Temperature Controls
The fan, air delivery mode, air conditioning,
and temperature settings can be controlled
by touching CLIMATE on the infotainment
home screen.
]: Turn the knob clockwise or
counterclockwise to increase or decrease the
fan speed or turn the fan off.
Temperature Control : Turn the knob
clockwise or counterclockwise to increase or
decrease the temperature.
Air Delivery Mode Controls : Press
z,Y,
or
6to change the direction of the airflow.
The indicator light in the button will turn
on. Any combination of the three buttons
can be selected. The indicator light in the
button will turn on.
To change the current mode, select one or
more of the following:
z: Clears the windows of fog or moisture.
Air is directed to the windshield.
Y: Air is directed to the instrument panel
outlets.
6: Air is directed to the floor outlets.
0MAX : Air is directed to the windshield
and the fan runs at a higher speed. Fog or
frost is cleared from the windshield more
quickly. When the button is pressed again,
the system returns to the previous mode
setting.
For best results, clear all snow and ice from
the windshield before defrosting.
A/C : Press to turn the air conditioning
system on or off. If the climate control
system is turned off or the outside
temperature falls below freezing, the air
conditioner will not run.
@: Press to turn on recirculation. An
indicator light comes on. Air is recirculated
to quickly cool the inside of the vehicle or
to reduce the entry of outside air and odors.
Rear Window Defogger
K: Press to turn the rear window defogger
on or off. An indicator light on the button
comes on to show that the rear window
defogger is on.
The defogger can be turned off by turning
the vehicle off or to accessory mode.
Page 229 of 330
Buick Encore GX Owner Manual (GMNA-Localizing-U.S./Canada/Mexico-
16897608) - 2024 - CRC - 1/23/23
228 Vehicle Care
{Warning
Plain water, or other liquids such as
alcohol, can boil before the proper
coolant mixture will. With plain water or
the wrong mixture, the engine could get
too hot but there would not be an
overheat warning. The engine could catch
fire and you or others could be burned.
{Warning
Spilling coolant on hot engine parts can
burn you. Coolant contains ethylene
glycol and it will burn if the engine parts
are hot enough.
Caution
Failure to follow the specific coolant fill
procedure could cause the engine to
overheat and could cause system
damage. If coolant is not visible in the
surge tank, contact your dealer.If no problem is found, check to see if
coolant is visible in the coolant surge tank.
If coolant is visible but the coolant level is
not at the indicated level mark, add a
50/50 mixture of clean, drinkable water and
DEX-COOL coolant at the coolant surge tank,
but be sure the cooling system, including
the coolant surge tank pressure cap, is cool
before you do it.
1. Remove the coolant surge tank pressure
cap when the cooling system, including
the coolant surge tank pressure cap and
upper radiator hose, is no longer hot.
Turn the pressure cap slowly
counterclockwise about one-quarter of a
turn. If you hear a hiss, wait for that to
stop. This will allow any pressure still
left to be vented out the discharge hose.
2. Keep turning the pressure cap slowly and remove it.
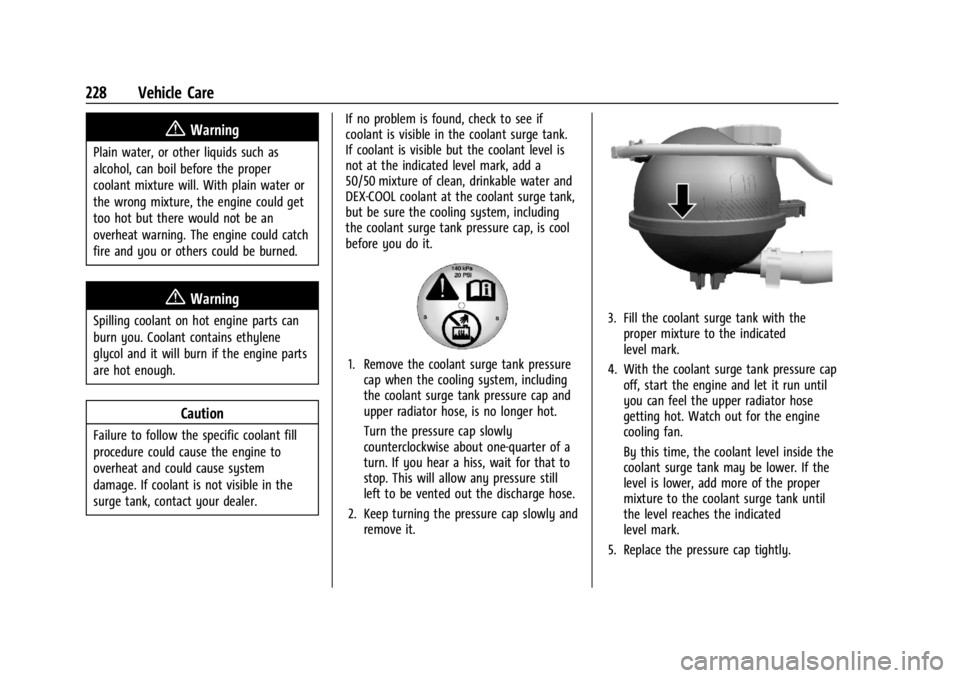
3. Fill the coolant surge tank with theproper mixture to the indicated
level mark.
4. With the coolant surge tank pressure cap off, start the engine and let it run until
you can feel the upper radiator hose
getting hot. Watch out for the engine
cooling fan.
By this time, the coolant level inside the
coolant surge tank may be lower. If the
level is lower, add more of the proper
mixture to the coolant surge tank until
the level reaches the indicated
level mark.
5. Replace the pressure cap tightly.
Page 241 of 330

Buick Encore GX Owner Manual (GMNA-Localizing-U.S./Canada/Mexico-
16897608) - 2024 - CRC - 1/23/23
240 Vehicle Care
4. Remove the old bulb from the bulbsocket by pulling it straight out.
5. Insert a new bulb into the bulb socket.
6. Install the bulb socket into the taillamp assembly.
7. Install the taillamp assembly to the vehicle body with the two screws.
Rear Back-Up Lamp
The bulbs are accessible from the underside
of the vehicle.
1. Turn the bulb holder anti-clockwise and remove it from reflector.
2. Disengage the bulb socket from the plugconnector by pressing the retaining lug.
3. Remove and replace the bulb socket with bulb and attach the plug connector.
4. Insert the bulb socket into the reflector and turn clockwise to engage.
Page 247 of 330

Buick Encore GX Owner Manual (GMNA-Localizing-U.S./Canada/Mexico-
16897608) - 2024 - CRC - 1/23/23
246 Vehicle Care
FuseUsage
F01 LUMBAR
F02 SUNROOF Fuse
Usage
F03 VBAT_3
F04 VBAT_7 F05 VBAT_6
F06 AUTO HVAC F07 CGM
F08 ST_WHL_HTR
F09 DISPLAY F10 RADIO F11 ONSTAR (ERA)
F12 PARK_ASSIST
F13 MAN. HVAC
F14 WL CHARGER F15 VBAT_2
F16 VBAT_1 F17 SWC BKLT
F18 N/A
F19 N/A
F20 CLOCK SPRING F21 OCC SEN Fuse
Usage
F22 DLC
F23 SDM
F24 IGN_SW/ESCL F25 PWR L-GATE MDL
F26 SEC FUSE-2 F27 PWR SEAT CO-DR
F28 VBAT_8
F29 DC-DC AT
F30 PWR L-GATE MDL F31 OSRVM
F32 FRT HS PWR-1
F33 VBAT_4
F34 FRT HS PWR-2 F35 AMPLIFIER
F36 ONSTAR (TCP) F37 PWR SEAT DR
F38 DC-DC_400W
F39 SEC FUSE-1
F40 HVAC_BLOWER
Page 267 of 330
Buick Encore GX Owner Manual (GMNA-Localizing-U.S./Canada/Mexico-
16897608) - 2024 - CRC - 1/23/23
266 Vehicle Care
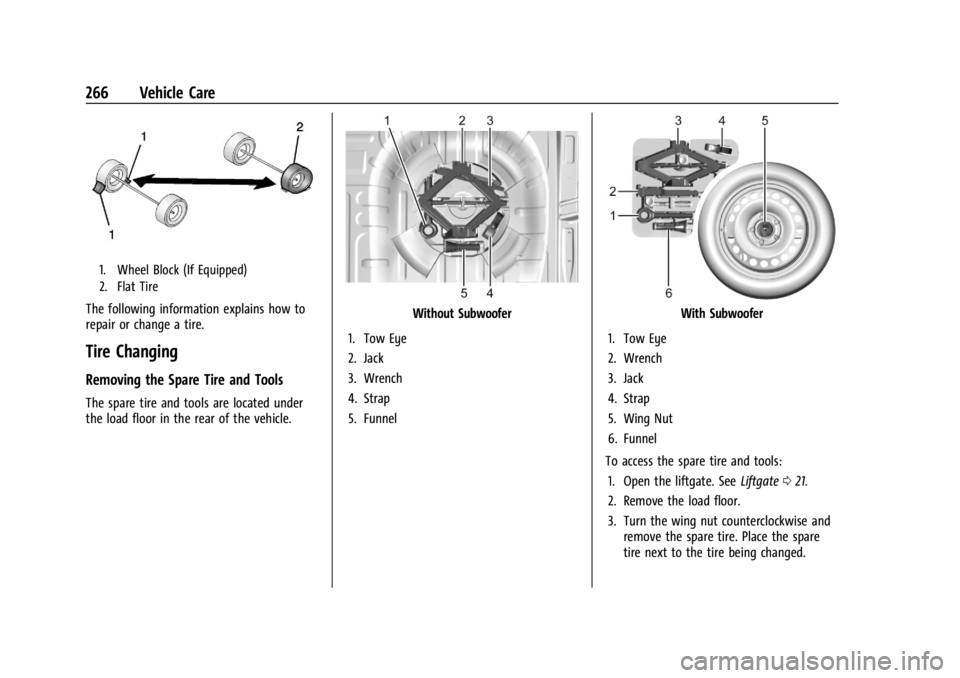
1. Wheel Block (If Equipped)
2. Flat Tire
The following information explains how to
repair or change a tire.
Tire Changing
Removing the Spare Tire and Tools
The spare tire and tools are located under
the load floor in the rear of the vehicle.
Without Subwoofer
1. Tow Eye
2. Jack
3. Wrench
4. Strap
5. FunnelWith Subwoofer
1. Tow Eye
2. Wrench
3. Jack
4. Strap
5. Wing Nut
6. Funnel
To access the spare tire and tools: 1. Open the liftgate. See Liftgate021.
2. Remove the load floor.
3. Turn the wing nut counterclockwise and remove the spare tire. Place the spare
tire next to the tire being changed.