lock BUICK ENVISION 2019 Owner's Guide
[x] Cancel search | Manufacturer: BUICK, Model Year: 2019, Model line: ENVISION, Model: BUICK ENVISION 2019Pages: 377, PDF Size: 6.03 MB
Page 42 of 377
Buick Envision Owner Manual (GMNA-Localizing-U.S./Canada/Mexico-
12032235) - 2019 - CRC - 6/27/18
Keys, Doors, and Windows 41
Caution
Driving with an open and
unsecured liftgate may result in
damage to the power liftgate
components.
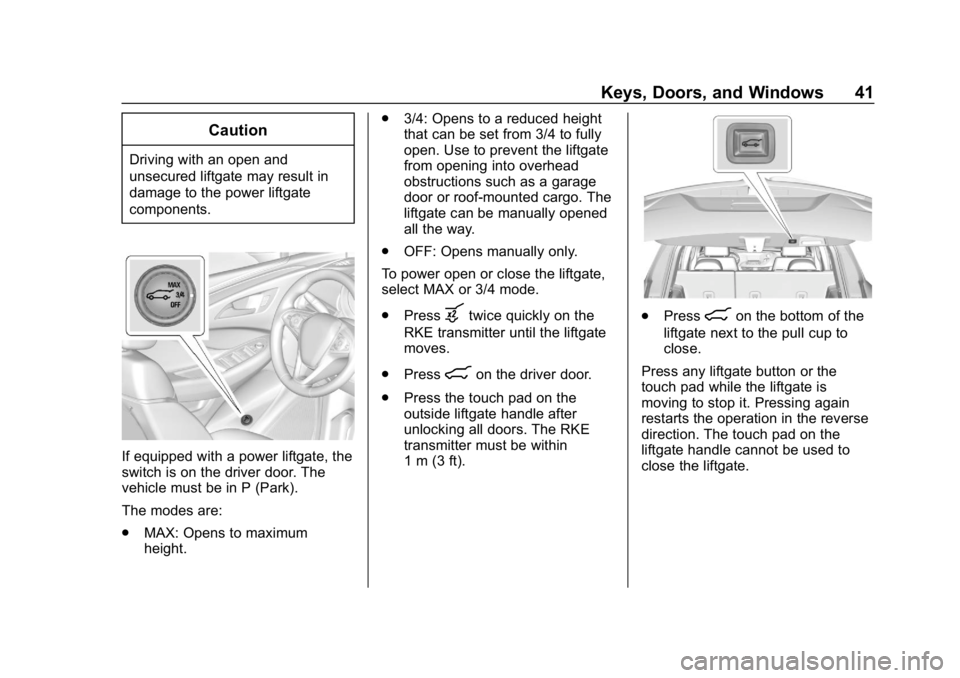
If equipped with a power liftgate, the
switch is on the driver door. The
vehicle must be in P (Park).
The modes are:
.MAX: Opens to maximum
height. .
3/4: Opens to a reduced height
that can be set from 3/4 to fully
open. Use to prevent the liftgate
from opening into overhead
obstructions such as a garage
door or roof-mounted cargo. The
liftgate can be manually opened
all the way.
. OFF: Opens manually only.
To power open or close the liftgate,
select MAX or 3/4 mode.
. Press
btwice quickly on the
RKE transmitter until the liftgate
moves.
. Press
8on the driver door.
. Press the touch pad on the
outside liftgate handle after
unlocking all doors. The RKE
transmitter must be within
1 m (3 ft).
.Press8on the bottom of the
liftgate next to the pull cup to
close.
Press any liftgate button or the
touch pad while the liftgate is
moving to stop it. Pressing again
restarts the operation in the reverse
direction. The touch pad on the
liftgate handle cannot be used to
close the liftgate.
Page 43 of 377
Buick Envision Owner Manual (GMNA-Localizing-U.S./Canada/Mexico-
12032235) - 2019 - CRC - 6/27/18
42 Keys, Doors, and Windows
Caution
Manually forcing the liftgate to
open or close during a power
cycle can damage the vehicle.
Allow the power cycle to
complete.
The power liftgate may be
temporarily disabled under extreme
low temperatures, or after repeated
power cycling over a short period of
time. If this occurs, the liftgate can
still be operated manually.
If the vehicle is shifted out of
P (Park) while the power function is
in progress, the liftgate will continue
to completion. If the vehicle is
accelerated before the liftgate has
completed moving, the liftgate may
stop or reverse direction. Check for
DIC messages and make sure the
liftgate is closed and latched before
driving. Falling Liftgate Detection
If the power liftgate automatically
closes after a power opening cycle,
it indicates that the system is
reacting to excess weight on the
liftgate or a possible support strut
failure. Remove any excess weight.
If the liftgate continues to
automatically close after opening,
see your dealer for service before
using the power liftgate. Interfering
with the power liftgate motion or
manually closing the liftgate too
quickly after power opening may
resemble a support strut failure.
This could also activate the falling
liftgate detection feature. Allow the
liftgate to complete its operation and
wait a few seconds before manually
closing the liftgate.
Obstacle Detection Features
If the liftgate encounters an obstacle
during a power open or close cycle,
a warning chime will sound and the
liftgate will automatically reverse
direction and move a short distance
away from the obstacle. After
removing the obstruction, the powerliftgate operation can be used again.
If the liftgate encounters multiple
obstacles on the same power cycle,
the power function will deactivate.
After removing the obstructions,
manually close the liftgate which will
allow normal power operation
functions to resume.
If the vehicle is locked while the
liftgate is closing, and an obstacle is
encountered that prevents the
liftgate from completely closing, the
horn will sound as an alert that the
liftgate did not close.
Pinch sensors are on the side
edges of the liftgate. If an object is
caught between the liftgate and the
vehicle and presses against this
sensor, the liftgate will reverse
direction and open fully. The liftgate
will remain open until it is activated
again or closed manually.Setting the 3/4 Mode
To change the position the liftgate
stops at when opening:
1. Select MAX or 3/4 mode and power open the liftgate.
Page 46 of 377
Buick Envision Owner Manual (GMNA-Localizing-U.S./Canada/Mexico-
12032235) - 2019 - CRC - 6/27/18
Keys, Doors, and Windows 45
On Solid :Vehicle is secured
during the delay to arm the system.
Fast Flash : Vehicle is unsecured.
A door, the hood, or the liftgate
is open.
Slow Flash : Alarm system is
armed.
Arming the Alarm System
1. Turn off the vehicle.
2. Lock the vehicle in one of three ways:
.Use the RKE transmitter.
. Use the Keyless Access
system.
. With a door open, press the
inside
Q.
3. After 30 seconds the alarm system will arm, and the
indicator light will begin to
slowly flash indicating the
alarm system is operating.
Pressing
Qon the RKE
transmitter a second time will bypass the 30-second delay
and immediately arm the alarm
system.
If the driver door is opened without
first unlocking with the RKE
transmitter, the horn will chirp and
the lights will flash to indicate
pre-alarm. If the vehicle is not
started, or the door is not unlocked
by pressing
Kon the RKE
transmitter during the 10-second
pre-alarm, the alarm will be
activated.
The aIarm will also be activated if a
door, the hood, or the liftgate is
opened without first disarming the
system. When the alarm is
activated, the turn signals will flash
and the horn will sound for about
30 seconds. The alarm system will
then re-arm to monitor for the next
unauthorized event.
Disarming the Alarm System
To disarm the alarm system or turn
off the alarm if it has been activated:
. Press
Kon the RKE transmitter. .
Unlock the vehicle using the
Keyless Access system.
. Start the vehicle.
To avoid setting off the alarm by
accident:
. Lock the vehicle after all
occupants have exited.
. Always unlock the vehicle with
the RKE transmitter, or use the
Keyless Access system.
Unlocking the driver door with the
key will not disarm the system or
turn off the alarm.
How to Detect a Tamper
Condition
IfKis pressed on the RKE
transmitter and the horn chirps and
the lights flash three times, an alarm
occurred previously while the alarm
system was armed.
If the alarm has been activated, a
message will appear on the Driver
Information Center (DIC).
Page 50 of 377

Buick Envision Owner Manual (GMNA-Localizing-U.S./Canada/Mexico-
12032235) - 2019 - CRC - 6/27/18
Keys, Doors, and Windows 49
The vehicle aerodynamics are
designed to improve fuel economy
performance. This may result in a
pulsing sound when either rear
window is down and the front
windows are up. To reduce the
sound, open either a front window
or the sunroof, if equipped.
Power Windows
{Warning
Children could be seriously
injured or killed if caught in the
path of a closing window. Never
leave the Remote Keyless Entry
(RKE) transmitter in a vehicle with
children. When there are children
in the rear seat, use the window
lockout switch to prevent
operation of the windows. See
Keys027.Power windows work when the
ignition is on, in ACC/ACCESSORY,
or when Retained Accessory Power
(RAP) is active. See Retained
Accessory Power (RAP) 0194.
Using the window switch, press to
open or pull to close the window.
The windows may be temporarily
disabled if they are used repeatedly
within a short time.
Window Lockout
This feature stops the rear window
switches from working.
. PressZto engage the rear
window lockout feature. The
indicator light is on when
engaged.
. Press
Zagain to disengage.
This also disables the rear power
door locks. See Safety Locks039.
Window Express Movement
All windows can be opened without
holding the window switch. Press
the switch down fully and quickly
release to express open the
window.
Page 51 of 377

Buick Envision Owner Manual (GMNA-Localizing-U.S./Canada/Mexico-
12032235) - 2019 - CRC - 6/27/18
50 Keys, Doors, and Windows
If equipped, pull the window switch
up fully and quickly release to
express close the window.
Briefly press or pull the window
switch in the same direction to stop
that window’s express movement.
Window Automatic Reversal
System
The express-close feature will
reverse window movement if it
comes in contact with an object.
Extreme cold or ice could cause the
window to auto-reverse. The
window will operate normally after
the object or condition is removed.
Automatic Reversal System
Override
{Warning
If automatic reversal system
override is active, the window will
not reverse automatically. You or
others could be injured and the
window could be damaged.
Before using automatic reversal(Continued)
Warning (Continued)
system override, make sure that
all people and obstructions are
clear of the window path.
When the engine is on, override the
automatic reversal system by pulling
and holding the window switch if
conditions prevent it from closing.
Programming the Power
Windows
Programming may be necessary if
the vehicle battery has been
disconnected or discharged. If the
window is unable to express-up,
program each express-close
window: 1. Close all doors.
2. Turn the ignition on or to ACC/ ACCESSORY. 3. Partially open the window to be
programmed. Then close it and
continue to pull the switch
briefly after the window has
fully closed.
4. Open the window and continue to press the switch briefly after
the window has fully opened.
Sun Visors
Pull the sun visor down to block
glare. Detach the sun visor from the
center mount to pivot to the side
window and, if equipped, extend
along the rod.
Page 55 of 377
Buick Envision Owner Manual (GMNA-Localizing-U.S./Canada/Mexico-
12032235) - 2019 - CRC - 6/27/18
54 Seats and Restraints
Head Restraints
Front Seats
The vehicle's front seats have
adjustable head restraints in the
outboard seating positions.
{Warning
With head restraints that are not
installed and adjusted properly,
there is a greater chance that
occupants will suffer a neck/
spinal injury in a crash. Do not
drive until the head restraints for
all occupants are installed and
adjusted properly.
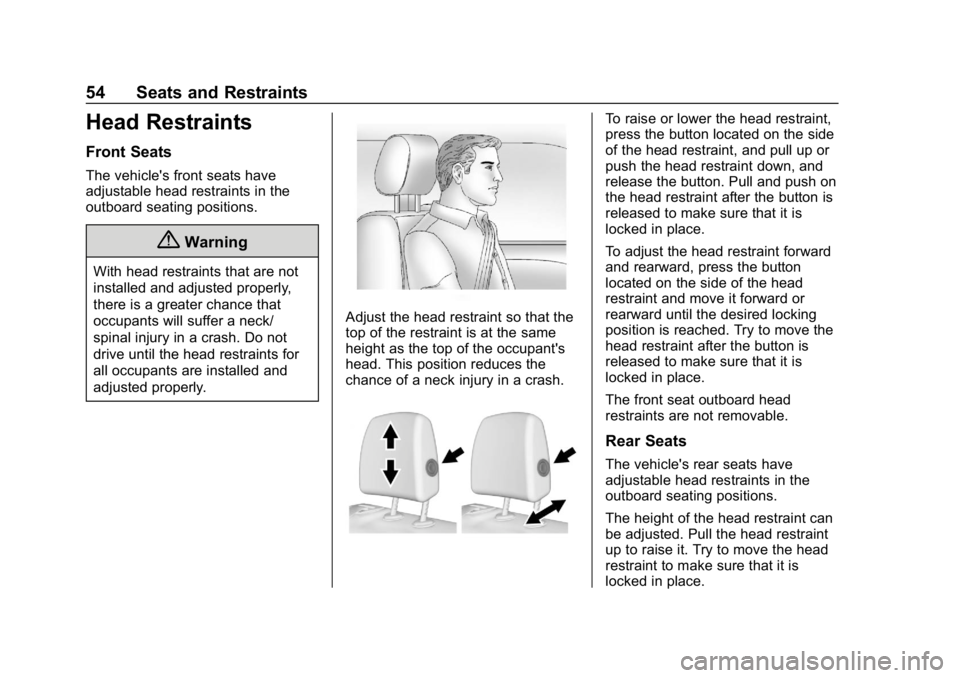
Adjust the head restraint so that the
top of the restraint is at the same
height as the top of the occupant's
head. This position reduces the
chance of a neck injury in a crash.
To raise or lower the head restraint,
press the button located on the side
of the head restraint, and pull up or
push the head restraint down, and
release the button. Pull and push on
the head restraint after the button is
released to make sure that it is
locked in place.
To adjust the head restraint forward
and rearward, press the button
located on the side of the head
restraint and move it forward or
rearward until the desired locking
position is reached. Try to move the
head restraint after the button is
released to make sure that it is
locked in place.
The front seat outboard head
restraints are not removable.
Rear Seats
The vehicle's rear seats have
adjustable head restraints in the
outboard seating positions.
The height of the head restraint can
be adjusted. Pull the head restraint
up to raise it. Try to move the head
restraint to make sure that it is
locked in place.
Page 56 of 377
Buick Envision Owner Manual (GMNA-Localizing-U.S./Canada/Mexico-
12032235) - 2019 - CRC - 6/27/18
Seats and Restraints 55
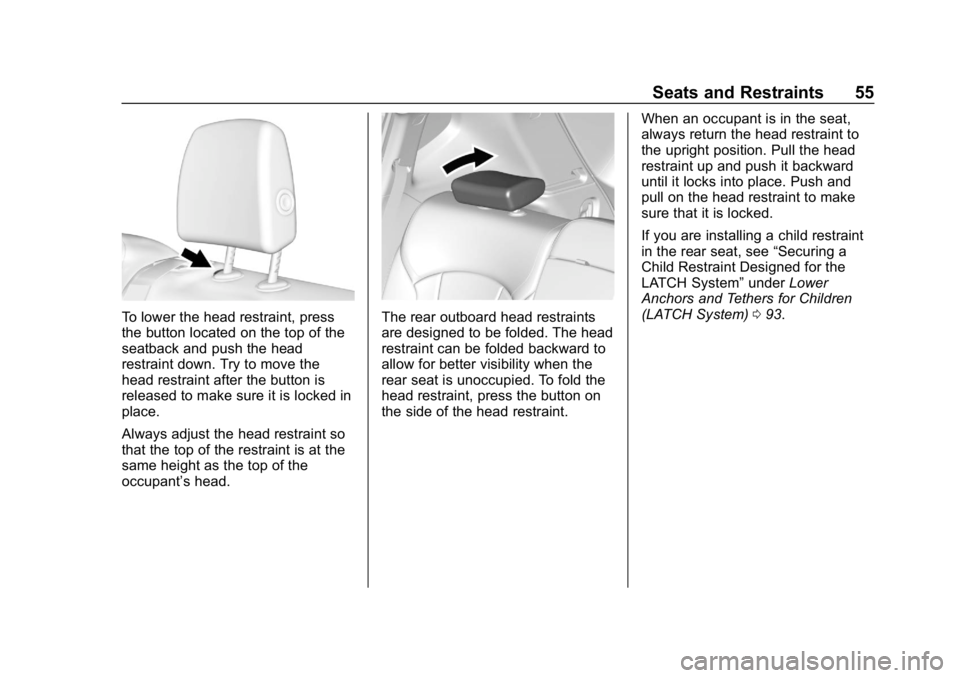
To lower the head restraint, press
the button located on the top of the
seatback and push the head
restraint down. Try to move the
head restraint after the button is
released to make sure it is locked in
place.
Always adjust the head restraint so
that the top of the restraint is at the
same height as the top of the
occupant’s head.The rear outboard head restraints
are designed to be folded. The head
restraint can be folded backward to
allow for better visibility when the
rear seat is unoccupied. To fold the
head restraint, press the button on
the side of the head restraint.When an occupant is in the seat,
always return the head restraint to
the upright position. Pull the head
restraint up and push it backward
until it locks into place. Push and
pull on the head restraint to make
sure that it is locked.
If you are installing a child restraint
in the rear seat, see
“Securing a
Child Restraint Designed for the
LATCH System” underLower
Anchors and Tethers for Children
(LATCH System) 093.
Page 58 of 377
Buick Envision Owner Manual (GMNA-Localizing-U.S./Canada/Mexico-
12032235) - 2019 - CRC - 6/27/18
Seats and Restraints 57
Thigh Support
Adjustment
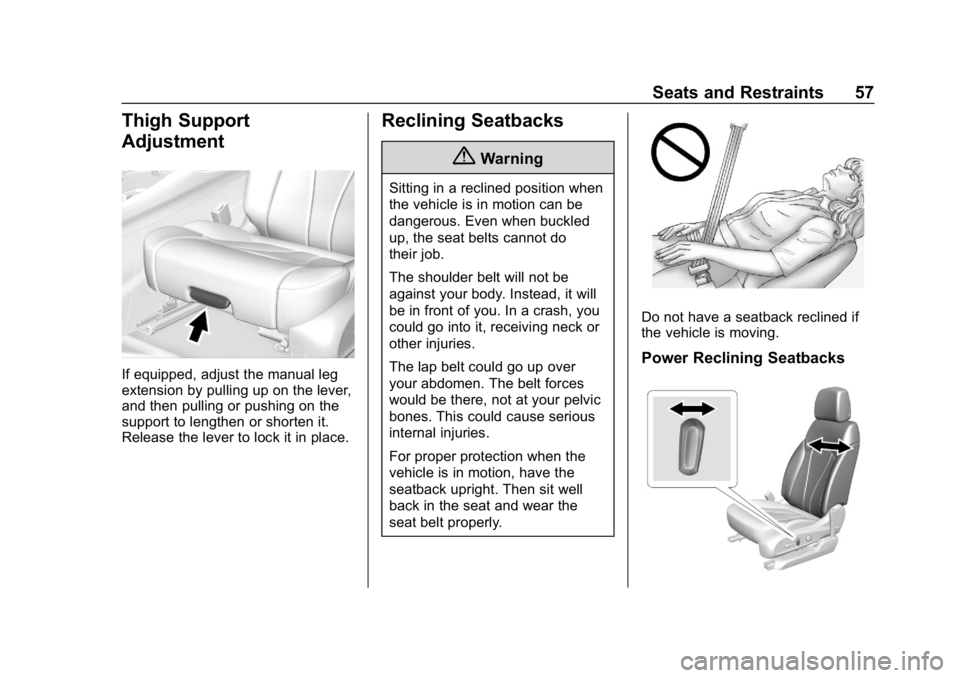
If equipped, adjust the manual leg
extension by pulling up on the lever,
and then pulling or pushing on the
support to lengthen or shorten it.
Release the lever to lock it in place.
Reclining Seatbacks
{Warning
Sitting in a reclined position when
the vehicle is in motion can be
dangerous. Even when buckled
up, the seat belts cannot do
their job.
The shoulder belt will not be
against your body. Instead, it will
be in front of you. In a crash, you
could go into it, receiving neck or
other injuries.
The lap belt could go up over
your abdomen. The belt forces
would be there, not at your pelvic
bones. This could cause serious
internal injuries.
For proper protection when the
vehicle is in motion, have the
seatback upright. Then sit well
back in the seat and wear the
seat belt properly.
Do not have a seatback reclined if
the vehicle is moving.
Power Reclining Seatbacks
Page 61 of 377
Buick Envision Owner Manual (GMNA-Localizing-U.S./Canada/Mexico-
12032235) - 2019 - CRC - 6/27/18
60 Seats and Restraints
Auto Memory Recall
The vehicle identifies the number of
the current driver’s RKE transmitter
(1–8). See Remote Keyless Entry
(RKE) System Operation 028. If the
RKE transmitter is 1 or 2, and Auto
Memory Recall is programmed on in
vehicle personalization, the
positions saved to the same
memory button number 1 or 2 are
automatically recalled when the
ignition is turned on, or turned from
off to ACC/ACCESSORY. RKE
transmitters 3–8 will not provide
automatic memory recalls.
To turn Auto Memory Recall on or
off, see "Vehicle Personalization
Settings" previously in this section
and Vehicle Personalization 0150.
The shift lever must be in P (Park)
to start Auto Memory Recall. Auto
Memory Recall will complete if the
vehicle is shifted out of P (Park)
prior to reaching the saved memory
position. To stop Auto Memory Recall
movement, turn the ignition off or
press any of the following controls:
.
Power seat
. Memory SET, 1, 2, or
B
.Power mirror, with the driver or
passenger side mirror selected
. Power steering wheel,
if equipped
If the saved memory seat position
does not automatically recall or
recalls to the wrong positions, the
driver ’s RKE transmitter number (1
or 2) may not match the memory
button number that positions were
saved to. Try saving the position to
the other memory button or try the
other RKE transmitter.
Easy Exit Recall
Easy Exit Recall is not linked to an
RKE transmitter. The position saved
to
Bis used for all drivers. To turn
Easy Exit Recall on or off, see
"Vehicle Personalization Settings"
previously in this section and
Vehicle Personalization 0150. If turned on, the position saved to
Bis automatically recalled when
one of the following occurs:
. The vehicle is turned off and the
driver door is opened within a
short time.
. The vehicle is turned off with the
driver door open.
To stop Easy Exit Recall movement,
press any of the following memory
controls:
. Power seat
. Memory SET, 1, 2, or
B
.Power mirror, with the driver or
passenger side mirror selected
. Power steering wheel,
if equipped
Obstructions
If something has blocked the driver
seat and/or power steering wheel
while recalling a memory position,
the recall may stop. Remove the
obstruction and try the recall again.
If the memory position still does not
recall, see your dealer for service.
Page 64 of 377
Buick Envision Owner Manual (GMNA-Localizing-U.S./Canada/Mexico-
12032235) - 2019 - CRC - 6/27/18
Seats and Restraints 63
Reclining the Seatbacks
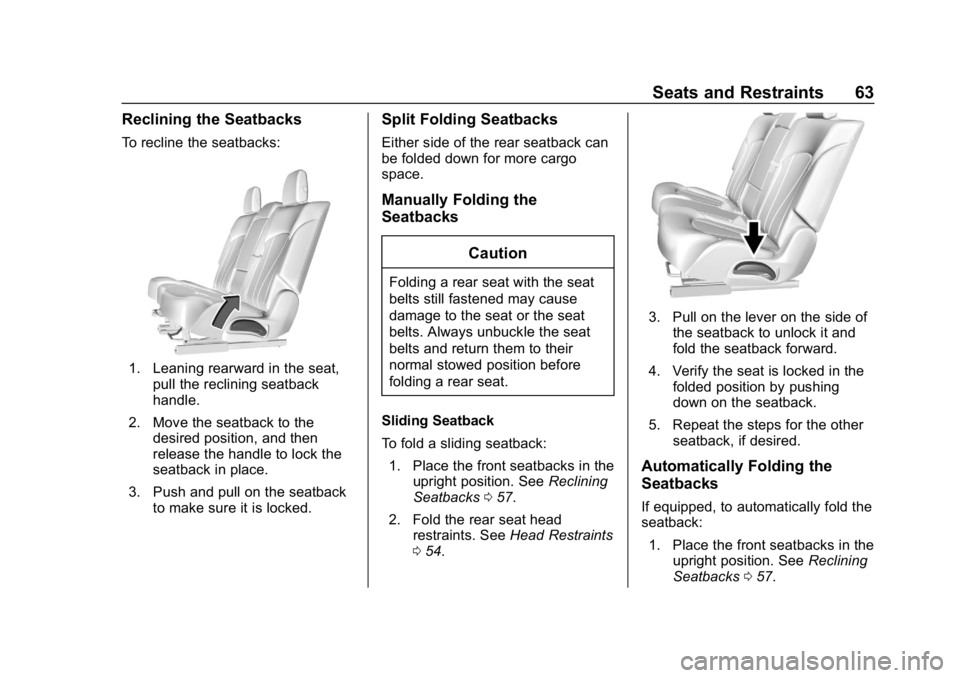
To recline the seatbacks:
1. Leaning rearward in the seat,pull the reclining seatback
handle.
2. Move the seatback to the desired position, and then
release the handle to lock the
seatback in place.
3. Push and pull on the seatback to make sure it is locked.
Split Folding Seatbacks
Either side of the rear seatback can
be folded down for more cargo
space.
Manually Folding the
Seatbacks
Caution
Folding a rear seat with the seat
belts still fastened may cause
damage to the seat or the seat
belts. Always unbuckle the seat
belts and return them to their
normal stowed position before
folding a rear seat.
Sliding Seatback
To fold a sliding seatback: 1. Place the front seatbacks in the upright position. See Reclining
Seatbacks 057.
2. Fold the rear seat head restraints. See Head Restraints
0 54.
3. Pull on the lever on the side of
the seatback to unlock it and
fold the seatback forward.
4. Verify the seat is locked in the folded position by pushing
down on the seatback.
5. Repeat the steps for the other seatback, if desired.
Automatically Folding the
Seatbacks
If equipped, to automatically fold the
seatback:
1. Place the front seatbacks in the upright position. See Reclining
Seatbacks 057.