clock BUICK ENVISION 2019 Owner's Manual
[x] Cancel search | Manufacturer: BUICK, Model Year: 2019, Model line: ENVISION, Model: BUICK ENVISION 2019Pages: 377, PDF Size: 6.03 MB
Page 8 of 377

Buick Envision Owner Manual (GMNA-Localizing-U.S./Canada/Mexico-
12032235) - 2019 - CRC - 6/27/18
In Brief 7
1.Air Vents 0174.
2. Turn Signal Lever. See Turn
and Lane-Change Signals
0 164.
3. Instrument Cluster 0122.
Driver Information Center
Display. See Driver Information
Center (DIC) (Base Level)
0 140 orDriver Information
Center (DIC) (Uplevel) 0143.
4. Windshield Wiper/Washer
0113.
Rear Window Wiper/Washer
0 115.
5. Hazard Warning Flashers
0163.
6. Infotainment 0168.
7. Light Sensor. See Automatic
Headlamp System 0163.
8. Lane Keep Assist (LKA) 0228
(If Equipped).
Assistance Systems for
Parking or Backing 0217 (If
Equipped). Stop/Start Disable Switch. See
Starting the Engine
0191.
9. Clock 0116.
10. Heated and Ventilated Front
Seats 061 (If Equipped).
11. Dual Automatic Climate Control
System 0169.
12. Traction Control/Electronic
Stability Control 0203.
13. Electric Parking Brake 0201.
14. Shift Lever. See Automatic
Transmission 0197.
15. ENGINE START/STOP Button. SeeIgnition Positions 0189.
16. Steering Wheel Controls 0113.
Driver Information Center (DIC)
Buttons. See Driver Information
Center (DIC) (Base Level)
0 140 orDriver Information
Center (DIC) (Uplevel) 0143.
17. Horn 0113.
18. Steering Wheel Adjustment
0113 (Out of View).
19. Cruise Control 0205. Adaptive Cruise Control
0208
(If Equipped).
Heated Steering Wheel 0113
(If Equipped).
Forward Collision Alert (FCA)
System 0222 (If Equipped).
20. Data Link Connector (DLC) (Out of View). See Malfunction
Indicator Lamp (Check Engine
Light) 0132.
21. Front Storage 0106.
22. Instrument Panel Illumination
Control 0165.
Head-Up Display (HUD) 0145
(If Equipped) (Out of View).
23. Exterior Lamp Controls 0160.
Fog Lamps 0164 (If
Equipped).
Page 113 of 377
Buick Envision Owner Manual (GMNA-Localizing-U.S./Canada/Mexico-
12032235) - 2019 - CRC - 6/27/18
112 Instruments and Controls
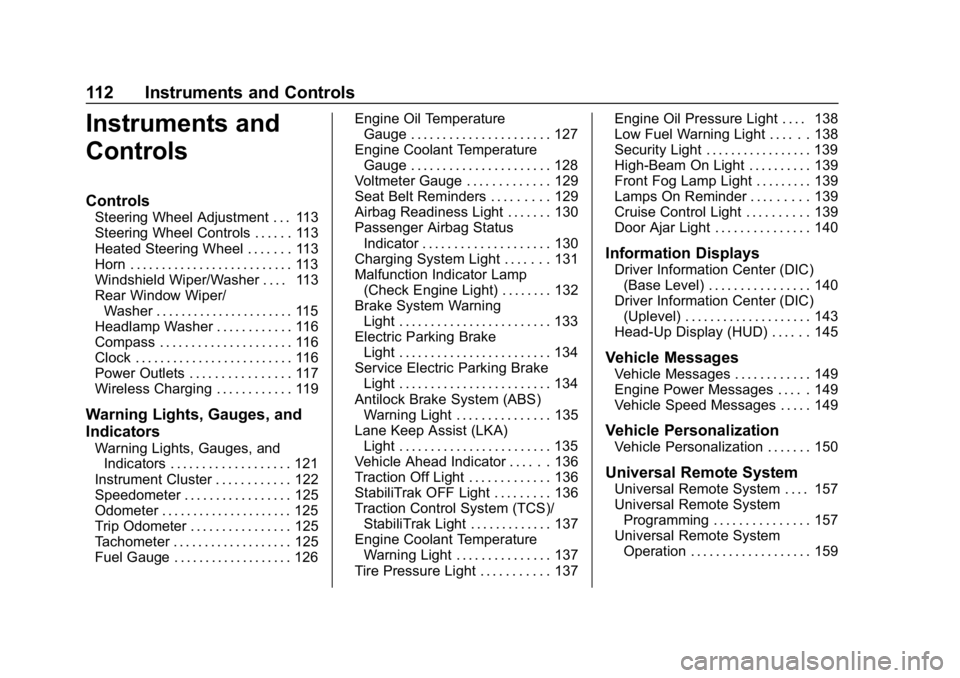
Instruments and
Controls
Controls
Steering Wheel Adjustment . . . 113
Steering Wheel Controls . . . . . . 113
Heated Steering Wheel . . . . . . . 113
Horn . . . . . . . . . . . . . . . . . . . . . . . . . . 113
Windshield Wiper/Washer . . . . 113
Rear Window Wiper/Washer . . . . . . . . . . . . . . . . . . . . . . 115
Headlamp Washer . . . . . . . . . . . . 116
Compass . . . . . . . . . . . . . . . . . . . . . 116
Clock . . . . . . . . . . . . . . . . . . . . . . . . . 116
Power Outlets . . . . . . . . . . . . . . . . 117
Wireless Charging . . . . . . . . . . . . 119
Warning Lights, Gauges, and
Indicators
Warning Lights, Gauges, and Indicators . . . . . . . . . . . . . . . . . . . 121
Instrument Cluster . . . . . . . . . . . . 122
Speedometer . . . . . . . . . . . . . . . . . 125
Odometer . . . . . . . . . . . . . . . . . . . . . 125
Trip Odometer . . . . . . . . . . . . . . . . 125
Tachometer . . . . . . . . . . . . . . . . . . . 125
Fuel Gauge . . . . . . . . . . . . . . . . . . . 126 Engine Oil Temperature
Gauge . . . . . . . . . . . . . . . . . . . . . . 127
Engine Coolant Temperature Gauge . . . . . . . . . . . . . . . . . . . . . . 128
Voltmeter Gauge . . . . . . . . . . . . . 129
Seat Belt Reminders . . . . . . . . . 129
Airbag Readiness Light . . . . . . . 130
Passenger Airbag Status
Indicator . . . . . . . . . . . . . . . . . . . . 130
Charging System Light . . . . . . . 131
Malfunction Indicator Lamp (Check Engine Light) . . . . . . . . 132
Brake System Warning Light . . . . . . . . . . . . . . . . . . . . . . . . 133
Electric Parking Brake Light . . . . . . . . . . . . . . . . . . . . . . . . 134
Service Electric Parking Brake Light . . . . . . . . . . . . . . . . . . . . . . . . 134
Antilock Brake System (ABS) Warning Light . . . . . . . . . . . . . . . 135
Lane Keep Assist (LKA) Light . . . . . . . . . . . . . . . . . . . . . . . . 135
Vehicle Ahead Indicator . . . . . . 136
Traction Off Light . . . . . . . . . . . . . 136
StabiliTrak OFF Light . . . . . . . . . 136
Traction Control System (TCS)/ StabiliTrak Light . . . . . . . . . . . . . 137
Engine Coolant Temperature Warning Light . . . . . . . . . . . . . . . 137
Tire Pressure Light . . . . . . . . . . . 137 Engine Oil Pressure Light . . . . 138
Low Fuel Warning Light . . . . . . 138
Security Light . . . . . . . . . . . . . . . . . 139
High-Beam On Light . . . . . . . . . . 139
Front Fog Lamp Light . . . . . . . . . 139
Lamps On Reminder . . . . . . . . . 139
Cruise Control Light . . . . . . . . . . 139
Door Ajar Light . . . . . . . . . . . . . . . 140
Information Displays
Driver Information Center (DIC)
(Base Level) . . . . . . . . . . . . . . . . 140
Driver Information Center (DIC) (Uplevel) . . . . . . . . . . . . . . . . . . . . 143
Head-Up Display (HUD) . . . . . . 145
Vehicle Messages
Vehicle Messages . . . . . . . . . . . . 149
Engine Power Messages . . . . . 149
Vehicle Speed Messages . . . . . 149
Vehicle Personalization
Vehicle Personalization . . . . . . . 150
Universal Remote System
Universal Remote System . . . . 157
Universal Remote System Programming . . . . . . . . . . . . . . . 157
Universal Remote System Operation . . . . . . . . . . . . . . . . . . . 159
Page 117 of 377
Buick Envision Owner Manual (GMNA-Localizing-U.S./Canada/Mexico-
12032235) - 2019 - CRC - 6/27/18
116 Instruments and Controls
OFF :Turns the system off.
INT : Intermittent wipes.
ON : Slow wipes.
1:Push the windshield wiper
lever forward to spray washer fluid
on the rear window. The lever
automatically returns to its original
position when released.
Reverse Gear Wipes
If the rear wiper control is off, the
rear wiper will automatically operate
continuously when the shift lever is
in R (Reverse), and the front
windshield wiper is performing low
or high speed wipes. If the rear
wiper control is off, the shift lever is
in R (Reverse), and the front
windshield wiper is performing
interval wipes, then the rear wiper
automatically performs interval
wipes.
This feature can be turned on or off.
See Vehicle Personalization 0150. The windshield washer reservoir is
used for the windshield and rear
window. Check the fluid level if
either washer is not working. See
Washer Fluid
0261.
Headlamp Washer
If equipped with headlamp washers,
they are located to the side of the
headlamps.
The headlamps must be on in order
to use the headlamp washers. If the
headlamps are not on, only the
windshield will be washed.
Pull the wiper lever toward you and
hold briefly to activate. The
headlamp washers will spray once,
pause, and spray again. The
headlamp washers will spray again
after five windshield wash cycles.
To refill the windshield washer fluid,
see Washer Fluid 0261.
Compass
The vehicle may have a compass
display on the Driver Information
Center (DIC). The compass receives its heading and other information
from the Global Positioning
System (GPS) antenna, StabiliTrak/
Electronic Stability Control (ESC),
and vehicle speed information.
The compass system is designed to
operate for a certain number of
miles or degrees of turn before
needing a signal from the GPS
satellites. When the compass
display shows CAL, drive the
vehicle for a short distance in an
open area where it can receive a
GPS signal. The compass system
will automatically determine when a
GPS signal is restored and provide
a heading again.
Clock
Setting the Digital Clock
The infotainment system controls
are used to access the time and
date settings through the menu
system. See
“Using the System” in
the infotainment manual.
Page 118 of 377
Buick Envision Owner Manual (GMNA-Localizing-U.S./Canada/Mexico-
12032235) - 2019 - CRC - 6/27/18
Instruments and Controls 117
To set the time:1. Touch SETTINGS from the Home Page, then touch Time
and Date.
2. Touch Set Time and touch
«
orªto increase or decrease
hours, minutes, and AM or PM.
Touch 12–24 Hr for 12 or
24 hour clock.
3. Touch
Sto go back to the
previous menu.
Auto Set requires an active OnStar
or connected service plan.
If auto timing is set, the time
displayed on the clock may not
update immediately when driving
into a new time zone.
To set the date: 1. Touch SETTINGS from the Home Page, then touch Time
and Date.
2. Touch Set Date and touch
«
orªto increase or decrease
month, day, or year. 3. Touch
Sto go back to the
previous menu.
To set the clock display: 1. Touch SETTINGS and touch Time and Date.
2. Touch Clock Display and touch Off or On to turn the clock
display off or on.
3. Touch
Sto go back to the
previous menu.
Setting the Analog Clock
The clock on the center stack is not
connected to any other vehicle
system. To adjust the time:
1. Press and hold the button next to the clock to quickly advance
the time.
2. Press and release the button to increase the time by
one-minute intervals.
Power Outlets
The vehicle has four 12-volt
accessory power outlets, which can
be used to plug in electrical
equipment, such as a cell phone or
MP3 player.
There are power outlets:
.On the center floor console.
. Inside the center floor console.
. On the rear of the center floor
console.
. In the rear cargo area.
To use the outlet, remove the cover.
Caution
Leaving electrical equipment
plugged in for an extended period
of time while the vehicle is off will
drain the battery. Always unplug
electrical equipment when not in
use and do not plug in equipment
that exceeds the maximum
20 amp rating.
Page 151 of 377
Buick Envision Owner Manual (GMNA-Localizing-U.S./Canada/Mexico-
12032235) - 2019 - CRC - 6/27/18
150 Instruments and Controls
Vehicle
Personalization
The audio system controls are used
to access the personalization
menus for customizing vehicle
features. See“Using the System” in
the infotainment manual.
The following are all possible
personalization features. Depending
on the vehicle, some may not be
available.
To access the personalization
menus:
1. Select SETTINGS on the Home Page of the infotainment
system display.
2. Select the desired feature to display a list of available
options.
3. Select the desired option.
4. Select the desired option setting.
5. Press
SBACK to return to the
previous menu.
Personalization Menus
The following list of features may be
available:
. Time and Date
. Rear Seat Reminder
. Language
. Valet Mode
. Teen Driver
. Radio
. Vehicle
. Bluetooth
. Apple CarPlay
. Android Auto
. Voice
. Display
. Rear Camera
. Return to Factory Settings
. Software Information
. Wi-Fi
Each menu is detailed in the
following information.
Time and Date
Manually set the time and date. See
Clock 0116.
Rear Seat Reminder
This allows for a chime and a
message when the rear door has
been opened before or during
operation of the vehicle.
Select Off or On.
Language
Select Language, then select from
the available language(s).
Valet Mode
To turn Valet Mode on and off, see
“Valet Mode” under“Settings” in the
infotainment manual.
Teen Driver
See “Teen Driver” under“Settings”
in the infotainment manual.
Radio
To manage the radio features, see
“Radio” under“Settings” in the
infotainment manual.
Page 174 of 377
Buick Envision Owner Manual (GMNA-Localizing-U.S./Canada/Mexico-
12032235) - 2019 - CRC - 6/27/18
Climate Controls 173
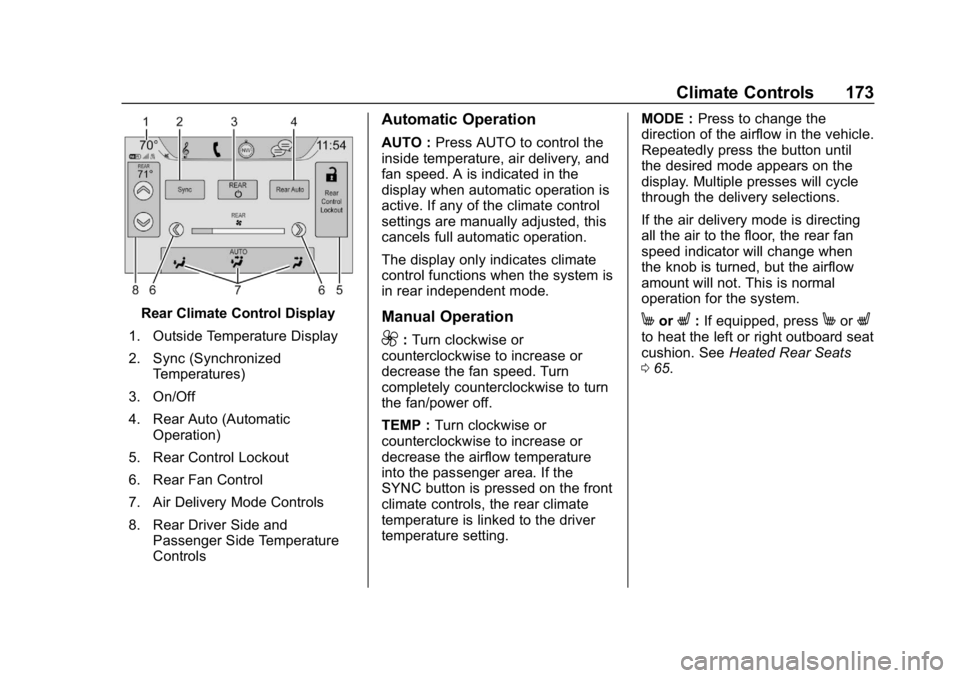
Rear Climate Control Display
1. Outside Temperature Display
2. Sync (Synchronized Temperatures)
3. On/Off
4. Rear Auto (Automatic Operation)
5. Rear Control Lockout
6. Rear Fan Control
7. Air Delivery Mode Controls
8. Rear Driver Side and Passenger Side Temperature
Controls
Automatic Operation
AUTO : Press AUTO to control the
inside temperature, air delivery, and
fan speed. A is indicated in the
display when automatic operation is
active. If any of the climate control
settings are manually adjusted, this
cancels full automatic operation.
The display only indicates climate
control functions when the system is
in rear independent mode.
Manual Operation
9: Turn clockwise or
counterclockwise to increase or
decrease the fan speed. Turn
completely counterclockwise to turn
the fan/power off.
TEMP : Turn clockwise or
counterclockwise to increase or
decrease the airflow temperature
into the passenger area. If the
SYNC button is pressed on the front
climate controls, the rear climate
temperature is linked to the driver
temperature setting. MODE :
Press to change the
direction of the airflow in the vehicle.
Repeatedly press the button until
the desired mode appears on the
display. Multiple presses will cycle
through the delivery selections.
If the air delivery mode is directing
all the air to the floor, the rear fan
speed indicator will change when
the knob is turned, but the airflow
amount will not. This is normal
operation for the system.
MorL: If equipped, pressMorLto heat the left or right outboard seat
cushion. See Heated Rear Seats
0 65.
Page 260 of 377
Buick Envision Owner Manual (GMNA-Localizing-U.S./Canada/Mexico-
12032235) - 2019 - CRC - 6/27/18
Vehicle Care 259
cooling system, including the
coolant surge tank pressure cap, is
cool before you do it.
1. Remove the coolant surge tankpressure cap when the cooling
system, including the coolant
surge tank pressure cap and
upper radiator hose, is no
longer hot.
Turn the pressure cap slowly
counterclockwise about
one-quarter of a turn. If you
hear a hiss, wait for that to
stop. This will allow any
pressure still left to be vented
out the discharge hose.
2. Keep turning the pressure cap slowly and remove it.
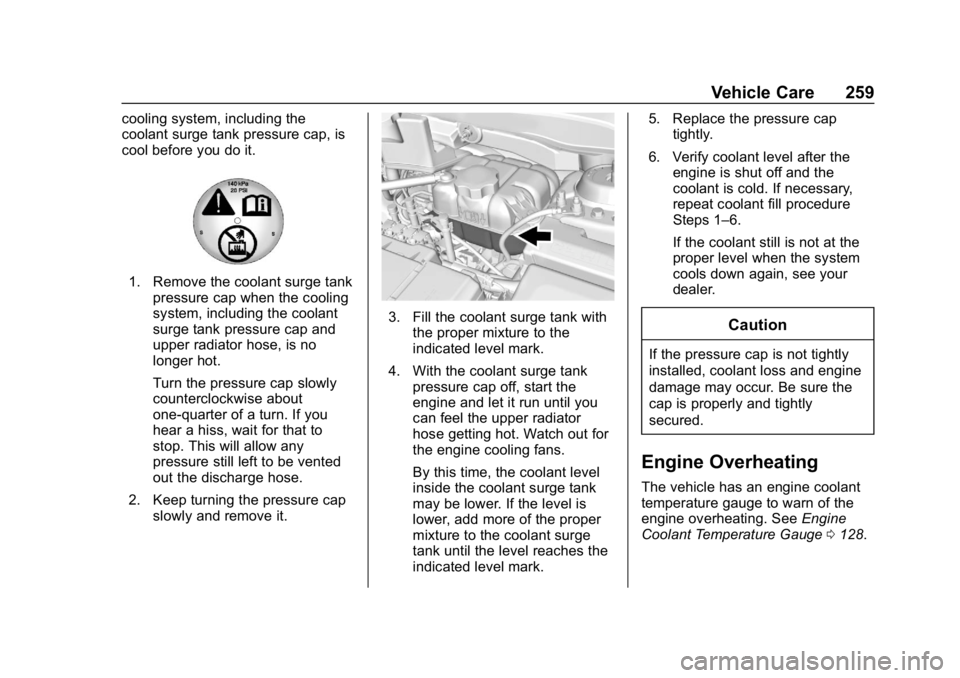
3. Fill the coolant surge tank withthe proper mixture to the
indicated level mark.
4. With the coolant surge tank pressure cap off, start the
engine and let it run until you
can feel the upper radiator
hose getting hot. Watch out for
the engine cooling fans.
By this time, the coolant level
inside the coolant surge tank
may be lower. If the level is
lower, add more of the proper
mixture to the coolant surge
tank until the level reaches the
indicated level mark. 5. Replace the pressure cap
tightly.
6. Verify coolant level after the engine is shut off and the
coolant is cold. If necessary,
repeat coolant fill procedure
Steps 1–6.
If the coolant still is not at the
proper level when the system
cools down again, see your
dealer.Caution
If the pressure cap is not tightly
installed, coolant loss and engine
damage may occur. Be sure the
cap is properly and tightly
secured.
Engine Overheating
The vehicle has an engine coolant
temperature gauge to warn of the
engine overheating. See Engine
Coolant Temperature Gauge 0128.
Page 271 of 377
Buick Envision Owner Manual (GMNA-Localizing-U.S./Canada/Mexico-
12032235) - 2019 - CRC - 6/27/18
270 Vehicle Care
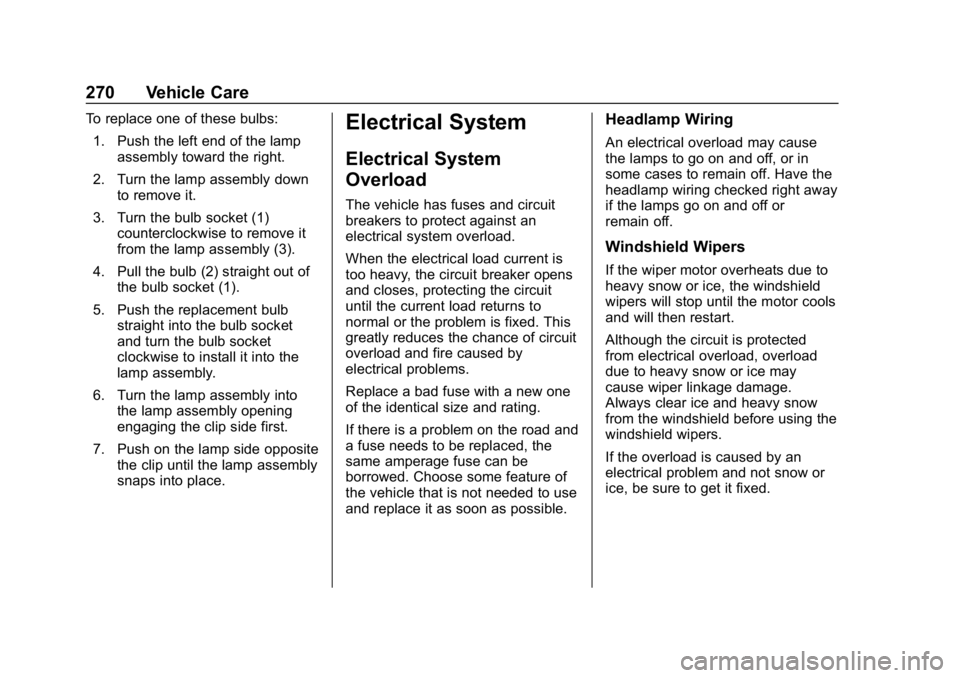
To replace one of these bulbs:1. Push the left end of the lamp assembly toward the right.
2. Turn the lamp assembly down to remove it.
3. Turn the bulb socket (1) counterclockwise to remove it
from the lamp assembly (3).
4. Pull the bulb (2) straight out of the bulb socket (1).
5. Push the replacement bulb straight into the bulb socket
and turn the bulb socket
clockwise to install it into the
lamp assembly.
6. Turn the lamp assembly into the lamp assembly opening
engaging the clip side first.
7. Push on the lamp side opposite the clip until the lamp assembly
snaps into place.Electrical System
Electrical System
Overload
The vehicle has fuses and circuit
breakers to protect against an
electrical system overload.
When the electrical load current is
too heavy, the circuit breaker opens
and closes, protecting the circuit
until the current load returns to
normal or the problem is fixed. This
greatly reduces the chance of circuit
overload and fire caused by
electrical problems.
Replace a bad fuse with a new one
of the identical size and rating.
If there is a problem on the road and
a fuse needs to be replaced, the
same amperage fuse can be
borrowed. Choose some feature of
the vehicle that is not needed to use
and replace it as soon as possible.
Headlamp Wiring
An electrical overload may cause
the lamps to go on and off, or in
some cases to remain off. Have the
headlamp wiring checked right away
if the lamps go on and off or
remain off.
Windshield Wipers
If the wiper motor overheats due to
heavy snow or ice, the windshield
wipers will stop until the motor cools
and will then restart.
Although the circuit is protected
from electrical overload, overload
due to heavy snow or ice may
cause wiper linkage damage.
Always clear ice and heavy snow
from the windshield before using the
windshield wipers.
If the overload is caused by an
electrical problem and not snow or
ice, be sure to get it fixed.
Page 300 of 377
Buick Envision Owner Manual (GMNA-Localizing-U.S./Canada/Mexico-
12032235) - 2019 - CRC - 6/27/18
Vehicle Care 299
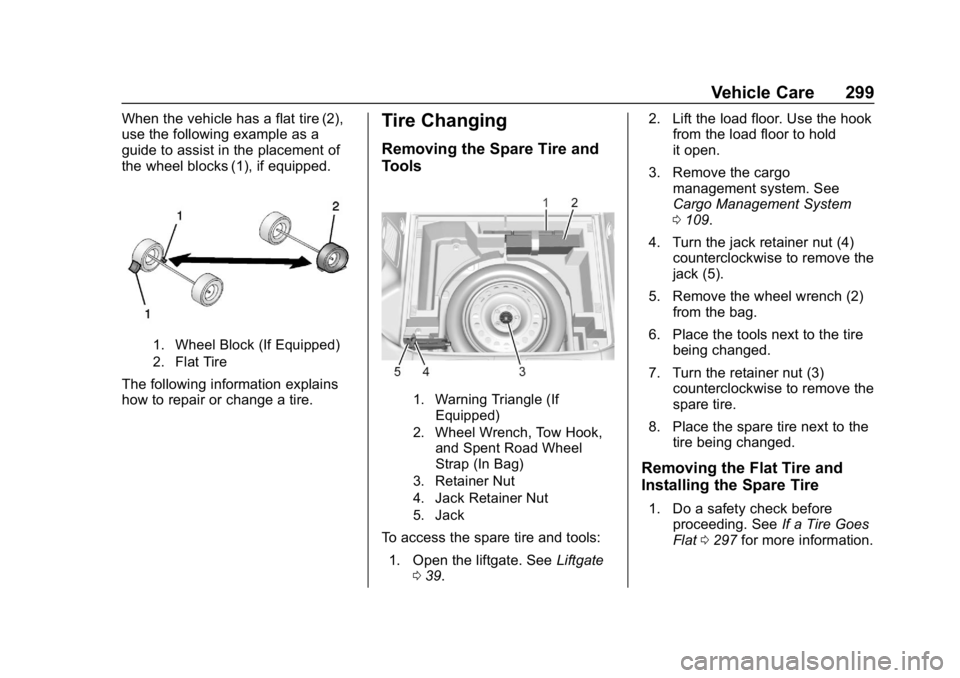
When the vehicle has a flat tire (2),
use the following example as a
guide to assist in the placement of
the wheel blocks (1), if equipped.
1. Wheel Block (If Equipped)
2. Flat Tire
The following information explains
how to repair or change a tire.
Tire Changing
Removing the Spare Tire and
Tools
1. Warning Triangle (IfEquipped)
2. Wheel Wrench, Tow Hook, and Spent Road Wheel
Strap (In Bag)
3. Retainer Nut
4. Jack Retainer Nut
5. Jack
To access the spare tire and tools:
1. Open the liftgate. See Liftgate
0 39. 2. Lift the load floor. Use the hook
from the load floor to hold
it open.
3. Remove the cargo management system. See
Cargo Management System
0109.
4. Turn the jack retainer nut (4) counterclockwise to remove the
jack (5).
5. Remove the wheel wrench (2) from the bag.
6. Place the tools next to the tire being changed.
7. Turn the retainer nut (3) counterclockwise to remove the
spare tire.
8. Place the spare tire next to the tire being changed.
Removing the Flat Tire and
Installing the Spare Tire
1. Do a safety check beforeproceeding. See If a Tire Goes
Flat 0297 for more information.
Page 301 of 377
Buick Envision Owner Manual (GMNA-Localizing-U.S./Canada/Mexico-
12032235) - 2019 - CRC - 6/27/18
300 Vehicle Care
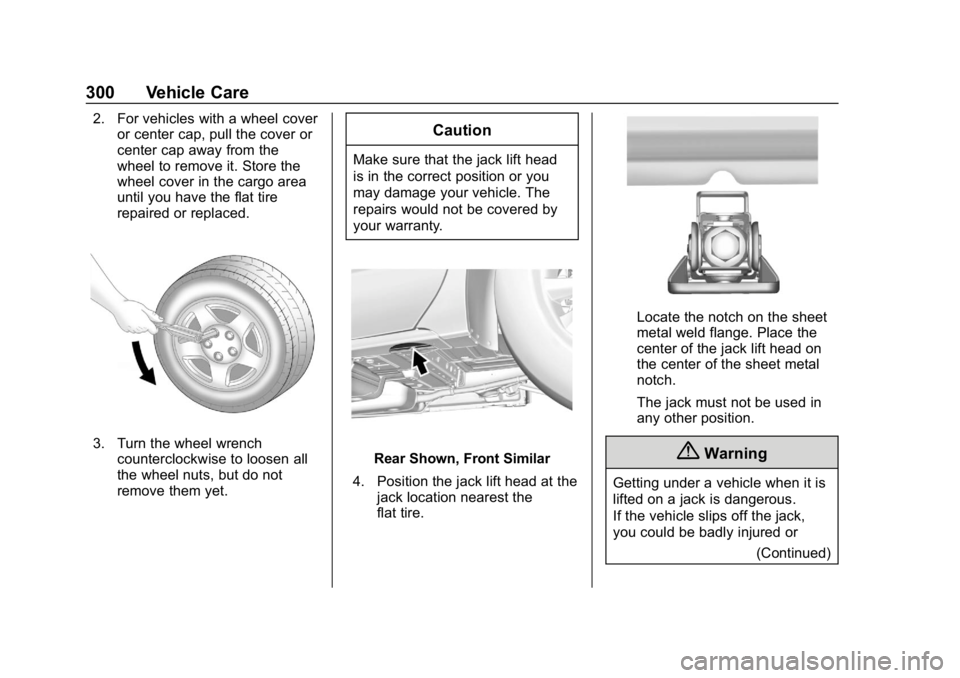
2. For vehicles with a wheel coveror center cap, pull the cover or
center cap away from the
wheel to remove it. Store the
wheel cover in the cargo area
until you have the flat tire
repaired or replaced.
3. Turn the wheel wrench
counterclockwise to loosen all
the wheel nuts, but do not
remove them yet.
Caution
Make sure that the jack lift head
is in the correct position or you
may damage your vehicle. The
repairs would not be covered by
your warranty.
Rear Shown, Front Similar
4. Position the jack lift head at the jack location nearest the
flat tire.
Locate the notch on the sheet
metal weld flange. Place the
center of the jack lift head on
the center of the sheet metal
notch.
The jack must not be used in
any other position.
{Warning
Getting under a vehicle when it is
lifted on a jack is dangerous.
If the vehicle slips off the jack,
you could be badly injured or
(Continued)