Remote Start BUICK ENVISION 2021 User Guide
[x] Cancel search | Manufacturer: BUICK, Model Year: 2021, Model line: ENVISION, Model: BUICK ENVISION 2021Pages: 360, PDF Size: 10.4 MB
Page 25 of 360
Buick E2UB-N Owner Manual (GMNA-Localizing-U.S./Canada/Mexico-
14583509) - 2021 - CRC - 1/8/21
24 Keys, Doors, and Windows
How to Detect a Tamper Condition
IfKis pressed and the horn chirps and the
lights flash three times, the alarm was
activated while the alarm system was
armed.
If the alarm system has been activated, a
message will appear on the DIC.
Immobilizer Operation
This vehicle has a passive theft-deterrent
system.
The system does not have to be manually
armed or disarmed.
The vehicle is automatically immobilized
when the vehicle is turned off.
The immobilization system is disarmed
when the ignition is on or in ACC/
ACCESSORY and a valid remote key is
present in the vehicle.
The security light, in the instrument cluster,
comes on if there is a problem with arming
or disarming the theft-deterrent system.
The system has one or more remote keys
matched to an immobilizer control unit in
your vehicle. Only a correctly matched
remote key will start the vehicle. If the
remote key is ever damaged, you may not
be able to start your vehicle.
When trying to start the vehicle, the
security light may come on briefly when the
ignition is turned on.
If the engine does not start and the security
light stays on, there is a problem with the
system. Turn the ignition off and try again.
If the vehicle will not change ignition modes
(ACC/ACCESSORY, on, off), and the remote
key appears to be undamaged, try another
remote key. Or, you may try placing the
remote key in the front cupholder located in
the center console. See Remote Keyless Entry
(RKE) System Operation 07. If the ignition mode will not change with
the other remote key or in the front
cupholder, your vehicle needs service. If the
ignition does change modes, the first
remote key may be faulty. See your dealer
who can service the theft-deterrent system
and have a new remote key programmed to
the vehicle.
It is possible for the immobilizer system to
learn new or replacement remote keys. Up
to eight remote keys can be programmed
for the vehicle. To program additional
remote keys, see
“Programming Remote
Keys to the Vehicle” underRemote Keyless
Entry (RKE) System Operation 07.
Do not leave the remote key or device that
disarms or deactivates the theft-deterrent
system in the vehicle.
Page 38 of 360
Buick E2UB-N Owner Manual (GMNA-Localizing-U.S./Canada/Mexico-
14583509) - 2021 - CRC - 1/8/21
Seats and Restraints 37
hold 1, 2, orBuntil the saved position is
reached. Follow the instructions under
“Saving Memory Positions.”
The vehicle identifies the current driver’s
remote key number (1–8). See Remote
Keyless Entry (RKE) System Operation 07.
Only remote keys 1 and 2 can be used for
automatic memory recalls. A Driver
Information Center (DIC) welcome message
indicating the remote key number may
display for the first few ignition cycles
following a remote key change. For Seat
Entry Memory to work properly, save the
positions to the memory button (1 or 2)
matching the remote key number displayed
in the DIC welcome message. Carry the
linked remote key when entering the
vehicle.
Vehicle Personalization Settings
.To have the Seat Entry Memory
movement begin when the vehicle is
started, select the Settings menu, then
Vehicle, then Seating Position, and then
Seat Entry Memory. Select On or Off. See
“Seat Entry Memory” later in this section.
.To begin Seat Exit Memory movement
when the vehicle is turned off and the
driver door is opened, or when the vehicle
is turned off with the driver door already opened, select the Settings menu, then
Vehicle, then Seating Position, and then
Seat Exit Memory. Select On or Off. See
“Seat Exit Memory”
later in this section.
.SeeVehicle Personalization 0109 for
additional setting information.
Identifying Driver Number
To identify the driver number: 1. Move your remote key away from the vehicle.
2. Start the vehicle with another remote key. The DIC should display the driver
number for the other remote key. Turn
the vehicle off and remove the remote
key from the vehicle.
3. Start the vehicle with the initial remote key. The DIC should display the driver
number of your remote key.
Saving Memory Positions
Read these instructions completely before
saving memory positions.
To save preferred driving positions 1 and 2: 1. Turn the vehicle on or to ACC/ ACCESSORY with remote key 1 or 2.
A DIC welcome message may indicate
driver number 1 or 2. 2. Adjust all available memory features to
the desired driving position.
3. Press and release SET; a beep will sound.
4. Immediately press and hold the 1 or 2 memory button matching the above
DIC welcome message until two beeps
sound.
If too much time passes between
releasing SET and pressing 1, the
memory position will not be saved and
two beeps will not sound. Repeat
Steps 3 and 4.
1 or 2 corresponds to the driver number.
See “Identifying Driver Number”
previously in this section.
5. Repeat Steps 1–4 for a second driver using 1 or 2.
To save the position for
Band Seat Exit
Memory features, repeat Steps 1–4 using
B. This saves the position for getting out
of the vehicle.
Save preferred memory feature positions to
both 1 and 2 if you are the only driver.
Page 39 of 360
Buick E2UB-N Owner Manual (GMNA-Localizing-U.S./Canada/Mexico-
14583509) - 2021 - CRC - 1/8/21
38 Seats and Restraints
Manually Recalling Memory Positions
Press and hold 1, 2, or
Bto recall the
previously saved memory positions if you
are driver 1 or 2 identified in the DIC
welcome message.
To stop Manual Memory recall movement,
release 1, 2, or
Bor press any of the
following controls:
.Power seat
.Memory SET
.Power mirror, with the driver or
passenger side mirror selected
.Power steering wheel, if equipped
Manual Memory recall movement for 1, 2 or
Bbuttons may be initiated and will
complete to the saved memory position if
the vehicle is shifted in or out of P (Park).
Seat Entry Memory
The vehicle identifies the number of the
current driver’s remote key (1–8). See
Remote Keyless Entry (RKE) System
Operation 07. If the remote key is 1 or 2,
and Seat Entry Memory is enabled in vehicle
personalization, the positions saved to the
same memory button number 1 or 2 are
automatically recalled when the vehicle is turned on, or turned from off to ACC/
ACCESSORY. Remote keys 3–8 will not
provide automatic memory recalls.
To turn Seat Entry Memory on or off, see
“Vehicle Personalization Settings”
previously
in this section and Vehicle Personalization
0 109.
The shift lever must be in P (Park) to start
Seat Entry Memory. Seat Entry Memory
recall will complete if the vehicle is shifted
out of P (Park) prior to reaching the saved
memory position.
To stop Seat Entry Memory recall
movement, turn the vehicle off or press any
of the following controls:.Power seat
.Memory SET, 1, 2, orB
.Power mirror, with the driver or
passenger side mirror selected
.Power steering wheel, if equipped
If the saved memory seat position does not
automatically recall or recalls to the wrong
positions, the driver’s remote key number (1
or 2) may not match the memory button
number that positions were saved to. Try
storing the position to the other memory
button or try the other remote key. Seat Exit Memory
Seat Exit Memory is not linked to a remote
key. The position saved to
Bis used for all
drivers. To turn Seat Exit Memory on or off,
see "Vehicle Personalization Settings"
previously in this section and Vehicle
Personalization 0109.
If turned on, the position saved to
Bis
automatically recalled when one of the
following occurs:
.The vehicle is turned off and the driver
door is opened within a short time.
.The vehicle is turned off with the driver
door open.
To stop Seat Exit Memory movement, press
any of the following memory controls:
.Power seat
.Memory SET, 1, 2, orB
.Power mirror, with the driver or
passenger side mirror selected
.Power steering wheel, if equipped
Page 41 of 360
Buick E2UB-N Owner Manual (GMNA-Localizing-U.S./Canada/Mexico-
14583509) - 2021 - CRC - 1/8/21
40 Seats and Restraints
the vehicle is on. If equipped with a heated
steering wheel, the auto heated steering
wheel activation will follow the heated seat
auto activation and the heated wheel
indicator will follow the state of the steering
wheel heat.
SeeVehicle Personalization 0109.
Remote Start Heated and Ventilated Seats
During a remote start, the heated or
ventilated seats, if equipped, can be turned
on automatically. When it is cold outside,
the heated seats will turn on followed by
the heated steering wheel, if equipped.
When it is hot outside, the ventilated seats
turn on. The heated or ventilated seats are
canceled when the ignition is turned on.
Press the heated or ventilated seat button
to use the heated or ventilated seats after
the vehicle is started.
The heated or ventilated seat indicator lights
may turn on during a remote start.
The temperature performance of an
unoccupied seat may be reduced. This is
normal. The remote start heated or ventilated seats
may be enabled or disabled in the vehicle
personalization menu. See
Remote Vehicle
Start 012 and
Vehicle Personalization 0109.
Rear Seats
Rear Seat Reminder
If equipped, the message REAR SEAT
REMINDER LOOK IN REAR SEAT displays
under certain conditions indicating there
may be an item or passenger in the rear
seat. Check before exiting the vehicle.
This feature will activate when a second row
door is opened while the vehicle is on or up
to 10 minutes before the vehicle is turned
on. There will be an alert when the vehicle
is turned off. The alert does not directly
detect objects in the rear seat; instead,
under certain conditions, it detects when a
rear door is opened and closed, indicating
that there may be something in the
rear seat. The feature is active only once each time
the vehicle is turned on and off, and will
require reactivation by opening and closing
the second row doors. There may be an
alert even when there is nothing in the rear
seat; for example, if a child entered the
vehicle through the rear door and left the
vehicle without the vehicle being shut off.
The feature can be turned on or off. See
Vehicle Personalization
0109.
Folding the Seatback
Either side of the seatback can be folded for
more cargo space. Fold a seatback only
when the vehicle is not moving.
Caution
Folding a rear seat with the seat belts
still fastened may cause damage to the
seat or the seat belts. Always unbuckle
the seat belts and return them to their
normal stowed position before folding a
rear seat.
Page 93 of 360

Buick E2UB-N Owner Manual (GMNA-Localizing-U.S./Canada/Mexico-
14583509) - 2021 - CRC - 1/8/21
92 Instruments and Controls
set the Speed Warning press the
thumbwheel when Speed Warning is
displayed. Use the thumbwheel to adjust
the value and press to set the speed.
Once the speed is set, this feature can be
turned off by pressing the thumbwheel
while viewing this page. If the selected
speed limit is exceeded, a pop-up warning is
displayed with a chime.
Remote Relearn :If equipped, this feature
allows for the vehicle to relearn
remote keys.
See "Programming with Recognized Remote
Keys" under Remote Keyless Entry (RKE)
System Operation 07.
Software Information : Displays open source
software information.
Speedometer
The speedometer shows the vehicle's speed
in either kilometers per hour (km/h) or
miles per hour (mph).
Odometer
The odometer shows how far the vehicle has
been driven, in either kilometers or miles.
Trip Odometer
The trip odometer shows how far the
vehicle has been driven since the trip
odometer was last reset.
The trip odometer is accessed and reset
through the Driver Information Center (DIC).
See Driver Information Center (DIC) 0103.
Tachometer
The tachometer displays the engine speed in
revolutions per minute (rpm).
For vehicles with the Stop/Start system,
when the ignition is on, the tachometer
indicates the vehicle status. When pointing
to AUTO STOP, the engine is off but the
vehicle is on and can move. The engine
could auto start at any time. When the
indicator points to OFF, the vehicle is off.
When the engine is on, the tachometer will
indicate the engine’s revolutions per minute
(rpm). The tachometer may vary by several
hundred rpm, during Auto Stop mode, when
the engine is shutting off and restarting.
Fuel Gauge
When the ignition is on, the fuel gauge
indicates about how much fuel is left in
the tank.
There is an arrow near the fuel gauge
pointing to the side of the vehicle the fuel
door is on.
When the indicator nears empty, the low
fuel light comes on. There still is a little fuel
left, but the vehicle should be refueled soon.
Here are four things that some owners ask
about. None of these show a problem with
the fuel gauge:
.At the service station, the fuel pump
shuts off before the gauge reads full.
Page 113 of 360
Buick E2UB-N Owner Manual (GMNA-Localizing-U.S./Canada/Mexico-
14583509) - 2021 - CRC - 1/8/21
112 Instruments and Controls
Touch Off, 30 Seconds, 60 Seconds,
or 120 Seconds.
Advanced Forward Lighting
This setting automatically adjusts headlights
at corners and curves to provide greater
road illumination.
Touch Off or Curve Lighting.
Automatic High Beam Assist
This setting specifies how the high beams
adjust based on vehicle environment .
Touch IntelliBeam or Adaptive Headlight
System.
Power Door Locks
Touch and the following may display:
.Auto Door Unlock
.Delayed Door Lock
Auto Door Unlock
This setting allows selection of which doors
will automatically unlock when the vehicle is
shifted into P (Park).
Touch Off, All Doors, or Driver Door. Delayed Door Lock
When on, this feature will delay the locking
of the doors. To override the delay, press
the power door lock switch on the door.
Touch Off or On.
Remote Lock, Unlock, and Start
Touch and the following may display:
.Remote Unlock Light Feedback
.Remote Lock Feedback
.Remote Door Unlock
.Remote Start Auto Cool Seats
.Remote Start Auto Heat Seats
.Remote Window Operation
.Passive Door Unlock
.Passive Door Lock
.Remote Left in Vehicle Alert
.Remote Removed From Vehicle Alert
Remote Unlock Light Feedback
When on, the exterior lamps will flash when
unlocking the vehicle with the remote key.
Touch Off or Flash Lights. Remote Lock Feedback
This allows selection of what type of
feedback is given when locking the vehicle
with the remote key.
Touch Off, Lights and Horn, Lights Only,
or Horn Only.
Remote Door Unlock
This allows selection of which doors will
unlock when pressing
Kon the remote key.
Touch All Doors or Driver Door.
Remote Start Auto Cool Seats
This setting automatically turns on the
ventilated seats when using the remote
start function on warm days. See Heated
and Ventilated Front Seats 039 and
Remote Vehicle Start 012.
Touch Off or On.
Remote Start Auto Heat Seats
This setting will automatically turn on the
heated seats when using remote start on
cold days. See Heated and Ventilated Front
Seats 039 and
Remote Vehicle Start 012.
Touch Off or On.
Page 123 of 360
Buick E2UB-N Owner Manual (GMNA-Localizing-U.S./Canada/Mexico-
14583509) - 2021 - CRC - 1/8/21
122 Lighting
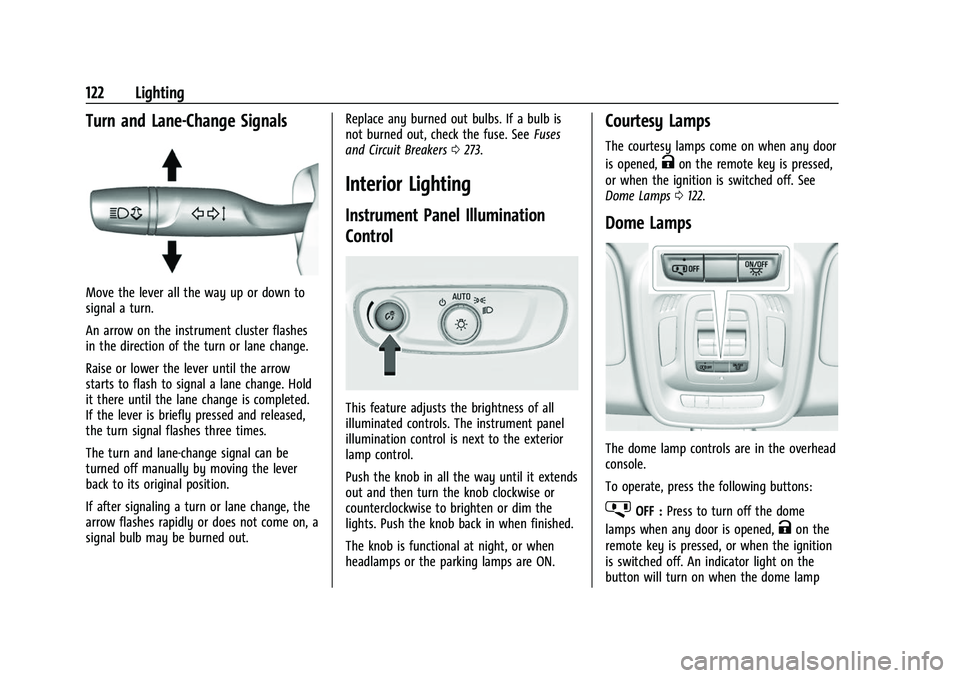
Turn and Lane-Change Signals
Move the lever all the way up or down to
signal a turn.
An arrow on the instrument cluster flashes
in the direction of the turn or lane change.
Raise or lower the lever until the arrow
starts to flash to signal a lane change. Hold
it there until the lane change is completed.
If the lever is briefly pressed and released,
the turn signal flashes three times.
The turn and lane-change signal can be
turned off manually by moving the lever
back to its original position.
If after signaling a turn or lane change, the
arrow flashes rapidly or does not come on, a
signal bulb may be burned out.Replace any burned out bulbs. If a bulb is
not burned out, check the fuse. See
Fuses
and Circuit Breakers 0273.
Interior Lighting
Instrument Panel Illumination
Control
This feature adjusts the brightness of all
illuminated controls. The instrument panel
illumination control is next to the exterior
lamp control.
Push the knob in all the way until it extends
out and then turn the knob clockwise or
counterclockwise to brighten or dim the
lights. Push the knob back in when finished.
The knob is functional at night, or when
headlamps or the parking lamps are ON.
Courtesy Lamps
The courtesy lamps come on when any door
is opened,
Kon the remote key is pressed,
or when the ignition is switched off. See
Dome Lamps 0122.
Dome Lamps
The dome lamp controls are in the overhead
console.
To operate, press the following buttons:
jOFF : Press to turn off the dome
lamps when any door is opened,
Kon the
remote key is pressed, or when the ignition
is switched off. An indicator light on the
button will turn on when the dome lamp
Page 125 of 360
Buick E2UB-N Owner Manual (GMNA-Localizing-U.S./Canada/Mexico-
14583509) - 2021 - CRC - 1/8/21
124 Lighting
remote key. The entry lighting feature for
exterior lighting can be changed by vehicle
locator lights. SeeVehicle Personalization
0 109.
Exit Lighting
Some exterior lamps come on at night, or in
areas with limited lighting, when the driver
door is opened after the ignition is turned
off. The dome lamp comes on when any
door is opened or the ignition is turned OFF.
The exterior lamps and dome lamp remain
on after the door is closed for a set amount
of time, then automatically turn off.
The exterior lamps turn off immediately by
turning the exterior lamp control off.
The exit lighting for exterior lights can be
changed. See Vehicle Personalization 0109.
Battery Load Management
The vehicle has Electric Power Management
(EPM), which estimates the battery's
temperature and state of charge. It then
adjusts the voltage for best performance
and extended life of the battery.
When the battery's state of charge is low,
the voltage is raised slightly to quickly bring
the charge back up. When the state of charge is high, the voltage is lowered
slightly to prevent overcharging. The
voltmeter gauge or the voltage display on
the Driver Information Center (DIC),
if equipped, may show the voltage moving
up or down. This is normal. If there is a
problem, an alert will be displayed.
The battery can be discharged at idle if the
electrical loads are very high. This is true for
all vehicles. This is because the generator
(alternator) may not be spinning fast
enough at idle to produce all the power that
is needed for very high electrical loads.
A high electrical load occurs when several of
the following are on, such as: headlamps,
high beams, fog lamps, rear window
defogger, climate control fan at high speed,
heated seats, engine cooling fans, trailer
loads, and loads plugged into accessory
power outlets.
EPM works to prevent excessive discharge of
the battery. It does this by balancing the
generator's output and the vehicle's
electrical needs. It can increase engine idle
speed to generate more power, whenever
needed. It can temporarily reduce the power
demands of some accessories.
Normally, these actions occur in steps or
levels, without being noticeable. In rare
cases at the highest levels of corrective
action, this action may be noticeable to the
driver. If so, a DIC message might be
displayed and it is recommended that the
driver reduce the electrical loads as much as
possible.
Battery Power Protection
The battery saver feature is designed to
protect the vehicle's battery.
If some interior lamps are left on and the
ignition is turned off, the battery rundown
protection system automatically turns the
lamp off after some time.
Exterior Lighting Battery Saver
The exterior lamps turn off about 10 minutes
after the ignition is turned off, if the parking
lamps or headlamps have been manually
left on. This protects against draining the
battery. To restart the 10-minute timer, turn
the exterior lamp control to the
Oposition
and then back to the
;or2position.
To keep the lamps on for more than
10 minutes, the ignition must be on or in
ACC/ACCESSORY.
Page 162 of 360
Buick E2UB-N Owner Manual (GMNA-Localizing-U.S./Canada/Mexico-
14583509) - 2021 - CRC - 1/8/21
Infotainment System 161
.Types: This setting lists all
Android-defined as dangerous permissions
currently used by the infotainment
system, the number of applications that
have requested this permission, and the
number of applications that are allowed
to use this permission.
.Used By Applications: This setting lists all
applications that are requested or are
using Android-defined as dangerous
permissions. Only requested and active
permissions are shown.
Device Remote Access
Touch and the following may display:
.Remote Access: Allowed devices can
interact with vehicle features and access
data. This feature can be turned off or on.
.Device Permissions: Shows only devices
with an installed app linked to this
vehicle that can request Remote Access.
Display
Touch and the following may display:
.Mode: This adjusts the appearance of the
navigation map view and any
downloaded apps optimized for day or
night time conditions. Set to Auto for the
display to automatically adjust based on
bright/dark conditions. Touch Auto, Day, or Night to adjust the
display.
.Calibrate Touchscreen: Touch to calibrate
the infotainment display and follow the
prompts.
.Turn Display Off: Touch to turn the
display off. Touch anywhere on the
infotainment display or press any
infotainment control on the center stack
again to turn the display on.
Sounds
Touch and the following may display:
.Maximum Startup Volume: This feature
adjusts the maximum volume of the
infotainment system when you start your
vehicle. To set the maximum startup
volume, touch the controls on the
infotainment display to increase or
decrease.
.Audio Cues: This feature determines if
sounds play when the infotainment
system starts up and shuts down. This
feature can be turned off or on.
.Set Audio Cue Volume: This setting
controls the volume of Audio Cues played
on startup and shut down. Touch the
controls on the infotainment display to
increase or decrease.
.Audible Touch Feedback: This setting
determines if a sound plays when
touching the infotainment display or
radio controls. This feature can be turned
off or on.
Voice
Touch and the following may display:
.Confirm More/Less: This setting specifies
how often the voice recognition system
confirms commands. Touch Confirm More
to have the system check with you more
often before acting on your commands.
.Prompt Length: This setting specifies the
amount of detail the voice recognition
system provides when giving you
feedback. Touch Auto to have the system
automatically adjust to your speech
habits. Touch Informative, Short, or Auto.
.Audio Feedback Speed: Touch Slow,
Medium, or Fast to adjust how quickly
the voice recognition system speaks.
.Friendly Prompts: This setting adjusts the
formality of voice prompts. Touch Off for
shorter prompts. Touch On to hear
prompts with more personality. Touch
Auto to have the prompt match your
command style.
Page 167 of 360
Buick E2UB-N Owner Manual (GMNA-Localizing-U.S./Canada/Mexico-
14583509) - 2021 - CRC - 1/8/21
166 Infotainment System
Vehicle
This menu allows adjustment of different
vehicle features. SeeVehicle Personalization
0 109.
Personal
If equipped, this menu allows adjustment of
different user profile settings. See “Users”in
Using the System 0127 for information on
setting up user profiles.
The menu may contain the following:
Name
Touch to edit your user name that will be
displayed in the vehicle.
Vehicle Account Information
Touch to view the vehicle account
information and to change the account
password.
An “unverified user account” pop-up will
display until the account information
verification process has been completed on
the Internet. Check your registered e-mail
account for an activation e-mail to complete
the verification process. Profile Picture
Touch to choose or change your profile
picture.
Profile Identifiers
Touch to have the vehicle recognize the
identifier you choose.
Touch Vehicle Key 1 and/or Vehicle Key 2.
If the remote key is lost or stolen, see your
dealer.
Security
Touch to have your profile secured with
a PIN.
Touch No or Yes.
Vehicle Name
Touch to edit your vehicle name.
Vehicle Account
Touch to view the vehicle account
information and to change the account
password.
Delete Profile
Touch to remove the profile from the
vehicle.
Touch Remove or Cancel.
Teen Driver
If equipped, this allows multiple keys to be
registered for beginner drivers to encourage
safe driving habits. When the vehicle is
started with a Teen Driver key, it will
automatically activate certain safety
systems, allow setting of some features, and
limit the use of others. The Report Card will
record vehicle data about driving behavior
that can be viewed later. When the vehicle
is started with a registered key, the Driver
Information Center (DIC) displays a message
that Teen Driver is active.
To access:
1. Touch Settings on the Home Page, then touch Vehicle, and then Teen Driver.
2. Create a Personal Identification Number (PIN) by choosing a four-digit PIN.
Re-enter the PIN to confirm. To change
the PIN, touch Change PIN.
The PIN is required to:
.Register or unregister keys.
.Change Teen Driver settings.
.Change or clear the Teen Driver PIN.
.Access or delete Report Card data.