keyless BUICK ENVISION 2021 User Guide
[x] Cancel search | Manufacturer: BUICK, Model Year: 2021, Model line: ENVISION, Model: BUICK ENVISION 2021Pages: 360, PDF Size: 10.4 MB
Page 24 of 360
Buick E2UB-N Owner Manual (GMNA-Localizing-U.S./Canada/Mexico-
14583509) - 2021 - CRC - 1/8/21
Keys, Doors, and Windows 23
Vehicle Security
This vehicle has theft-deterrent features;
however, they do not make the vehicle
impossible to steal.
Vehicle Alarm System
This vehicle has an anti-theft alarm system.
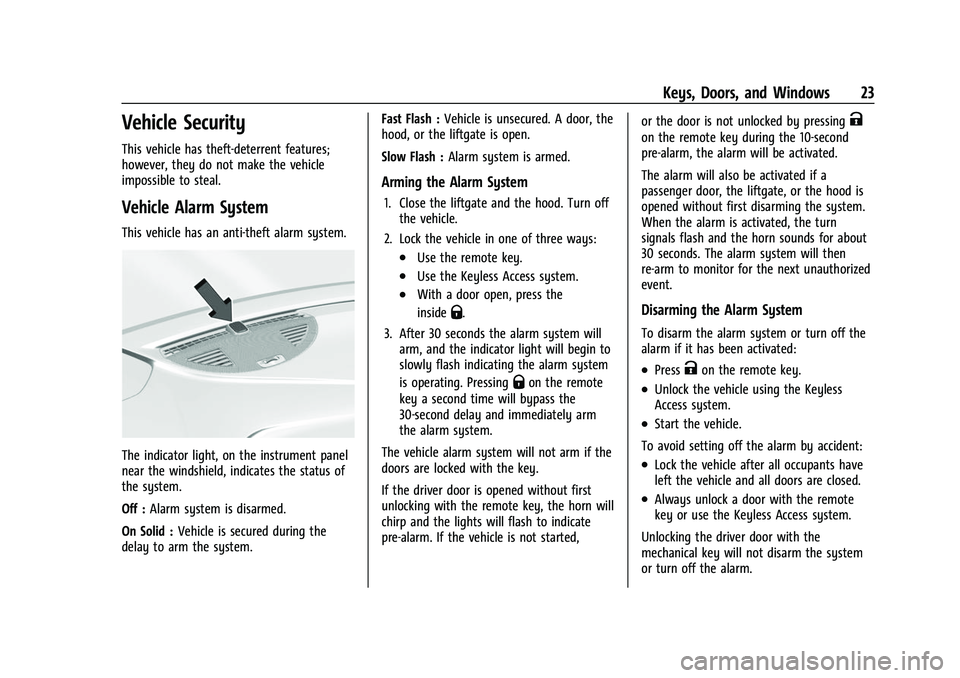
The indicator light, on the instrument panel
near the windshield, indicates the status of
the system.
Off :Alarm system is disarmed.
On Solid : Vehicle is secured during the
delay to arm the system. Fast Flash :
Vehicle is unsecured. A door, the
hood, or the liftgate is open.
Slow Flash : Alarm system is armed.
Arming the Alarm System
1. Close the liftgate and the hood. Turn off
the vehicle.
2. Lock the vehicle in one of three ways:
.Use the remote key.
.Use the Keyless Access system.
.With a door open, press the
inside
Q.
3. After 30 seconds the alarm system will arm, and the indicator light will begin to
slowly flash indicating the alarm system
is operating. Pressing
Qon the remote
key a second time will bypass the
30-second delay and immediately arm
the alarm system.
The vehicle alarm system will not arm if the
doors are locked with the key.
If the driver door is opened without first
unlocking with the remote key, the horn will
chirp and the lights will flash to indicate
pre-alarm. If the vehicle is not started, or the door is not unlocked by pressing
K
on the remote key during the 10-second
pre-alarm, the alarm will be activated.
The alarm will also be activated if a
passenger door, the liftgate, or the hood is
opened without first disarming the system.
When the alarm is activated, the turn
signals flash and the horn sounds for about
30 seconds. The alarm system will then
re-arm to monitor for the next unauthorized
event.
Disarming the Alarm System
To disarm the alarm system or turn off the
alarm if it has been activated:
.PressKon the remote key.
.Unlock the vehicle using the Keyless
Access system.
.Start the vehicle.
To avoid setting off the alarm by accident:
.Lock the vehicle after all occupants have
left the vehicle and all doors are closed.
.Always unlock a door with the remote
key or use the Keyless Access system.
Unlocking the driver door with the
mechanical key will not disarm the system
or turn off the alarm.
Page 25 of 360
Buick E2UB-N Owner Manual (GMNA-Localizing-U.S./Canada/Mexico-
14583509) - 2021 - CRC - 1/8/21
24 Keys, Doors, and Windows
How to Detect a Tamper Condition
IfKis pressed and the horn chirps and the
lights flash three times, the alarm was
activated while the alarm system was
armed.
If the alarm system has been activated, a
message will appear on the DIC.
Immobilizer Operation
This vehicle has a passive theft-deterrent
system.
The system does not have to be manually
armed or disarmed.
The vehicle is automatically immobilized
when the vehicle is turned off.
The immobilization system is disarmed
when the ignition is on or in ACC/
ACCESSORY and a valid remote key is
present in the vehicle.
The security light, in the instrument cluster,
comes on if there is a problem with arming
or disarming the theft-deterrent system.
The system has one or more remote keys
matched to an immobilizer control unit in
your vehicle. Only a correctly matched
remote key will start the vehicle. If the
remote key is ever damaged, you may not
be able to start your vehicle.
When trying to start the vehicle, the
security light may come on briefly when the
ignition is turned on.
If the engine does not start and the security
light stays on, there is a problem with the
system. Turn the ignition off and try again.
If the vehicle will not change ignition modes
(ACC/ACCESSORY, on, off), and the remote
key appears to be undamaged, try another
remote key. Or, you may try placing the
remote key in the front cupholder located in
the center console. See Remote Keyless Entry
(RKE) System Operation 07. If the ignition mode will not change with
the other remote key or in the front
cupholder, your vehicle needs service. If the
ignition does change modes, the first
remote key may be faulty. See your dealer
who can service the theft-deterrent system
and have a new remote key programmed to
the vehicle.
It is possible for the immobilizer system to
learn new or replacement remote keys. Up
to eight remote keys can be programmed
for the vehicle. To program additional
remote keys, see
“Programming Remote
Keys to the Vehicle” underRemote Keyless
Entry (RKE) System Operation 07.
Do not leave the remote key or device that
disarms or deactivates the theft-deterrent
system in the vehicle.
Page 38 of 360
Buick E2UB-N Owner Manual (GMNA-Localizing-U.S./Canada/Mexico-
14583509) - 2021 - CRC - 1/8/21
Seats and Restraints 37
hold 1, 2, orBuntil the saved position is
reached. Follow the instructions under
“Saving Memory Positions.”
The vehicle identifies the current driver’s
remote key number (1–8). See Remote
Keyless Entry (RKE) System Operation 07.
Only remote keys 1 and 2 can be used for
automatic memory recalls. A Driver
Information Center (DIC) welcome message
indicating the remote key number may
display for the first few ignition cycles
following a remote key change. For Seat
Entry Memory to work properly, save the
positions to the memory button (1 or 2)
matching the remote key number displayed
in the DIC welcome message. Carry the
linked remote key when entering the
vehicle.
Vehicle Personalization Settings
.To have the Seat Entry Memory
movement begin when the vehicle is
started, select the Settings menu, then
Vehicle, then Seating Position, and then
Seat Entry Memory. Select On or Off. See
“Seat Entry Memory” later in this section.
.To begin Seat Exit Memory movement
when the vehicle is turned off and the
driver door is opened, or when the vehicle
is turned off with the driver door already opened, select the Settings menu, then
Vehicle, then Seating Position, and then
Seat Exit Memory. Select On or Off. See
“Seat Exit Memory”
later in this section.
.SeeVehicle Personalization 0109 for
additional setting information.
Identifying Driver Number
To identify the driver number: 1. Move your remote key away from the vehicle.
2. Start the vehicle with another remote key. The DIC should display the driver
number for the other remote key. Turn
the vehicle off and remove the remote
key from the vehicle.
3. Start the vehicle with the initial remote key. The DIC should display the driver
number of your remote key.
Saving Memory Positions
Read these instructions completely before
saving memory positions.
To save preferred driving positions 1 and 2: 1. Turn the vehicle on or to ACC/ ACCESSORY with remote key 1 or 2.
A DIC welcome message may indicate
driver number 1 or 2. 2. Adjust all available memory features to
the desired driving position.
3. Press and release SET; a beep will sound.
4. Immediately press and hold the 1 or 2 memory button matching the above
DIC welcome message until two beeps
sound.
If too much time passes between
releasing SET and pressing 1, the
memory position will not be saved and
two beeps will not sound. Repeat
Steps 3 and 4.
1 or 2 corresponds to the driver number.
See “Identifying Driver Number”
previously in this section.
5. Repeat Steps 1–4 for a second driver using 1 or 2.
To save the position for
Band Seat Exit
Memory features, repeat Steps 1–4 using
B. This saves the position for getting out
of the vehicle.
Save preferred memory feature positions to
both 1 and 2 if you are the only driver.
Page 39 of 360
Buick E2UB-N Owner Manual (GMNA-Localizing-U.S./Canada/Mexico-
14583509) - 2021 - CRC - 1/8/21
38 Seats and Restraints
Manually Recalling Memory Positions
Press and hold 1, 2, or
Bto recall the
previously saved memory positions if you
are driver 1 or 2 identified in the DIC
welcome message.
To stop Manual Memory recall movement,
release 1, 2, or
Bor press any of the
following controls:
.Power seat
.Memory SET
.Power mirror, with the driver or
passenger side mirror selected
.Power steering wheel, if equipped
Manual Memory recall movement for 1, 2 or
Bbuttons may be initiated and will
complete to the saved memory position if
the vehicle is shifted in or out of P (Park).
Seat Entry Memory
The vehicle identifies the number of the
current driver’s remote key (1–8). See
Remote Keyless Entry (RKE) System
Operation 07. If the remote key is 1 or 2,
and Seat Entry Memory is enabled in vehicle
personalization, the positions saved to the
same memory button number 1 or 2 are
automatically recalled when the vehicle is turned on, or turned from off to ACC/
ACCESSORY. Remote keys 3–8 will not
provide automatic memory recalls.
To turn Seat Entry Memory on or off, see
“Vehicle Personalization Settings”
previously
in this section and Vehicle Personalization
0 109.
The shift lever must be in P (Park) to start
Seat Entry Memory. Seat Entry Memory
recall will complete if the vehicle is shifted
out of P (Park) prior to reaching the saved
memory position.
To stop Seat Entry Memory recall
movement, turn the vehicle off or press any
of the following controls:.Power seat
.Memory SET, 1, 2, orB
.Power mirror, with the driver or
passenger side mirror selected
.Power steering wheel, if equipped
If the saved memory seat position does not
automatically recall or recalls to the wrong
positions, the driver’s remote key number (1
or 2) may not match the memory button
number that positions were saved to. Try
storing the position to the other memory
button or try the other remote key. Seat Exit Memory
Seat Exit Memory is not linked to a remote
key. The position saved to
Bis used for all
drivers. To turn Seat Exit Memory on or off,
see "Vehicle Personalization Settings"
previously in this section and Vehicle
Personalization 0109.
If turned on, the position saved to
Bis
automatically recalled when one of the
following occurs:
.The vehicle is turned off and the driver
door is opened within a short time.
.The vehicle is turned off with the driver
door open.
To stop Seat Exit Memory movement, press
any of the following memory controls:
.Power seat
.Memory SET, 1, 2, orB
.Power mirror, with the driver or
passenger side mirror selected
.Power steering wheel, if equipped
Page 93 of 360

Buick E2UB-N Owner Manual (GMNA-Localizing-U.S./Canada/Mexico-
14583509) - 2021 - CRC - 1/8/21
92 Instruments and Controls
set the Speed Warning press the
thumbwheel when Speed Warning is
displayed. Use the thumbwheel to adjust
the value and press to set the speed.
Once the speed is set, this feature can be
turned off by pressing the thumbwheel
while viewing this page. If the selected
speed limit is exceeded, a pop-up warning is
displayed with a chime.
Remote Relearn :If equipped, this feature
allows for the vehicle to relearn
remote keys.
See "Programming with Recognized Remote
Keys" under Remote Keyless Entry (RKE)
System Operation 07.
Software Information : Displays open source
software information.
Speedometer
The speedometer shows the vehicle's speed
in either kilometers per hour (km/h) or
miles per hour (mph).
Odometer
The odometer shows how far the vehicle has
been driven, in either kilometers or miles.
Trip Odometer
The trip odometer shows how far the
vehicle has been driven since the trip
odometer was last reset.
The trip odometer is accessed and reset
through the Driver Information Center (DIC).
See Driver Information Center (DIC) 0103.
Tachometer
The tachometer displays the engine speed in
revolutions per minute (rpm).
For vehicles with the Stop/Start system,
when the ignition is on, the tachometer
indicates the vehicle status. When pointing
to AUTO STOP, the engine is off but the
vehicle is on and can move. The engine
could auto start at any time. When the
indicator points to OFF, the vehicle is off.
When the engine is on, the tachometer will
indicate the engine’s revolutions per minute
(rpm). The tachometer may vary by several
hundred rpm, during Auto Stop mode, when
the engine is shutting off and restarting.
Fuel Gauge
When the ignition is on, the fuel gauge
indicates about how much fuel is left in
the tank.
There is an arrow near the fuel gauge
pointing to the side of the vehicle the fuel
door is on.
When the indicator nears empty, the low
fuel light comes on. There still is a little fuel
left, but the vehicle should be refueled soon.
Here are four things that some owners ask
about. None of these show a problem with
the fuel gauge:
.At the service station, the fuel pump
shuts off before the gauge reads full.
Page 114 of 360
Buick E2UB-N Owner Manual (GMNA-Localizing-U.S./Canada/Mexico-
14583509) - 2021 - CRC - 1/8/21
Instruments and Controls 113
Remote Window Operation
This allows the windows to be opened when
pressing and holding
Kon the remote key.
See Remote Keyless Entry (RKE) System
Operation 07.
Touch Off or On.
Passive Door Unlock
This allows the selection of what doors will
unlock when using the button on the driver
door to unlock the vehicle.
Touch Off, All Doors, or Driver Door Only.
Passive Door Lock
This allows passive locking to be turned on
or off and selects feedback. See Remote
Keyless Entry (RKE) System Operation 07.
Touch Off, On with Horn Chirp, or On.
Remote Left in Vehicle Alert
This feature sounds an alert when the
remote key is left in the vehicle. This menu
also enables Remote No Longer In Vehicle
Alert.
Touch Off or On. Remote Removed From Vehicle Alert
This setting beeps the horn three times if
exiting a running vehicle with the
remote key.
Touch Off or On.
Seating Position
Touch and the following may display:
.Seat Entry Memory
.Seat Exit Memory
Seat Entry Memory
This feature automatically recalls the
previously stored 1 or 2 button positions
when the ignition is changed from off to on
or ACC/ACCESSORY. See Memory Seats036.
Touch On or Off.
Seat Exit Memory
This feature automatically recalls the
previously stored exit button positions when
the ignition is changed from on or ACC/
ACCESSORY to off if the driver door is open
or opened. See Memory Seats036.
Touch Off or On.
Teen Driver
See Teen Driver 0166.
Valet Mode
This will lock the infotainment system and
steering wheel controls. It may also limit
access to vehicle storage locations,
if equipped.
To enable valet mode:
1. Enter a four-digit code on the keypad.
2. Select Enter to go to the confirmation screen.
3. Re-enter the four-digit code.
Touch Lock or Unlock to lock or unlock the
system. Touch Back to go back to the
previous menu.
Universal Remote System
See Radio Frequency Statement 0336.
Page 168 of 360
Buick E2UB-N Owner Manual (GMNA-Localizing-U.S./Canada/Mexico-
14583509) - 2021 - CRC - 1/8/21
Infotainment System 167
Register keys to activate Teen Driver and
assign restrictions to the key:
Any vehicle key can be registered, up to a
maximum of eight keys. Label the key to
tell it apart from the other keys.
For a pushbutton start system:1. Start the engine.
2. For automatic transmissions, the vehicle must be in P (Park). For manual
transmissions, the vehicle must be
stopped with the parking brake set.
3. From the Settings menu, touch Vehicle and then Teen Driver.
4. Enter the PIN.
5. Place the remote key you wish to register in the transmitter pocket. The
key does not need to be the one that
started the vehicle. See Remote Keyless
Entry (RKE) System Operation 07for
transmitter pocket location.
6. From the Teen Driver menu, touch Setup Keys.
.If the transmitter key has not
previously been registered, the option
to add the key displays. Touch Setup
and a confirmation message displays. Teen Driver restrictions will be
applied whenever this key is used to
operate the vehicle.
.If the transmitter key has already
been registered, the option to
remove the key displays. If Remove is
touched, the transmitter key is no
longer registered. A confirmation
message displays, and Teen Driver
restrictions will not be applied if this
transmitter key is used to operate
the vehicle.
In vehicles with a pushbutton start system,
if a Teen Driver and a non-Teen Driver key
are both present at start up, the vehicle will
recognize the non-Teen Driver key to start
the vehicle. The Teen Driver settings will not
be active.
For a keyed ignition system: 1. Start the engine.
2. For automatic transmissions, the vehicle must be in P (Park). For manual
transmissions, the vehicle must be
stopped with the parking brake set.
3. From the Settings menu, touch Vehicle and then Teen Driver.
4. Enter the PIN. 5. Touch Setup Keys. The system displays
instructions for registering or
unregistering a key. A confirmation
message displays.
Manage Settings
Buckle To Drive : When turned ON, Buckle
to Drive prevents the driver from shifting
out of P (Park) for a period of time if driver
seat belt, and on some vehicles, the
passenger seat belt, is not buckled. See
Buckle To Drive 042 and
Vehicle Personalization 0109.
Audio Volume Limit : Allows the audio
volume limit to be turned on or off. Touch
Set Audio Volume Limit to choose the
maximum allowable audio volume level.
Set Audio Volume Limit : Allows a
maximum radio volume to be set. Use the
arrows to choose the maximum allowable
level for the audio volume.
Teen Driver Speed Limiter : Limits the
maximum speed of the vehicle. When the
speed limiter is turned on and the vehicle is
started with a Teen Driver key, the DIC
displays a message that the top speed is
limited.
Page 198 of 360
Buick E2UB-N Owner Manual (GMNA-Localizing-U.S./Canada/Mexico-
14583509) - 2021 - CRC - 1/8/21
Driving and Operating 197
Caution (Continued)
.Do not drive at any one constant
speed, fast or slow, for the first
800 km (500 mi). Do not make
full-throttle starts. Avoid downshifting
to brake or slow the vehicle.
.Avoid making hard stops for the first
300 km (200 mi) or so. During this
time the new brake linings are not yet
broken in. Hard stops with new linings
can mean premature wear and earlier
replacement. Follow this breaking-in
guideline every time you get new
brake linings.
Following break-in, engine speed and load
can be gradually increased.
Ignition Positions
This vehicle has pushbutton starting.
The remote key must be in the vehicle for
the system to operate. If the pushbutton
start is not working, the vehicle may be
near a strong radio antenna signal causing
interference to the Keyless Access system.
See Remote Keyless Entry (RKE) System
Operation 07.
To shift out of P (Park), the ignition must be
on or in Service Mode and the brake pedal
must be applied. Stopping the Engine/OFF (No Indicator
Lights) :
When the vehicle is stopped, press
ENGINE START/STOP once to turn the
engine off.
If the vehicle is in P (Park), the ignition will
turn off, and Retained Accessory Power
(RAP) will remain active. See Retained
Accessory Power (RAP) 0201.
When the vehicle is stopped, press ENGINE
START/STOP to turn off the vehicle. The
transmission will shift to P (Park)
automatically.
Do not turn the engine off when the vehicle
is moving. This will cause a loss of power
assist in the brake and steering systems and
disable the airbags.
If the vehicle must be shut off in an
emergency: 1. Brake using a firm and steady pressure. Do not pump the brakes repeatedly. This
may deplete power assist, requiring
increased brake pedal force.
2. Shift the vehicle to N (Neutral). This can be done while the vehicle is moving.
After shifting to N (Neutral), firmly apply
the brakes and steer the vehicle to a
safe location.
Page 199 of 360
Buick E2UB-N Owner Manual (GMNA-Localizing-U.S./Canada/Mexico-
14583509) - 2021 - CRC - 1/8/21
198 Driving and Operating
3. Come to a complete stop, shift toP (Park), and turn the ignition off. The
vehicle must be in P (Park) to turn the
ignition off.
4. Set the parking brake. See Electric
Parking Brake 0208.
{Warning
Turning off the vehicle while moving may
cause loss of power assist in the brake
and steering systems and disable the
airbags. While driving, only shut the
vehicle off in an emergency.
If the vehicle cannot be pulled over, and
must be shut off while driving, press and
hold ENGINE START/STOP for longer than
two seconds, or press twice in five seconds.
ACC/ACCESSORY (Amber Indicator Light) :
This mode allows some electrical accessories
to be used when the engine is off.
With the ignition off, pressing the button
one time without the brake pedal applied
will place the ignition system in ACC/
ACCESSORY.
The ignition will switch from ACC/
ACCESSORY to OFF after five minutes to
prevent battery rundown. ON/RUN/START (Green Indicator Light) :
This
mode is for driving and starting. With the
ignition off, and the brake pedal applied,
pressing the button once will place the
ignition system in ON/RUN/START. Once
engine cranking begins, release the button.
Engine cranking will continue until the
engine starts. See Starting the Engine 0198.
The ignition will then remain in ON/RUN.
Service Mode
This power mode is available for service and
diagnostics, and to verify the proper
operation of the malfunction indicator lamp
as may be required for emission inspection
purposes. With the vehicle off, and the
brake pedal not applied, pressing and
holding ENGINE START/STOP for more than
five seconds will place the vehicle in Service
Mode. The instruments and audio systems
will operate as they do in ON/RUN, but the
vehicle will not be able to be driven. The
engine will not start in Service Mode. Press
the button again to turn the vehicle off.
Starting the Engine
Place the transmission in the proper gear,
P (Park) or N (Neutral). To restart the engine
when the vehicle is already moving, use
N (Neutral).
Caution
Do not try to shift to P (Park) if the
vehicle is moving. If you do, you could
damage the transmission. Shift to P (Park)
only when the vehicle is stopped.
Caution
If you add electrical parts or accessories,
you could change the way the engine
operates. Any resulting damage would
not be covered by the vehicle warranty.
See Add-On Electrical Equipment 0251.
To start the vehicle: 1. With the Keyless Access system, the remote key must be in the vehicle. Press
ENGINE START/STOP with the brake pedal
applied. When the engine begins
cranking, let go of the button. The idle
speed will go down as the engine warms
up. Do not race the engine immediately
after starting it.
If the remote key is not in the vehicle,
if there is interference, or if the remote
key battery is low, a Driver Information
Page 200 of 360
Buick E2UB-N Owner Manual (GMNA-Localizing-U.S./Canada/Mexico-
14583509) - 2021 - CRC - 1/8/21
Driving and Operating 199
Center (DIC) message will display. See
Remote Keyless Entry (RKE) System
Operation07.
Caution
Cranking the engine for long periods of
time, by pressing ENGINE START/STOP
immediately after cranking has ended,
can overheat and damage the cranking
motor, and drain the battery. Wait at
least 15 seconds between each try, to let
the cranking motor cool down.
2. If the engine does not start after five to 10 seconds, especially in very cold
weather (below −18 °C or 0 °F), it could
be flooded with too much gasoline. Try
pushing the accelerator pedal all the way
to the floor and hold it there, then press
ENGINE START/STOP for up to a
maximum of 15 seconds. Wait at least
15 seconds between each try, to allow
the cranking motor to cool down. When
the engine starts, let go of the button
and the accelerator. If the vehicle starts
briefly but then stops again, do the
same thing. This clears the extra gasoline
from the engine. Do not race the engine
immediately after starting it. Operate the engine and transmission gently until
the oil warms up and lubricates all
moving parts.
Stop/Start System
The Stop/Start system will shut off the
engine to help conserve fuel. It has
components designed for the increased
number of starts.
{Warning
The automatic engine Stop/Start feature
causes the engine to shut off while the
vehicle is still on. Do not exit the vehicle
before shifting to P (Park). The vehicle
may restart and move unexpectedly.
Always shift to P (Park), and then turn
the ignition off before exiting the vehicle.
Auto Engine Stop/Start
When the brakes are applied and the vehicle
is at a complete stop, the engine may turn
off. When stopped, the tachometer displays
AUTO STOP. See Tachometer092. When the
brake pedal is released or the accelerator
pedal is pressed, the engine will restart. To maintain vehicle performance, other
conditions may cause the engine to
automatically restart before the brake pedal
is released.
Auto Stops may not occur and/or auto
restarts may occur because:
.The climate control settings require the
engine to be running to cool or heat the
vehicle interior.
.The vehicle battery needs to charge.
.The vehicle battery has recently been
disconnected.
.Minimum vehicle speed has not been
reached since the last Auto Stop.
.The accelerator pedal is pressed.
.The engine or transmission is not at the
required operating temperature.
.The outside temperature is not in the
required operating range.
.The vehicle transmission is shifted out of
D (Drive) to any gear other than P (Park).
.Certain driver modes have been selected.
See
Driver Mode Control 0212.
.The vehicle is on a steep hill or grade.
.The driver door has been opened or the
driver seat belt has been unbuckled.
.The hood has been opened.