Charge battery BUICK ENVISION 2021 Owner's Manual
[x] Cancel search | Manufacturer: BUICK, Model Year: 2021, Model line: ENVISION, Model: BUICK ENVISION 2021Pages: 360, PDF Size: 10.4 MB
Page 18 of 360
Buick E2UB-N Owner Manual (GMNA-Localizing-U.S./Canada/Mexico-
14583509) - 2021 - CRC - 1/8/21
Keys, Doors, and Windows 17
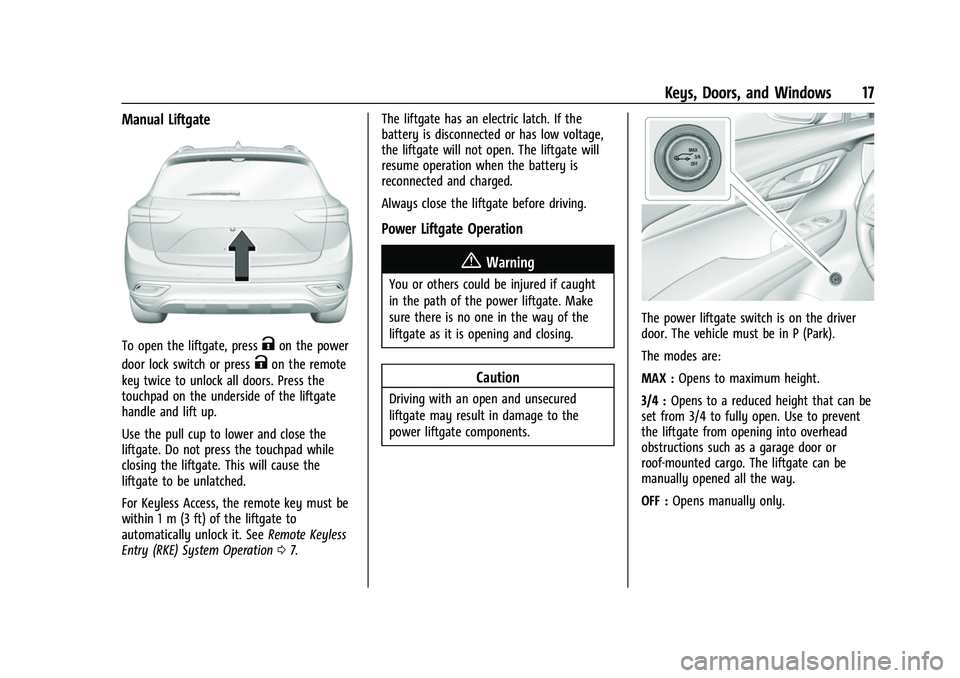
Manual Liftgate
To open the liftgate, pressKon the power
door lock switch or press
Kon the remote
key twice to unlock all doors. Press the
touchpad on the underside of the liftgate
handle and lift up.
Use the pull cup to lower and close the
liftgate. Do not press the touchpad while
closing the liftgate. This will cause the
liftgate to be unlatched.
For Keyless Access, the remote key must be
within 1 m (3 ft) of the liftgate to
automatically unlock it. See Remote Keyless
Entry (RKE) System Operation 07. The liftgate has an electric latch. If the
battery is disconnected or has low voltage,
the liftgate will not open. The liftgate will
resume operation when the battery is
reconnected and charged.
Always close the liftgate before driving.
Power Liftgate Operation
{Warning
You or others could be injured if caught
in the path of the power liftgate. Make
sure there is no one in the way of the
liftgate as it is opening and closing.
Caution
Driving with an open and unsecured
liftgate may result in damage to the
power liftgate components.
The power liftgate switch is on the driver
door. The vehicle must be in P (Park).
The modes are:
MAX :
Opens to maximum height.
3/4 : Opens to a reduced height that can be
set from 3/4 to fully open. Use to prevent
the liftgate from opening into overhead
obstructions such as a garage door or
roof-mounted cargo. The liftgate can be
manually opened all the way.
OFF : Opens manually only.
Page 31 of 360
Buick E2UB-N Owner Manual (GMNA-Localizing-U.S./Canada/Mexico-
14583509) - 2021 - CRC - 1/8/21
30 Keys, Doors, and Windows
Programming the Power Windows
Programming may be necessary if the
vehicle battery has been disconnected or
discharged. If the window is unable to
express-up, program each express-close
window:1. Close all doors.
2. Turn the ignition on or to ACC/ ACCESSORY.
3. Partially open the window to be programmed. Then close it and continue
to pull the switch briefly after the
window has fully closed.
4. Open the window and continue to press the switch briefly after the window has
fully opened.
Remote Window Operation
If equipped, this feature allows all windows
to be opened remotely. If enabled in vehicle
personalization, press and hold
Kon the
remote key. See Vehicle Personalization
0 109.
Sun Visors
Pull the sun visor down to block glare.
Detach the sun visor from the center mount
to pivot to the side window and,
if equipped, extend along the rod.
Roof
Sunroof
If equipped, the ignition must be on or in
ACC/ACCESSORY, or Retained Accessory
Power (RAP) must be active to operate the
sunroof. See Ignition Positions 0197 and
Retained Accessory Power (RAP) 0201.
While the sunroof always operates in
express mode, movement can be stopped by
pressing the switch again. The sunroof cannot be opened or closed if
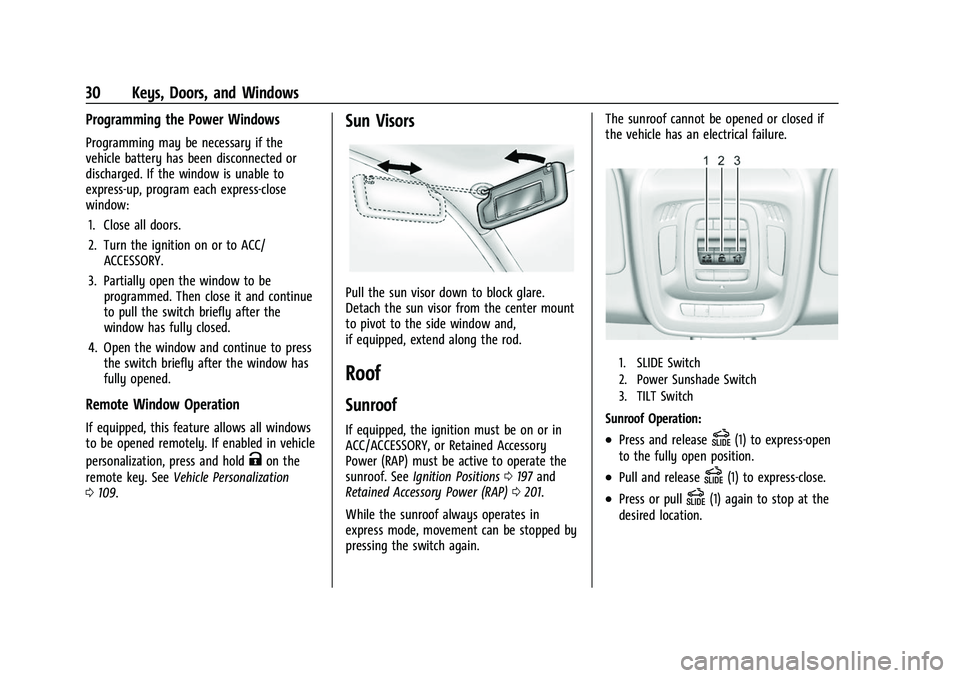
the vehicle has an electrical failure.
1. SLIDE Switch
2. Power Sunshade Switch
3. TILT Switch
Sunroof Operation:
.Press and releaseD(1) to express-open
to the fully open position.
.Pull and releaseD(1) to express-close.
.Press or pullD(1) again to stop at the
desired location.
Page 125 of 360
Buick E2UB-N Owner Manual (GMNA-Localizing-U.S./Canada/Mexico-
14583509) - 2021 - CRC - 1/8/21
124 Lighting
remote key. The entry lighting feature for
exterior lighting can be changed by vehicle
locator lights. SeeVehicle Personalization
0 109.
Exit Lighting
Some exterior lamps come on at night, or in
areas with limited lighting, when the driver
door is opened after the ignition is turned
off. The dome lamp comes on when any
door is opened or the ignition is turned OFF.
The exterior lamps and dome lamp remain
on after the door is closed for a set amount
of time, then automatically turn off.
The exterior lamps turn off immediately by
turning the exterior lamp control off.
The exit lighting for exterior lights can be
changed. See Vehicle Personalization 0109.
Battery Load Management
The vehicle has Electric Power Management
(EPM), which estimates the battery's
temperature and state of charge. It then
adjusts the voltage for best performance
and extended life of the battery.
When the battery's state of charge is low,
the voltage is raised slightly to quickly bring
the charge back up. When the state of charge is high, the voltage is lowered
slightly to prevent overcharging. The
voltmeter gauge or the voltage display on
the Driver Information Center (DIC),
if equipped, may show the voltage moving
up or down. This is normal. If there is a
problem, an alert will be displayed.
The battery can be discharged at idle if the
electrical loads are very high. This is true for
all vehicles. This is because the generator
(alternator) may not be spinning fast
enough at idle to produce all the power that
is needed for very high electrical loads.
A high electrical load occurs when several of
the following are on, such as: headlamps,
high beams, fog lamps, rear window
defogger, climate control fan at high speed,
heated seats, engine cooling fans, trailer
loads, and loads plugged into accessory
power outlets.
EPM works to prevent excessive discharge of
the battery. It does this by balancing the
generator's output and the vehicle's
electrical needs. It can increase engine idle
speed to generate more power, whenever
needed. It can temporarily reduce the power
demands of some accessories.
Normally, these actions occur in steps or
levels, without being noticeable. In rare
cases at the highest levels of corrective
action, this action may be noticeable to the
driver. If so, a DIC message might be
displayed and it is recommended that the
driver reduce the electrical loads as much as
possible.
Battery Power Protection
The battery saver feature is designed to
protect the vehicle's battery.
If some interior lamps are left on and the
ignition is turned off, the battery rundown
protection system automatically turns the
lamp off after some time.
Exterior Lighting Battery Saver
The exterior lamps turn off about 10 minutes
after the ignition is turned off, if the parking
lamps or headlamps have been manually
left on. This protects against draining the
battery. To restart the 10-minute timer, turn
the exterior lamp control to the
Oposition
and then back to the
;or2position.
To keep the lamps on for more than
10 minutes, the ignition must be on or in
ACC/ACCESSORY.
Page 194 of 360
Buick E2UB-N Owner Manual (GMNA-Localizing-U.S./Canada/Mexico-
14583509) - 2021 - CRC - 1/8/21
Driving and Operating 193
Warning (Continued)
.Adjust the climate control system to
circulate the air inside the vehicle and
set the fan speed to the highest
setting. See“Climate Control Systems.”
For more information about CO, see
Engine Exhaust 0203.
To save fuel, run the engine for short
periods to warm the vehicle and then shut
the engine off and partially close the
window. Moving about to keep warm also
helps.
If it takes time for help to arrive, when
running the engine, push the accelerator
pedal slightly so the engine runs faster than
the idle speed. This keeps the battery
charged to restart the vehicle and to signal
for help with the headlamps. Do this as
little as possible, to save fuel.
If the Vehicle Is Stuck
Slowly and cautiously spin the wheels to
free the vehicle when stuck in sand, mud,
ice, or snow. If stuck too severely for the traction system
to free the vehicle, turn the traction system
off and use the rocking method. See
Traction Control/Electronic Stability Control
0
210.
{Warning
If the vehicle's tires spin at high speed,
they can explode, and you or others
could be injured. The vehicle can
overheat, causing an engine compartment
fire or other damage. Spin the wheels as
little as possible and avoid going above
56 km/h (35 mph).
Rocking the Vehicle to Get it Out
Turn the steering wheel left and right to
clear the area around the front wheels. Turn
off any traction system. Shift back and forth
between R (Reverse) and a low forward gear,
spinning the wheels as little as possible. To
prevent transmission wear, wait until the
wheels stop spinning before shifting gears.
Release the accelerator pedal while shifting,
and press lightly on the accelerator pedal
when the transmission is in gear. Slowly
spinning the wheels in the forward and
reverse directions causes a rocking motion
that could free the vehicle. If that does not get the vehicle out after a few tries, it
might need to be towed out. If the vehicle
does need to be towed out, see
Towing the
Vehicle 0304.
Vehicle Load Limits
It is very important to know how much
weight the vehicle can carry. This
weight is called the vehicle capacity
weight and includes the weight of all
occupants, cargo, and all
nonfactory-installed options. Two labels
on the vehicle may show how much
weight it may properly carry, the Tire
and Loading Information label and the
Certification/Tire label.
{Warning
Do not load the vehicle any heavier
than the Gross Vehicle Weight Rating
(GVWR), or either the maximum
front or rear Gross Axle Weight
Rating (GAWR). This can cause
systems to break and change the
way the vehicle handles. This could
cause loss of control and a crash.
(Continued)
Page 200 of 360
Buick E2UB-N Owner Manual (GMNA-Localizing-U.S./Canada/Mexico-
14583509) - 2021 - CRC - 1/8/21
Driving and Operating 199
Center (DIC) message will display. See
Remote Keyless Entry (RKE) System
Operation07.
Caution
Cranking the engine for long periods of
time, by pressing ENGINE START/STOP
immediately after cranking has ended,
can overheat and damage the cranking
motor, and drain the battery. Wait at
least 15 seconds between each try, to let
the cranking motor cool down.
2. If the engine does not start after five to 10 seconds, especially in very cold
weather (below −18 °C or 0 °F), it could
be flooded with too much gasoline. Try
pushing the accelerator pedal all the way
to the floor and hold it there, then press
ENGINE START/STOP for up to a
maximum of 15 seconds. Wait at least
15 seconds between each try, to allow
the cranking motor to cool down. When
the engine starts, let go of the button
and the accelerator. If the vehicle starts
briefly but then stops again, do the
same thing. This clears the extra gasoline
from the engine. Do not race the engine
immediately after starting it. Operate the engine and transmission gently until
the oil warms up and lubricates all
moving parts.
Stop/Start System
The Stop/Start system will shut off the
engine to help conserve fuel. It has
components designed for the increased
number of starts.
{Warning
The automatic engine Stop/Start feature
causes the engine to shut off while the
vehicle is still on. Do not exit the vehicle
before shifting to P (Park). The vehicle
may restart and move unexpectedly.
Always shift to P (Park), and then turn
the ignition off before exiting the vehicle.
Auto Engine Stop/Start
When the brakes are applied and the vehicle
is at a complete stop, the engine may turn
off. When stopped, the tachometer displays
AUTO STOP. See Tachometer092. When the
brake pedal is released or the accelerator
pedal is pressed, the engine will restart. To maintain vehicle performance, other
conditions may cause the engine to
automatically restart before the brake pedal
is released.
Auto Stops may not occur and/or auto
restarts may occur because:
.The climate control settings require the
engine to be running to cool or heat the
vehicle interior.
.The vehicle battery needs to charge.
.The vehicle battery has recently been
disconnected.
.Minimum vehicle speed has not been
reached since the last Auto Stop.
.The accelerator pedal is pressed.
.The engine or transmission is not at the
required operating temperature.
.The outside temperature is not in the
required operating range.
.The vehicle transmission is shifted out of
D (Drive) to any gear other than P (Park).
.Certain driver modes have been selected.
See
Driver Mode Control 0212.
.The vehicle is on a steep hill or grade.
.The driver door has been opened or the
driver seat belt has been unbuckled.
.The hood has been opened.
Page 265 of 360

Buick E2UB-N Owner Manual (GMNA-Localizing-U.S./Canada/Mexico-
14583509) - 2021 - CRC - 1/8/21
264 Vehicle Care
How to Add Coolant to the Surge Tank
{Warning
Spilling coolant on hot engine parts can
burn you. Coolant contains ethylene
glycol and it will burn if the engine parts
are hot enough.
{Warning
Steam and scalding liquids from a hot
cooling system are under pressure.
Turning the pressure cap, even a little,
can cause them to come out at high
speed and you could be burned. Never
turn the cap when the cooling system,
including the pressure cap, is hot. Wait
for the cooling system and pressure cap
to cool.
Caution
Failure to follow the specific coolant fill
procedure could cause the engine to
overheat and could cause system
damage. If coolant is not visible in the
surge tank, contact your dealer.The coolant surge tank pressure cap can be
removed when the cooling system, including
the surge tank pressure cap and upper
radiator hose, is no longer hot.
1. Turn the pressure cap slowly
counterclockwise. If a hiss is heard, wait
for that to stop. A hiss means there is
still some pressure left.
2. Keep turning the pressure cap slowly and remove it.
3. If topping off the level in the coolantsurge tank, add the proper mixture until
the level reaches the mark on the front
of the tank and replace the cap. Operate
the vehicle. Repeat steps 1–3, as
necessary.
If filling the system (such as after
servicing), follow the Automatic Coolant
Service Fill Instructions.
Caution
If the pressure cap is not tightly installed,
coolant loss and engine damage may
occur. Be sure the cap is properly and
tightly secured.
Automatic Coolant Service Fill
Instructions
This feature assists in filling and removing
air from the cooling system after service of
components or when coolant is added after
being too low.
To activate the fill and air removal process:
1. With a cold system, add coolant to the indicated mark on the surge tank.
2. Replace the cap on the surge tank.
3. Connect the vehicle to a battery charger.
Page 269 of 360
Buick E2UB-N Owner Manual (GMNA-Localizing-U.S./Canada/Mexico-
14583509) - 2021 - CRC - 1/8/21
268 Vehicle Care
{Warning
If too much brake fluid is added, it can
spill on the engine and burn, if the
engine is hot enough. You or others could
be burned, and the vehicle could be
damaged. Add brake fluid only when
work is done on the brake hydraulic
system.
When the brake fluid falls to a low level,
the brake warning light comes on. See Brake
System Warning Light 096.
Brake fluid absorbs water over time which
degrades the effectiveness of the brake fluid.
Replace brake fluid at the specified intervals
to prevent increased stopping distance. See
Maintenance Schedule 0314.
What to Add
Use only GM approved DOT 4 brake fluid
from a clean, sealed container. See
Recommended Fluids and Lubricants 0322.
{Warning
The wrong or contaminated brake fluid
could result in damage to the brake
system. This could result in the loss of
(Continued)
Warning (Continued)
braking leading to a possible injury.
Always use the proper GM approved
brake fluid.
Caution
If brake fluid is spilled on the vehicle's
painted surfaces, the paint finish can be
damaged. Immediately wash off any
painted surface.
Battery - North America
The original equipment battery is
maintenance free. Do not remove the cap
and do not add fluid.
Refer to the replacement number shown on
the original battery label when a new
battery is needed. SeeEngine Compartment
Overview 0257 for battery location.
Stop/Start System
The vehicle has a Stop/Start system to shut
off the engine to help conserve fuel. See
Stop/Start System 0199. The vehicle has an Absorbed Glass Mat
(AGM) 12-volt battery. Installation of a
standard 12-volt battery will result in
reduced 12-volt battery life.
When using a 12-volt battery charger on the
12-volt AGM battery, some chargers have an
AGM battery setting on the charger.
If available, use the AGM setting on the
charger, to limit charge voltage to 14.8 volts.
Follow the charger manufacturer's
instructions.
{Warning
WARNING:
Battery posts, terminals, and
related accessories contain lead and lead
compounds, chemicals known to the
State of California to cause cancer and
birth defects or other reproductive harm.
Batteries also contain other chemicals
known to the State of California to cause
cancer. WASH HANDS AFTER HANDLING.
For more information go to
www.P65Warnings.ca.gov/
passenger-vehicle.
See California Proposition 65 Warning 0254
and the back cover.
Page 270 of 360
Buick E2UB-N Owner Manual (GMNA-Localizing-U.S./Canada/Mexico-
14583509) - 2021 - CRC - 1/8/21
Vehicle Care 269
Vehicle Storage
{Warning
Batteries have acid that can burn you and
gas that can explode. You can be badly
hurt if you are not careful. SeeJump
Starting - North America 0302 for tips on
working around a battery without
getting hurt.
Infrequent Usage: Remove the black,
negative (−) cable from the battery to keep
the battery from running down.
Extended Storage: Remove the black,
negative (−) cable from the battery or use a
battery trickle charger.
All-Wheel Drive
Transfer Case
Under normal driving conditions, transfer
case fluid does not require maintenance
unless there is a fluid leak or unusual noise.
If required, have the transfer case serviced
by your dealer.
Park Brake and P (Park)
Mechanism Check
{Warning
When you are doing this check, the
vehicle could begin to move. You or
others could be injured and property
could be damaged. Make sure there is
room in front of the vehicle in case it
begins to roll. Be ready to apply the
regular brake at once should the vehicle
begin to move.
Park on a fairly steep hill, with the vehicle
facing downhill. Keeping your foot on the
regular brake, set the parking brake.
.To check the parking brake's holding
ability: With the engine running and the
transmission in N (Neutral), slowly remove
foot pressure from the regular brake
pedal. Do this until the vehicle is held by
the parking brake only.
.To check the P (Park) mechanism's holding
ability: With the engine running, shift to
P (Park). Then release the parking brake
followed by the regular brake.
Contact your dealer if service is required.
Wiper Blade Replacement
Windshield wiper blades should be inspected
for wear or cracking.
Clean or replace the wiper blade assembly
on a regular basis or when worn. For proper
windshield wiper blade length and type, see
Maintenance Replacement Parts 0323.
Caution
Allowing the wiper arm to touch the
windshield when no wiper blade is
installed could damage the windshield.
Any damage that occurs would not be
covered by the vehicle warranty. Do not
allow the wiper arm to touch the
windshield.
Front Wiper Blade Replacement
To replace the wiper blade assembly:
1. Pull the windshield wiper assembly away from the windshield.
Page 303 of 360
Buick E2UB-N Owner Manual (GMNA-Localizing-U.S./Canada/Mexico-
14583509) - 2021 - CRC - 1/8/21
302 Vehicle Care
Jump Starting
Jump Starting - North America
For more information about the vehicle
battery, seeBattery - North America 0268.
If the battery has run down, try to use
another vehicle and some jumper cables to
start your vehicle. Be sure to use the
following steps to do it safely.
{Warning
WARNING: Battery posts, terminals, and
related accessories contain lead and lead
compounds, chemicals known to the
State of California to cause cancer and
birth defects or other reproductive harm.
Batteries also contain other chemicals
known to the State of California to cause
cancer. WASH HANDS AFTER HANDLING.
For more information go to
www.P65Warnings.ca.gov/
passenger-vehicle.
See California Proposition 65 Warning 0254
and the back cover.
{Warning
Batteries can hurt you. They can be
dangerous because:
.They contain acid that can burn you.
.They contain gas that can explode or
ignite.
.They contain enough electricity to
burn you.
If you do not follow these steps exactly,
some or all of these things can hurt you.
Caution
Ignoring these steps could result in costly
damage to the vehicle that would not be
covered by the vehicle warranty. Trying
to start the vehicle by pushing or pulling
it will not work, and it could damage the
vehicle.
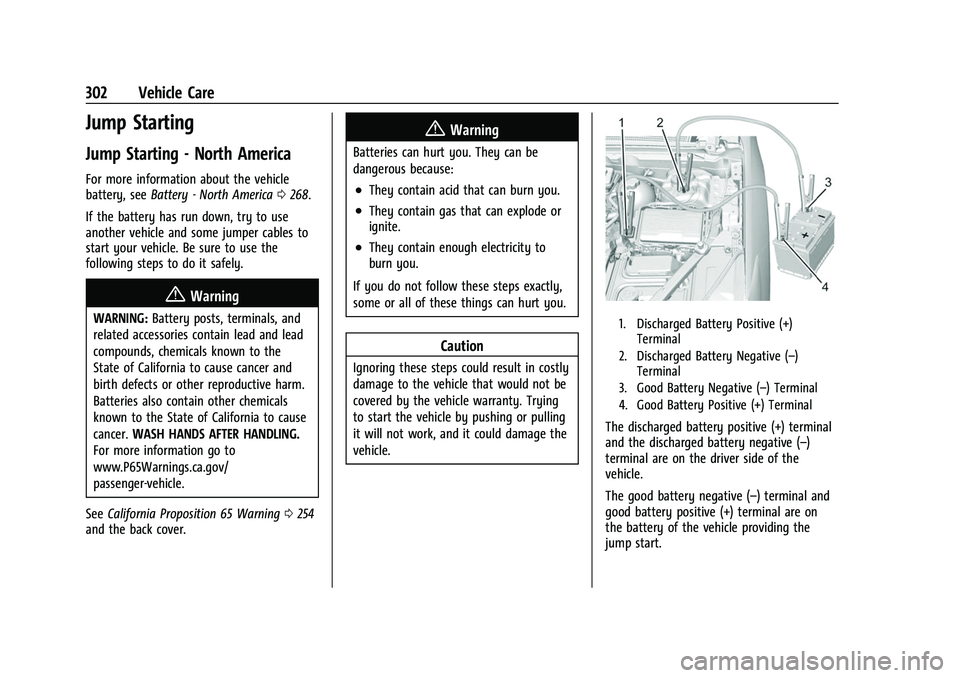
1. Discharged Battery Positive (+) Terminal
2. Discharged Battery Negative (–) Terminal
3. Good Battery Negative (–) Terminal
4. Good Battery Positive (+) Terminal
The discharged battery positive (+) terminal
and the discharged battery negative (–)
terminal are on the driver side of the
vehicle.
The good battery negative (–) terminal and
good battery positive (+) terminal are on
the battery of the vehicle providing the
jump start.
Page 304 of 360
Buick E2UB-N Owner Manual (GMNA-Localizing-U.S./Canada/Mexico-
14583509) - 2021 - CRC - 1/8/21
Vehicle Care 303
The discharged battery positive (+) terminal
is under a cover. Remove the cover to
expose the terminal.1. Check the other vehicle. It must have a 12-volt battery with a negative ground
system.
Caution
If the other vehicle does not have a
12-volt system with a negative ground,
both vehicles can be damaged. Only use
a vehicle that has a 12-volt system with a
negative ground for jump starting.
2. Position the two vehicles so that they are not touching.
3. Set the parking brake firmly and put the transmission in P (Park). See Shifting Into
Park 0201.
Caution
If any accessories are left on or plugged
in during the jump starting procedure,
they could be damaged. The repairs
would not be covered by the vehicle
warranty. Whenever possible, turn off or
unplug all accessories on either vehicle
when jump starting. 4. Turn the ignition off. Turn off all lights
and accessories in both vehicles, except
the hazard warning flashers if needed.
{Warning
An electric fan can start up even when
the engine is not running and can injure
you. Keep hands, clothing, and tools
away from any underhood electric fan.
{Warning
Using a match near a battery can cause
battery gas to explode. People have been
hurt doing this, and some have been
blinded. Use a flashlight if you need
more light.
Battery fluid contains acid that can burn
you. Do not get it on you. If you
accidentally get it in your eyes or on
your skin, flush the place with water and
get medical help immediately.
{Warning
Fans or other moving engine parts can
injure you badly. Keep your hands away
from moving parts once the engine is
running.
5. Connect one end of the red positive (+) cable to the discharged battery
positive (+) terminal.
6. Connect the other end of the red positive (+) cable to the good battery
positive (+) terminal.
7. Connect one end of the black negative (–) cable to the good battery negative
(–) terminal.
8. Connect the other end of the black negative (–) cable to the discharge
battery negative (–) terminal on the
driver side shock tower.
9. Start the engine in the vehicle with the good battery and run the engine at idle
speed for at least four minutes.
10. Try to start the vehicle that had the dead battery. If it will not start after a
few tries, it probably needs service.