buttons BUICK ENVISION 2021 Owner's Manual
[x] Cancel search | Manufacturer: BUICK, Model Year: 2021, Model line: ENVISION, Model: BUICK ENVISION 2021Pages: 360, PDF Size: 10.4 MB
Page 6 of 360
Buick E2UB-N Owner Manual (GMNA-Localizing-U.S./Canada/Mexico-
14583509) - 2021 - CRC - 1/8/21
Introduction 5
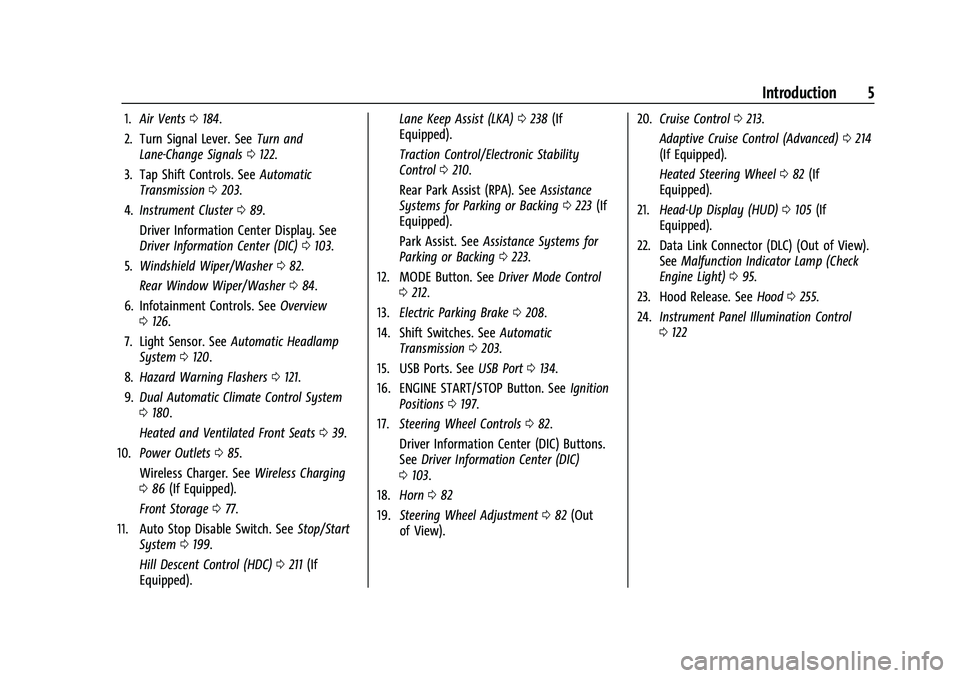
1.Air Vents 0184.
2. Turn Signal Lever. See Turn and
Lane-Change Signals 0122.
3. Tap Shift Controls. See Automatic
Transmission 0203.
4. Instrument Cluster 089.
Driver Information Center Display. See
Driver Information Center (DIC) 0103.
5. Windshield Wiper/Washer 082.
Rear Window Wiper/Washer 084.
6. Infotainment Controls. See Overview
0 126.
7. Light Sensor. See Automatic Headlamp
System 0120.
8. Hazard Warning Flashers 0121.
9. Dual Automatic Climate Control System
0180.
Heated and Ventilated Front Seats 039.
10. Power Outlets 085.
Wireless Charger. See Wireless Charging
0 86 (If Equipped).
Front Storage 077.
11. Auto Stop Disable Switch. See Stop/Start
System 0199.
Hill Descent Control (HDC) 0211 (If
Equipped). Lane Keep Assist (LKA)
0238 (If
Equipped).
Traction Control/Electronic Stability
Control 0210.
Rear Park Assist (RPA). See Assistance
Systems for Parking or Backing 0223 (If
Equipped).
Park Assist. See Assistance Systems for
Parking or Backing 0223.
12. MODE Button. See Driver Mode Control
0 212.
13. Electric Parking Brake 0208.
14. Shift Switches. See Automatic
Transmission 0203.
15. USB Ports. See USB Port0134.
16. ENGINE START/STOP Button. See Ignition
Positions 0197.
17. Steering Wheel Controls 082.
Driver Information Center (DIC) Buttons.
See Driver Information Center (DIC)
0 103.
18. Horn 082
19. Steering Wheel Adjustment 082 (Out
of View). 20.
Cruise Control 0213.
Adaptive Cruise Control (Advanced) 0214
(If Equipped).
Heated Steering Wheel 082 (If
Equipped).
21. Head-Up Display (HUD) 0105 (If
Equipped).
22. Data Link Connector (DLC) (Out of View). SeeMalfunction Indicator Lamp (Check
Engine Light) 095.
23. Hood Release. See Hood0255.
24. Instrument Panel Illumination Control
0122
Page 35 of 360
Buick E2UB-N Owner Manual (GMNA-Localizing-U.S./Canada/Mexico-
14583509) - 2021 - CRC - 1/8/21
34 Seats and Restraints
3. Release the handle to stop the seat frommoving.
4. Try to move the seat back and forth to be sure it is locked in place.
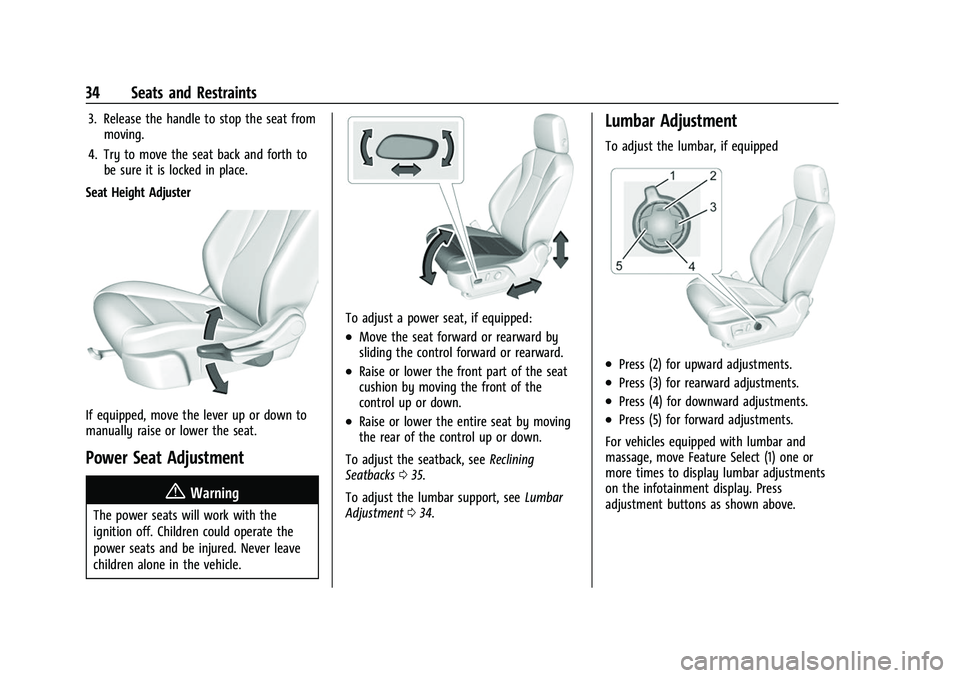
Seat Height Adjuster
If equipped, move the lever up or down to
manually raise or lower the seat.
Power Seat Adjustment
{Warning
The power seats will work with the
ignition off. Children could operate the
power seats and be injured. Never leave
children alone in the vehicle.
To adjust a power seat, if equipped:
.Move the seat forward or rearward by
sliding the control forward or rearward.
.Raise or lower the front part of the seat
cushion by moving the front of the
control up or down.
.Raise or lower the entire seat by moving
the rear of the control up or down.
To adjust the seatback, see Reclining
Seatbacks 035.
To adjust the lumbar support, see Lumbar
Adjustment 034.
Lumbar Adjustment
To adjust the lumbar, if equipped
.Press (2) for upward adjustments.
.Press (3) for rearward adjustments.
.Press (4) for downward adjustments.
.Press (5) for forward adjustments.
For vehicles equipped with lumbar and
massage, move Feature Select (1) one or
more times to display lumbar adjustments
on the infotainment display. Press
adjustment buttons as shown above.
Page 39 of 360
Buick E2UB-N Owner Manual (GMNA-Localizing-U.S./Canada/Mexico-
14583509) - 2021 - CRC - 1/8/21
38 Seats and Restraints
Manually Recalling Memory Positions
Press and hold 1, 2, or
Bto recall the
previously saved memory positions if you
are driver 1 or 2 identified in the DIC
welcome message.
To stop Manual Memory recall movement,
release 1, 2, or
Bor press any of the
following controls:
.Power seat
.Memory SET
.Power mirror, with the driver or
passenger side mirror selected
.Power steering wheel, if equipped
Manual Memory recall movement for 1, 2 or
Bbuttons may be initiated and will
complete to the saved memory position if
the vehicle is shifted in or out of P (Park).
Seat Entry Memory
The vehicle identifies the number of the
current driver’s remote key (1–8). See
Remote Keyless Entry (RKE) System
Operation 07. If the remote key is 1 or 2,
and Seat Entry Memory is enabled in vehicle
personalization, the positions saved to the
same memory button number 1 or 2 are
automatically recalled when the vehicle is turned on, or turned from off to ACC/
ACCESSORY. Remote keys 3–8 will not
provide automatic memory recalls.
To turn Seat Entry Memory on or off, see
“Vehicle Personalization Settings”
previously
in this section and Vehicle Personalization
0 109.
The shift lever must be in P (Park) to start
Seat Entry Memory. Seat Entry Memory
recall will complete if the vehicle is shifted
out of P (Park) prior to reaching the saved
memory position.
To stop Seat Entry Memory recall
movement, turn the vehicle off or press any
of the following controls:.Power seat
.Memory SET, 1, 2, orB
.Power mirror, with the driver or
passenger side mirror selected
.Power steering wheel, if equipped
If the saved memory seat position does not
automatically recall or recalls to the wrong
positions, the driver’s remote key number (1
or 2) may not match the memory button
number that positions were saved to. Try
storing the position to the other memory
button or try the other remote key. Seat Exit Memory
Seat Exit Memory is not linked to a remote
key. The position saved to
Bis used for all
drivers. To turn Seat Exit Memory on or off,
see "Vehicle Personalization Settings"
previously in this section and Vehicle
Personalization 0109.
If turned on, the position saved to
Bis
automatically recalled when one of the
following occurs:
.The vehicle is turned off and the driver
door is opened within a short time.
.The vehicle is turned off with the driver
door open.
To stop Seat Exit Memory movement, press
any of the following memory controls:
.Power seat
.Memory SET, 1, 2, orB
.Power mirror, with the driver or
passenger side mirror selected
.Power steering wheel, if equipped
Page 40 of 360
Buick E2UB-N Owner Manual (GMNA-Localizing-U.S./Canada/Mexico-
14583509) - 2021 - CRC - 1/8/21
Seats and Restraints 39
Obstructions
If something has blocked the driver seat
while recalling a memory position, the recall
may stop. Remove the obstruction and try
the recall again. If the memory position still
does not recall, see your dealer.
Heated and Ventilated Front
Seats
{Warning
If temperature change or pain to the skin
cannot be felt, the seat heater may cause
burns. To reduce the risk of burns, use
care when using the seat heater,
especially for long periods of time. Do
not place anything on the seat that
insulates against heat, such as a blanket,
cushion, cover, or similar item. This may
cause the seat heater to overheat. An
overheated seat heater may cause a burn
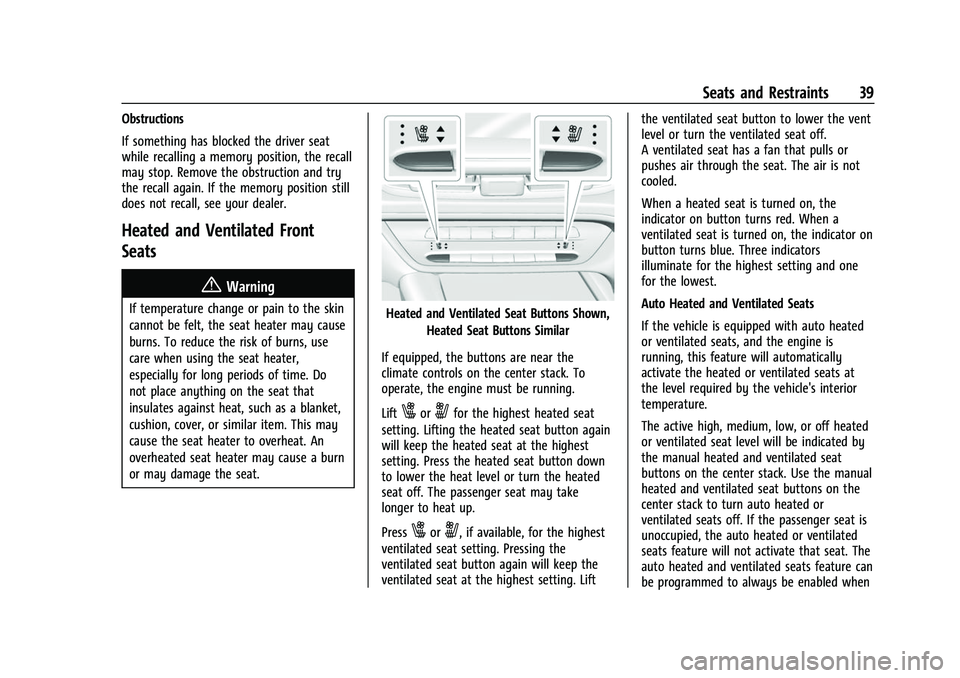
or may damage the seat.Heated and Ventilated Seat Buttons Shown,Heated Seat Buttons Similar
If equipped, the buttons are near the
climate controls on the center stack. To
operate, the engine must be running.
Lift
xoryfor the highest heated seat
setting. Lifting the heated seat button again
will keep the heated seat at the highest
setting. Press the heated seat button down
to lower the heat level or turn the heated
seat off. The passenger seat may take
longer to heat up.
Press
xory, if available, for the highest
ventilated seat setting. Pressing the
ventilated seat button again will keep the
ventilated seat at the highest setting. Lift the ventilated seat button to lower the vent
level or turn the ventilated seat off.
A ventilated seat has a fan that pulls or
pushes air through the seat. The air is not
cooled.
When a heated seat is turned on, the
indicator on button turns red. When a
ventilated seat is turned on, the indicator on
button turns blue. Three indicators
illuminate for the highest setting and one
for the lowest.
Auto Heated and Ventilated Seats
If the vehicle is equipped with auto heated
or ventilated seats, and the engine is
running, this feature will automatically
activate the heated or ventilated seats at
the level required by the vehicle's interior
temperature.
The active high, medium, low, or off heated
or ventilated seat level will be indicated by
the manual heated and ventilated seat
buttons on the center stack. Use the manual
heated and ventilated seat buttons on the
center stack to turn auto heated or
ventilated seats off. If the passenger seat is
unoccupied, the auto heated or ventilated
seats feature will not activate that seat. The
auto heated and ventilated seats feature can
be programmed to always be enabled when
Page 111 of 360
Buick E2UB-N Owner Manual (GMNA-Localizing-U.S./Canada/Mexico-
14583509) - 2021 - CRC - 1/8/21
110 Instruments and Controls
Air Quality Sensor
This allows for selection of air quality sensor
operation at high or low sensitivity.
Select Off, Low Sensitivity, or High
Sensitivity.
Pollution Control
When set to on, this turns on the
Recirculation Mode at low vehicle speeds
such as heavy traffic.
Touch Off or On.
Auto Cooled Seats
This setting automatically turns on and
regulates the ventilated seats when the
cabin temperature is warm. SeeHeated and
Ventilated Front Seats 039.
Touch Off or On.
Auto Heated Seats
When enabled, this feature will
automatically activate the heated seats at
the level required by the interior
temperature. The auto heated seats can be
turned off by using the heated seat buttons
on the center stack. See Heated and
Ventilated Front Seats 039.
Touch Off or On. Auto Defog
When set to On, the front defog will
automatically react to temperature and
humidity conditions that may cause fogging.
Touch Off or On.
Auto Rear Defog
If equipped, this feature will automatically
turn on the rear defog.
Touch Off or On.
Ionizer
If equipped and on, this feature purifies the
air in the interior of the vehicle. See
Climate
Control Systems 0178.
Touch Off or On.
Collision/Detection Systems
Touch and the following may display:
.Alert Type
.Forward Collision System
.Front Pedestrian Detection
.Adaptive Cruise Go Notifier
.Lane Change Alert
.Park Assist
.Rear Camera Park Assist Symbols
.Rear Cross Traffic Alert Alert Type
This feature will set the type of alert
received from the driver assistance systems
to help avoid crashes, either Beeps or Safety
Alert Seat vibration pulses.
Touch Beeps or Safety Alert Seat.
Forward Collision System
This setting can alert of a potential crash
with a detected vehicle ahead and can apply
brakes to help reduce a collision’s severity.
Touch Off, Alert, or Alert and Brake.
Front Pedestrian Detection
This feature may help avoid or reduce the
harm caused by front-end crashes with
nearby pedestrians.
See
Front Pedestrian Braking (FPB) System
0 235.
Select Off, Alert, or Alert and Brake.
Adaptive Cruise Go Notifier
This feature will give a reminder that
Adaptive Cruise Control provides when it has
brought the vehicle to a complete stop
behind another stopping vehicle, and then
that vehicle drives on. See Adaptive Cruise
Control (Advanced) 0214.
Page 115 of 360
Buick E2UB-N Owner Manual (GMNA-Localizing-U.S./Canada/Mexico-
14583509) - 2021 - CRC - 1/8/21
114 Instruments and Controls
Universal Remote System
Programming
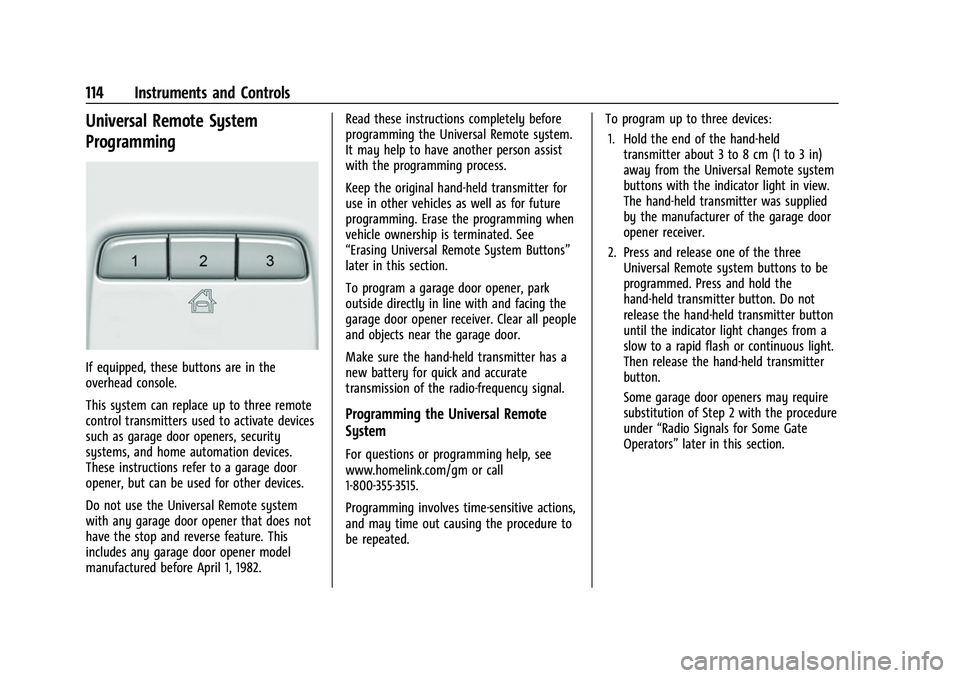
If equipped, these buttons are in the
overhead console.
This system can replace up to three remote
control transmitters used to activate devices
such as garage door openers, security
systems, and home automation devices.
These instructions refer to a garage door
opener, but can be used for other devices.
Do not use the Universal Remote system
with any garage door opener that does not
have the stop and reverse feature. This
includes any garage door opener model
manufactured before April 1, 1982.Read these instructions completely before
programming the Universal Remote system.
It may help to have another person assist
with the programming process.
Keep the original hand-held transmitter for
use in other vehicles as well as for future
programming. Erase the programming when
vehicle ownership is terminated. See
“Erasing Universal Remote System Buttons”
later in this section.
To program a garage door opener, park
outside directly in line with and facing the
garage door opener receiver. Clear all people
and objects near the garage door.
Make sure the hand-held transmitter has a
new battery for quick and accurate
transmission of the radio-frequency signal.
Programming the Universal Remote
System
For questions or programming help, see
www.homelink.com/gm or call
1-800-355-3515.
Programming involves time-sensitive actions,
and may time out causing the procedure to
be repeated.
To program up to three devices:
1. Hold the end of the hand-held transmitter about 3 to 8 cm (1 to 3 in)
away from the Universal Remote system
buttons with the indicator light in view.
The hand-held transmitter was supplied
by the manufacturer of the garage door
opener receiver.
2. Press and release one of the three Universal Remote system buttons to be
programmed. Press and hold the
hand-held transmitter button. Do not
release the hand-held transmitter button
until the indicator light changes from a
slow to a rapid flash or continuous light.
Then release the hand-held transmitter
button.
Some garage door openers may require
substitution of Step 2 with the procedure
under “Radio Signals for Some Gate
Operators” later in this section.
Page 116 of 360
Buick E2UB-N Owner Manual (GMNA-Localizing-U.S./Canada/Mexico-
14583509) - 2021 - CRC - 1/8/21
Instruments and Controls 115
3. Press and hold the newly programmedUniversal Remote system button for
five seconds while watching the indicator
light and garage door activation.
.If the indicator light stays on
continuously or the garage door
moves when the button is pressed,
then programming is complete. There
is no need to complete Steps 4–6.
.If the indicator light does not come
on or the garage door does not
move, a second button press may be
required. For a second time, press
and hold the newly programmed
button for five seconds. If the
indicator light is continuously lit,
or the garage door moves,
programming is complete.
.If the indicator light flashes rapidly
and the garage door does not move,
continue with programming
Steps 4–6.
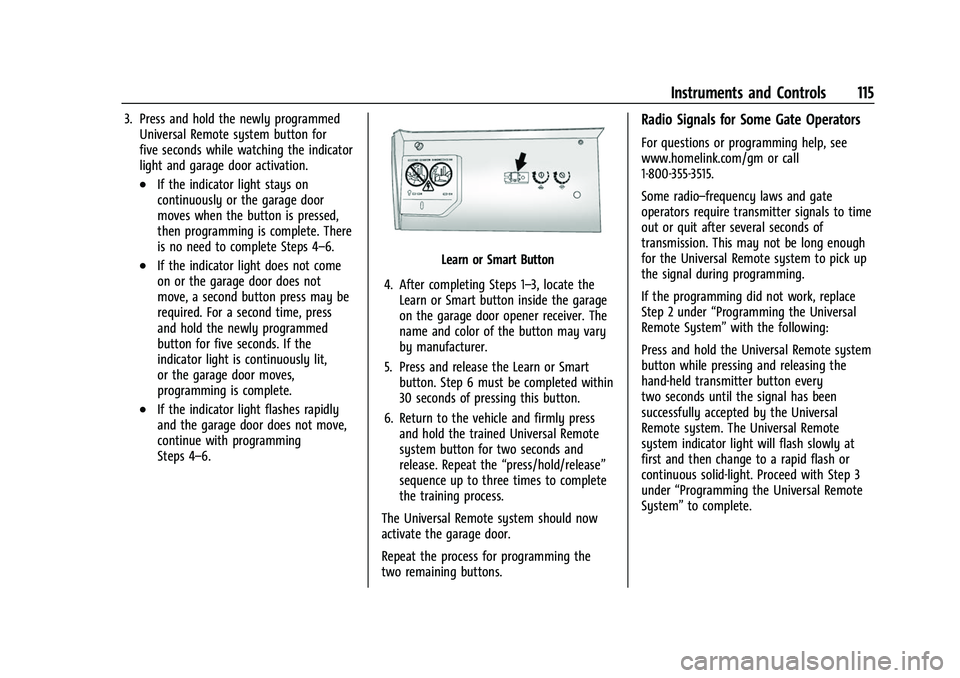
Learn or Smart Button
4. After completing Steps 1–3, locate the Learn or Smart button inside the garage
on the garage door opener receiver. The
name and color of the button may vary
by manufacturer.
5. Press and release the Learn or Smart button. Step 6 must be completed within
30 seconds of pressing this button.
6. Return to the vehicle and firmly press and hold the trained Universal Remote
system button for two seconds and
release. Repeat the “press/hold/release”
sequence up to three times to complete
the training process.
The Universal Remote system should now
activate the garage door.
Repeat the process for programming the
two remaining buttons.
Radio Signals for Some Gate Operators
For questions or programming help, see
www.homelink.com/gm or call
1-800-355-3515.
Some radio–frequency laws and gate
operators require transmitter signals to time
out or quit after several seconds of
transmission. This may not be long enough
for the Universal Remote system to pick up
the signal during programming.
If the programming did not work, replace
Step 2 under “Programming the Universal
Remote System” with the following:
Press and hold the Universal Remote system
button while pressing and releasing the
hand-held transmitter button every
two seconds until the signal has been
successfully accepted by the Universal
Remote system. The Universal Remote
system indicator light will flash slowly at
first and then change to a rapid flash or
continuous solid-light. Proceed with Step 3
under “Programming the Universal Remote
System” to complete.
Page 117 of 360
Buick E2UB-N Owner Manual (GMNA-Localizing-U.S./Canada/Mexico-
14583509) - 2021 - CRC - 1/8/21
116 Instruments and Controls
Universal Remote System
Operation
Using the Universal Remote System
Press and hold the appropriate Universal
Remote system button for at least one-half
second. The indicator light will come on
while the signal is being transmitted.
Erasing Universal Remote System
Buttons
Erase all programmed buttons when vehicle
ownership is terminated.
To erase:1. Press and hold the two outside buttons until the indicator light begins to flash.
This should take about 10 seconds.
2. Release both buttons.
Reprogramming a Single Universal
Remote System Button
To reprogram any of the system buttons: 1. Press and hold any one of the buttons. Do not release the button. 2. The indicator light will begin to flash
after 20 seconds. Without releasing the
button, proceed with Step 1 under
“Programming the Universal Remote
System.”
Page 123 of 360
Buick E2UB-N Owner Manual (GMNA-Localizing-U.S./Canada/Mexico-
14583509) - 2021 - CRC - 1/8/21
122 Lighting
Turn and Lane-Change Signals
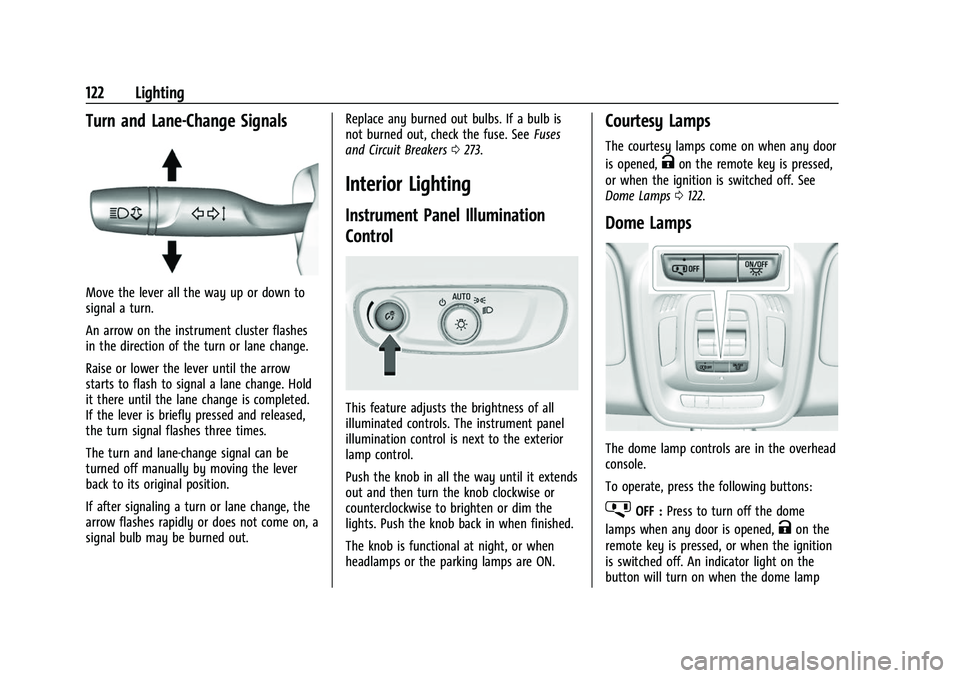
Move the lever all the way up or down to
signal a turn.
An arrow on the instrument cluster flashes
in the direction of the turn or lane change.
Raise or lower the lever until the arrow
starts to flash to signal a lane change. Hold
it there until the lane change is completed.
If the lever is briefly pressed and released,
the turn signal flashes three times.
The turn and lane-change signal can be
turned off manually by moving the lever
back to its original position.
If after signaling a turn or lane change, the
arrow flashes rapidly or does not come on, a
signal bulb may be burned out.Replace any burned out bulbs. If a bulb is
not burned out, check the fuse. See
Fuses
and Circuit Breakers 0273.
Interior Lighting
Instrument Panel Illumination
Control
This feature adjusts the brightness of all
illuminated controls. The instrument panel
illumination control is next to the exterior
lamp control.
Push the knob in all the way until it extends
out and then turn the knob clockwise or
counterclockwise to brighten or dim the
lights. Push the knob back in when finished.
The knob is functional at night, or when
headlamps or the parking lamps are ON.
Courtesy Lamps
The courtesy lamps come on when any door
is opened,
Kon the remote key is pressed,
or when the ignition is switched off. See
Dome Lamps 0122.
Dome Lamps
The dome lamp controls are in the overhead
console.
To operate, press the following buttons:
jOFF : Press to turn off the dome
lamps when any door is opened,
Kon the
remote key is pressed, or when the ignition
is switched off. An indicator light on the
button will turn on when the dome lamp
Page 138 of 360
Buick E2UB-N Owner Manual (GMNA-Localizing-U.S./Canada/Mexico-
14583509) - 2021 - CRC - 1/8/21
Infotainment System 137
Music can be launched by touching
Bluetooth from the recent sources list on
the left of the display or by touching the
More option and then touching the
Bluetooth device.
To play music via Bluetooth:1. Power on the device, and pair to connect the device.
2. Once paired, touch Audio from the Home Page, then touch Bluetooth from the
recent sources list on the left of the
display.
Bluetooth Sound Menu
See “Infotainment System Sound Menu”
under AM-FM Radio 0130.
Manage Bluetooth Devices
From the Home Page: 1. Touch Audio.
2. Touch Devices to add or delete devices.
When using the Bluetooth audio source, the
radio may not be able to launch specific
applications on your device. Use the device
to start audio playback when it is safe to
do so. All devices launch audio differently. When
selecting Bluetooth audio as a source, the
radio may show as paused on the display.
Touch
rto begin playback.
Browse functionality will be provided where
supported by the Bluetooth device. This
media content will not be part of the
MyMedia source mode.
Some smartphones support sending
Bluetooth music information to display on
the radio. When the radio receives this
information, it will check to see if any is
available and display it. For more
information about supported Bluetooth
features, see your dealer.
OnStar System
4G LTE
If equipped with 4G LTE, up to seven
devices, such as smartphones, tablets, and
laptops, can be connected to high-speed
Internet through the vehicle’s built-in Wi-Fi
hotspot.
Call 1-888-4ONSTAR (1-888-466-7827) to
connect to an OnStar Advisor for assistance.
See www.onstar.com for vehicle availability,
details, and system limitations. Service and connectivity may vary by make, model,
year, carrier, availability, and conditions.
4G LTE service is available in select markets.
4G LTE performance is based on industry
averages and vehicle systems design. Some
services require a data plan.
The OnStar App
If equipped, the infotainment system has
OnStar controls in the embedded OnStar app
on the Home Page. Most OnStar functions
that can be performed with the buttons can
be done using the app. To open the app,
touch the OnStar icon on the Home Page.
App updates require a corresponding service
plan. Features vary by region and model.
Features are subject to change. For more
information, see my.buick.com/learn or
press
Q.
Services
The Services tab displays the default view
for the app. Use this page to launch the
available OnStar services. Touch a service to
open its display. Touch Wi-Fi to launch the
connections manager. Turn-by-Turn and
Advisor Call are the other tiled options.