remove the rear seat BUICK ENVISION 2021 Owner's Manual
[x] Cancel search | Manufacturer: BUICK, Model Year: 2021, Model line: ENVISION, Model: BUICK ENVISION 2021Pages: 360, PDF Size: 10.4 MB
Page 13 of 360
Buick E2UB-N Owner Manual (GMNA-Localizing-U.S./Canada/Mexico-
14583509) - 2021 - CRC - 1/8/21
12 Keys, Doors, and Windows
3. Remove the old battery. Do not use ametal object.
4. Insert the new battery on the back housing, positive side facing down.
Replace with a CR2032 or equivalent
battery.
5. Align the front and back housing then snap the remote key together.
6. Reinsert the mechanical key.
Remote Vehicle Start
This feature allows the engine to be started
from outside the vehicle.
S: This button on the remote key is for
remote start.
The climate control system will use the
previous settings during a remote start. The
rear window defogger may come on during
remote start based on cold ambient
conditions. The rear defog indicator light
does not come on during remote start.
If equipped, the heated and ventilated front
seats may also come on when the vehicle
personalization setting is enabled. See
Heated and Ventilated Front Seats 039. If equipped with a remote start heated
steering wheel, it may come on during a
remote start. See
Heated Steering Wheel
0 82.
Laws in some local communities may restrict
the use of remote starters. For example,
some laws may require a person using
remote start to have the vehicle in view.
Check local regulations for any
requirements.
If your vehicle is low on fuel, do not use the
remote start feature. The vehicle may run
out of fuel.
The remote key range may be shorter while
the vehicle is running.
Other conditions can affect the performance
of the remote key. See Remote Keyless Entry
(RKE) System 07.
You are allowed multiple starts totaling
30 minutes of engine run time. The
maximum run time of a single start is
15 minutes, and it will shut off
automatically. You could do three 10 minute
starts if you manually shut off after
10 minutes. The last 10 minute start would
shut off automatically as your total
30 minutes will have been used. Starting the Engine Using Remote Start
1. Press
Stwice on the remote key. The
turn signal lamps will flash. The lamps
flash to confirm the request to remote
start the vehicle has been received.
During the remote start, the doors will
be locked and the parking lamps will
remain on as long as the engine is
running.
2. The engine will shut off after 15 minutes or after the remainder of the 30 minute
total running time is used, unless you
stop the remote start before engine
running has completed or the vehicle is
turned on.
3. After entering the vehicle during a remote start, press the brake and ENGINE
START/STOP with the remote key in the
vehicle to drive the vehicle.
Additional Engine Run Time
Remote start can be used for up to
30 minutes of total engine run time.
After two remote starts of 15 minutes,
or multiple shorter time starts totaling
30 minutes have been used, the vehicle
must be started normally before the remote
start can be used again.
Page 56 of 360
Buick E2UB-N Owner Manual (GMNA-Localizing-U.S./Canada/Mexico-
14583509) - 2021 - CRC - 1/8/21
Seats and Restraints 55
turn off the front outboard passenger
frontal airbag, depending upon the person's
seating posture and body build. Everyone in
the vehicle who has outgrown child
restraints should wear a seat belt
properly—whether or not there is an
airbag for that person.
{Warning
If the airbag readiness light ever comes
on and stays on, it means that
something may be wrong with the airbag
system. To help avoid injury to yourself
or others, have the vehicle serviced right
away. See Airbag Readiness Light 094
for more information, including important
safety information.
If the On Indicator Is Lit for a Child
Restraint
The passenger sensing system is designed to
turn off the front outboard passenger
frontal airbag if the system determines that
an infant is present in a child restraint. If a
child restraint has been installed and the ON
indicator is lit:
1. Turn the vehicle off. 2. Remove the child restraint from the
vehicle.
3. Remove any additional items from the seat such as blankets, cushions, seat
covers, seat heaters, or seat massagers.
4. Reinstall the child restraint following the directions provided by the child restraint
manufacturer and refer to Securing Child
Restraints (With the Seat Belt in the
Front Seat) 073 or
Securing Child Restraints (With the Seat
Belt in the Rear Seat) 071.
Make sure the seat belt retractor is
locked by pulling the shoulder belt all
the way out of the retractor when
installing the child restraint, even if the
child restraint is equipped with a seat
belt lock off. When the retractor lock is
set, the belt can be tightened but not
pulled out of the retractor.
5. If, after reinstalling the child restraint and restarting the vehicle, the ON
indicator is still lit, turn the vehicle off.
Then slightly recline the vehicle seatback
and adjust the seat cushion,
if adjustable, to make sure that the
vehicle seatback is not pushing the child
restraint into the seat cushion. Also make sure the child restraint is not
trapped under the vehicle head restraint.
If this happens, adjust the head restraint.
See
Head Restraints 032.
6. Restart the vehicle.
The passenger sensing system may or may
not turn off the airbag for a child in a child
restraint depending upon the child’s size.
It is better to secure the child restraint in a
rear seat. Never put a rear-facing child
restraint in the front seat, even if the ON
indicator is not lit.
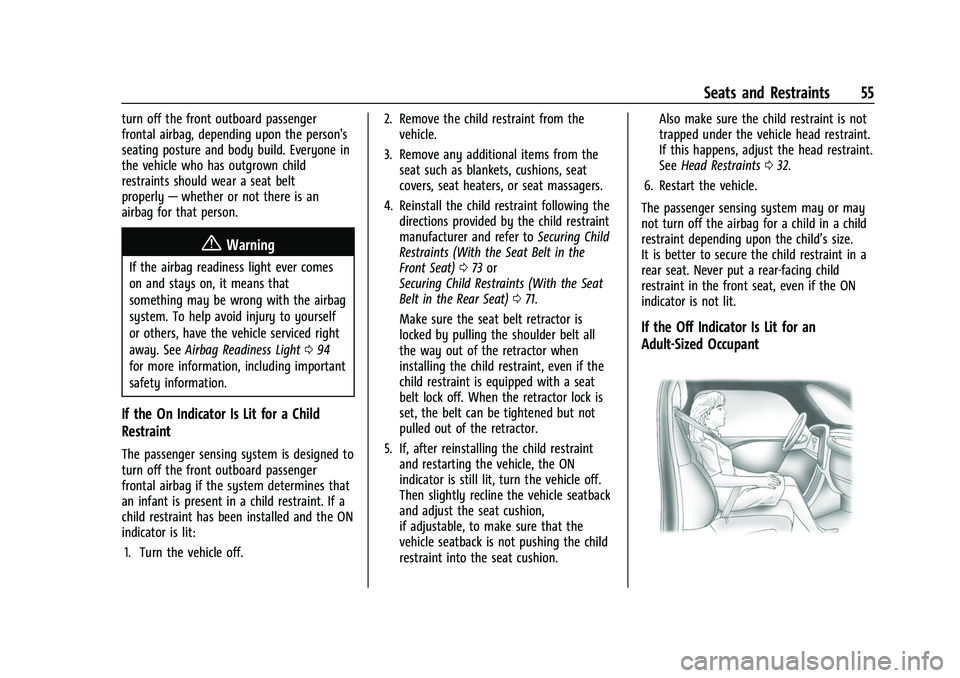
If the Off Indicator Is Lit for an
Adult-Sized Occupant
Page 72 of 360
Buick E2UB-N Owner Manual (GMNA-Localizing-U.S./Canada/Mexico-
14583509) - 2021 - CRC - 1/8/21
Seats and Restraints 71
Warning (Continued)
after a crash, see your dealer to have the
system inspected and any necessary
replacements made as soon as possible.
If the vehicle has the LATCH system and it
was being used during a crash, new LATCH
system parts may be needed.
New parts and repairs may be necessary
even if the LATCH system was not being
used at the time of the crash.
Securing Child Restraints (With
the Seat Belt in the Rear Seat)
When securing a child restraint with the
seat belts in a rear seat position, study the
instructions that came with the child
restraint to make sure it is compatible with
this vehicle.
If the child restraint has the LATCH system,
see Lower Anchors and Tethers for Children
(LATCH System) 065 for how and where to
install the child restraint using LATCH. If a
child restraint is secured in the vehicle using
a seat belt and it uses a top tether, see
Lower Anchors and Tethers for Children
(LATCH System) 065 for top tether anchor
locations. Do not secure a child seat in a position
without a top tether anchor if a national or
local law requires that the top tether be
anchored, or if the instructions that come
with the child restraint say that the top
tether must be anchored.
In Canada, the law requires that
forward-facing child restraints have a top
tether, and that the tether be attached.
If the child restraint or vehicle seat position
does not have the LATCH system, you will
be using the seat belt to secure the child
restraint. Be sure to follow the instructions
that came with the child restraint.
If more than one child restraint needs to be
installed in the rear seat, be sure to read
Where to Put the Restraint
063.
1. Put the child restraint on the seat. If the head restraint interferes with the
proper installation of the child restraint,
the head restraint may be removed. See
"Head Restraint Removal and
Reinstallation" under Lower Anchors and
Tethers for Children (LATCH System)
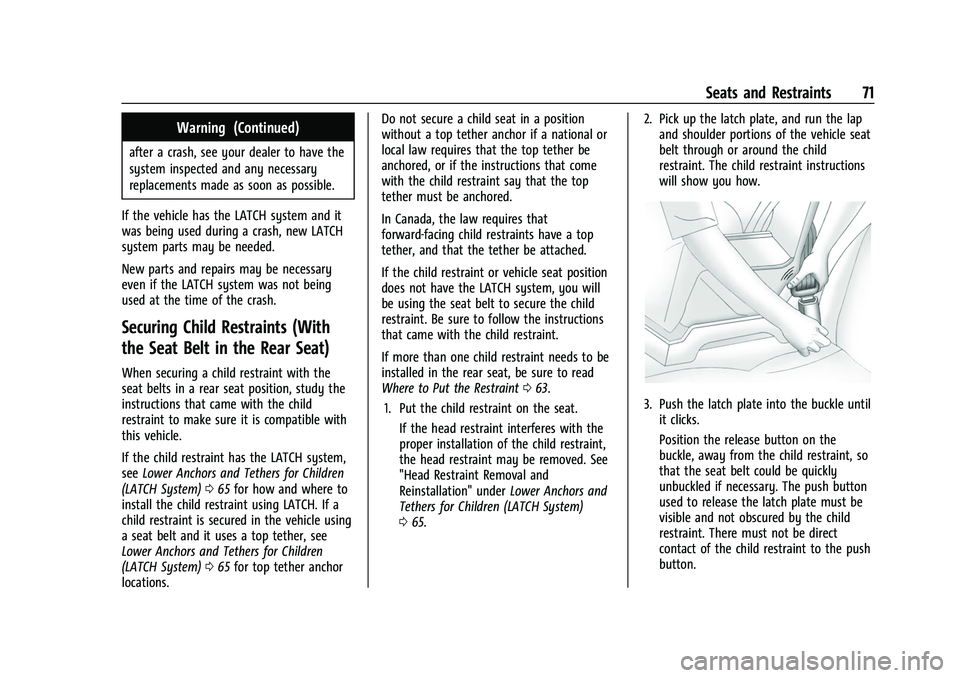
0 65. 2. Pick up the latch plate, and run the lap
and shoulder portions of the vehicle seat
belt through or around the child
restraint. The child restraint instructions
will show you how.
3. Push the latch plate into the buckle untilit clicks.
Position the release button on the
buckle, away from the child restraint, so
that the seat belt could be quickly
unbuckled if necessary. The push button
used to release the latch plate must be
visible and not obscured by the child
restraint. There must not be direct
contact of the child restraint to the push
button.
Page 78 of 360
Buick E2UB-N Owner Manual (GMNA-Localizing-U.S./Canada/Mexico-
14583509) - 2021 - CRC - 1/8/21
Storage 77
Rear
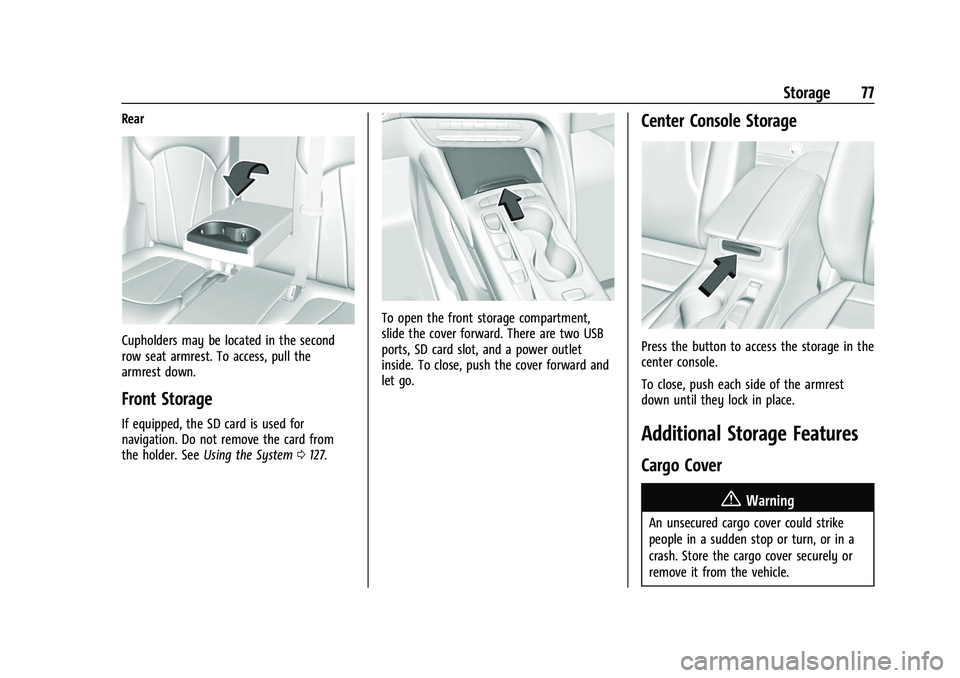
Cupholders may be located in the second
row seat armrest. To access, pull the
armrest down.
Front Storage
If equipped, the SD card is used for
navigation. Do not remove the card from
the holder. SeeUsing the System 0127.
To open the front storage compartment,
slide the cover forward. There are two USB
ports, SD card slot, and a power outlet
inside. To close, push the cover forward and
let go.
Center Console Storage
Press the button to access the storage in the
center console.
To close, push each side of the armrest
down until they lock in place.
Additional Storage Features
Cargo Cover
{Warning
An unsecured cargo cover could strike
people in a sudden stop or turn, or in a
crash. Store the cargo cover securely or
remove it from the vehicle.
Page 183 of 360
Buick E2UB-N Owner Manual (GMNA-Localizing-U.S./Canada/Mexico-
14583509) - 2021 - CRC - 1/8/21
182 Climate Controls
be selected. The current mode appears in
the display. Pressing any of the three
buttons cancels automatic air delivery
control and the direction of the airflow is
controlled manually. Press AUTO to return
to automatic operation.
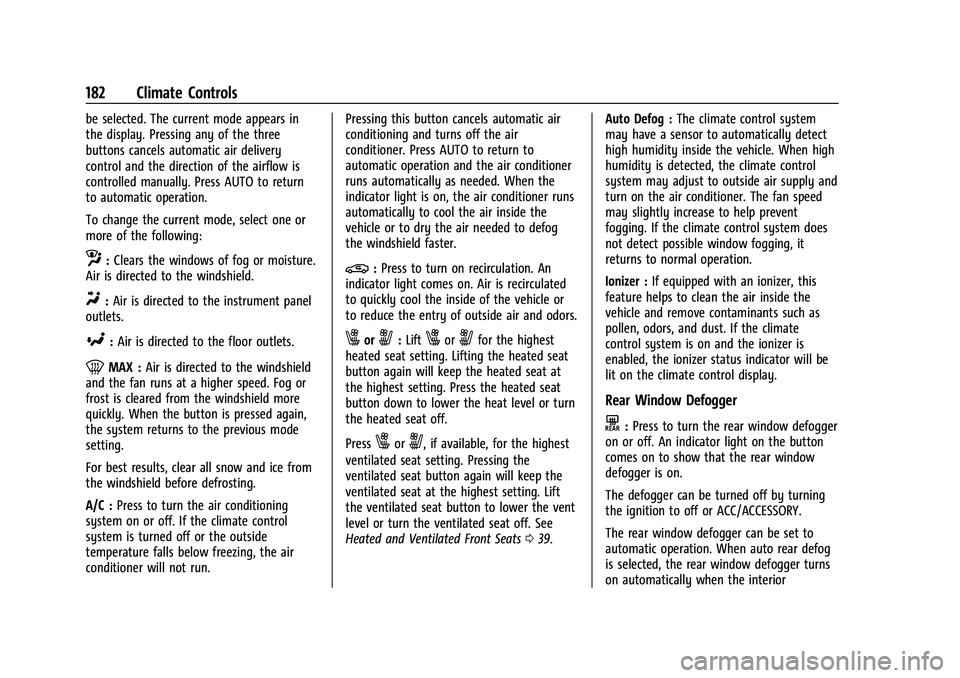
To change the current mode, select one or
more of the following:
z:Clears the windows of fog or moisture.
Air is directed to the windshield.
Y: Air is directed to the instrument panel
outlets.
[: Air is directed to the floor outlets.
0MAX : Air is directed to the windshield
and the fan runs at a higher speed. Fog or
frost is cleared from the windshield more
quickly. When the button is pressed again,
the system returns to the previous mode
setting.
For best results, clear all snow and ice from
the windshield before defrosting.
A/C : Press to turn the air conditioning
system on or off. If the climate control
system is turned off or the outside
temperature falls below freezing, the air
conditioner will not run. Pressing this button cancels automatic air
conditioning and turns off the air
conditioner. Press AUTO to return to
automatic operation and the air conditioner
runs automatically as needed. When the
indicator light is on, the air conditioner runs
automatically to cool the air inside the
vehicle or to dry the air needed to defog
the windshield faster.
@:
Press to turn on recirculation. An
indicator light comes on. Air is recirculated
to quickly cool the inside of the vehicle or
to reduce the entry of outside air and odors.
xory: Liftxoryfor the highest
heated seat setting. Lifting the heated seat
button again will keep the heated seat at
the highest setting. Press the heated seat
button down to lower the heat level or turn
the heated seat off.
Press
xory, if available, for the highest
ventilated seat setting. Pressing the
ventilated seat button again will keep the
ventilated seat at the highest setting. Lift
the ventilated seat button to lower the vent
level or turn the ventilated seat off. See
Heated and Ventilated Front Seats 039. Auto Defog :
The climate control system
may have a sensor to automatically detect
high humidity inside the vehicle. When high
humidity is detected, the climate control
system may adjust to outside air supply and
turn on the air conditioner. The fan speed
may slightly increase to help prevent
fogging. If the climate control system does
not detect possible window fogging, it
returns to normal operation.
Ionizer : If equipped with an ionizer, this
feature helps to clean the air inside the
vehicle and remove contaminants such as
pollen, odors, and dust. If the climate
control system is on and the ionizer is
enabled, the ionizer status indicator will be
lit on the climate control display.
Rear Window Defogger
K: Press to turn the rear window defogger
on or off. An indicator light on the button
comes on to show that the rear window
defogger is on.
The defogger can be turned off by turning
the ignition to off or ACC/ACCESSORY.
The rear window defogger can be set to
automatic operation. When auto rear defog
is selected, the rear window defogger turns
on automatically when the interior
Page 228 of 360
Buick E2UB-N Owner Manual (GMNA-Localizing-U.S./Canada/Mexico-
14583509) - 2021 - CRC - 1/8/21
Driving and Operating 227
.The sensors may not be clean. Keep the
vehicle's front and rear bumpers free of
mud, dirt, snow, ice, and slush. For
cleaning instructions, seeExterior Care
0 305.
.The Park Assist sensors may be covered
by frost or ice. Frost or ice can form
around and behind the sensors and may
not always be seen; this can occur after
washing the vehicle in cold weather. The
message may not clear until the frost or
ice has melted.
If a service message displays and the above
conditions do not exist, take the vehicle to
your dealer for repairs.
If the Park Assist System does not activate
due to a temporary condition, a system off
message is shown on the display. This can
occur under the following conditions:
.The driver has disabled the system.
.An object is currently blocking the rear
sensors (for example, bike rack, tailgate,
trailer hitch, etc.). Once the object is
removed, Park Assist will return to normal
operation.
.The bumper is damaged. Take the vehicle
to your dealer for repairs.
.Other conditions, such as vibrations from
a jackhammer or the compression of air
brakes on a very large truck, are affecting
system performance.
Backing Warning and Reverse Automatic
Braking (RAB)
Vehicles with Adaptive Cruise Control (ACC)
have the Backing Warning System and
Reverse Automatic Braking (RAB) system.
When in R (Reverse), Backing Warning alerts
of rear objects at vehicle speeds greater
than 8 km/h (5 mph), and RAB may
automatically brake hard at speeds between
1–32 km/h (0.5–20 mph).
The Backing Warning System will beep once
from the rear when an object is first
detected, or pulse twice on both sides of the
Safety Alert Seat. When the system detects
a potential crash, beeps will be heard from
the rear, or five pulses will be felt on both
sides of the Safety Alert Seat. There may
also be a brief, sharp application of the
brakes.{Warning
The Backing Warning System only
operates at speeds greater than 8 km/h
(5 mph). It does not detect children,
pedestrians, bicyclists, animals, or objects
below the bumper or that are too close
or too far from the vehicle. In some
situations, such as at higher backing
speeds, there may not be enough time
for the short, sharp application of the
vehicle brake system to occur. To prevent
injury, death, or vehicle damage, even
with the Backing Warning System, always
check the area around the vehicle and
check all mirrors before backing.
When the vehicle is in R (Reverse), if the
system detects the vehicle is backing too
fast to avoid a crash with a detected object
behind your vehicle in your path, it may
automatically brake hard to a stop to help
avoid or reduce the harm caused by a
backing crash.
Page 291 of 360
Buick E2UB-N Owner Manual (GMNA-Localizing-U.S./Canada/Mexico-
14583509) - 2021 - CRC - 1/8/21
290 Vehicle Care
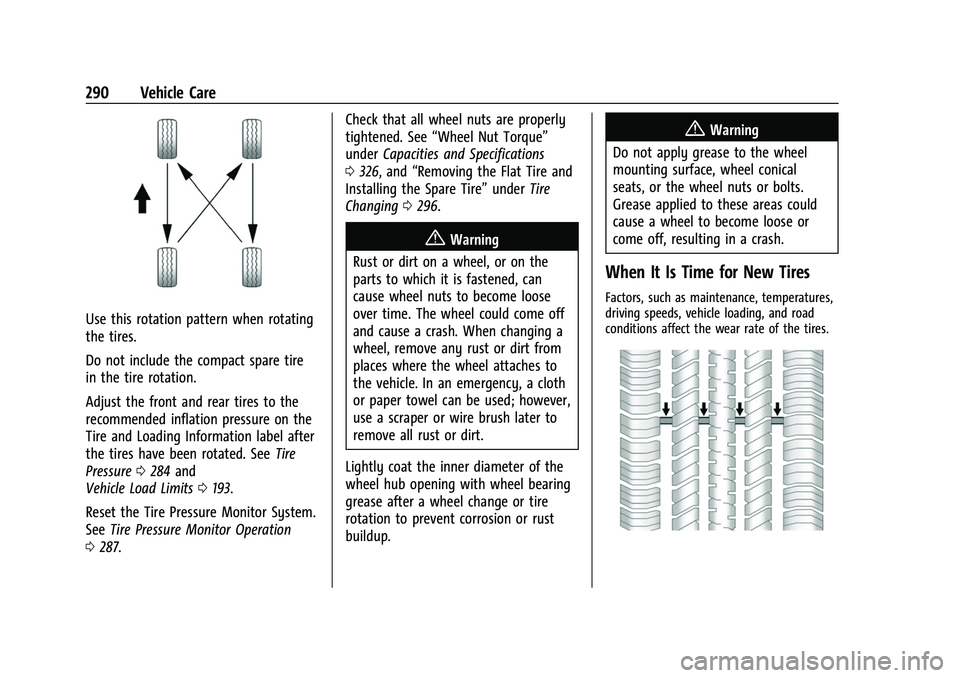
Use this rotation pattern when rotating
the tires.
Do not include the compact spare tire
in the tire rotation.
Adjust the front and rear tires to the
recommended inflation pressure on the
Tire and Loading Information label after
the tires have been rotated. SeeTire
Pressure 0284 and
Vehicle Load Limits 0193.
Reset the Tire Pressure Monitor System.
See Tire Pressure Monitor Operation
0 287. Check that all wheel nuts are properly
tightened. See
“Wheel Nut Torque”
under Capacities and Specifications
0 326, and “Removing the Flat Tire and
Installing the Spare Tire” underTire
Changing 0296.
{Warning
Rust or dirt on a wheel, or on the
parts to which it is fastened, can
cause wheel nuts to become loose
over time. The wheel could come off
and cause a crash. When changing a
wheel, remove any rust or dirt from
places where the wheel attaches to
the vehicle. In an emergency, a cloth
or paper towel can be used; however,
use a scraper or wire brush later to
remove all rust or dirt.
Lightly coat the inner diameter of the
wheel hub opening with wheel bearing
grease after a wheel change or tire
rotation to prevent corrosion or rust
buildup.
{Warning
Do not apply grease to the wheel
mounting surface, wheel conical
seats, or the wheel nuts or bolts.
Grease applied to these areas could
cause a wheel to become loose or
come off, resulting in a crash.
When It Is Time for New Tires
Factors, such as maintenance, temperatures,
driving speeds, vehicle loading, and road
conditions affect the wear rate of the tires.
Page 301 of 360

Buick E2UB-N Owner Manual (GMNA-Localizing-U.S./Canada/Mexico-
14583509) - 2021 - CRC - 1/8/21
300 Vehicle Care
17. Tighten the wheel nuts firmly in acrisscross sequence, as shown.
18. Lower the jack all the way and remove the jack from under the vehicle.
19. Tighten the wheel nuts firmly with the wheel wrench.
When reinstalling the wheel cover or center
cap on the full-size tire, tighten all five
plastic caps hand snug, then tighten them
with the wheel wrench an additional
one-quarter turn.
Caution
Wheel covers will not fit on the vehicle's
compact spare. If you try to put a wheel
cover on the compact spare, the cover or
the spare could be damaged.
Storing a Flat or Spare Tire and Tools
{Warning
Storing a jack, a tire, or other equipment
in the passenger compartment of the
vehicle could cause injury. In a sudden
stop or collision, loose equipment could
strike someone. Store all these in the
proper place.
To store the flat tire: 1. Return the jack and tools to their original storage location.
2. Replace the spare tire cover.
3. Place the folded load floor in the rear storage compartment and seat the
clips (1) into the metal brackets (2) on
both sides. Push the load floor forward
slightly, then unfold it and lower it into
place.
4. Place the flat tire, lying flat, in the rear storage compartment.
5. Place the loop end of the strap through the liftgate striker.