set clock BUICK ENVISION 2021 Owner's Manual
[x] Cancel search | Manufacturer: BUICK, Model Year: 2021, Model line: ENVISION, Model: BUICK ENVISION 2021Pages: 360, PDF Size: 10.4 MB
Page 86 of 360

Buick E2UB-N Owner Manual (GMNA-Localizing-U.S./Canada/Mexico-
14583509) - 2021 - CRC - 1/8/21
Instruments and Controls 85
lever is in R (Reverse), and the front
windshield wiper is performing interval
wipes, then the rear wiper automatically
performs interval wipes.
This feature can be turned on or off.
The windshield washer reservoir is used for
the windshield and rear window. Check the
fluid level if either washer is not working.
SeeWasher Fluid 0266.
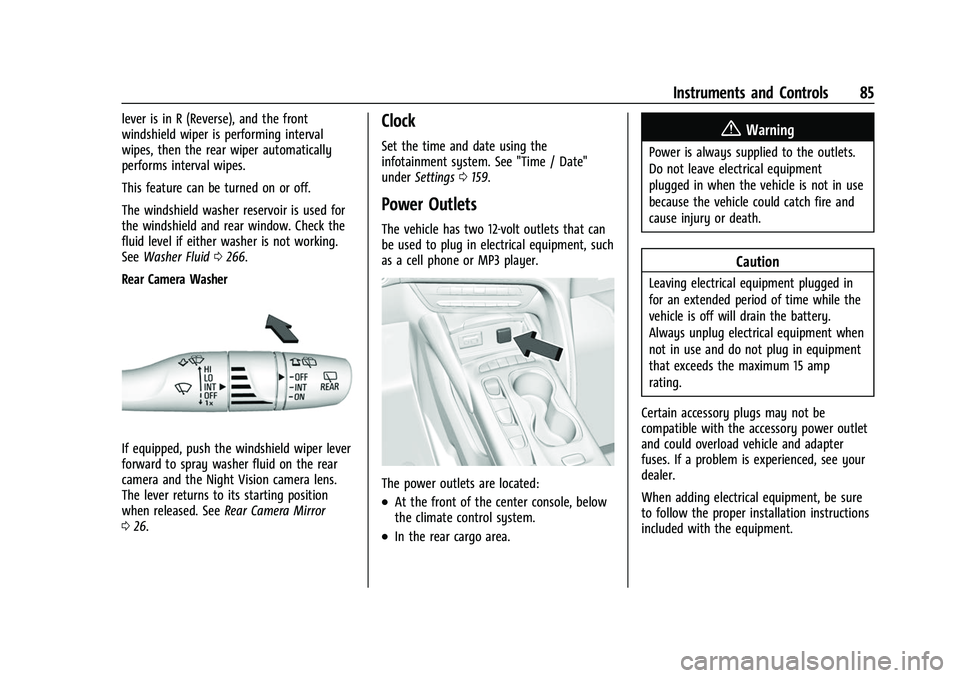
Rear Camera Washer
If equipped, push the windshield wiper lever
forward to spray washer fluid on the rear
camera and the Night Vision camera lens.
The lever returns to its starting position
when released. See Rear Camera Mirror
0 26.
Clock
Set the time and date using the
infotainment system. See "Time / Date"
under Settings 0159.
Power Outlets
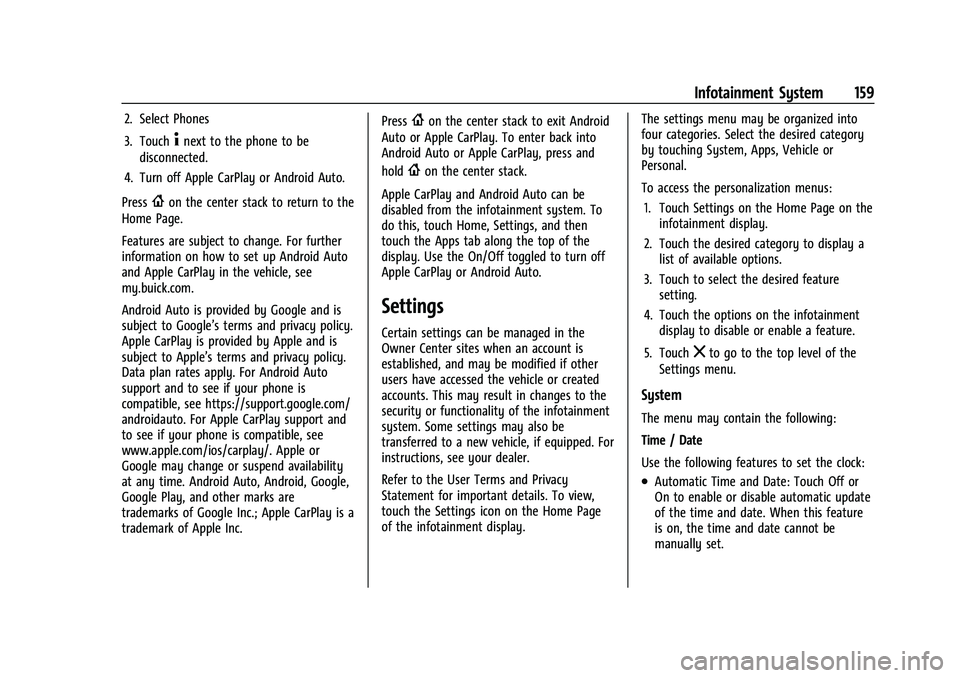
The vehicle has two 12-volt outlets that can
be used to plug in electrical equipment, such
as a cell phone or MP3 player.
The power outlets are located:
.At the front of the center console, below
the climate control system.
.In the rear cargo area.
{Warning
Power is always supplied to the outlets.
Do not leave electrical equipment
plugged in when the vehicle is not in use
because the vehicle could catch fire and
cause injury or death.
Caution
Leaving electrical equipment plugged in
for an extended period of time while the
vehicle is off will drain the battery.
Always unplug electrical equipment when
not in use and do not plug in equipment
that exceeds the maximum 15 amp
rating.
Certain accessory plugs may not be
compatible with the accessory power outlet
and could overload vehicle and adapter
fuses. If a problem is experienced, see your
dealer.
When adding electrical equipment, be sure
to follow the proper installation instructions
included with the equipment.
Page 160 of 360

Buick E2UB-N Owner Manual (GMNA-Localizing-U.S./Canada/Mexico-
14583509) - 2021 - CRC - 1/8/21
Infotainment System 159
2. Select Phones
3. Touch
4next to the phone to be
disconnected.
4. Turn off Apple CarPlay or Android Auto.
Press
{on the center stack to return to the
Home Page.
Features are subject to change. For further
information on how to set up Android Auto
and Apple CarPlay in the vehicle, see
my.buick.com.
Android Auto is provided by Google and is
subject to Google’s terms and privacy policy.
Apple CarPlay is provided by Apple and is
subject to Apple’s terms and privacy policy.
Data plan rates apply. For Android Auto
support and to see if your phone is
compatible, see https://support.google.com/
androidauto. For Apple CarPlay support and
to see if your phone is compatible, see
www.apple.com/ios/carplay/. Apple or
Google may change or suspend availability
at any time. Android Auto, Android, Google,
Google Play, and other marks are
trademarks of Google Inc.; Apple CarPlay is a
trademark of Apple Inc. Press
{on the center stack to exit Android
Auto or Apple CarPlay. To enter back into
Android Auto or Apple CarPlay, press and
hold
{on the center stack.
Apple CarPlay and Android Auto can be
disabled from the infotainment system. To
do this, touch Home, Settings, and then
touch the Apps tab along the top of the
display. Use the On/Off toggled to turn off
Apple CarPlay or Android Auto.
Settings
Certain settings can be managed in the
Owner Center sites when an account is
established, and may be modified if other
users have accessed the vehicle or created
accounts. This may result in changes to the
security or functionality of the infotainment
system. Some settings may also be
transferred to a new vehicle, if equipped. For
instructions, see your dealer.
Refer to the User Terms and Privacy
Statement for important details. To view,
touch the Settings icon on the Home Page
of the infotainment display. The settings menu may be organized into
four categories. Select the desired category
by touching System, Apps, Vehicle or
Personal.
To access the personalization menus:
1. Touch Settings on the Home Page on the infotainment display.
2. Touch the desired category to display a list of available options.
3. Touch to select the desired feature setting.
4. Touch the options on the infotainment display to disable or enable a feature.
5. Touch
zto go to the top level of the
Settings menu.
System
The menu may contain the following:
Time / Date
Use the following features to set the clock:
.Automatic Time and Date: Touch Off or
On to enable or disable automatic update
of the time and date. When this feature
is on, the time and date cannot be
manually set.
Page 161 of 360

Buick E2UB-N Owner Manual (GMNA-Localizing-U.S./Canada/Mexico-
14583509) - 2021 - CRC - 1/8/21
160 Infotainment System
.Set Time: Touch to manually set the time
using the controls on the infotainment
display.
.Set Date: Touch to manually set the date
using the controls on the infotainment
display.
.Automatic Time Zone (If Equipped): Touch
Off or On to disable or enable automatic
update of the time zone based on vehicle
location. When this feature is on, the
time zone cannot be manually set.
.Select Time Zone: Touch to manually set
the time zone. Touch a time zone from
the list.
.Use 24-hour Format: Touch to specify the
clock format shown.
Touch Off or On to disable or enable.
Language
This will set the display language used on
the infotainment display. It may also use
the selected language for voice recognition
and audio feedback. Touch Language and
touch the appropriate language. Phones
Touch to connect to a different cell phone or
mobile device source, disconnect a cell
phone or media device, or delete a cell
phone or media device.
Wi-Fi Networks
This will show connected and available Wi-Fi
networks.
If a 4G LTE data package is not active on the
vehicle, the infotainment system can be
connected to an external protected Wi-Fi
network, such as a mobile device or home
hotspot, to utilize connected services.
Wi-Fi Hotspot
Touch and the following may display:
.Wi-Fi Services: This allows devices to use
the vehicle hotspot.
Touch the controls on the infotainment
display to disable or enable.
.Wi-Fi Name: Touch to change the vehicle
Wi-Fi name.
.Wi-Fi Password: Touch to change the
vehicle Wi-Fi password.
.Connected Devices: Touch to show
connected devices.
.Share Hotspot Data: Touch On to allow
devices to use the vehicle hotspot and its
data, or touch Off to allow devices to
only use the vehicle hotspot but not
its data.
Privacy
Touch and the following may display:
.Location Services: This setting enables or
disables sharing of vehicle location
outside the vehicle. Emergency services
will not be affected when Off is selected.
.Data Services: If equipped, this setting
determines if data sharing can be used by
features including Wi-Fi, Hotspot, and
applications. Touch Off to disable data
services. Emergency services and phone
calls, such as calls with OnStar Advisors or
others, will not be affected when Off is
selected.
.Voice Recognition Sharing: This setting
determines if voice commands can be
shared with a cloud-based voice
recognition system. Touch Off to prevent
the sharing and possible recording of your
voice commands with this system. This
may limit the system’s ability to
understand your voice commands and
may disable some features.
Page 298 of 360

Buick E2UB-N Owner Manual (GMNA-Localizing-U.S./Canada/Mexico-
14583509) - 2021 - CRC - 1/8/21
Vehicle Care 297
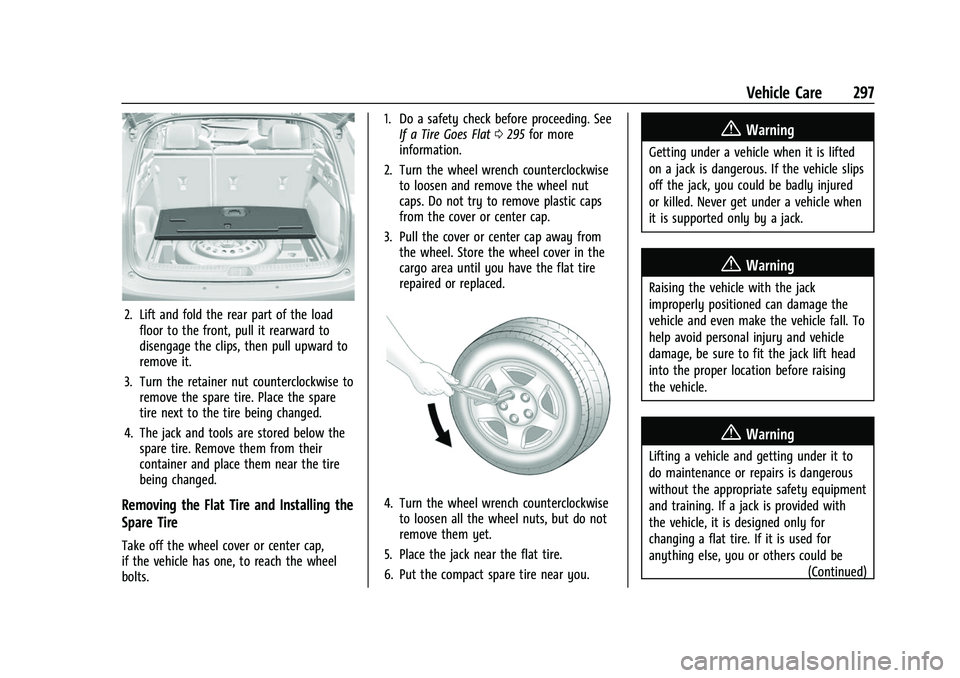
2. Lift and fold the rear part of the loadfloor to the front, pull it rearward to
disengage the clips, then pull upward to
remove it.
3. Turn the retainer nut counterclockwise to remove the spare tire. Place the spare
tire next to the tire being changed.
4. The jack and tools are stored below the spare tire. Remove them from their
container and place them near the tire
being changed.
Removing the Flat Tire and Installing the
Spare Tire
Take off the wheel cover or center cap,
if the vehicle has one, to reach the wheel
bolts. 1. Do a safety check before proceeding. See
If a Tire Goes Flat 0295 for more
information.
2. Turn the wheel wrench counterclockwise to loosen and remove the wheel nut
caps. Do not try to remove plastic caps
from the cover or center cap.
3. Pull the cover or center cap away from the wheel. Store the wheel cover in the
cargo area until you have the flat tire
repaired or replaced.
4. Turn the wheel wrench counterclockwiseto loosen all the wheel nuts, but do not
remove them yet.
5. Place the jack near the flat tire.
6. Put the compact spare tire near you.
{Warning
Getting under a vehicle when it is lifted
on a jack is dangerous. If the vehicle slips
off the jack, you could be badly injured
or killed. Never get under a vehicle when
it is supported only by a jack.
{Warning
Raising the vehicle with the jack
improperly positioned can damage the
vehicle and even make the vehicle fall. To
help avoid personal injury and vehicle
damage, be sure to fit the jack lift head
into the proper location before raising
the vehicle.
{Warning
Lifting a vehicle and getting under it to
do maintenance or repairs is dangerous
without the appropriate safety equipment
and training. If a jack is provided with
the vehicle, it is designed only for
changing a flat tire. If it is used for
anything else, you or others could be (Continued)