Release BUICK ENVISION 2023 User Guide
[x] Cancel search | Manufacturer: BUICK, Model Year: 2023, Model line: ENVISION, Model: BUICK ENVISION 2023Pages: 356, PDF Size: 7.42 MB
Page 50 of 356

Buick Envision Owner Manual (GMNA-Localizing-U.S./Canada/Mexico-
16060855) - 2023 - CRC - 2/9/22
Seats and Restraints 49
To unlatch the belt, push the button on the
buckle. The belt should return to its stowed
position.
Always stow the seat belt slowly. If the seat
belt webbing returns quickly to the stowed
position, the retractor may lock and cannot
be pulled out. If this happens, pull the seat
belt straight out firmly to unlock the
webbing, and then release it. If the webbing
is still locked in the retractor, see your
dealer.
Before a door is closed, be sure the seat belt
is out of the way. If a door is slammed
against a seat belt, damage can occur to
both the seat belt and the vehicle.
Shoulder Belt Height Adjuster
The vehicle has a shoulder belt height
adjuster for the driver and front outboard
passenger seating positions.
Adjust the height so that the shoulder
portion of the belt is on the shoulder and
not falling off of it. The belt should be close
to, but not contacting, the neck. Improper
shoulder belt height adjustment could
reduce the effectiveness of the seat belt in a
crash. SeeHow to Wear Seat Belts Properly
0 45.
Press and hold the release button while
raising or lowering the height adjuster to
the desired position. After the height adjuster is set to the
desired position, try to move it down
without pressing the release button to make
sure it has locked into position.
Seat Belt Pretensioners
This vehicle has seat belt pretensioners for
the front outboard occupants. Although the
seat belt pretensioners cannot be seen, they
are part of the seat belt assembly. They can
help tighten the seat belts during the early
stages of a moderate to severe frontal, near
frontal, or rear crash if the threshold
conditions for pretensioner activation are
met. Seat belt pretensioners can also help
tighten the seat belts in a side crash or a
rollover event.
Pretensioners work only once. If the
pretensioners activate in a crash, the
pretensioners and probably other parts of
the vehicle's seat belt system will need to
be replaced. See
Replacing Seat Belt System
Parts after a Crash 051.
Do not sit on the outboard seat belt while
entering or exiting the vehicle or at any
time while sitting in the seat. Sitting on the
seat belt can damage the webbing and
hardware.
Page 56 of 356

Buick Envision Owner Manual (GMNA-Localizing-U.S./Canada/Mexico-
16060855) - 2023 - CRC - 2/9/22
Seats and Restraints 55
Seat-mounted side impact airbags are
designed to inflate in moderate to severe
side crashes depending on the location of
the impact. These airbags may also inflate
in some moderate to severe frontal impacts.
Seat-mounted side impact airbags are not
designed to inflate in rollovers, or rear
impacts. A seat-mounted side impact airbag
is designed to inflate on the side of the
vehicle that is struck.
Roof-rail airbags are designed to inflate in
moderate to severe side crashes depending
on the location of the impact. In addition,
these roof-rail airbags may inflate during a
rollover or in a severe frontal impact.
Roof-rail airbags are not designed to inflate
in rear impacts. Both roof-rail airbags may
inflate when either side of the vehicle is
struck or if the sensing system predicts that
the vehicle is about to roll over on its side,
or in a severe frontal impact.
In any particular crash, no one can say
whether an airbag should have inflated
simply because of the vehicle damage or the
repair costs.What Makes an Airbag Inflate?
In a deployment event, the sensing system
sends an electrical signal triggering a release
of gas from the inflator. Gas from the
inflator fills the airbag causing the bag to
break out of the cover. The inflator, the
airbag, and related hardware are all part of
the airbag module.
For airbag locations, seeWhere Are the
Airbags? 053.
How Does an Airbag Restrain?
In moderate to severe frontal or near frontal
collisions, even belted occupants can contact
the steering wheel or the instrument panel.
In moderate to severe side collisions, even
belted occupants can contact the inside of
the vehicle.
Airbags supplement the protection provided
by seat belts by distributing the force of the
impact more evenly over the
occupant's body.
Rollover capable roof-rail airbags are
designed to help contain the head and chest
of occupants in the outboard seating
positions in the first and second rows. The
rollover capable roof-rail airbags are designed to help reduce the risk of full or
partial ejection in rollover events, although
no system can prevent all such ejections.
But airbags would not help in many types
of collisions, primarily because the
occupant's motion is not toward those
airbags. See
When Should an Airbag Inflate?
0 54.
Airbags should never be regarded as
anything more than a supplement to seat
belts.What Will You See after an
Airbag Inflates?
After frontal, knee, and seat-mounted side
impact airbags inflate, they quickly deflate,
so quickly that some people may not even
realize the airbags inflated. Roof-rail airbags
may still be at least partially inflated for
some time after they inflate. Some
components of the airbag module may be
hot for several minutes. For location of the
airbags, see Where Are the Airbags? 053.
The parts of the airbag that come into
contact with you may be warm, but not too
hot to touch. There may be some smoke
and dust coming from the vents in the
deflated airbags. Airbag inflation does not
Page 75 of 356

Buick Envision Owner Manual (GMNA-Localizing-U.S./Canada/Mexico-
16060855) - 2023 - CRC - 2/9/22
74 Seats and Restraints
If the vehicle has the LATCH system and it
was being used during a crash, new LATCH
system parts may be needed.
New parts and repairs may be necessary
even if the LATCH system was not being
used at the time of the crash.
Securing Child Restraints (With
the Seat Belt in the Rear Seat)
When securing a child restraint with the
seat belts in a rear seat position, study the
instructions that came with the child
restraint to make sure it is compatible with
this vehicle.
If the child restraint has the LATCH system,
seeLower Anchors and Tethers for Children
(LATCH System) 067 for how and where to
install the child restraint using LATCH. If a
child restraint is secured in the vehicle using
a seat belt and it uses a top tether, see
Lower Anchors and Tethers for Children
(LATCH System) 067 for top tether anchor
locations.
Do not secure a child seat in a position
without a top tether anchor if a national or
local law requires that the top tether be anchored, or if the instructions that come
with the child restraint say that the top
tether must be anchored.
In Canada, the law requires that
forward-facing child restraints have a top
tether, and that the tether be attached.
If the child restraint or vehicle seat position
does not have the LATCH system, you will
be using the seat belt to secure the child
restraint. Be sure to follow the instructions
that came with the child restraint.
If more than one child restraint needs to be
installed in the rear seat, be sure to read
Where to Put the Restraint
066.
1. Put the child restraint on the seat. If the head restraint interferes with the
proper installation of the child restraint,
the head restraint may be removed. See
"Head Restraint Removal and
Reinstallation" under Lower Anchors and
Tethers for Children (LATCH System) 067.
2. Pick up the latch plate, and run the lap and shoulder portions of the vehicle’s
seat belt through or around the restraint.
Ensure the seat belt webbing is routed
as direct as possible, and is not caught
on seat handles or plastic trim. The child
restraint instructions will show you how.
3. Push the latch plate into the buckle untilit clicks.
Position the release button on the
buckle, away from the child restraint, so
that the seat belt could be quickly
unbuckled if necessary. There must not
be direct contact of the child restraint to
the push button.
Page 78 of 356

Buick Envision Owner Manual (GMNA-Localizing-U.S./Canada/Mexico-
16060855) - 2023 - CRC - 2/9/22
Seats and Restraints 77
3. Pick up the latch plate, and run the lapand shoulder portions of the vehicle seat
belt through or around the restraint.
Ensure the seat belt webbing is routed
as direct as possible, and is not caught
on seat handles or plastic trim. The child
restraint instructions will show you how.
4. Push the latch plate into the buckle untilit clicks.
Position the release button on the
buckle, away from the child restraint, so
that the seat belt could be quickly
unbuckled if necessary.
5. Pull the shoulder belt all the way out ofthe retractor to set the lock. When the
retractor lock is set, the belt can be
tightened but not pulled out of the
retractor.6. To tighten the belt, push down on thechild restraint, pull the shoulder portion
of the belt to tighten the lap portion of
the belt, and feed the shoulder belt back
into the retractor.
There must be finger clearance between
the push button and the child restraint.
If there is not clearance between the
buckle push button and the child
restraint, move the seat upward and
repeat prior installation steps. Otherwise
secure the child restraint in a rear seat.
When installing a forward-facing child
restraint, it may be helpful to use your
knee to push down on the child restraint
as you tighten the belt.
Page 88 of 356

Buick Envision Owner Manual (GMNA-Localizing-U.S./Canada/Mexico-
16060855) - 2023 - CRC - 2/9/22
Instruments and Controls 87
AUTO :Move the windshield wiper lever to
AUTO. Turn the band on the wiper lever to
adjust the sensitivity.
.Turn the band up for more sensitivity to
moisture.
.Turn the band down for less sensitivity to
moisture.
.Move the windshield wiper lever out of
the AUTO position to deactivate
Rainsense.
Wiper Arm Assembly Protection
When using an automatic car wash, move
the windshield wiper lever to OFF. This
disables the automatic Rainsense windshield
wipers and/or manual windshield wipers. With Rainsense, if the transmission is in
N (Neutral) and the vehicle speed is very
slow, the wipers will automatically stop at
the base of the windshield.
The wiper operations return to normal when
the transmission is no longer in N (Neutral)
or the vehicle speed has increased.
Windshield Washer
f:
Pull the windshield wiper lever
toward you to spray windshield washer fluid
and activate the wipers. The wipers will
continue until the lever is released or the
maximum wash time is reached. When the
lever is released, additional wipes may occur
depending on how long the windshield
washer had been activated. See Washer
Fluid 0263 for information on filling the
windshield washer fluid reservoir.
Rear Window Wiper/Washer
The ignition must be on or in accessory
mode to operate the rear window
wiper/washer.
Rear Wiper without Rainsense Shown, with
Rainsense Similar
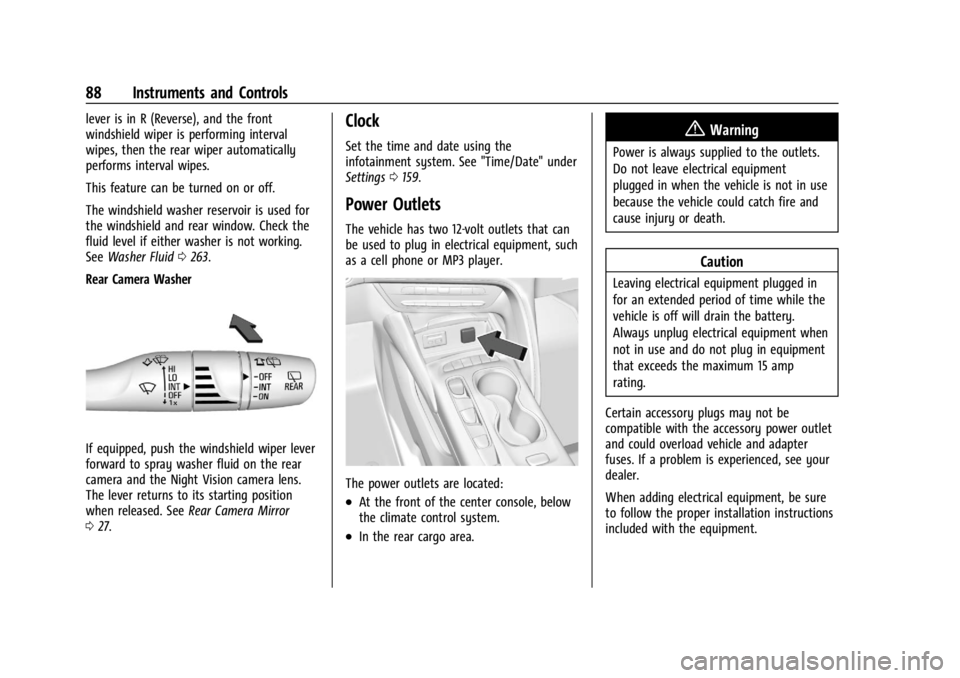
Turn the end of the windshield wiper lever
to operate the rear window wiper/washer.
OFF : Turns the system off.
INT : Intermittent wipes.
ON : Slow wipes.
1:Push the windshield wiper lever
forward to spray washer fluid on the rear
window. The lever automatically returns to
its original position when released.
Reverse Gear Wipes
If the rear wiper control is off, the rear
wiper will automatically operate
continuously when the shift lever is in
R (Reverse), and the front windshield wiper
is performing low or high speed wipes.
If the rear wiper control is off, the shift
Page 89 of 356

Buick Envision Owner Manual (GMNA-Localizing-U.S./Canada/Mexico-
16060855) - 2023 - CRC - 2/9/22
88 Instruments and Controls
lever is in R (Reverse), and the front
windshield wiper is performing interval
wipes, then the rear wiper automatically
performs interval wipes.
This feature can be turned on or off.
The windshield washer reservoir is used for
the windshield and rear window. Check the
fluid level if either washer is not working.
SeeWasher Fluid 0263.
Rear Camera Washer
If equipped, push the windshield wiper lever
forward to spray washer fluid on the rear
camera and the Night Vision camera lens.
The lever returns to its starting position
when released. See Rear Camera Mirror
0 27.
Clock
Set the time and date using the
infotainment system. See "Time/Date" under
Settings 0159.
Power Outlets
The vehicle has two 12-volt outlets that can
be used to plug in electrical equipment, such
as a cell phone or MP3 player.
The power outlets are located:
.At the front of the center console, below
the climate control system.
.In the rear cargo area.
{Warning
Power is always supplied to the outlets.
Do not leave electrical equipment
plugged in when the vehicle is not in use
because the vehicle could catch fire and
cause injury or death.
Caution
Leaving electrical equipment plugged in
for an extended period of time while the
vehicle is off will drain the battery.
Always unplug electrical equipment when
not in use and do not plug in equipment
that exceeds the maximum 15 amp
rating.
Certain accessory plugs may not be
compatible with the accessory power outlet
and could overload vehicle and adapter
fuses. If a problem is experienced, see your
dealer.
When adding electrical equipment, be sure
to follow the proper installation instructions
included with the equipment.
Page 101 of 356

Buick Envision Owner Manual (GMNA-Localizing-U.S./Canada/Mexico-
16060855) - 2023 - CRC - 2/9/22
100 Instruments and Controls
If the light comes on and stays on, there is
a brake problem. Have the brake system
inspected right away. This light may come
on if the brake fluid is low. SeeBrake Fluid
0 265.
If the light comes on while driving, pull off
the road and stop carefully. The brake pedal
might be harder to push, or the brake pedal
may go closer to the floor. It could take
longer to stop. If the light is still on, have
the vehicle towed for service. See
Transporting a Disabled Vehicle 0302.
{Warning
The brake system might not be working
properly if the brake system warning
light is on. Driving with the brake system
warning light on can lead to a crash.
If the light is still on after the vehicle has
been pulled off the road and carefully
stopped, have the vehicle towed for
service.
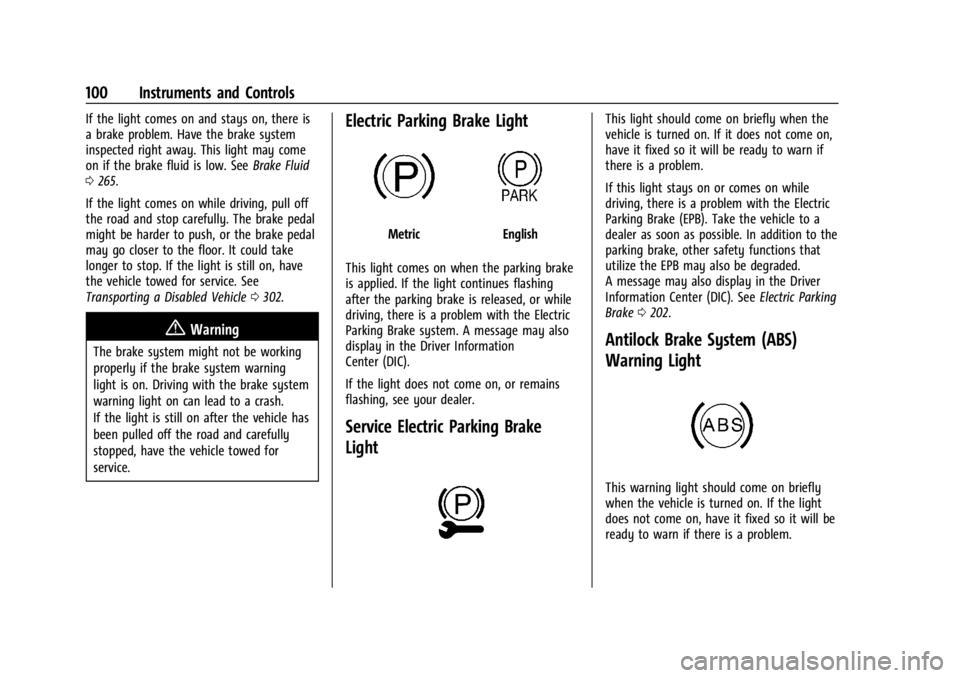
Electric Parking Brake Light
MetricEnglish
This light comes on when the parking brake
is applied. If the light continues flashing
after the parking brake is released, or while
driving, there is a problem with the Electric
Parking Brake system. A message may also
display in the Driver Information
Center (DIC).
If the light does not come on, or remains
flashing, see your dealer.
Service Electric Parking Brake
Light
This light should come on briefly when the
vehicle is turned on. If it does not come on,
have it fixed so it will be ready to warn if
there is a problem.
If this light stays on or comes on while
driving, there is a problem with the Electric
Parking Brake (EPB). Take the vehicle to a
dealer as soon as possible. In addition to the
parking brake, other safety functions that
utilize the EPB may also be degraded.
A message may also display in the Driver
Information Center (DIC). See Electric Parking
Brake 0202.
Antilock Brake System (ABS)
Warning Light
This warning light should come on briefly
when the vehicle is turned on. If the light
does not come on, have it fixed so it will be
ready to warn if there is a problem.
Page 114 of 356

Buick Envision Owner Manual (GMNA-Localizing-U.S./Canada/Mexico-
16060855) - 2023 - CRC - 2/9/22
Instruments and Controls 113
Programming involves time-sensitive actions,
and may time out causing the procedure to
be repeated.
To program up to three devices:1. Hold the end of the hand-held transmitter about 3 to 8 cm (1 to 3 in)
away from the Universal Remote system
buttons with the indicator light in view.
The hand-held transmitter was supplied
by the manufacturer of the garage door
opener receiver.
2. Press and release one of the three Universal Remote system buttons to be
programmed. Press and hold the
hand-held transmitter button. Do not
release the hand-held transmitter button
until the indicator light changes from a
slow to a rapid flash or continuous light.
Then release the hand-held transmitter
button.
Some garage door openers may require
substitution of Step 2 with the procedure
under “Radio Signals for Some Gate
Operators” later in this section. 3. Press and hold the newly programmed
Universal Remote system button for
five seconds while watching the indicator
light and garage door activation.
.If the indicator light stays on
continuously or the garage door
moves when the button is pressed,
then programming is complete. There
is no need to complete Steps 4–6.
.If the indicator light does not come
on or the garage door does not
move, a second button press may be
required. For a second time, press
and hold the newly programmed
button for five seconds. If the
indicator light is continuously lit,
or the garage door moves,
programming is complete.
.If the indicator light flashes rapidly
and the garage door does not move,
continue with programming
Steps 4–6.
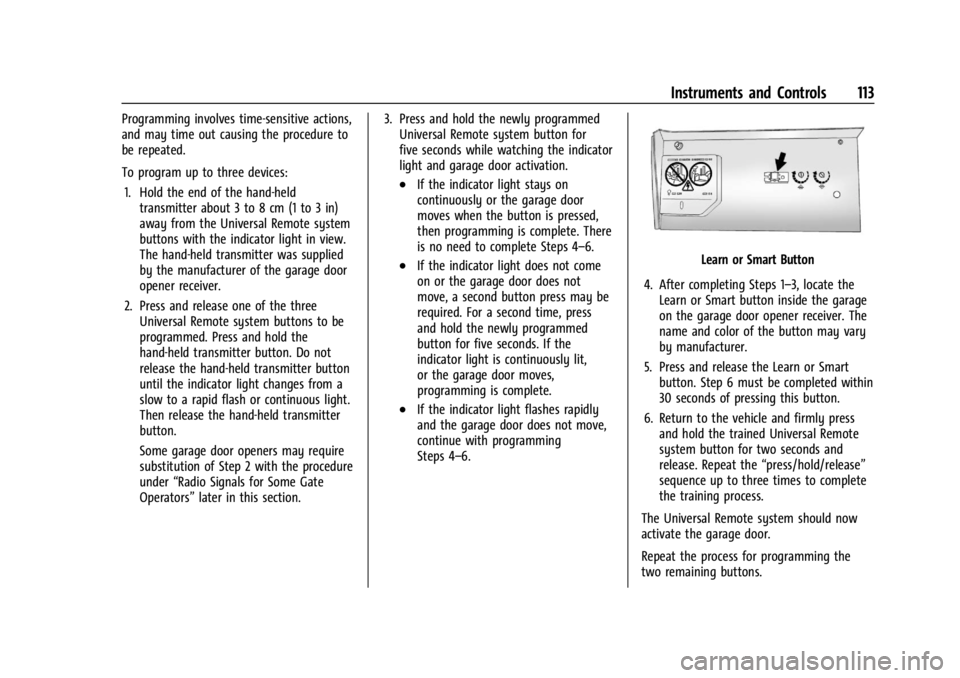
Learn or Smart Button
4. After completing Steps 1–3, locate the Learn or Smart button inside the garage
on the garage door opener receiver. The
name and color of the button may vary
by manufacturer.
5. Press and release the Learn or Smart button. Step 6 must be completed within
30 seconds of pressing this button.
6. Return to the vehicle and firmly press and hold the trained Universal Remote
system button for two seconds and
release. Repeat the “press/hold/release”
sequence up to three times to complete
the training process.
The Universal Remote system should now
activate the garage door.
Repeat the process for programming the
two remaining buttons.
Page 115 of 356

Buick Envision Owner Manual (GMNA-Localizing-U.S./Canada/Mexico-
16060855) - 2023 - CRC - 2/9/22
114 Instruments and Controls
Radio Signals for Some Gate Operators
For questions or programming help, see
www.homelink.com/gm or call
1-800-355-3515.
Some radio–frequency laws and gate
operators require transmitter signals to time
out or quit after several seconds of
transmission. This may not be long enough
for the Universal Remote system to pick up
the signal during programming.
If the programming did not work, replace
Step 2 under“Programming the Universal
Remote System” with the following:
Press and hold the Universal Remote system
button while pressing and releasing the
hand-held transmitter button every
two seconds until the signal has been
successfully accepted by the Universal
Remote system. The Universal Remote
system indicator light will flash slowly at
first and then change to a rapid flash or
continuous solid-light. Proceed with Step 3
under “Programming the Universal Remote
System” to complete.
Universal Remote System
Operation
Using the Universal Remote System
Press and hold the appropriate Universal
Remote system button for at least one-half
second. The indicator light will come on
while the signal is being transmitted.
Erasing Universal Remote System
Buttons
Erase all programmed buttons when vehicle
ownership is terminated.
To erase:
1. Press and hold the two outside buttons until the indicator light begins to flash.
This should take about 10 seconds.
2. Release both buttons.
Reprogramming a Single Universal
Remote System Button
To reprogram any of the system buttons: 1. Press and hold any one of the buttons. Do not release the button. 2. The indicator light will begin to flash
after 20 seconds. Without releasing the
button, proceed with Step 1 under
“Programming the Universal Remote
System.”
Page 116 of 356

Buick Envision Owner Manual (GMNA-Localizing-U.S./Canada/Mexico-
16060855) - 2023 - CRC - 2/9/22
Lighting 115
Lighting
Exterior Lighting
Exterior Lamp Controls . . . . . . . . . . . . . . . . . 115
Exterior Lamps Off Reminder . . . . . . . . . . . 118
Headlamp High/Low-Beam Changer . . . . 118
Flash-to-Pass . . . . . . . . . . . . . . . . . . . . . . . . . . . 118
Daytime Running Lamps (DRL) . . . . . . . . . 118
Automatic Headlamp System . . . . . . . . . . 118
Adaptive Forward Lighting (AFL) . . . . . . . 119
Hazard Warning Flashers . . . . . . . . . . . . . . . 121
Turn and Lane-Change Signals . . . . . . . . . . 121
Interior Lighting
Instrument Panel IlluminationControl . . . . . . . . . . . . . . . . . . . . . . . . . . . . . . . 121
Courtesy Lamps . . . . . . . . . . . . . . . . . . . . . . . . 122
Dome Lamps . . . . . . . . . . . . . . . . . . . . . . . . . . . 122
Reading Lamps . . . . . . . . . . . . . . . . . . . . . . . . . 122
Lighting Features
Entry Lighting . . . . . . . . . . . . . . . . . . . . . . . . . 123
Exit Lighting . . . . . . . . . . . . . . . . . . . . . . . . . . . 123
Battery Load Management . . . . . . . . . . . . . 123
Battery Power Protection . . . . . . . . . . . . . . 124
Exterior Lighting Battery Saver . . . . . . . . 124
Exterior Lighting
Exterior Lamp Controls
The exterior lamp control is on the
instrument panel to the left of the steering
column.
Turn the control to the following positions:
O: Turns off the exterior lamps. The knob
returns to the AUTO position after it is
released. Turn to
Oagain to reactivate the
AUTO mode.
For vehicles first sold in Canada, the
headlamps will automatically reactivate
when the vehicle is shifted out of P (Park).
AUTO : Automatically turns the exterior
lamps on and off, depending on outside
lighting.
;: Turns on the parking lamps including
all lamps, except the headlamps.
2: Turns on the headlamps together with
the parking lamps and instrument panel
lights.
IntelliBeam System
If equipped, this system turns the vehicle's
high-beam headlamps on and off according
to surrounding traffic conditions.
The system turns the high-beam headlamps
on when it is dark enough and there is no
other traffic present.
This light
bcomes on in the instrument
cluster when the IntelliBeam system is
enabled.
Turning On and Enabling IntelliBeam