turn signal BUICK ENVISION 2023 User Guide
[x] Cancel search | Manufacturer: BUICK, Model Year: 2023, Model line: ENVISION, Model: BUICK ENVISION 2023Pages: 356, PDF Size: 7.42 MB
Page 114 of 356
Buick Envision Owner Manual (GMNA-Localizing-U.S./Canada/Mexico-
16060855) - 2023 - CRC - 2/9/22
Instruments and Controls 113
Programming involves time-sensitive actions,
and may time out causing the procedure to
be repeated.
To program up to three devices:1. Hold the end of the hand-held transmitter about 3 to 8 cm (1 to 3 in)
away from the Universal Remote system
buttons with the indicator light in view.
The hand-held transmitter was supplied
by the manufacturer of the garage door
opener receiver.
2. Press and release one of the three Universal Remote system buttons to be
programmed. Press and hold the
hand-held transmitter button. Do not
release the hand-held transmitter button
until the indicator light changes from a
slow to a rapid flash or continuous light.
Then release the hand-held transmitter
button.
Some garage door openers may require
substitution of Step 2 with the procedure
under “Radio Signals for Some Gate
Operators” later in this section. 3. Press and hold the newly programmed
Universal Remote system button for
five seconds while watching the indicator
light and garage door activation.
.If the indicator light stays on
continuously or the garage door
moves when the button is pressed,
then programming is complete. There
is no need to complete Steps 4–6.
.If the indicator light does not come
on or the garage door does not
move, a second button press may be
required. For a second time, press
and hold the newly programmed
button for five seconds. If the
indicator light is continuously lit,
or the garage door moves,
programming is complete.
.If the indicator light flashes rapidly
and the garage door does not move,
continue with programming
Steps 4–6.
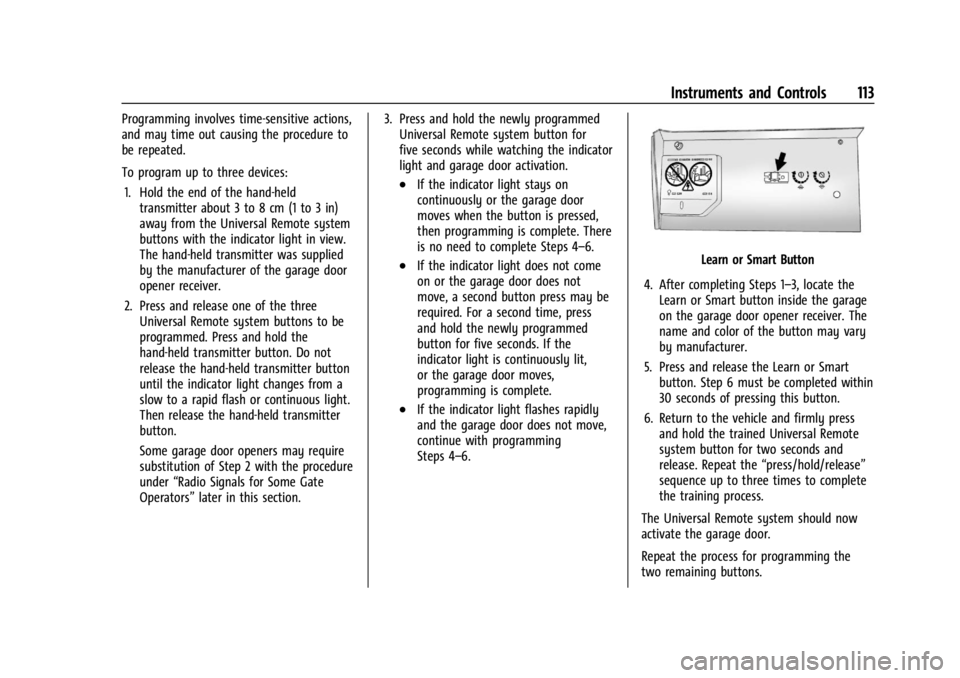
Learn or Smart Button
4. After completing Steps 1–3, locate the Learn or Smart button inside the garage
on the garage door opener receiver. The
name and color of the button may vary
by manufacturer.
5. Press and release the Learn or Smart button. Step 6 must be completed within
30 seconds of pressing this button.
6. Return to the vehicle and firmly press and hold the trained Universal Remote
system button for two seconds and
release. Repeat the “press/hold/release”
sequence up to three times to complete
the training process.
The Universal Remote system should now
activate the garage door.
Repeat the process for programming the
two remaining buttons.
Page 116 of 356

Buick Envision Owner Manual (GMNA-Localizing-U.S./Canada/Mexico-
16060855) - 2023 - CRC - 2/9/22
Lighting 115
Lighting
Exterior Lighting
Exterior Lamp Controls . . . . . . . . . . . . . . . . . 115
Exterior Lamps Off Reminder . . . . . . . . . . . 118
Headlamp High/Low-Beam Changer . . . . 118
Flash-to-Pass . . . . . . . . . . . . . . . . . . . . . . . . . . . 118
Daytime Running Lamps (DRL) . . . . . . . . . 118
Automatic Headlamp System . . . . . . . . . . 118
Adaptive Forward Lighting (AFL) . . . . . . . 119
Hazard Warning Flashers . . . . . . . . . . . . . . . 121
Turn and Lane-Change Signals . . . . . . . . . . 121
Interior Lighting
Instrument Panel IlluminationControl . . . . . . . . . . . . . . . . . . . . . . . . . . . . . . . 121
Courtesy Lamps . . . . . . . . . . . . . . . . . . . . . . . . 122
Dome Lamps . . . . . . . . . . . . . . . . . . . . . . . . . . . 122
Reading Lamps . . . . . . . . . . . . . . . . . . . . . . . . . 122
Lighting Features
Entry Lighting . . . . . . . . . . . . . . . . . . . . . . . . . 123
Exit Lighting . . . . . . . . . . . . . . . . . . . . . . . . . . . 123
Battery Load Management . . . . . . . . . . . . . 123
Battery Power Protection . . . . . . . . . . . . . . 124
Exterior Lighting Battery Saver . . . . . . . . 124
Exterior Lighting
Exterior Lamp Controls
The exterior lamp control is on the
instrument panel to the left of the steering
column.
Turn the control to the following positions:
O: Turns off the exterior lamps. The knob
returns to the AUTO position after it is
released. Turn to
Oagain to reactivate the
AUTO mode.
For vehicles first sold in Canada, the
headlamps will automatically reactivate
when the vehicle is shifted out of P (Park).
AUTO : Automatically turns the exterior
lamps on and off, depending on outside
lighting.
;: Turns on the parking lamps including
all lamps, except the headlamps.
2: Turns on the headlamps together with
the parking lamps and instrument panel
lights.
IntelliBeam System
If equipped, this system turns the vehicle's
high-beam headlamps on and off according
to surrounding traffic conditions.
The system turns the high-beam headlamps
on when it is dark enough and there is no
other traffic present.
This light
bcomes on in the instrument
cluster when the IntelliBeam system is
enabled.
Turning On and Enabling IntelliBeam
Page 117 of 356

Buick Envision Owner Manual (GMNA-Localizing-U.S./Canada/Mexico-
16060855) - 2023 - CRC - 2/9/22
116 Lighting
To enable the IntelliBeam system, press
bon the turn signal lever when it is
dark outside and the exterior lamp control is
in AUTO or
2.
Driving with IntelliBeam
The system only activates the high beams
when driving over 40 km/h (25 mph).
The blue high-beam on light appears on the
instrument cluster when the high beams
are on.
There is a sensor near the top center of the
windshield that automatically controls the
system. Keep this area of the windshield
clear of debris to allow for best system
performance.
The high-beam headlamps remain on, under
the automatic control, until one of the
following occurs:
.The system detects an approaching
vehicle's headlamps.
.The system detects a preceding vehicle's
taillamps.
.The outside light is bright enough that
high-beam headlamps are not required.
.The vehicle speed drops below 20 km/h
(12 mph).
.The IntelliBeam system is disabled by the
button on the turn signal lever. If this
happens, press
bon the turn signal
lever when the exterior lamp control is in
the AUTO or
2position to reactivate the
IntelliBeam system. The instrument
cluster light will come on to indicate the
IntelliBeam system is reactivated.
The high beams may not turn off
automatically if the system cannot detect
another vehicle's lamps because of any of
the following:
.The other vehicle's lamps are missing,
damaged, obstructed from view,
or otherwise undetected.
.The other vehicle's lamps are covered
with dirt, snow, and/or road spray.
.The other vehicle's lamps cannot be
detected due to dense exhaust, smoke,
fog, snow, road spray, mist, or other
airborne obstructions.
.The vehicle windshield is dirty, cracked,
or obstructed by something that blocks
the view of the light sensor.
.The vehicle is loaded such that the front
end points upward, causing the light
sensor to aim high and not detect
headlamps and taillamps.
.Driving on winding or hilly roads.
The automatic high-beam headlamps may
need to be disabled if any of the above
conditions exist.
Adaptive Headlight System
If equipped, this Adaptive Headlight System
allows the high beam to function as the
main driving light at night. The sensor in
the windshield detects the lights of
oncoming or preceding vehicles.
The system turns on all the high-beam
headlamp LED segment when it is dark
enough and there is no other traffic present.
This light
bappears on the instrument
cluster when the Adaptive Headlight System
is enabled.
Page 118 of 356

Buick Envision Owner Manual (GMNA-Localizing-U.S./Canada/Mexico-
16060855) - 2023 - CRC - 2/9/22
Lighting 117
Turning On and Enabling the Adaptive
Headlight System
To enable the Adaptive Headlight System,
press
bon the turn signal lever when it
is dark outside and the exterior lamp control
is in AUTO or
2.
Driving with the Adaptive Headlight System
The system only activates the high beams
when driving over 40 km/h (25 mph).
There is a sensor near the top center of the
windshield that automatically detects the
lights of oncoming and preceding vehicles.
Keep this area of the windshield clear of
debris to allow for best system performance.
Individual segments of the headlamp high
beam are faded out according to the traffic
situation, preventing high beam light from glaring oncoming or preceding traffic. This
gives the best light distribution without
glaring other road users.
The Adaptive Headlight System remains on,
under the automatic control, until one of
the following situations occurs:
.Fog Lamps are turned On.
.The outside light is bright enough that
high-beam headlamps are not required.
.The vehicle speed drops below 20 km/h
(12 mph).
.The Adaptive Headlight System is disabled
by the button on the turn signal lever.
If this happens, press
bon the turn
signal lever when the exterior lamp
control is in the or AUTO or
2position
to reactivate the Adaptive Headlight
System. The instrument cluster light will
come on to indicate the Adaptive
Headlight System is reactivated.
The high beams may not turn off
automatically if the system cannot detect
another vehicle's lamps because of any of
the following:
.The other vehicle's lamps are missing,
damaged, obstructed from view,
or otherwise undetected.
.The other vehicle's lamps are covered
with dirt, snow, and/or road spray.
.The other vehicle's lamps cannot be
detected due to dense exhaust, smoke,
fog, snow, road spray, mist, or other
airborne obstructions.
.The vehicle windshield is dirty, cracked,
or obstructed by something that blocks
the view of the light sensor.
.The vehicle is loaded such that the front
end points upward, causing the light
sensor to aim high and not detect
headlamps and taillamps.
.The vehicle is being driven on winding or
hilly roads.
The Adaptive Headlight System may need to
be disabled if any of the above conditions
exist.
Town Light
Activated automatically in situations with
low exterior ambient light.
The light is wide and symmetrical. The
special beam pattern is designed to avoid
glare for other road users.
Page 119 of 356

Buick Envision Owner Manual (GMNA-Localizing-U.S./Canada/Mexico-
16060855) - 2023 - CRC - 2/9/22
118 Lighting
Country Light
Activated automatically when low beams
come on. This is the normal low beam light
pattern.
The illumination of the current lane and the
side of the road is improved, reducing glare
to oncoming and preceding vehicles.
The high beams may not turn off
automatically if the system cannot detect
another vehicle's lamps because of any of
the following:
.The other vehicle's lamps are missing,
damaged, obstructed from view,
or otherwise undetected.
.The other vehicle's lamps are covered
with dirt, snow, and/or road spray.
.The other vehicle's lamps cannot be
detected due to dense exhaust, smoke,
fog, snow, road spray, mist, or other
airborne obstructions.
.The vehicle's windshield is dirty, cracked,
or obstructed by something that blocks
the view of the light sensor.
.The vehicle is loaded such that the front
end points upward, causing the light
sensor to aim high and not detect
headlamps and taillamps.
.Driving on winding or hilly roads.The automatic high-beam headlamps may
need to be disabled if any of the above
conditions exist.
Exterior Lamps Off Reminder
A warning chime sounds if the driver door is
opened while the vehicle is off and the
exterior lamps are on.
Headlamp High/Low-Beam
Changer
3:
Push the turn signal lever away from
you and release, to turn the high beams on.
To return to low beams, push the lever
again or pull it toward you and release.
This indicator light turns on in the
instrument cluster when the high-beam
headlamps are on.
Flash-to-Pass
To flash the high beams, pull the turn signal
lever toward you, and release.
Daytime Running Lamps (DRL)
DRL can make it easier for others to see the
front of the vehicle during the day.
The DRL system comes on when the
following conditions are met:
.The vehicle is on.
.The exterior lamp control is in AUTO.
.The light sensor determines it is daytime.
When the DRL system is on, only the DRL
are on. The taillamps, sidemarker lamps,
instrument panel lights, and other lamps
will not be on.
When it begins to get dark, the automatic
headlamp system switches from DRL to the
headlamps.
To turn off the DRL, turn the exterior lamp
control to the off position and then release.
For vehicles first sold in Canada, off will only
work when the vehicle is parked.
Automatic Headlamp System
When it is dark enough outside, the
automatic headlamp system turns on the
headlamps at the normal brightness, along
Page 122 of 356
Buick Envision Owner Manual (GMNA-Localizing-U.S./Canada/Mexico-
16060855) - 2023 - CRC - 2/9/22
Lighting 121
Hazard Warning Flashers
|:Press this button to make the front
and rear turn signal lamps flash on and off.
Press again to turn the flashers off.
The hazard warning flashers turn on
automatically if the airbags deploy.
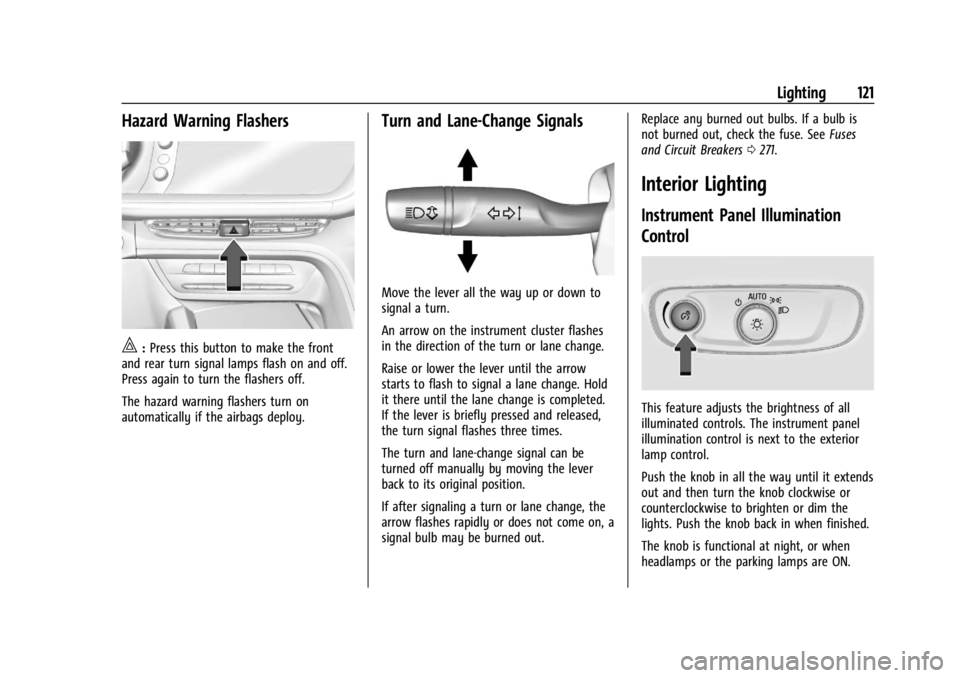
Turn and Lane-Change Signals
Move the lever all the way up or down to
signal a turn.
An arrow on the instrument cluster flashes
in the direction of the turn or lane change.
Raise or lower the lever until the arrow
starts to flash to signal a lane change. Hold
it there until the lane change is completed.
If the lever is briefly pressed and released,
the turn signal flashes three times.
The turn and lane-change signal can be
turned off manually by moving the lever
back to its original position.
If after signaling a turn or lane change, the
arrow flashes rapidly or does not come on, a
signal bulb may be burned out. Replace any burned out bulbs. If a bulb is
not burned out, check the fuse. See
Fuses
and Circuit Breakers 0271.
Interior Lighting
Instrument Panel Illumination
Control
This feature adjusts the brightness of all
illuminated controls. The instrument panel
illumination control is next to the exterior
lamp control.
Push the knob in all the way until it extends
out and then turn the knob clockwise or
counterclockwise to brighten or dim the
lights. Push the knob back in when finished.
The knob is functional at night, or when
headlamps or the parking lamps are ON.
Page 133 of 356
Buick Envision Owner Manual (GMNA-Localizing-U.S./Canada/Mexico-
16060855) - 2023 - CRC - 2/9/22
132 Infotainment System
Favorites can also be stored by touchingH
in a station or channel list. This will
highlight indicating that it is now saved as a
favorite.
The number of favorites displayed is
automatically adjusted by default, but can
be manually adjusted in Settings in the
System tab under Favorites and then Set
Number of Audio Favorites. It can also be
adjusted in Settings in the Apps tab under
Audio and then Set Number of Audio
Favorites.
HD Radio Technology
If equipped, HD Radio is a free service with
features such as digital quality sound, more
stations available on a single frequency such
as HD2 and HD3, and display information
such as artist and song title.
From the Now Playing display, touch the HD
Radio icon to turn HD on or off.
Station Access
To access HD Radio stations:1. Tune the radio to the station. If HD Radio is turned on and the station is
broadcasting in HD Radio, the radio will
automatically tune to the HD version of
the current channel (HD1) after several seconds. The radio will also display
icons representing additional channels
(HD2, ...HD8), that may be available.
When the radio successfully tunes to a
HD station, the HD logo will display and
digital audio will play.
2. Touch the display arrows to tune to the previous or next HD Radio station.
There may be a delay before the station
starts playing.
The HD Radio station number is indicated
next to the HD logo.
HD Radio stations can be saved as favorites.
For a list of all stations, see
www.hdradio.com.
HD Radio Troubleshooting
Digital Audio Delay : Wait for the signal to
process. This can take several seconds.
Volume Change, Audio Skip, Echo, Digital
Audio Lost : Station signal strength may be
weak, the station is out of range, or the
station may be out of alignment. Verify
proper reception on another station.
If the HD Radio signal weakens while
listening to HD1, the radio will automatically
switch to the analog version of the radio
station. If the HD Radio signal loses reception while
listening to stations HD2 to HD8, the radio
mutes until the signal can be recovered or
until the station is changed.
HD Radio can be disabled if driving in a
weak signal area. Touch HD Radio On/Off to
toggle HD Radio reception on and off.
Radio Data System (RDS)
If equipped, RDS features are available for
use only on FM stations that broadcast RDS
information. When supported, the
radio may:
.Group stations by Category (i.e., Program
Type) such as Rock, Jazz, Classical, etc.
.Display text from radio stations that
include station name and messages.
This system relies on receiving specific
information from these stations and only
works when the information is available.
It is possible that a radio station could
broadcast incorrect information that causes
the radio features to work improperly. If this
happens, contact the radio station.
Page 134 of 356
Buick Envision Owner Manual (GMNA-Localizing-U.S./Canada/Mexico-
16060855) - 2023 - CRC - 2/9/22
Infotainment System 133
When information is broadcast from a RDS
station, the station name or call letters
display on the audio screen. Radio text
supporting the currently playing broadcast
may also appear.
Satellite Radio
SiriusXM Radio Service
If equipped, vehicles with a valid SiriusXM
radio subscription can receive SiriusXM
programming.
SiriusXM radio has a wide variety of
programming and commercial-free music,
coast to coast, in digital-quality sound. In
the U.S., see www.siriusxm.com or call
1-888-601-6296. In Canada, see
www.siriusxm.ca or call 1-877-438-9677.
When SiriusXM is active, the channel name,
number, song title, and artist appear on the
display.
SiriusXM with 360L
SiriusXM with 360L interface has enhanced
in-vehicle listening experience for
subscribers. The experience now offers more
categories and system learned
recommendations toward discovering more
personalized content.To use the full SiriusXM 360L program,
including streaming content and listening
recommendations, OnStar Connected Access
is required. Connected vehicle services vary
by model and require a complete working
electrical system, cell reception, and GPS
signal. An active connected plan is required.
Reference the SiriusXM user guide for use
and subscription information.
Radio Reception
Unplug electronic devices from the accessory
power outlets if there is interference or
static in the radio.
FM
FM signals only reach about 16 to 65 km
(10 to 40 mi). Although the radio has a
built-in electronic circuit that automatically
works to reduce interference, some static
can occur, especially around tall buildings or
hills, causing the sound to fade in and out.
AM
The range for most AM stations is greater
than for FM, especially at night. The longer
range can cause station frequencies to
interfere with each other. Static can also
occur when things like storms and powerlines interfere with radio reception. When
this happens, try reducing the treble on the
radio.
SiriusXM Satellite Radio Service
If equipped, SiriusXM Satellite Radio Service
provides digital radio reception. Tall
buildings or hills can interfere with satellite
radio signals, causing the sound to fade in
and out. In addition, traveling or standing
under heavy foliage, bridges, garages,
or tunnels may cause loss of the SiriusXM
signal for a period of time. Some cellular
services may interfere with SXM reception
causing loss of signal.
Mobile Device Usage
Mobile device usage, such as making or
receiving calls, charging, or just having the
mobile device on may cause static
interference in the radio. Unplug the mobile
device or turn it off if this happens.
Multi-Band Antenna
The roof antenna may be used for radio,
navigation, and OnStar, depending on the
equipped options. Keep clear of obstructions
for clear reception. If the vehicle has a
sunroof, and it is open, reception can also
be affected.
Page 148 of 356

Buick Envision Owner Manual (GMNA-Localizing-U.S./Canada/Mexico-
16060855) - 2023 - CRC - 2/9/22
Infotainment System 147
For more information if the GPS is not
functioning properly, seeProblems with
Route Guidance 0147 and
If the System Needs Service 0147.
Vehicle Positioning
At times, the position of the vehicle on the
map could be inaccurate due to one or more
of the following reasons:
.The road system has changed.
.The vehicle is driving on slippery road
surfaces such as sand, gravel, or snow.
.The vehicle is traveling on winding roads
or long, straight roads.
.The vehicle is approaching a tall building
or a large vehicle.
.The surface streets run parallel to a
freeway.
.The vehicle has been transferred by a
vehicle carrier or a ferry.
.The current position calibration is set
incorrectly.
.The vehicle is traveling at high speed.
.The vehicle changes directions more than
once, or the vehicle is turning on a turn
table in a parking lot.
.The vehicle is entering and/or exiting a
parking lot, garage, or a lot with a roof.
.The GPS signal is not received.
.A roof carrier is installed on the vehicle.
.Tire chains are installed on the vehicle.
.The tires are replaced or worn.
.The tire pressure for the tires is incorrect.
.This is the first navigation use after the
map data is updated.
.The 12-volt battery has been disconnected
for several days.
.The vehicle is driving in heavy traffic
where driving is at low speeds, and the
vehicle is stopped and started repeatedly.
Problems with Route Guidance
Inappropriate route guidance can occur
under one or more of the following
conditions:
.The turn was not made on the road
indicated.
.Route guidance might not be available
when using automatic rerouting for the
next right or left turn.
.The route might not be changed when
using automatic rerouting.
.There is no route guidance when turning
at an intersection.
.Plural names of places might be
announced occasionally.
.It could take a long time to operate
automatic rerouting during high-speed
driving.
.Automatic rerouting might display a route
returning to the set waypoint if heading
for a destination without passing through
a set waypoint.
.The route prohibits the entry of a vehicle
due to a regulation by time or season or
any other regulation which may be given.
.Some routes might not be searched.
.The route to the destination might not be
shown if there are new roads, if roads
have recently changed, or if certain roads
are not listed in the map data. See Maps
0 140.
To recalibrate the vehicle's position on the
map, park with the vehicle running for two
to five minutes, until the vehicle position
updates. Make sure the vehicle is parked in
a location that is safe and has a clear view
of the sky and away from large
obstructions.
If the System Needs Service
If the navigation system needs service, see
your dealer.
Page 187 of 356
Buick Envision Owner Manual (GMNA-Localizing-U.S./Canada/Mexico-
16060855) - 2023 - CRC - 2/9/22
186 Driving and Operating
.Shift to a lower gear when going down
steep or long hills.
{Warning
Using the brakes to slow the vehicle on a
long downhill slope can cause brake
overheating, can reduce brake
performance, and could result in a loss of
braking. Shift the transmission to a lower
gear to let the engine assist the brakes
on a steep downhill slope.
{Warning
Coasting downhill in N (Neutral) or with
the ignition off is dangerous. This can
cause overheating of the brakes and loss
of steering assist. Always have the engine
running and the vehicle in gear.
.Drive at speeds that keep the vehicle in
its own lane. Do not swing wide or cross
the center line.
.Be alert on top of hills; something could
be in your lane (e.g., stalled car, crash).
.Pay attention to special road signs (e.g.,
falling rocks area, winding roads, long
grades, passing or no-passing zones) and
take appropriate action.
Winter Driving
Driving on Snow or IceCaution
To avoid damage to the wheels and
brake components, always clear snow and
ice from inside the wheels and
underneath the vehicle before driving.
Snow or ice between the tires and the road
creates less traction or grip, so drive
carefully. Wet ice can occur at about 0 °C
(32 °F) when freezing rain begins to fall.
Avoid driving on wet ice or in freezing rain
until roads can be treated.
For Slippery Road Driving:
.Accelerate gently. Accelerating too quickly
causes the wheels to spin and makes the
surface under the tires slick.
.Turn on Traction Control. See Traction
Control/Electronic Stability Control 0204.
.The Antilock Brake System (ABS) improves
vehicle stability during hard stops, but
the brakes should be applied sooner than
when on dry pavement. See Antilock
Brake System (ABS) 0202.
.Allow greater following distance and
watch for slippery spots. Icy patches can
occur on otherwise clear roads in shaded
areas. The surface of a curve or an
overpass can remain icy when the
surrounding roads are clear. Avoid sudden
steering maneuvers and braking while
on ice.
.Turn off cruise control.
.Select All-Wheel Drive (AWD) Mode for
vehicles equipped with AWD. Select
Snow/Ice Mode for FWD only vehicles.
See Driver Mode Control 0208 and
All-Wheel Drive 0201.
Blizzard Conditions
Stop the vehicle in a safe place and signal
for help. Stay with the vehicle unless there
is help nearby. If possible, use Roadside
Assistance. See Roadside Assistance Program
0 326. To get help and keep everyone in the
vehicle safe:
.Turn on the hazard warning flashers.
.Tie a red cloth to an outside mirror.