fuse BUICK LACROSSE 2006 User Guide
[x] Cancel search | Manufacturer: BUICK, Model Year: 2006, Model line: LACROSSE, Model: BUICK LACROSSE 2006Pages: 444, PDF Size: 2.66 MB
Page 313 of 444
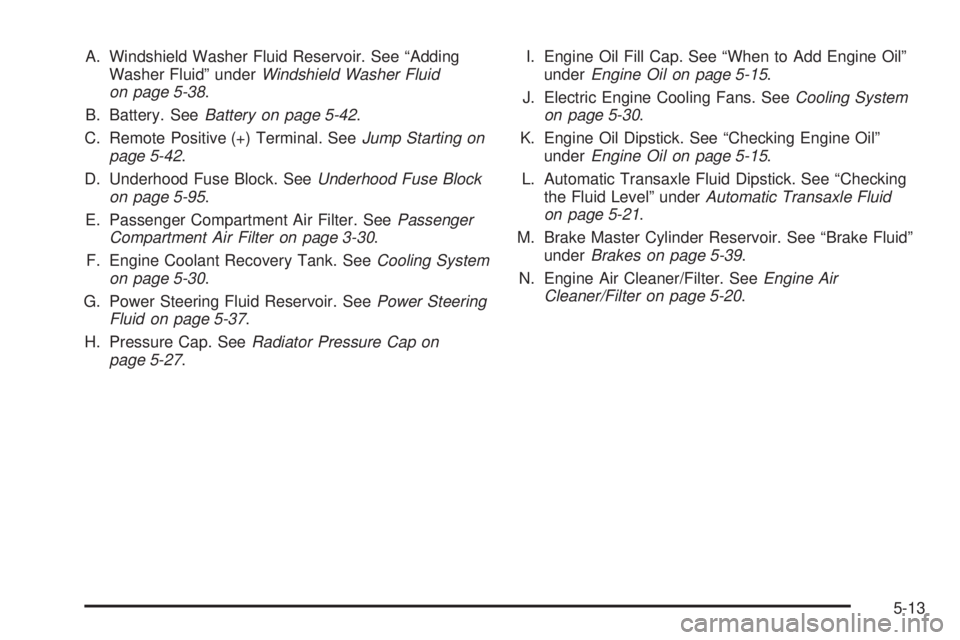
A. Windshield Washer Fluid Reservoir. See “Adding
Washer Fluid” underWindshield Washer Fluid
on page 5-38.
B. Battery. SeeBattery on page 5-42.
C. Remote Positive (+) Terminal. SeeJump Starting on
page 5-42.
D. Underhood Fuse Block. SeeUnderhood Fuse Block
on page 5-95.
E. Passenger Compartment Air Filter. SeePassenger
Compartment Air Filter on page 3-30.
F. Engine Coolant Recovery Tank. SeeCooling System
on page 5-30.
G. Power Steering Fluid Reservoir. SeePower Steering
Fluid on page 5-37.
H. Pressure Cap. SeeRadiator Pressure Cap on
page 5-27.I. Engine Oil Fill Cap. See “When to Add Engine Oil”
underEngine Oil on page 5-15.
J. Electric Engine Cooling Fans. SeeCooling System
on page 5-30.
K. Engine Oil Dipstick. See “Checking Engine Oil”
underEngine Oil on page 5-15.
L. Automatic Transaxle Fluid Dipstick. See “Checking
the Fluid Level” underAutomatic Transaxle Fluid
on page 5-21.
M. Brake Master Cylinder Reservoir. See “Brake Fluid”
underBrakes on page 5-39.
N. Engine Air Cleaner/Filter. SeeEngine Air
Cleaner/Filter on page 5-20.
5-13
Page 315 of 444
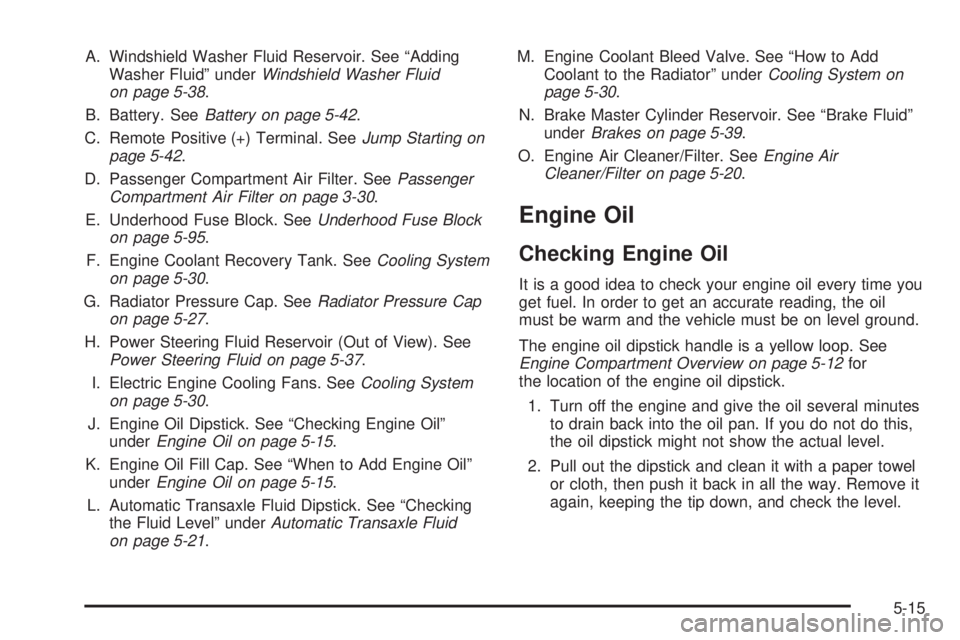
A. Windshield Washer Fluid Reservoir. See “Adding
Washer Fluid” underWindshield Washer Fluid
on page 5-38.
B. Battery. SeeBattery on page 5-42.
C. Remote Positive (+) Terminal. SeeJump Starting on
page 5-42.
D. Passenger Compartment Air Filter. SeePassenger
Compartment Air Filter on page 3-30.
E. Underhood Fuse Block. SeeUnderhood Fuse Block
on page 5-95.
F. Engine Coolant Recovery Tank. SeeCooling System
on page 5-30.
G. Radiator Pressure Cap. SeeRadiator Pressure Cap
on page 5-27.
H. Power Steering Fluid Reservoir (Out of View). See
Power Steering Fluid on page 5-37.
I. Electric Engine Cooling Fans. SeeCooling System
on page 5-30.
J. Engine Oil Dipstick. See “Checking Engine Oil”
underEngine Oil on page 5-15.
K. Engine Oil Fill Cap. See “When to Add Engine Oil”
underEngine Oil on page 5-15.
L. Automatic Transaxle Fluid Dipstick. See “Checking
the Fluid Level” underAutomatic Transaxle Fluid
on page 5-21.M. Engine Coolant Bleed Valve. See “How to Add
Coolant to the Radiator” underCooling System on
page 5-30.
N. Brake Master Cylinder Reservoir. See “Brake Fluid”
underBrakes on page 5-39.
O. Engine Air Cleaner/Filter. SeeEngine Air
Cleaner/Filter on page 5-20.
Engine Oil
Checking Engine Oil
It is a good idea to check your engine oil every time you
get fuel. In order to get an accurate reading, the oil
must be warm and the vehicle must be on level ground.
The engine oil dipstick handle is a yellow loop. See
Engine Compartment Overview on page 5-12for
the location of the engine oil dipstick.
1. Turn off the engine and give the oil several minutes
to drain back into the oil pan. If you do not do this,
the oil dipstick might not show the actual level.
2. Pull out the dipstick and clean it with a paper towel
or cloth, then push it back in all the way. Remove it
again, keeping the tip down, and check the level.
5-15
Page 344 of 444
4. Open the hood on the other vehicle and locate the
positive (+) and negative (−) terminal locations on
that vehicle.
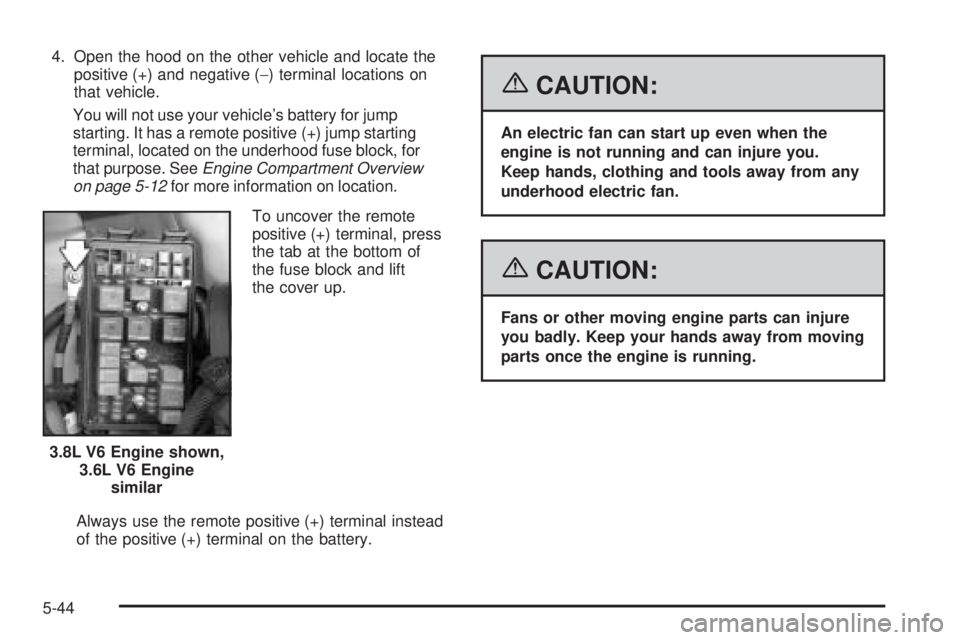
You will not use your vehicle’s battery for jump
starting. It has a remote positive (+) jump starting
terminal, located on the underhood fuse block, for
that purpose. SeeEngine Compartment Overview
on page 5-12for more information on location.
To uncover the remote
positive (+) terminal, press
the tab at the bottom of
the fuse block and lift
the cover up.
Always use the remote positive (+) terminal instead
of the positive (+) terminal on the battery.
{CAUTION:
An electric fan can start up even when the
engine is not running and can injure you.
Keep hands, clothing and tools away from any
underhood electric fan.
{CAUTION:
Fans or other moving engine parts can injure
you badly. Keep your hands away from moving
parts once the engine is running.
3.8L V6 Engine shown,
3.6L V6 Engine
similar
5-44
Page 347 of 444
Notice:If the jumper cables are connected or
removed in the wrong order, electrical shorting may
occur and damage the vehicle. The repairs would
not be covered by your warranty. Always connect
and remove the jumper cables in the correct
order, making sure that the cables do not touch
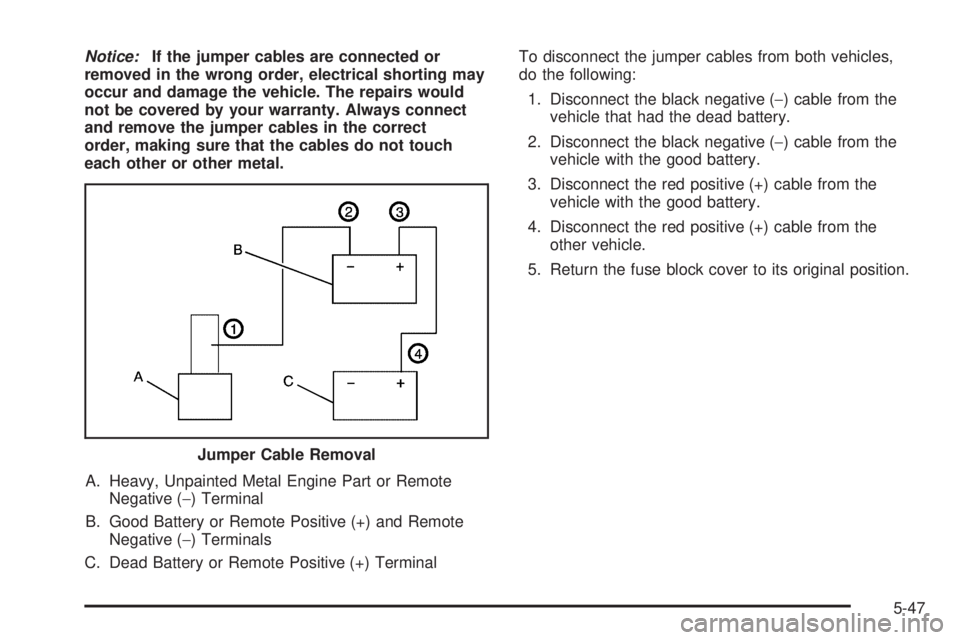
each other or other metal.
A. Heavy, Unpainted Metal Engine Part or Remote
Negative (−) Terminal
B. Good Battery or Remote Positive (+) and Remote
Negative (−) Terminals
C. Dead Battery or Remote Positive (+) TerminalTo disconnect the jumper cables from both vehicles,
do the following:
1. Disconnect the black negative (−) cable from the
vehicle that had the dead battery.
2. Disconnect the black negative (−) cable from the
vehicle with the good battery.
3. Disconnect the red positive (+) cable from the
vehicle with the good battery.
4. Disconnect the red positive (+) cable from the
other vehicle.
5. Return the fuse block cover to its original position.
Jumper Cable Removal
5-47
Page 393 of 444
Electrical System
Add-On Electrical Equipment
Notice:Don’t add anything electrical to your
vehicle unless you check with your dealer �rst.
Some electrical equipment can damage your vehicle
and the damage wouldn’t be covered by your
warranty. Some add-on electrical equipment can
keep other components from working as they should.
Your vehicle has an airbag system. Before attempting
to add anything electrical to your vehicle, seeServicing
Your Airbag-Equipped Vehicle on page 1-69.
Headlamp Wiring
The headlamp wiring is protected by a circuit breaker
in the underhood fuse block. An electrical overload
will cause the headlamps to go on and off, or in some
cases to remain off. If this happens, have the headlamp
system checked right away.
Windshield Wiper Fuses
The windshield wiper motor is protected by a circuit
breaker and a fuse. If the motor overheats due to heavy
snow, etc., the wiper will stop until the motor cools.
If the overload is caused by some electrical problem,
have it �xed.
Power Windows and Other
Power Options
Circuit breakers in the instrument panel fuse block
protect the power windows and other power accessories.
When the current load is too heavy, the circuit breaker
opens and closes, protecting the circuit until the
problem is �xed.
Fuses and Circuit Breakers
The wiring circuits in the vehicle are protected from
short circuits by a combination of fuses, circuit breakers
and in the fuse block wiring itself. This greatly reduces
the chance of �res caused by electrical problems.
Look at the silver-colored band inside the fuse. If the
band is broken or melted, replace the fuse. Make sure
a bad fuse is replaced with a new one of the identical
size and rating.
5-93
Page 394 of 444
Instrument Panel Fuse Block
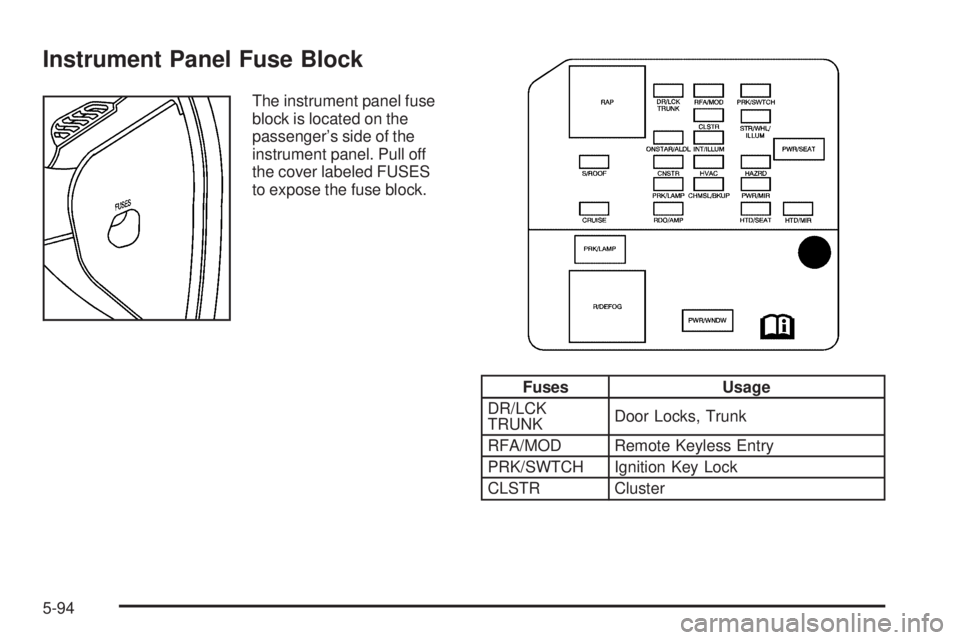
The instrument panel fuse
block is located on the
passenger’s side of the
instrument panel. Pull off
the cover labeled FUSES
to expose the fuse block.
Fuses Usage
DR/LCK
TRUNKDoor Locks, Trunk
RFA/MOD Remote Keyless Entry
PRK/SWTCH Ignition Key Lock
CLSTR Cluster
5-94
Page 395 of 444
Fuses Usage
STR/WHL/
ILLUMSteering Wheel Controls Illumination
ONSTAR/ALDL OnStar
®, Data Link
INT/ILLUM Interior Lamps
PWR/SEAT Power Seat
S/ROOF Sunroof
CNSTR Canister Vent
HVAC Climate Control System
HAZRD Turn Signal, Hazard
PRK/LAMP Park Lamps
CHMSL/BKUPCenter-High-Mounted
Stoplamp/Back-up Lamps
PWR/MIR Power Mirrors
CRUISE Cruise Control
RDO/AMP Radio, Ampli�er
HTD/SEAT Heated Seats
HTD/MIR Heated Mirrors
PWR/WNDW Power Window
Relays Usage
RAP Retained Accessory Power
PRK/LAMP Park Lamp Relay
R/DEFOG Rear Defogger Relay
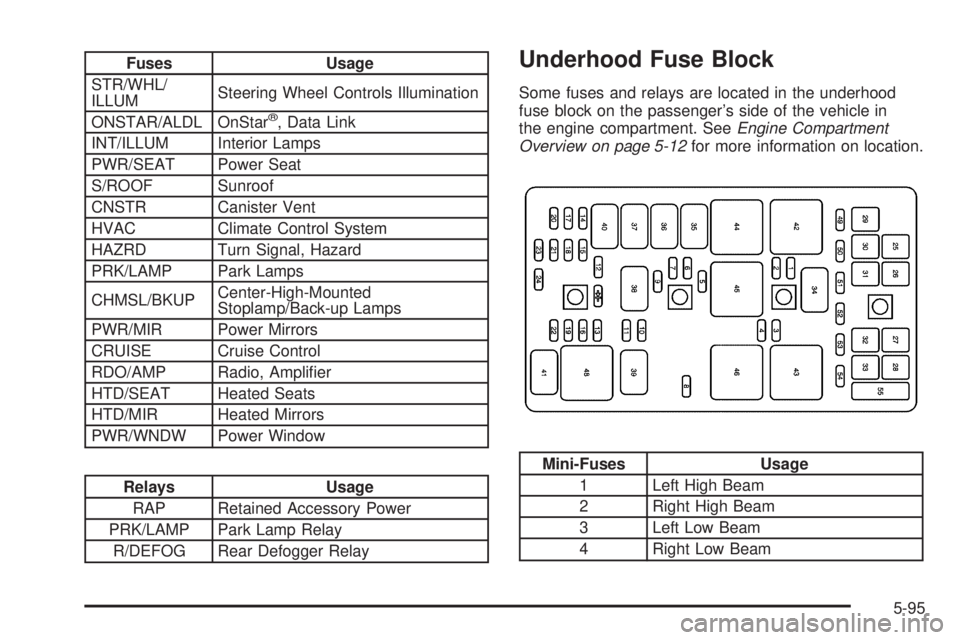
Underhood Fuse Block
Some fuses and relays are located in the underhood
fuse block on the passenger’s side of the vehicle in
the engine compartment. SeeEngine Compartment
Overview on page 5-12for more information on location.
Mini-Fuses Usage
1 Left High Beam
2 Right High Beam
3 Left Low Beam
4 Right Low Beam
5-95
Page 396 of 444
Mini-Fuses Usage
5 Windshield Wiper
6 Washer/Regulated Voltage Control
7 Fog Lamps
8 Transaxle Control Module
9 Supplemental In�atable Restraint
10 Auxiliary Power
11 Horn
12 Emission
13 Air Conditioner Clutch
14 Oxygen Sensor
15 Powertrain Control Module
16Powertrain Control Module,
Electronic Throttle Control
17 Electronic Throttle Control
18 Display
19 Anti-lock Brake Solenoid
20 Fuel InjectorMini-Fuses Usage
21 Transmission Solenoid
22 Fuel Pump
23 Anti-lock Brake System
24 Ignition
J-Style Fuses Usage
25 Air Pump
26 Battery Main 1
27 Battery Main 2
28 Battery Main 3
29 Fan 1
30 Battery Main 4
31 Anti-lock Brake System Motor
32 Fan 2
33 Starter
5-96
Page 397 of 444
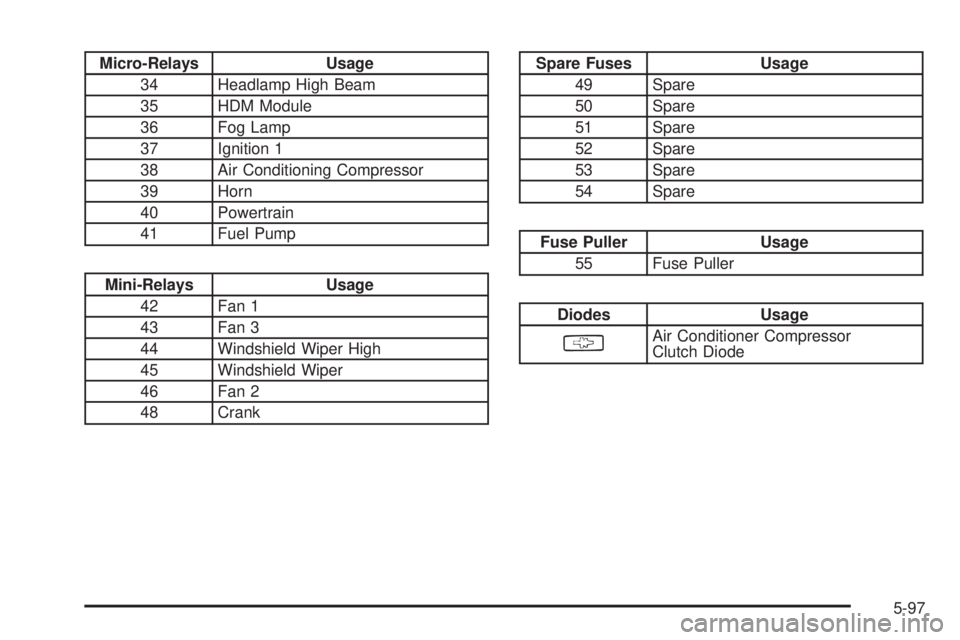
Micro-Relays Usage
34 Headlamp High Beam
35 HDM Module
36 Fog Lamp
37 Ignition 1
38 Air Conditioning Compressor
39 Horn
40 Powertrain
41 Fuel Pump
Mini-Relays Usage
42 Fan 1
43 Fan 3
44 Windshield Wiper High
45 Windshield Wiper
46 Fan 2
48 Crank
Spare Fuses Usage
49 Spare
50 Spare
51 Spare
52 Spare
53 Spare
54 Spare
Fuse Puller Usage
55 Fuse Puller
Diodes Usage
§Air Conditioner Compressor
Clutch Diode
5-97
Page 435 of 444
E
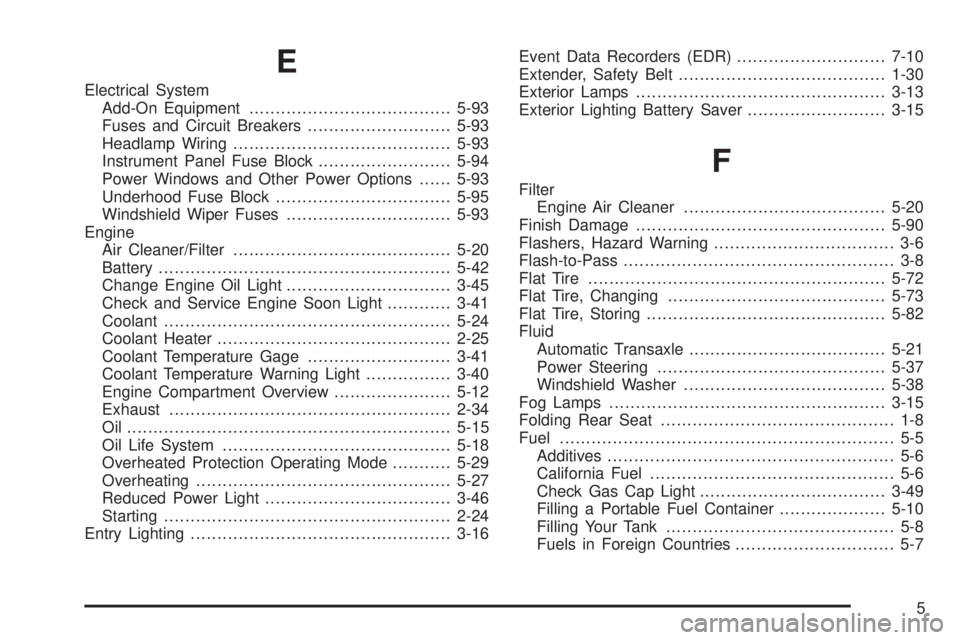
Electrical System
Add-On Equipment......................................5-93
Fuses and Circuit Breakers...........................5-93
Headlamp Wiring.........................................5-93
Instrument Panel Fuse Block.........................5-94
Power Windows and Other Power Options......5-93
Underhood Fuse Block.................................5-95
Windshield Wiper Fuses...............................5-93
Engine
Air Cleaner/Filter.........................................5-20
Battery.......................................................5-42
Change Engine Oil Light...............................3-45
Check and Service Engine Soon Light............3-41
Coolant......................................................5-24
Coolant Heater............................................2-25
Coolant Temperature Gage...........................3-41
Coolant Temperature Warning Light................3-40
Engine Compartment Overview......................5-12
Exhaust.....................................................2-34
Oil .............................................................5-15
Oil Life System...........................................5-18
Overheated Protection Operating Mode...........5-29
Overheating................................................5-27
Reduced Power Light...................................3-46
Starting......................................................2-24
Entry Lighting.................................................3-16Event Data Recorders (EDR)............................7-10
Extender, Safety Belt.......................................1-30
Exterior Lamps...............................................3-13
Exterior Lighting Battery Saver..........................3-15
F
Filter
Engine Air Cleaner......................................5-20
Finish Damage...............................................5-90
Flashers, Hazard Warning.................................. 3-6
Flash-to-Pass................................................... 3-8
Flat Tire........................................................5-72
Flat Tire, Changing.........................................5-73
Flat Tire, Storing.............................................5-82
Fluid
Automatic Transaxle.....................................5-21
Power Steering...........................................5-37
Windshield Washer......................................5-38
Fog Lamps....................................................3-15
Folding Rear Seat............................................ 1-8
Fuel............................................................... 5-5
Additives...................................................... 5-6
California Fuel.............................................. 5-6
Check Gas Cap Light...................................3-49
Filling a Portable Fuel Container....................5-10
Filling Your Tank........................................... 5-8
Fuels in Foreign Countries.............................. 5-7
5