hood open BUICK LACROSSE 2006 User Guide
[x] Cancel search | Manufacturer: BUICK, Model Year: 2006, Model line: LACROSSE, Model: BUICK LACROSSE 2006Pages: 444, PDF Size: 2.66 MB
Page 344 of 444
4. Open the hood on the other vehicle and locate the
positive (+) and negative (−) terminal locations on
that vehicle.
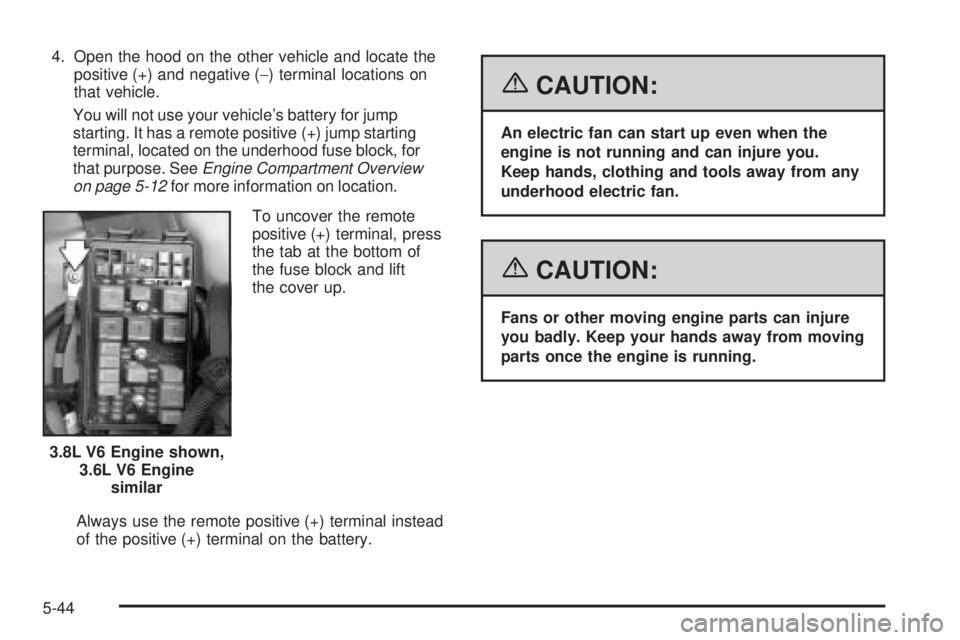
You will not use your vehicle’s battery for jump
starting. It has a remote positive (+) jump starting
terminal, located on the underhood fuse block, for
that purpose. SeeEngine Compartment Overview
on page 5-12for more information on location.
To uncover the remote
positive (+) terminal, press
the tab at the bottom of
the fuse block and lift
the cover up.
Always use the remote positive (+) terminal instead
of the positive (+) terminal on the battery.
{CAUTION:
An electric fan can start up even when the
engine is not running and can injure you.
Keep hands, clothing and tools away from any
underhood electric fan.
{CAUTION:
Fans or other moving engine parts can injure
you badly. Keep your hands away from moving
parts once the engine is running.
3.8L V6 Engine shown,
3.6L V6 Engine
similar
5-44
Page 349 of 444

The vertical headlamp aiming screws are located under
the hood near the headlamps.
The adjustment screw can be turned with a
6 mm male hex.To adjust the vertical aim on the headlamps, do the
following:
1. Open the hood. SeeHood Release on page 5-11
for more information.
2. Locate the aim dot on the lens of the low-beam
headlamp.
3. Measure the distance from the ground to the aim
dot on the low-beam headlamp. Record the
distance.
5-49
Page 352 of 444

Low-Beam Headlamp and
Sidemarker Bulbs
To replace a low-beam headlamp or sidemarker bulb,
do the following:
1. Open the hood. SeeHood Release on page 5-11
for more information.
2. Remove the fastener from the front fascia.
The fastener is located inboard of the headlamp
assembly, near the high-beam headlamp.
3. Pull up on the plastic retaining clip (C) while
pushing rearward on the headlamp. Align the square
cut-out on the retaining clip with the notch on the
headlamp.
4. Remove the screw (A) from the metal headlamp
retainer to pull up and release the headlamp
assembly.
5. Remove the push pin (B) retaining the front fascia.
5-52
Page 353 of 444
6. Pull back on the front fascia and then pull the
headlamp assembly out from the vehicle. Moving
the headlamp up and down slightly may help with
its removal.
You may have someone assist you with this step.
7. Remove the access cover from behind the bulb
being replaced.
8. Turn the bulb socket one-quarter of a turn to
remove it from the headlamp assembly.
9. Holding the base of the socket, pull the old bulb
from the socket.
10. Replace with a new bulb.
11. Reverse all the steps to reassemble the headlamp
assembly.
When replacing the plastic retaining clip, push down
on it while pushing rearward on the headlamp,
making sure the headlamp assembly is secure.
High-Beam Headlamp Bulbs
To replace the high-beam headlamp bulb, do the
following:
1. Open the hood. SeeHood Release on page 5-11
for more information.
2. Locate the high-beam headlamp bulb socket.3. Remove the access cover from behind the bulb
being replaced.
4. Turn the bulb socket counterclockwise and pull it
from the headlamp assembly.
5. Holding the base of the socket, pull the old bulb
from the socket.
6. Replace with a new bulb.
7. Reverse Steps 2 through 4 to reinstall.
Front Turn Signal and
Parking Lamps
To replace a front turn signal/parking lamp bulb in the
front fascia, do the following:
1. Locate the front turn signal/parking bulb socket by
reaching behind the front bumper.
2. Turn the bulb socket counterclockwise and pull it
out of the assembly.
3. Holding the base of the socket, pull the old bulb
from the socket.
4. Push the new bulb into the socket.
5. Reverse Steps 1 through 3 to reinstall.
5-53
Page 393 of 444
Electrical System
Add-On Electrical Equipment
Notice:Don’t add anything electrical to your
vehicle unless you check with your dealer rst.
Some electrical equipment can damage your vehicle
and the damage wouldn’t be covered by your
warranty. Some add-on electrical equipment can
keep other components from working as they should.
Your vehicle has an airbag system. Before attempting
to add anything electrical to your vehicle, seeServicing
Your Airbag-Equipped Vehicle on page 1-69.
Headlamp Wiring
The headlamp wiring is protected by a circuit breaker
in the underhood fuse block. An electrical overload
will cause the headlamps to go on and off, or in some
cases to remain off. If this happens, have the headlamp
system checked right away.
Windshield Wiper Fuses
The windshield wiper motor is protected by a circuit
breaker and a fuse. If the motor overheats due to heavy
snow, etc., the wiper will stop until the motor cools.
If the overload is caused by some electrical problem,
have it xed.
Power Windows and Other
Power Options
Circuit breakers in the instrument panel fuse block
protect the power windows and other power accessories.
When the current load is too heavy, the circuit breaker
opens and closes, protecting the circuit until the
problem is xed.
Fuses and Circuit Breakers
The wiring circuits in the vehicle are protected from
short circuits by a combination of fuses, circuit breakers
and in the fuse block wiring itself. This greatly reduces
the chance of res caused by electrical problems.
Look at the silver-colored band inside the fuse. If the
band is broken or melted, replace the fuse. Make sure
a bad fuse is replaced with a new one of the identical
size and rating.
5-93
Page 405 of 444
Maintenance Footnotes
(a)Visually inspect brake lines and hoses for proper
hook-up, binding, leaks, cracks, chang, etc. Inspect
disc brake pads for wear and rotors for surface condition.
Inspect other brake parts, including calipers, parking
brake, etc.
(b)Visually inspect front and rear suspension and
steering system for damaged, loose, or missing parts or
signs of wear. Inspect power steering lines and hoses for
proper hook-up, binding, leaks, cracks, chang, etc.
(c)Visually inspect hoses and have them replaced if they
are cracked, swollen, or deteriorated. Inspect all pipes,
ttings and clamps; replace with genuine GM parts as
needed. To help ensure proper operation, a pressure test
of the cooling system and pressure cap and cleaning the
outside of the radiator and air conditioning condenser is
recommended at least once a year.
(d)Visually inspect wiper blades for wear or cracking.
Replace wiper blades that appear worn or damaged or
that streak or miss areas of the windshield.(e)Make sure the safety belt reminder light and all your
belts, buckles, latch plates, retractors, and anchorages
are working properly. Look for any other loose or
damaged safety belt system parts. If you see anything
that might keep a safety belt system from doing its job,
have it repaired. Have any torn or frayed safety belts
replaced. Also look for any opened or broken airbag
coverings, and have them repaired or replaced. The
airbag system does not need regular maintenance.
(f)Lubricate all key lock cylinders. Lubricate all hinges
and latches, including those for the body doors, hood,
secondary latch, pivots, spring anchor, release pawl, rear
compartment, glove box door, and console door. More
frequent lubrication may be required when exposed to a
corrosive environment. Applying silicone grease on
weatherstrips with a clean cloth will make them last
longer, seal better, and not stick or squeak.
(g)If you drive regularly under dusty conditions, the lter
may require replacement more often.
6-7
Page 436 of 444

Fuel (cont.)
Gage.........................................................3-48
Gasoline Octane........................................... 5-5
Gasoline Specications.................................. 5-6
Low Warning Light.......................................3-49
Fuses
Fuses and Circuit Breakers...........................5-93
Instrument Panel Fuse Block.........................5-94
Underhood Fuse Block.................................5-95
Windshield Wiper.........................................5-93
G
Gage
Engine Coolant Temperature.........................3-41
Fuel..........................................................3-48
Speedometer..............................................3-33
Tachometer.................................................3-33
Garage Door Opener.......................................2-40
Gasoline
Octane........................................................ 5-5
Specications............................................... 5-6
Glove Box.....................................................2-44
GM Mobility Reimbursement Program.................. 7-6
H
Hazard Warning Flashers................................... 3-6
Head Restraints............................................... 1-7
Headlamp
Aiming.......................................................5-48
Headlamp Wiring............................................5-93
Headlamps
Bulb Replacement.......................................5-51
Daytime Running Lamps/Automatic Headlamp
System...................................................3-14
Flash-to-Pass............................................... 3-8
Front Turn Signal and Parking Lamps.............5-53
Halogen Bulbs............................................5-51
Headlamps and Sidemarker Lamps................5-51
High/Low Beam Changer................................ 3-8
Suggested Light..........................................3-47
Headlamps and Sidemarker Lamps...................5-51
Heated Seats................................................... 1-4
Heater...........................................................3-22
Heater...........................................................3-25
Highbeam On Light.........................................3-47
Highway Hypnosis...........................................4-23
Hill and Mountain Roads..................................4-24
6