radio buttons BUICK LACROSSE 2007 Owner's Manual
[x] Cancel search | Manufacturer: BUICK, Model Year: 2007, Model line: LACROSSE, Model: BUICK LACROSSE 2007Pages: 512
Page 129 of 512
How OnStar®Service Works
In order to provide you with OnStar®services, your
vehicle’s OnStar®system has the capability of
recording and transmitting vehicle information. This
information is automatically sent to an OnStar
®Call
Center at the time of an OnStar®button press,
Emergency button press or if your airbags or AACN
system deploys. The vehicle information usually
includes your GPS location and, in the event of a
crash, additional information regarding the accident
that your vehicle has been involved in (e.g. the
direction from which your vehicle was hit). When
you use the Virtual Advisor feature of OnStar
®
Hands-Free Calling, your vehicle also sends
OnStar®your GPS location so that we can provide
you with location-based services.
OnStar
®service cannot work unless your vehicle is
in a place where OnStar®has an agreement with a
wireless service provider for service in that area.
OnStar
®service also cannot work unless you are in
a place where the wireless service provider
OnStar
®has hired for that area has coverage,
network capacity and reception when the service is
needed, and technology that is compatible with the
OnStar
®service. Not all services are available
everywhere, particularly in remote or enclosed
areas, or at all times.OnStar
®service that involves location information
about your vehicle cannot work unless GPS
satellite signals are unobstructed and available in
that place as well.
Your vehicle must have a working electrical
system (including adequate battery power) for the
OnStar
®equipment to operate. There are other
problems OnStar®cannot control that may prevent
OnStar®from providing OnStar®service to you
at any particular time or place. Some examples are
damage to important parts of your vehicle in an
accident, hills, tall buildings, tunnels, weather
or wireless phone network congestion.
Your Responsibility
You may need to increase the volume of your
radio to hear the OnStar®advisor. If the light next
to the OnStar®buttons is red, this means that
your system is not functioning properly and should
be checked by a dealer. If the light appears
clear (no light is appearing), your OnStar
®
subscription has expired. You can always press
the OnStar®button to conrm that your OnStar®
equipment is active.
129
Page 137 of 512
Universal Home Remote System
Operation (With One Triangular LED)
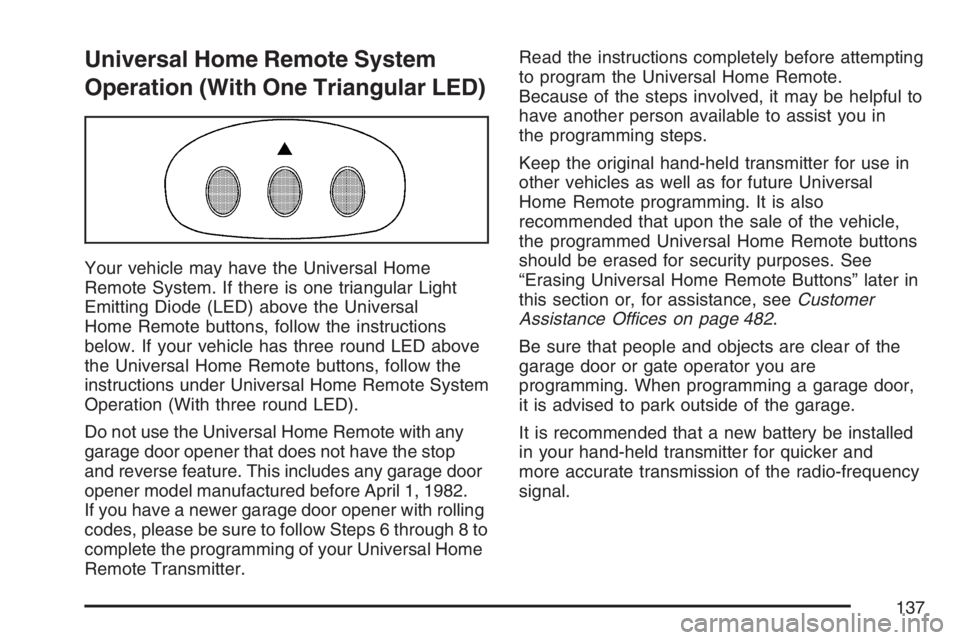
Your vehicle may have the Universal Home
Remote System. If there is one triangular Light
Emitting Diode (LED) above the Universal
Home Remote buttons, follow the instructions
below. If your vehicle has three round LED above
the Universal Home Remote buttons, follow the
instructions under Universal Home Remote System
Operation (With three round LED).
Do not use the Universal Home Remote with any
garage door opener that does not have the stop
and reverse feature. This includes any garage door
opener model manufactured before April 1, 1982.
If you have a newer garage door opener with rolling
codes, please be sure to follow Steps 6 through 8 to
complete the programming of your Universal Home
Remote Transmitter.Read the instructions completely before attempting
to program the Universal Home Remote.
Because of the steps involved, it may be helpful to
have another person available to assist you in
the programming steps.
Keep the original hand-held transmitter for use in
other vehicles as well as for future Universal
Home Remote programming. It is also
recommended that upon the sale of the vehicle,
the programmed Universal Home Remote buttons
should be erased for security purposes. See
“Erasing Universal Home Remote Buttons” later in
this section or, for assistance, seeCustomer
Assistance Offices on page 482.
Be sure that people and objects are clear of the
garage door or gate operator you are
programming. When programming a garage door,
it is advised to park outside of the garage.
It is recommended that a new battery be installed
in your hand-held transmitter for quicker and
more accurate transmission of the radio-frequency
signal.
137
Page 139 of 512
6. Locate in the garage, the garage door opener
receiver (motor-head unit). Locate the “Learn”
or “Smart” button. This can usually be
found where the hanging antenna wire is
attached to the motor-head unit.
7. Firmly press and release the “Learn” or
“Smart” button. The name and color of
the button may vary by manufacturer.
You will have 30 seconds to start Step 8.
8. Return to the vehicle. Firmly press and hold
the programmed Universal Home Remote
button for two seconds, then release it.
Immediately press and hold the same button
a second time for two seconds, then
release it. Immediately, press and hold the
same button a third time for two seconds,
then release.
The Universal Home Remote should now
activate your rolling-code equipped device.
To program the remaining two Universal Home
Remote buttons, begin with Step 2 of
“Programming Universal Home Remote.” You do
not want to repeat Step 1, as this will erase
all previous programming from the Universal Home
Remote buttons.Gate Operator and Canadian
Programming
Canadian radio-frequency laws require transmitter
signals to time out or quit after several seconds
of transmission. This may not be long enough
for Universal Home Remote to pick up the signal
during programming. Similarly, some U.S. gate
operators are manufactured to time out in
the same manner.
If you live in Canada, or you are having difficulty
programming a gate operator or garage door
opener by using the “Programming Universal
Home Remote” procedures, regardless of where
you live, replace Step 3 under “Programming
Universal Home Remote” with the following:
Continue to press and hold the Universal Home
Remote button while you press and release every
two seconds (cycle) the hand-held transmitter
button until the frequency signal has been
successfully accepted by the Universal Home
Remote. The Universal Home Remote indicator
light will ash slowly at rst and then rapidly.
Proceed with Step 4 under “Programming
Universal Home Remote” to complete.
139
Page 240 of 512
Radio with CD (Base)
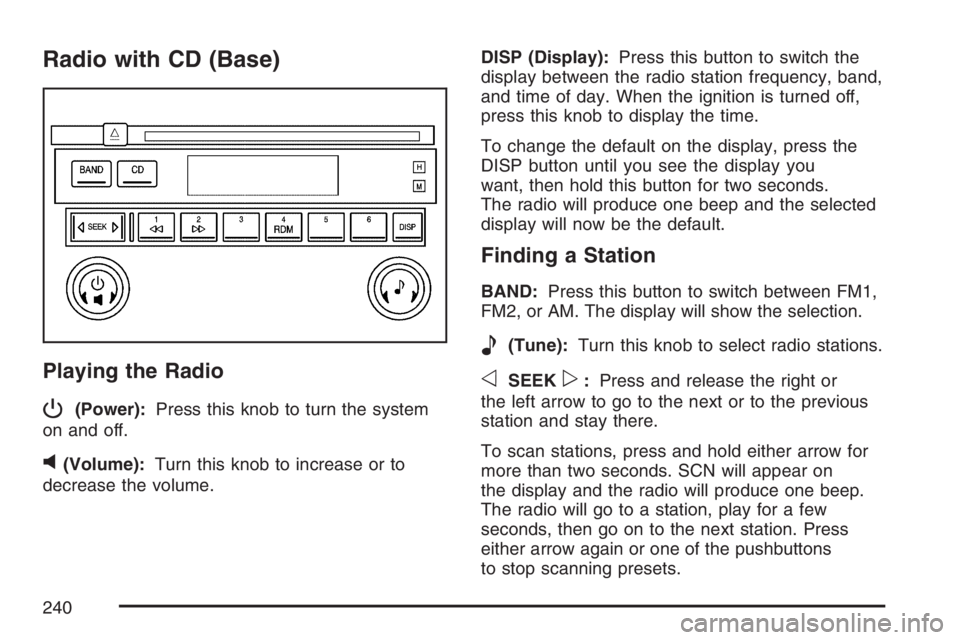
Playing the Radio
P
(Power):Press this knob to turn the system
on and off.
v(Volume):Turn this knob to increase or to
decrease the volume.DISP (Display):Press this button to switch the
display between the radio station frequency, band,
and time of day. When the ignition is turned off,
press this knob to display the time.
To change the default on the display, press the
DISP button until you see the display you
want, then hold this button for two seconds.
The radio will produce one beep and the selected
display will now be the default.
Finding a Station
BAND:Press this button to switch between FM1,
FM2, or AM. The display will show the selection.
e(Tune):Turn this knob to select radio stations.
oSEEKp:Press and release the right or
the left arrow to go to the next or to the previous
station and stay there.
To scan stations, press and hold either arrow for
more than two seconds. SCN will appear on
the display and the radio will produce one beep.
The radio will go to a station, play for a few
seconds, then go on to the next station. Press
either arrow again or one of the pushbuttons
to stop scanning presets.
240
Page 241 of 512
To scan preset stations, press and hold either arrow
for more than four seconds. PSC will appear on the
display and the radio will produce two beeps. The
radio will go to a preset station, play for a few
seconds, then go on to the next preset station.
Press either arrow again or one of the pushbuttons
to stop scanning.
The radio will only seek and scan stations with a
strong signal that are in the selected band.
Setting Preset Stations
Up to 18 stations (six FM1, six FM2, and six AM),
can be programmed on the six numbered
pushbuttons, by performing the following steps:
1. Turn the radio on.
2. Press BAND to select FM1, FM2, or AM.
3. Tune in the desired station.
4. Press and hold one of the six numbered
pushbuttons until you hear a beep.
Whenever that numbered pushbutton is
pressed, the station that was set will return for
that pushbutton.
5. Repeat the Steps 2-4 for each pushbutton.
Setting the Tone (Bass/Treble)
e
(Bass/Treble):Push and release this knob
until BAS or TRE appears on the display. Turn this
knob to increase or to decrease. The display will
show the bass or the treble level. If a station
is weak or noisy, decrease the treble.
To adjust the bass and the treble to the middle
position, push and hold the tone knob. The radio
will produce one beep.
To adjust all tone and speaker controls to the
middle position, push and hold the tone knob when
no tone or speaker control is displayed. CEN will
appear on the display and you will hear a beep.
241
Page 246 of 512
SCV (Speed Compensated Volume):With SCV,
the audio system adjusts automatically to make
up for road and wind noise as you drive.
Set the volume at the desired level. Press this
button to select SPEED VOL MIN, SPEED
VOL MED, or SPEED VOL MAX. Each higher
setting will allow for more volume compensation at
faster vehicle speeds. Then as you drive, SCV
increases the volume, as necessary, to overcome
noise at any speed. The volume level should
always sound the same to you as you drive. NONE
will appear on the display if the radio cannot
determine the vehicle speed. To turn SCV
off, press this button until SPEED VOL OFF
appears on the display.
Finding a Station
BAND:Press this button to switch between FM1,
FM2, AM, or XM1 or XM2 (if equipped). The
display will show the selection.
e(Tune):Turn this knob to select radio stations.
oSEEKp:Press and release the right or
the left arrow to go to the next or to the previous
station and stay there.To scan stations, press and hold either arrow for
more than two seconds. SCAN will appear on
the display and the radio will produce one beep.
The radio will go to a station, play for a few
seconds, then go on to the next station. Press
either arrow again or one of the pushbuttons
to stop scanning presets.
To scan preset stations, press and hold either arrow
for more than four seconds. PSCAN will appear on
the display and the radio will produce two beeps.
The radio will go to a preset station, play for a few
seconds, then go on to the next preset station.
Press either arrow again or one of the pushbuttons
to stop scanning presets.
The radio will only seek and scan stations with a
strong signal that are in the selected band.
INFO (Information) (XM™ Satellite Radio
Service Only):If the current station has a
message, the information symbol will appear on
the display. Press this button to see the message.
The message may display the artist, song title,
call in phone numbers, etc.
246
Page 247 of 512
If the entire message is not displayed, parts of the
message will appear every three seconds. To
scroll through the message, press and release the
INFO button. A new group of words will appear
on the display after every press of this button.
Once the complete message has been displayed,
the information symbol will disappear from the
display until another new message is received.
The last message can be displayed by pressing
the INFO button. You can view the last message
until a new message is received or a different
station is tuned to.
When a message is not available from a station,
NO INFO will appear on the display.
Setting Preset Stations
Up to 30 stations (six FM1, six FM2, and six AM,
six XM1 and six XM2 (if equipped)), can be
programmed on the six numbered pushbuttons, by
performing the following steps:
1. Turn the radio on.
2. Press BAND to select FM1, FM2, AM, or XM1
or XM2.
3. Tune in the desired station.4. Press EQ to select the equalization.
5. Press and hold one of the six numbered
pushbuttons until you hear a beep.
Whenever that numbered pushbutton is
pressed, the station that was set will return
and the equalization that was selected will be
stored for that pushbutton.
6. Repeat the steps for each pushbutton.
Setting the Tone (Bass/Treble)
e
(Bass/Treble):Push and release this knob until
BASS or TREBLE appears on the display. Turn this
knob to increase or to decrease. The display will
show the bass or the treble level. If a station is
weak or noisy, decrease the treble.
To adjust the bass and the treble to the middle
position, push and hold the tone knob. The radio
will produce one beep.
To adjust all tone and speaker controls to the
middle position, push and hold the tone knob
when no tone or speaker control is displayed.
ALL CENTERED will appear on the display and you
will hear a beep.
247
Page 254 of 512
Finding a Station
BAND:Press this button to switch between FM1,
FM2, AM, or XM1 or XM2 (if equipped). The
display will show the selection.
e(Tune):Turn this knob to select radio stations.
oSEEKp:Press and release the right or
the left arrow to go to the next or to the previous
station and stay there.
To scan stations, press and hold either arrow for
more than two seconds. SCAN will appear on
the display and the radio will produce one beep.
The radio will go to a station, play for a few
seconds, then go on to the next station. Press
either arrow again or one of the pushbuttons
to stop scanning presets.
To scan preset stations, press and hold either arrow
for more than four seconds. PSCAN will appear on
the display and the radio will produce two beeps.
The radio will go to a preset station, play for a
few seconds, then go on to the next preset station.
Press either arrow again or one of the pushbuttons
to stop scanning presets.
The radio will only seek and scan stations with a
strong signal that are in the selected band.INFO (Information) (XM™ Satellite Radio
Service Only):If the current station has a
message, the information symbol will appear on
the display. Press this button to see the message.
The message may display the artist, song title,
call in phone numbers, etc.
If the entire message is not displayed, parts of the
message will appear every three seconds. To
scroll through the message, press and release the
INFO button. A new group of words will appear
on the display after every press of this button.
Once the complete message has been displayed,
the information symbol will disappear from the
display until another new message is received.
The last message can be displayed by pressing
the INFO button. You can view the last message
until a new message is received or a different
station is tuned to.
When a message is not available from a station,
NO INFO will appear on the display.
254
Page 255 of 512
Setting Preset Stations
Up to 30 stations (six FM1, six FM2, and six AM,
six XM1 and six XM2 (if equipped)), can be
programmed on the six numbered pushbuttons, by
performing the following steps:
1. Turn the radio on.
2. Press BAND to select FM1, FM2, AM, or XM1
or XM2.
3. Tune in the desired station.
4. Press EQ to select the equalization.
5. Press and hold one of the six numbered
pushbuttons until you hear a beep.
Whenever that numbered pushbutton is
pressed, the station that was set will return
and the equalization that was selected will be
stored for that pushbutton.
6. Repeat the steps for each pushbutton.
Setting the Tone (Bass/Treble)
e
(Bass/Treble):Push and release this knob until
BASS or TREBLE appears on the display. Turn this
knob to increase or to decrease. The display will
show the bass or the treble level. If a station is
weak or noisy, decrease the treble.
To adjust the bass and the treble to the middle
position, push and hold the tone knob. The radio
will produce one beep.
To adjust all tone and speaker controls to the
middle position, push and hold the tone knob
when no tone or speaker control is displayed.
ALL CENTERED will appear on the display and
you will hear a beep.
EQ (Equalization):Press this button to select
customized equalization settings designed
for country/western, jazz, talk, pop, rock,
classical, and custom.
To return the bass and treble to the manual mode,
push and release the tone knob until BASS or
TREBLE appears on the display.
255
Page 262 of 512
To scan radio stations, press and hold either
arrow for more than two seconds. SCAN
will appear on the display and the radio will
produce one beep. The radio will go to a station,
play for a few seconds, then go on to the next
station. Press either arrow again or one of
the pushbuttons to stop scanning presets.
To scan the preset stations, press and hold either
arrow for more than four seconds. PSC will
appear on the display and the radio will produce
two beeps. The radio will go to a preset station,
play for a few seconds, then go on to the
next preset station. Press either arrow again or
one of the pushbuttons to stop scanning presets.
The radio will only seek and scan stations with
a strong signal that are in the selected band.
SCAN:Press this button until SC appears on the
display. The radio will go to a station, play for
a few seconds, then go on to the next station.
Press this button again to stop scanning stations.
The radio will only scan stations with a strong
signal that are in the selected band.INFO (Information) (XM™ Satellite Radio
Service Only):If the current station has a
message, the information symbol will appear on
the display. Press this button to see the message.
The message may display the artist, song title,
call in phone numbers, etc.
If the entire message is not displayed, parts of the
message will appear every three seconds. To
scroll through the message, press and release the
INFO button. A new group of words will appear
on the display after every press of this button.
Once the complete message has been displayed,
the information symbol will disappear from the
display until another new message is received.
The last message can be displayed by pressing
the INFO button. You can view the last message
until a new message is received or a different
station is tuned to.
When a message is not available from a station,
NO INFO will appear on the display.
262