BUICK LACROSSE 2010 Get To Know Guide
Manufacturer: BUICK, Model Year: 2010, Model line: LACROSSE, Model: BUICK LACROSSE 2010Pages: 16, PDF Size: 1.77 MB
Page 11 of 16
11
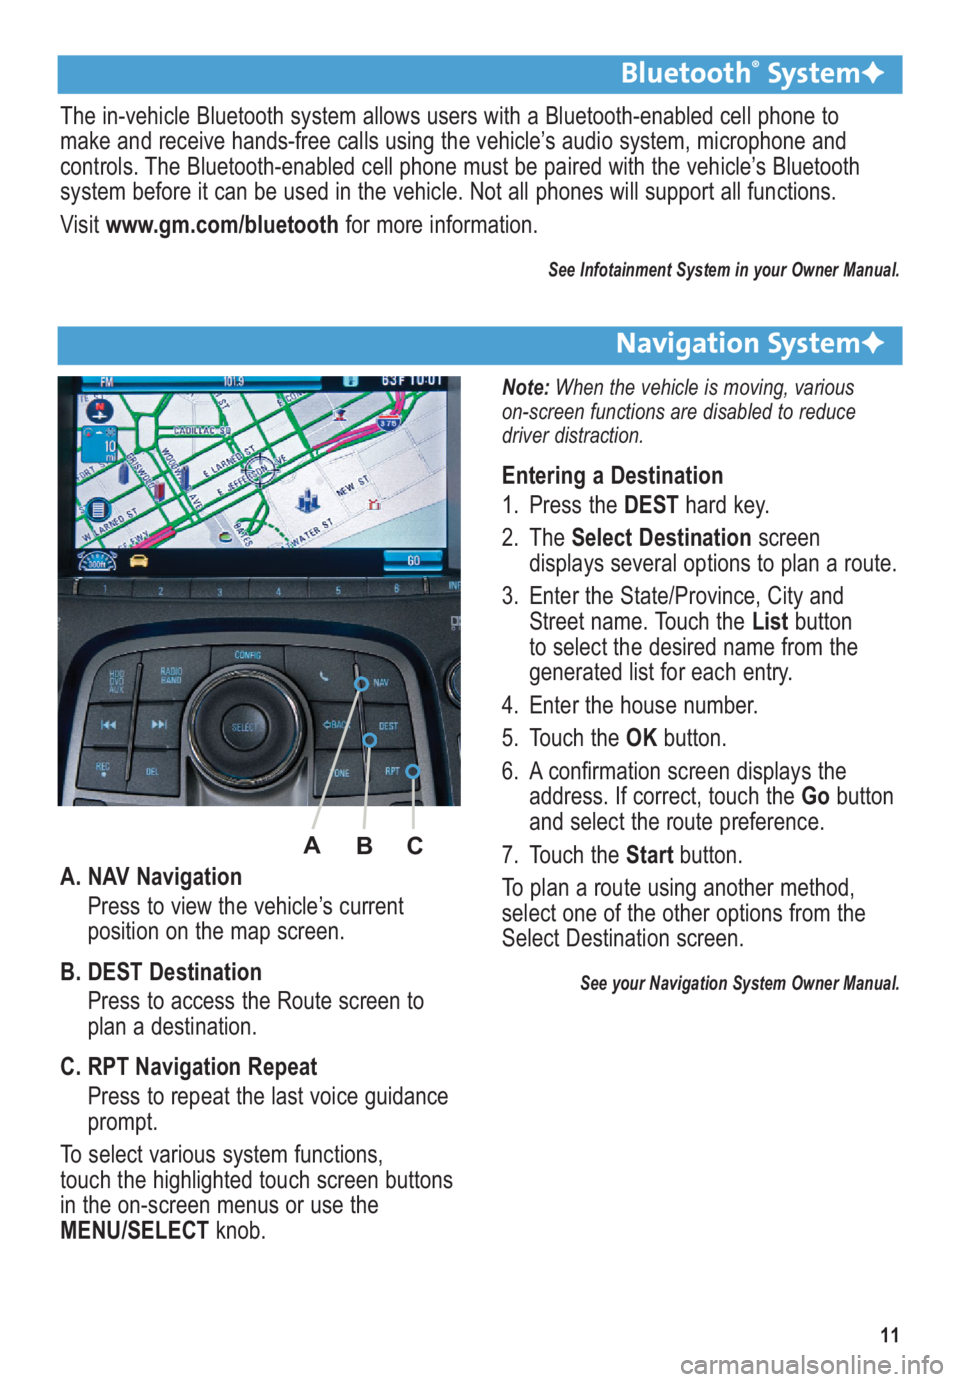
A. NAV Navigation
Press to view the vehicle’s current
position on the map screen.
B. DEST Destination
Press to access the Route screen to
plan a destination.
C. RPT Navigation Repeat
Press to repeat the last voice guidance
prompt.
To select various system functions,
touch the highlighted touch screen buttons
in the on-screen menus or use the
MENU/SELECTknob.
Bluetooth®SystemF
The in-vehicle Bluetooth system allows users with a Bluetooth-enabled cell phone to
make and receive hands-free calls using the vehicle’s audio system, microphone and
controls. The Bluetooth-enabled cell phone must be paired with the vehicle’s Bluetooth
system before it can be used in the vehicle. Not all phones will support all functions.
Visit www.gm.com/bluetoothfor more information.
See Infotainment System in your Owner Manual.
Navigation SystemF
Note: When the vehicle is moving, various
on-screen functions are disabled to reduce
driver distraction.
Entering a Destination
1. Press the DESThard key.
2. The Select Destinationscreen
displays several options to plan a route.
3. Enter the State/Province, City and
Street name. Touch the Listbutton
to select the desired name from the
generated list for each entry.
4. Enter the house number.
5. Touch the OKbutton.
6. A confirmation screen displays the
address. If correct, touch the Gobutton
and select the route preference.
7. Touch the Start button.
To plan a route using another method,
select one of the other options from the
Select Destination screen.
See your Navigation System Owner Manual.
A
B
C
Page 12 of 16
12
Driver Information Center
The Driver Information Center (DIC) on the instrument cluster displays a variety of vehicle
system information and warning messages.
DIC Controls
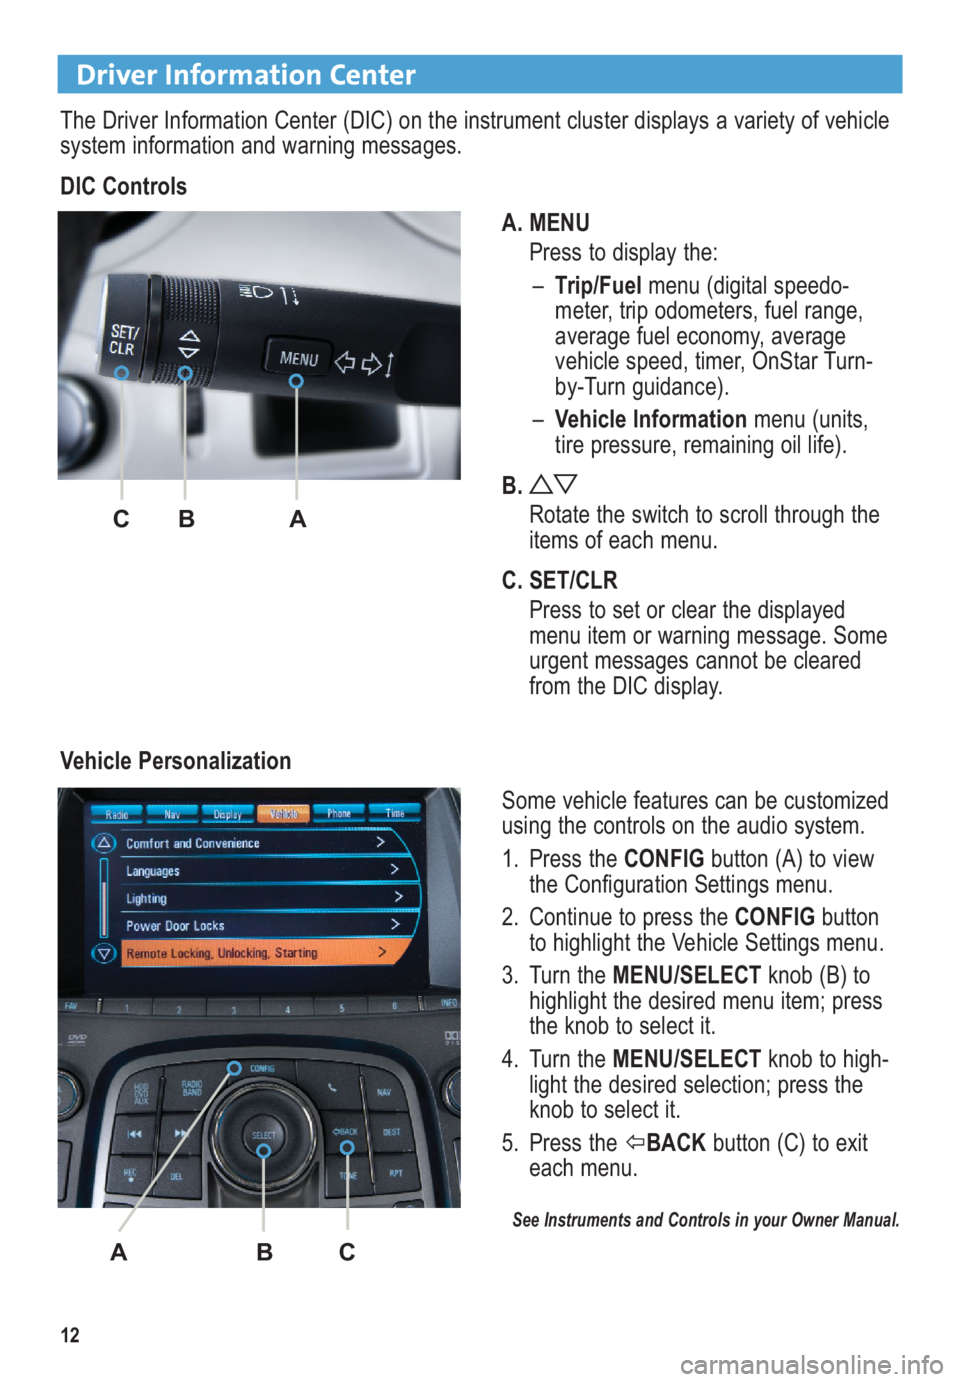
A. MENU
Press to display the:
–Trip/Fuelmenu (digital speedo -
meter, trip odometers, fuel range,
average fuel economy, average
vehicle speed, timer, OnStar Turn-
by-Turn guidance).
–Vehicle Information menu (units,
tire pressure, remaining oil life).
B.
Rotate the switch to scroll through the
items of each menu.
C. SET/CLR
Press to set or clear the displayed
menu item or warning message. Some
urgent messages cannot be cleared
from the DIC display.
Vehicle Personalization
Some vehicle features can be customized
using the controls on the audio system.
1. Press the CONFIGbutton (A) to view
the Configuration Settings menu.
2. Continue to press the CONFIGbutton
to highlight the Vehicle Settings menu.
3. Turn the MENU/SELECTknob (B) to
highlight the desired menu item; press
the knob to select it.
4. Turn the MENU/SELECTknob to high-
light the desired selection; press the
knob to select it.
5. Press the BACKbutton (C) to exit
each menu.
See Instruments and Controls in your Owner Manual.
CB A
ABC
Page 13 of 16
13
Exterior/Interior Lighting
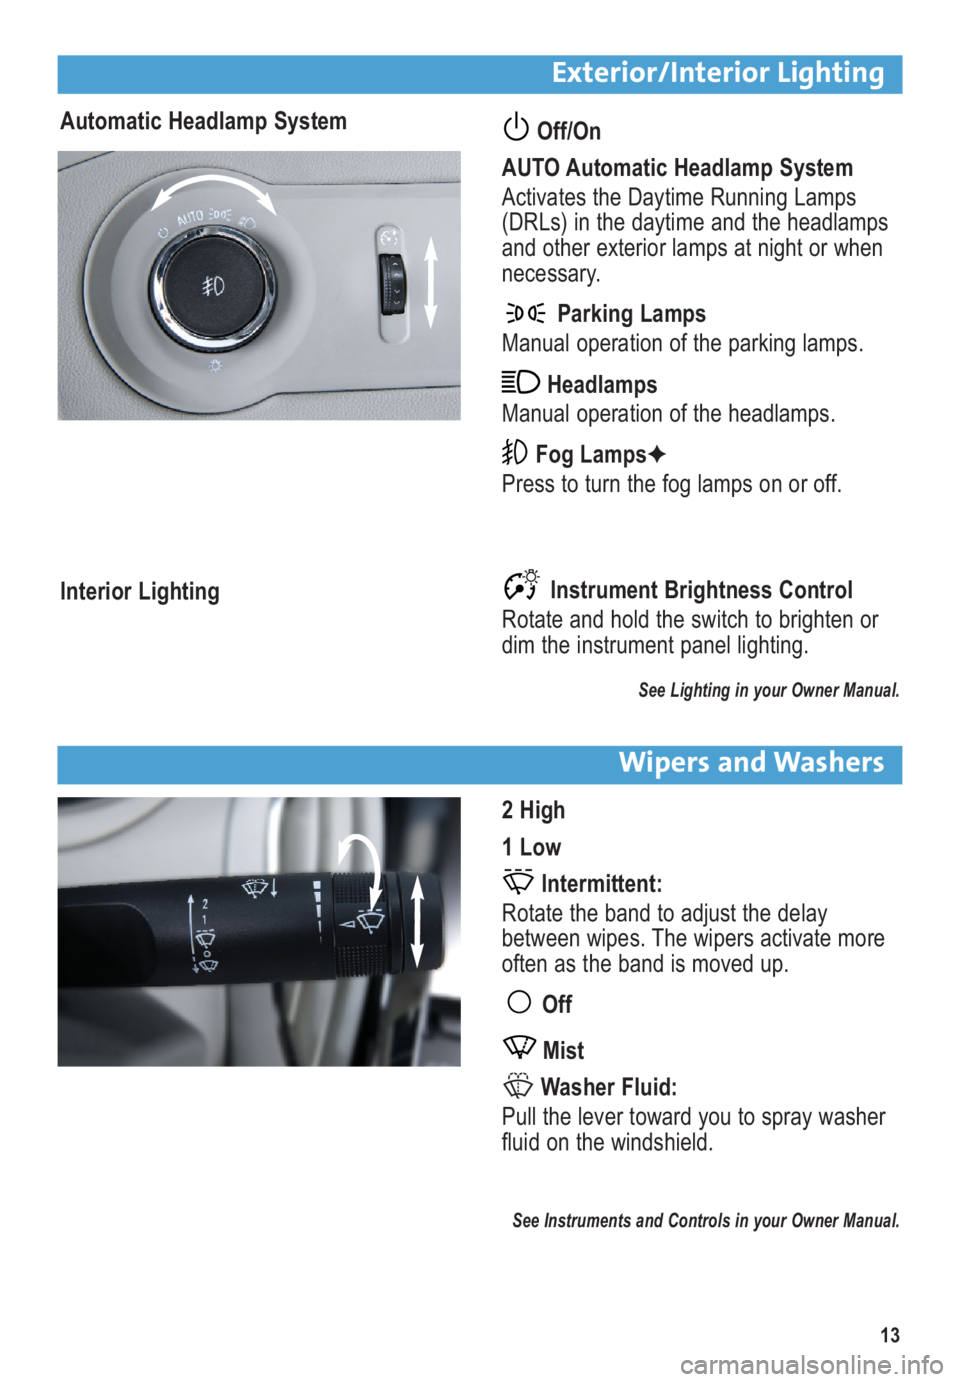
Automatic Headlamp SystemOff/On
AUTO Automatic Headlamp System
Activates the Daytime Running Lamps
(DRLs) in the daytime and the headlamps
and other exterior lamps at night or when
necessary.
Parking Lamps
Manual operation of the parking lamps.
Headlamps
Manual operation of the headlamps.
Fog LampsF
Press to turn the fog lamps on or off.
Instrument Brightness Control
Rotate and hold the switch to brighten or
dim the instrument panel lighting.
See Lighting in your Owner Manual.
Interior Lighting
Wipers and Washers
2 High
1 Low
Intermittent:
Rotate the band to adjust the delay
between wipes. The wipers activate more
often as the band is moved up.
Off
Mist
Washer Fluid:
Pull the lever toward you to spray washer
fluid on the windshield.
See Instruments and Controls in your Owner Manual.
Page 14 of 16
14
Cruise Control
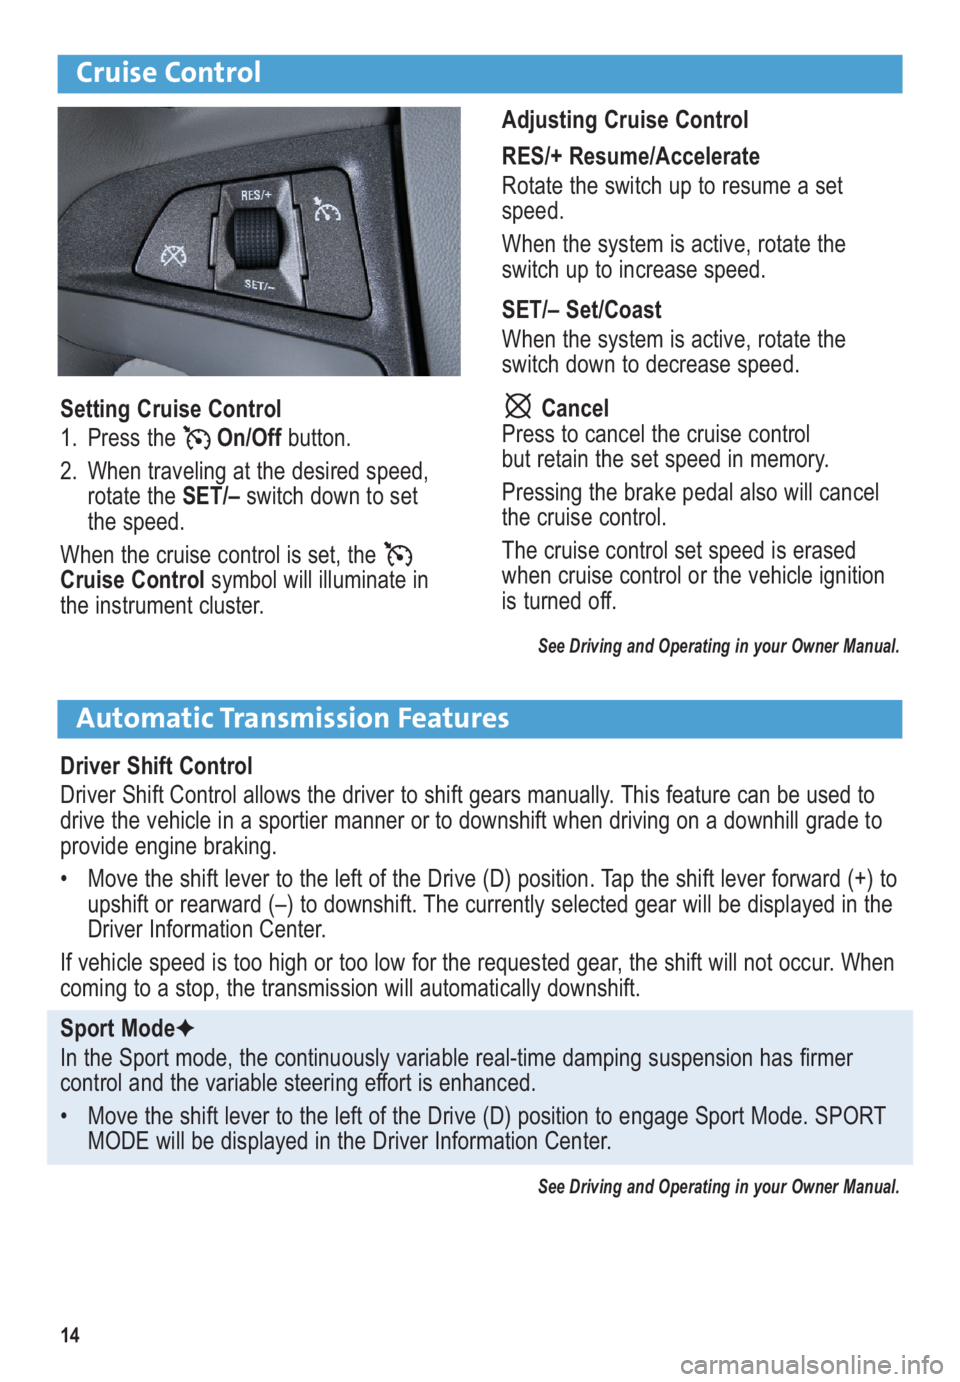
Adjusting Cruise Control
RES/+ Resume/Accelerate
Rotate the switch up to resume a set
speed.
When the system is active, rotate the
switch up to increase speed.
SET/– Set/Coast
When the system is active, rotate the
switch down to decrease speed.
Cancel
Press to cancel the cruise control
but retain the set speed in memory.
Pressing the brake pedal also will cancel
the cruise control.
The cruise control set speed is erased
when cruise control or the vehicle ignition
is turned off.
See Driving and Operating in your Owner Manual.
Automatic Transmission Features
Driver Shift Control
Driver Shift Control allows the driver to shift gears manually. This feature can be used to
drive the vehicle in a sportier manner or to downshift when driving on a downhill grade to
provide engine braking.
• Move the shift lever to the left of the Drive (D) position. Tap the shift lever forward (+) to
upshift or rearward (–) to downshift. The currently selected gear will be displayed in the
Driver Information Center.
If vehicle speed is too high or too low for the requested gear, the shift will not occur. When
coming to a stop, the transmission will automatically downshift.
Sport ModeF
In the Sport mode, the continuously variable real-time damping suspension has firmer
control and the variable steering effort is enhanced.
• Move the shift lever to the left of the Drive (D) position to engage Sport Mode. SPORT
MODE will be displayed in the Driver Information Center.
See Driving and Operating in your Owner Manual.
Setting Cruise Control
1. Press the On/Offbutton.
2. When traveling at the desired speed,
rotate the SET/–switch down to set
the speed.
When the cruise control is set, the
Cruise Controlsymbol will illuminate in
the instrument cluster.
Page 15 of 16
15
• To apply the parking brake, pull up the parking brake switch by the shift lever.
• To release the parking brake, press the brake pedal and press the switch.
See Driving and Operating in your Owner Manual.
Electric Parking Brake
Both systems turn on automatically every
time the vehicle is started.
Turning the Systems Off/On
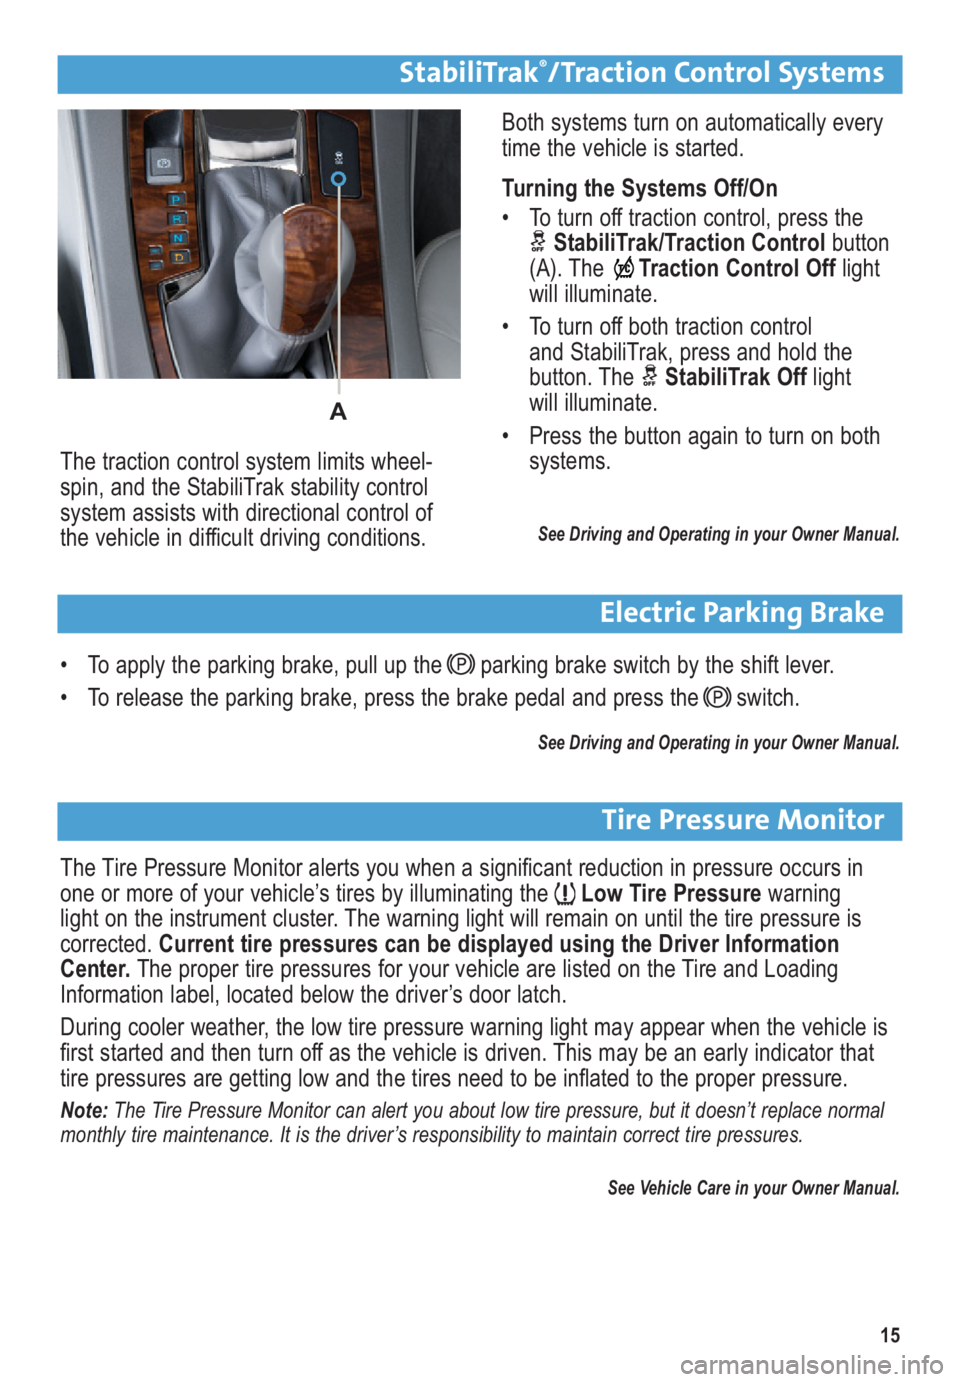
• To turn off traction control, press the
StabiliTrak/Traction Controlbutton
(A). TheTraction Control Offlight
will illuminate.
• To turn off both traction control
and StabiliTrak, press and hold the
button. The StabiliTrak Offlight
will illuminate.
• Press the button again to turn on both
systems.
See Driving and Operating in your Owner Manual.
The traction control system limits wheel-
spin, and the StabiliTrak stability control
system assists with directional control of
the vehicle in difficult driving conditions.
StabiliTrak®/Traction Control Systems
The Tire Pressure Monitor alerts you when a significant reduction in pressure occurs in
one or more of your vehicle’s tires by illuminating theLow Tire Pressurewarning
light on the instrument cluster. The warning light will remain on until the tire pressure is
corrected. Current tire pressures can be displayed using the Driver Information
Center.The proper tire pressures for your vehicle are listed on the Tire and Loading
Information label, located below the driver’s door latch.
During cooler weather, the low tire pressure warning light may appear when the vehicle is
first started and then turn off as the vehicle is driven. This may be an early indicator that
tire pressures are getting low and the tires need to be inflated to the proper pressure.
Note: The Tire Pressure Monitor can alert you about low tire pressure, but it doesn’t replace normal
monthly tire maintenance. It is the driver’s responsibility to maintain correct tire pressures.
See Vehicle Care in your Owner Manual.
Tire Pressure Monitor
A
Page 16 of 16
16
Roadside Assistance
1-800-252-1112 TTY Users: 1-888-889-2438
As the owner of a new Buick, you are automatically enrolled in the Buick Roadside Assistance
program. This value-added service is intended to provide you with peace of mind as you drive
in the city or travel the open road.
Buick’s Roadside Assistance toll-free number is staffed by a team of technically trained
advisors who are available 24 hours a day, 365 days a year, to provide minor repair information
or make arrangements to tow your vehicle to the nearest Buick dealer.
Buick will provide the following services for 5 years/100,000 miles at no expense to you:
• Fuel delivery
• Lockout service (identification required)
• Tow to nearest dealer for warranty service
• Flat tire assistance
• Jump starts
When calling, please provide the following information to the advisor:
• Location of the vehicle
• Telephone number and your location
• Vehicle model, year and color
• Vehicle mileage
• Vehicle Identification Number (VIN)
• Vehicle license plate number
Roadside Assistance and OnStar
If you have a current OnStar subscription, press the OnStar button and the vehicle will send
your current GPS location to an OnStar Advisor who will speak to you, assess your problem,
contact Roadside Assistance and relay your exact location so you will get the help you need.
Buick Owner Center
The Buick Owner Center, a complimentary service for Buick owners, is a one-stop resource
designed to enhance your Buick ownership experience. Exclusive member benefits include
online service reminders, vehicle maintenance tips, online owner manual, special privileges and
more. Sign up today at www.gmownercenter.com/buick.
25919689 A
!25919689=A!
Certain restrictions, precautions and safety procedures apply to your vehicle. Please read your Owner Manual
for complete instructions. All information contained herein is based on the latest information available at the time
of printing and is subject to change without notice. Copyright 2009 by GM Corp. All rights reserved.
Always demand genuine GM Parts