display BUICK LACROSSE 2010 Repair Manual
[x] Cancel search | Manufacturer: BUICK, Model Year: 2010, Model line: LACROSSE, Model: BUICK LACROSSE 2010Pages: 414
Page 190 of 414
6-44 Infotainment System
To link to a different paired phone,
see“Linking to a Different Phone”
later in this section.
Pairing a Phone
1. Press the CONFIG button.
2. Select Phone Settings.
3. Select Bluetooth.
4. Select Pair Device (Phone). A four digit PIN number appears
on the display.
5. Start the pairing process on the cell phone that will be paired to
the vehicle. Reference the cell
phone manufacturers user guide
for information on this process.
Locate the device named
“General Motors” in the list on
the cell phone and follow the
instructions on the cell phone to
enter the four digit PIN number
provided by the system. 6. The system prompts for a name
for the phone and confirms the
name provided. This name is
used to indicate which phone is
connected.
7. The system responds with “
successfully paired” after the
pairing process is complete.
8. Repeat Steps 1 through 7 to pair additional phones.
Listing All Paired and Connected
Phones
1. Press the CONFIG button.
2. Select Phone Settings.
3. Select Bluetooth.
4. Select Device List.
Deleting a Paired Phone
1. Press the CONFIG button.
2. Select Phone Settings.
3. Select Bluetooth. 4. Select Device List.
5. Select the phone to delete and
follow the on screen prompts.
Linking to a Different Phone
To link to a different phone, the new
phone must be in the vehicle and
available to be connected to the
bluetooth system before the process
is started.
1. Press the CONFIG button.
2. Select Phone Settings.
3. Select Bluetooth.
4. Select Device List.
5. Select the new phone to link to and follow the on screen
prompts.
If delete is selected, the
highlighted phone will be
deleted.
Page 205 of 414
Infotainment System 6-59
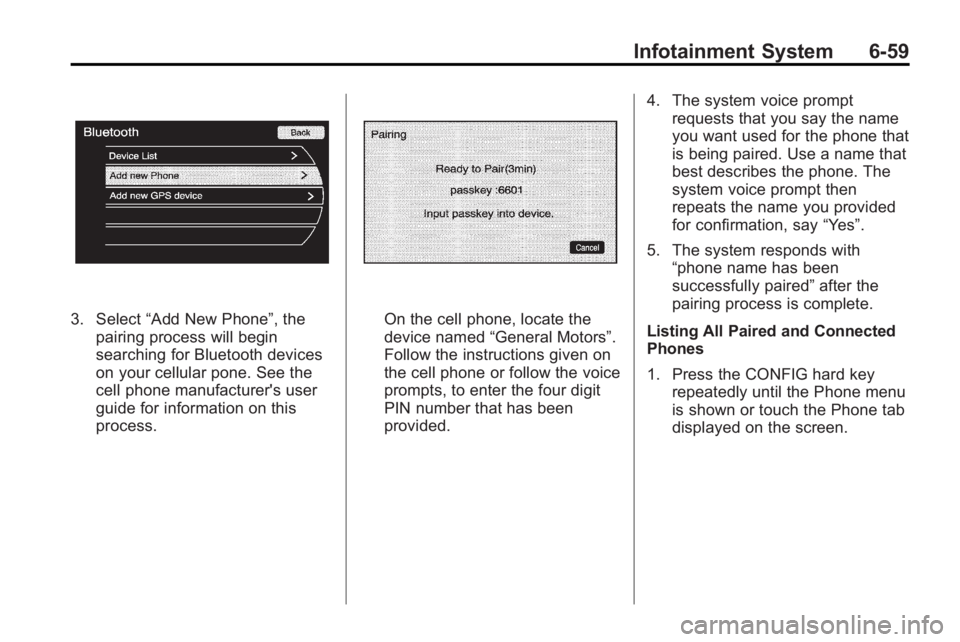
3. Select“Add New Phone”, the
pairing process will begin
searching for Bluetooth devices
on your cellular pone. See the
cell phone manufacturer's user
guide for information on this
process.On the cell phone, locate the
device named “General Motors”.
Follow the instructions given on
the cell phone or follow the voice
prompts, to enter the four digit
PIN number that has been
provided. 4. The system voice prompt
requests that you say the name
you want used for the phone that
is being paired. Use a name that
best describes the phone. The
system voice prompt then
repeats the name you provided
for confirmation, say “Yes”.
5. The system responds with “phone name has been
successfully paired” after the
pairing process is complete.
Listing All Paired and Connected
Phones
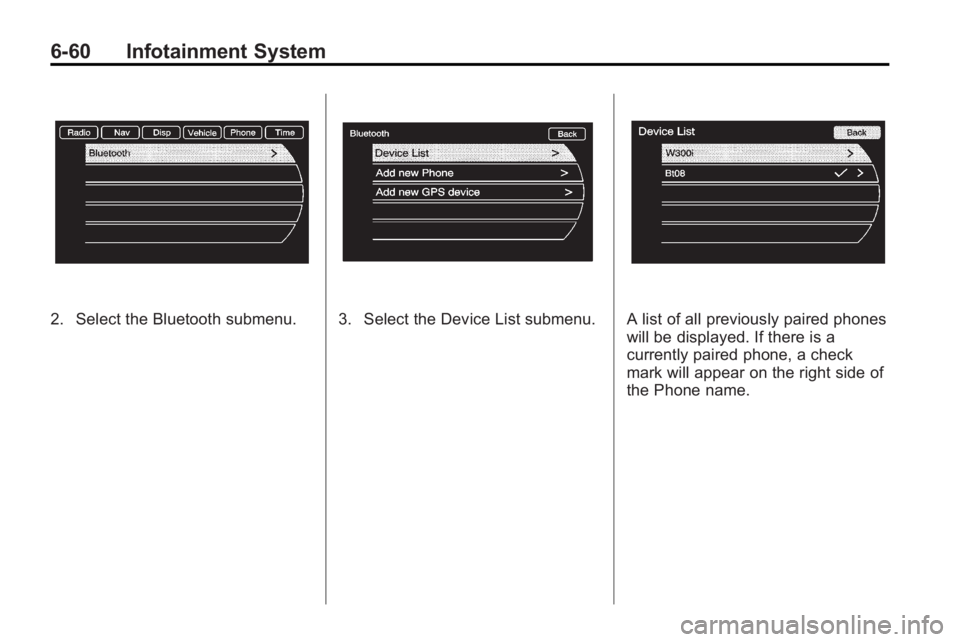
1. Press the CONFIG hard key repeatedly until the Phone menu
is shown or touch the Phone tab
displayed on the screen.
Page 206 of 414
6-60 Infotainment System
2. Select the Bluetooth submenu.3. Select the Device List submenu.A list of all previously paired phones
will be displayed. If there is a
currently paired phone, a check
mark will appear on the right side of
the Phone name.
Page 209 of 414
Infotainment System 6-63
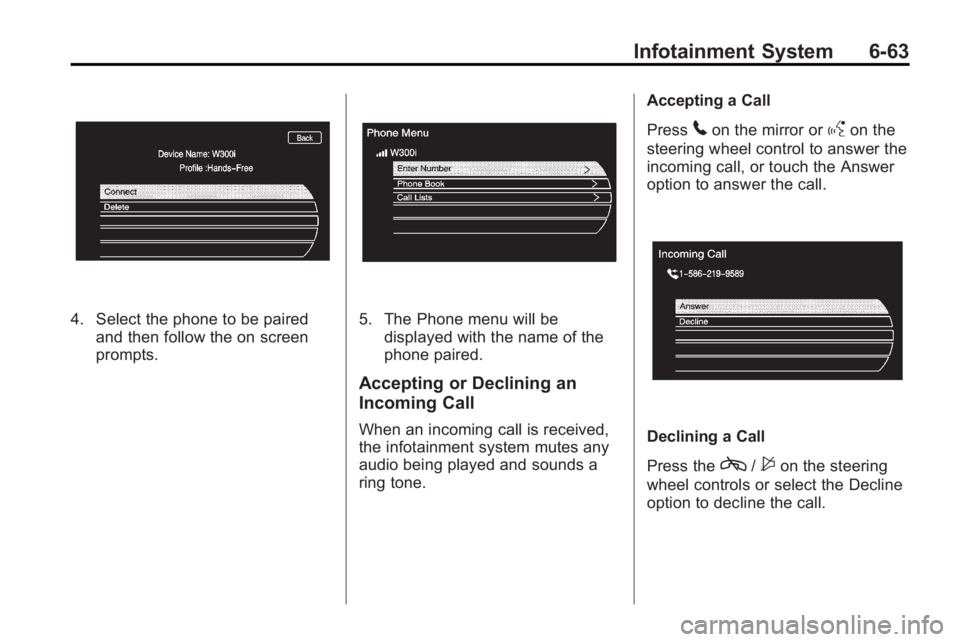
4. Select the phone to be pairedand then follow the on screen
prompts.5. The Phone menu will bedisplayed with the name of the
phone paired.
Accepting or Declining an
Incoming Call
When an incoming call is received,
the infotainment system mutes any
audio being played and sounds a
ring tone. Accepting a Call
Press
5on the mirror orgon the
steering wheel control to answer the
incoming call, or touch the Answer
option to answer the call.
Declining a Call
Press the
c/$on the steering
wheel controls or select the Decline
option to decline the call.
Page 214 of 414
7-2 Climate Controls
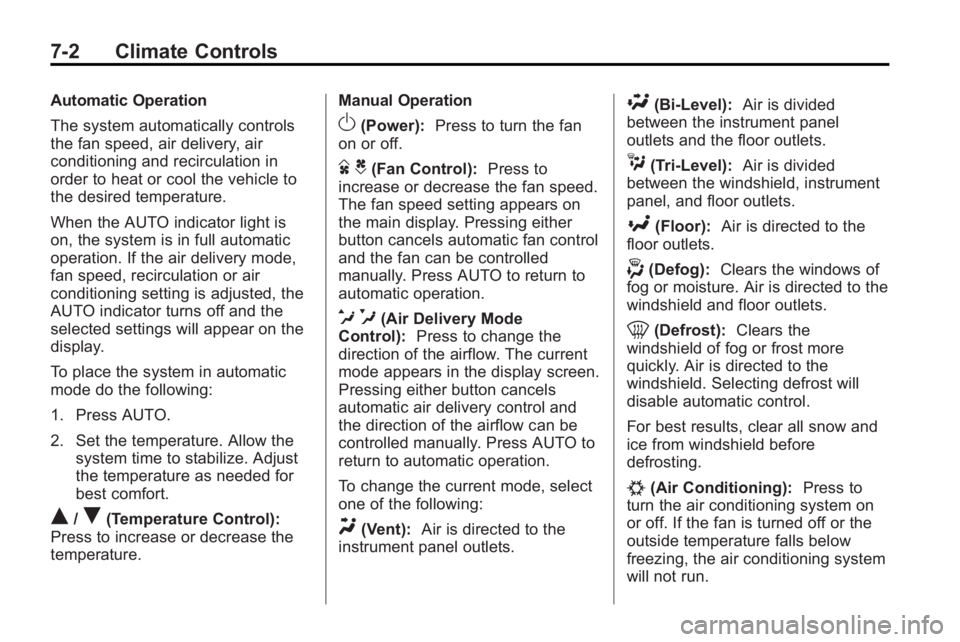
Automatic Operation
The system automatically controls
the fan speed, air delivery, air
conditioning and recirculation in
order to heat or cool the vehicle to
the desired temperature.
When the AUTO indicator light is
on, the system is in full automatic
operation. If the air delivery mode,
fan speed, recirculation or air
conditioning setting is adjusted, the
AUTO indicator turns off and the
selected settings will appear on the
display.
To place the system in automatic
mode do the following:
1. Press AUTO.
2. Set the temperature. Allow thesystem time to stabilize. Adjust
the temperature as needed for
best comfort.
Q/R(Temperature Control):
Press to increase or decrease the
temperature. Manual Operation
O(Power):
Press to turn the fan
on or off.
D C(Fan Control): Press to
increase or decrease the fan speed.
The fan speed setting appears on
the main display. Pressing either
button cancels automatic fan control
and the fan can be controlled
manually. Press AUTO to return to
automatic operation.
e *(Air Delivery Mode
Control): Press to change the
direction of the airflow. The current
mode appears in the display screen.
Pressing either button cancels
automatic air delivery control and
the direction of the airflow can be
controlled manually. Press AUTO to
return to automatic operation.
To change the current mode, select
one of the following:
Y(Vent): Air is directed to the
instrument panel outlets.
\(Bi-Level): Air is divided
between the instrument panel
outlets and the floor outlets.
C(Tri-Level): Air is divided
between the windshield, instrument
panel, and floor outlets.
[(Floor): Air is directed to the
floor outlets.
-(Defog): Clears the windows of
fog or moisture. Air is directed to the
windshield and floor outlets.
0(Defrost): Clears the
windshield of fog or frost more
quickly. Air is directed to the
windshield. Selecting defrost will
disable automatic control.
For best results, clear all snow and
ice from windshield before
defrosting.
#(Air Conditioning): Press to
turn the air conditioning system on
or off. If the fan is turned off or the
outside temperature falls below
freezing, the air conditioning system
will not run.
Page 217 of 414
Climate Controls 7-5
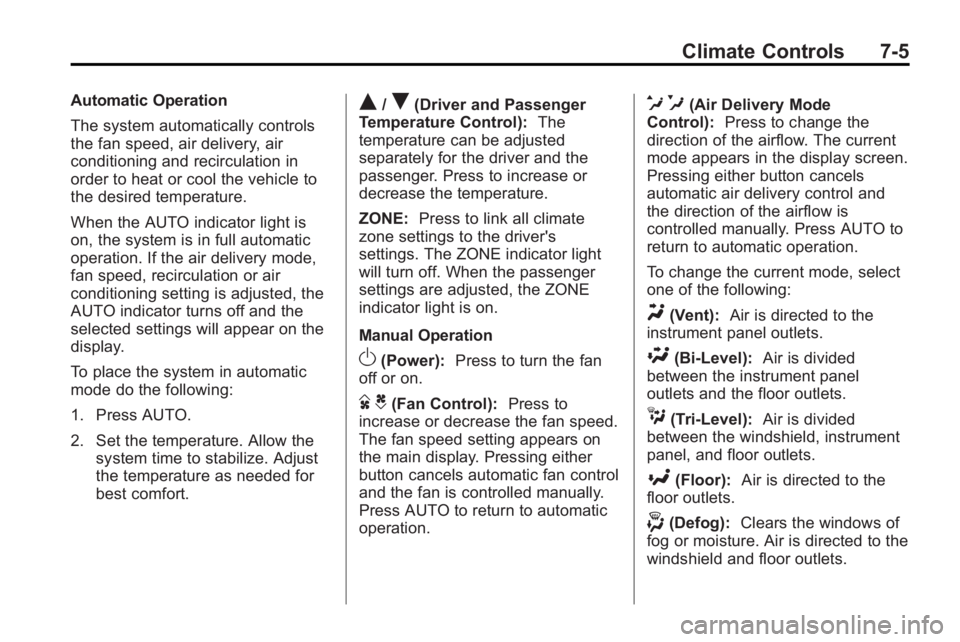
Automatic Operation
The system automatically controls
the fan speed, air delivery, air
conditioning and recirculation in
order to heat or cool the vehicle to
the desired temperature.
When the AUTO indicator light is
on, the system is in full automatic
operation. If the air delivery mode,
fan speed, recirculation or air
conditioning setting is adjusted, the
AUTO indicator turns off and the
selected settings will appear on the
display.
To place the system in automatic
mode do the following:
1. Press AUTO.
2. Set the temperature. Allow thesystem time to stabilize. Adjust
the temperature as needed for
best comfort.Q/R(Driver and Passenger
Temperature Control): The
temperature can be adjusted
separately for the driver and the
passenger. Press to increase or
decrease the temperature.
ZONE: Press to link all climate
zone settings to the driver's
settings. The ZONE indicator light
will turn off. When the passenger
settings are adjusted, the ZONE
indicator light is on.
Manual Operation
O(Power): Press to turn the fan
off or on.
D C(Fan Control): Press to
increase or decrease the fan speed.
The fan speed setting appears on
the main display. Pressing either
button cancels automatic fan control
and the fan is controlled manually.
Press AUTO to return to automatic
operation.
e *(Air Delivery Mode
Control): Press to change the
direction of the airflow. The current
mode appears in the display screen.
Pressing either button cancels
automatic air delivery control and
the direction of the airflow is
controlled manually. Press AUTO to
return to automatic operation.
To change the current mode, select
one of the following:
Y(Vent): Air is directed to the
instrument panel outlets.
\(Bi-Level): Air is divided
between the instrument panel
outlets and the floor outlets.
C(Tri-Level): Air is divided
between the windshield, instrument
panel, and floor outlets.
[(Floor): Air is directed to the
floor outlets.
-(Defog): Clears the windows of
fog or moisture. Air is directed to the
windshield and floor outlets.
Page 240 of 414
8-18 Driving and Operating
Ignition Positions (Key
Access)
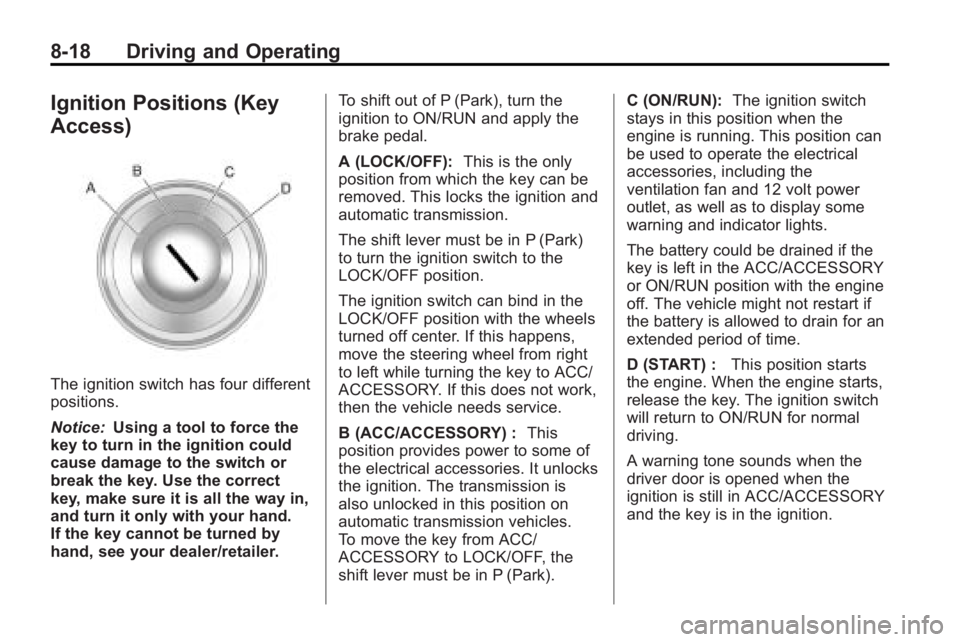
The ignition switch has four different
positions.
Notice:Using a tool to force the
key to turn in the ignition could
cause damage to the switch or
break the key. Use the correct
key, make sure it is all the way in,
and turn it only with your hand.
If the key cannot be turned by
hand, see your dealer/retailer. To shift out of P (Park), turn the
ignition to ON/RUN and apply the
brake pedal.
A (LOCK/OFF):
This is the only
position from which the key can be
removed. This locks the ignition and
automatic transmission.
The shift lever must be in P (Park)
to turn the ignition switch to the
LOCK/OFF position.
The ignition switch can bind in the
LOCK/OFF position with the wheels
turned off center. If this happens,
move the steering wheel from right
to left while turning the key to ACC/
ACCESSORY. If this does not work,
then the vehicle needs service.
B (ACC/ACCESSORY) : This
position provides power to some of
the electrical accessories. It unlocks
the ignition. The transmission is
also unlocked in this position on
automatic transmission vehicles.
To move the key from ACC/
ACCESSORY to LOCK/OFF, the
shift lever must be in P (Park). C (ON/RUN):
The ignition switch
stays in this position when the
engine is running. This position can
be used to operate the electrical
accessories, including the
ventilation fan and 12 volt power
outlet, as well as to display some
warning and indicator lights.
The battery could be drained if the
key is left in the ACC/ACCESSORY
or ON/RUN position with the engine
off. The vehicle might not restart if
the battery is allowed to drain for an
extended period of time.
D (START) : This position starts
the engine. When the engine starts,
release the key. The ignition switch
will return to ON/RUN for normal
driving.
A warning tone sounds when the
driver door is opened when the
ignition is still in ACC/ACCESSORY
and the key is in the ignition.
Page 241 of 414
Driving and Operating 8-19
Ignition Positions
(Keyless Access)
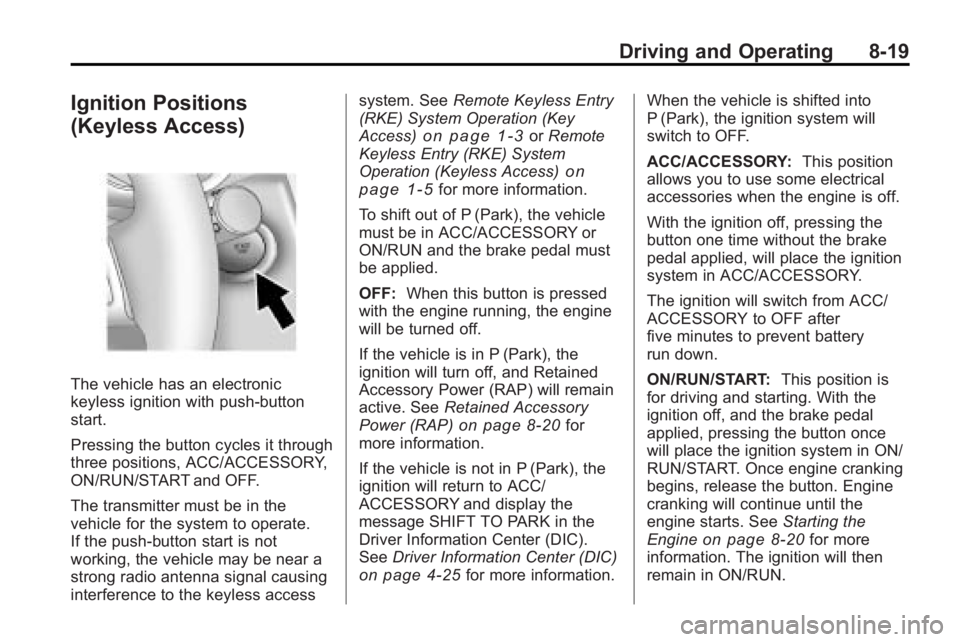
The vehicle has an electronic
keyless ignition with push-button
start.
Pressing the button cycles it through
three positions, ACC/ACCESSORY,
ON/RUN/START and OFF.
The transmitter must be in the
vehicle for the system to operate.
If the push-button start is not
working, the vehicle may be near a
strong radio antenna signal causing
interference to the keyless accesssystem. See
Remote Keyless Entry
(RKE) System Operation (Key
Access)
on page 1‑3or Remote
Keyless Entry (RKE) System
Operation (Keyless Access)
on
page 1‑5for more information.
To shift out of P (Park), the vehicle
must be in ACC/ACCESSORY or
ON/RUN and the brake pedal must
be applied.
OFF: When this button is pressed
with the engine running, the engine
will be turned off.
If the vehicle is in P (Park), the
ignition will turn off, and Retained
Accessory Power (RAP) will remain
active. See Retained Accessory
Power (RAP)
on page 8‑20for
more information.
If the vehicle is not in P (Park), the
ignition will return to ACC/
ACCESSORY and display the
message SHIFT TO PARK in the
Driver Information Center (DIC).
See Driver Information Center (DIC)
on page 4‑25for more information. When the vehicle is shifted into
P (Park), the ignition system will
switch to OFF.
ACC/ACCESSORY:
This position
allows you to use some electrical
accessories when the engine is off.
With the ignition off, pressing the
button one time without the brake
pedal applied, will place the ignition
system in ACC/ACCESSORY.
The ignition will switch from ACC/
ACCESSORY to OFF after
five minutes to prevent battery
run down.
ON/RUN/START: This position is
for driving and starting. With the
ignition off, and the brake pedal
applied, pressing the button once
will place the ignition system in ON/
RUN/START. Once engine cranking
begins, release the button. Engine
cranking will continue until the
engine starts. See Starting the
Engine
on page 8‑20for more
information. The ignition will then
remain in ON/RUN.
Page 243 of 414
Driving and Operating 8-21
The vehicle has a
Computer-Controlled Cranking
System. This feature assists in
starting the engine and protects
components. If the ignition key is
turned to the START position,
and then released when the
engine begins cranking, the
engine will continue cranking for
a few seconds or until the
vehicle starts. If the engine does
not start and the key is held in
START for many seconds,
cranking will be stopped after
15 seconds to prevent cranking
motor damage. To prevent gear
damage, this system also
prevents cranking if the engine
is already running. Engine
cranking can be stopped by
turning the ignition switch to
ACC/ACCESSORY or
LOCK/OFF.
Notice: Cranking the engine for
long periods of time, by returning
the key to the START position
immediately after cranking has
ended, can overheat and damage the cranking motor, and drain the
battery. Wait at least 15 seconds
between each try, to let the
cranking motor cool down.
2. If the engine does not start after
5-10 seconds, especially in very
cold weather (below −18°C or
0°F), it could be flooded with too
much gasoline. Try pushing the
accelerator pedal all the way to
the floor and holding it there as
you hold the key in START,
or press the START button, for
up to a maximum of 15 seconds.
Wait at least 15 seconds
between each try, to allow the
cranking motor to cool down.
When the engine starts, let go of
the key or button, and the
accelerator. If the vehicle starts
briefly but then stops again, do
the same thing. This clears the
extra gasoline from the engine.
Do not race the engine
immediately after starting it.
Operate the engine and transmission gently until the oil
warms up and lubricates all
moving parts.
Starting Procedure (Keyless
Access)
1. If the vehicle has the keyless access system, the transmitter
must be in the vehicle. Put your
foot on the brake pedal and
push the START button. When
the engine begins cranking, let
go of the button.
The idle speed will go down as
your engine gets warm. Do not
race the engine immediately
after starting it. Operate the
engine and transmission gently
to allow the oil to warm up and
lubricate all moving parts.
If the transmitter is not in the
vehicle or something is
interfering with the transmitter,
the Driver Information Center
(DIC) will display NO REMOTE
DETECTED. See Driver
Information Center (DIC)
on
page 4‑25for more information.
Page 244 of 414
8-22 Driving and Operating
If the battery in the keyless
access transmitter needs
replacing, the DIC displays
REPLACE BATTERY IN
REMOTE KEY. The vehicle can
still be driven. See Starting the
Vehicle with a Low Transmitter
Battery inRemote Keyless Entry
(RKE) System Operation (Key
Access)
on page 1‑3or
Remote Keyless Entry (RKE)
System Operation (Keyless
Access)
on page 1‑5for more
information.
The vehicle has a
Computer-Controlled Cranking
System. This feature assists in
starting the engine and protects
components. If the START
button is pressed, and then
released when the engine
begins cranking, the engine will
continue cranking for a few
seconds or until the vehicle
starts. If the engine does not
start and the button is pressed
for many seconds, cranking will
be stopped after 15 seconds to prevent cranking motor damage.
To prevent gear damage, this
system also prevents cranking if
the engine is already running.
Engine cranking can be stopped
by pressing the START button a
second time.
Notice: Cranking the engine for
long periods of time, by returning
the key to the START position
immediately after cranking has
ended, can overheat and damage
the cranking motor, and drain the
battery. Wait at least 15 seconds
between each try, to let the
cranking motor cool down.
2. If the engine does not start after
5-10 seconds, especially in very
cold weather (below −18°C or
0°F), it could be flooded with too
much gasoline. Try pushing the
accelerator pedal all the way to
the floor and holding it there as
you hold the key in START,
or press the START button, for
up to a maximum of 15 seconds.
Wait at least 15 seconds
between each try, to allow the cranking motor to cool down.
When the engine starts, let go of
the key or button, and the
accelerator. If the vehicle starts
briefly but then stops again, do
the same thing. This clears the
extra gasoline from the engine.
Do not race the engine
immediately after starting it.
Operate the engine and
transmission gently until the oil
warms up and lubricates all
moving parts.
Engine Heater
The engine coolant heater,
if available, can help in cold weather
conditions at or below
−18°C (0°F)
for easier starting and better fuel
economy during engine warm-up.
Plug in the coolant heater at least
four hours before starting the
vehicle. An internal thermostat in
the plug-end of the cord will prevent
engine coolant heater operation at
temperatures above −18°C (0°F).