turn signal BUICK LACROSSE 2012 Owner's Guide
[x] Cancel search | Manufacturer: BUICK, Model Year: 2012, Model line: LACROSSE, Model: BUICK LACROSSE 2012Pages: 512, PDF Size: 6.21 MB
Page 371 of 512
Black plate (33,1)Buick LaCrosse Owner Manual - 2012
Vehicle Care 10-33
Bulb Replacement
For the proper type of replacement
bulbs, seeReplacement Bulbs on
page 10‑36.
For any bulb changing procedure
not listed in this section, contact
your dealer.
Halogen Bulbs
{WARNING
Halogen bulbs have pressurized
gas inside and can burst if you
drop or scratch the bulb. You or
others could be injured. Be sure
to read and follow the instructions
on the bulb package.
High Intensity Discharge
(HID) Lighting
{WARNING
The low beam high intensity
discharge lighting system
operates at a very high voltage.
If you try to service any of the
system components, you could be
seriously injured. Have your
dealer or a qualified technician
service them.
After an HID headlamp bulb has
been replaced, the beam might be a
slightly different shade than it was
originally. This is normal.
Headlamps, Front Turn
Signal and Parking
Lamps
Base Headlamp Assembly
The base model vehicle has a
halogen high-beam headlamp, a
low-beam/Daytime Running Lamp
(DRL) headlamp, and a turn signal/
parking lamp on the headlamp
assembly.
For replacement of the turn signal/
parking lamp bulb on an eAssist
vehicle, contact your dealer.
Page 372 of 512
Black plate (34,1)Buick LaCrosse Owner Manual - 2012
10-34 Vehicle Care
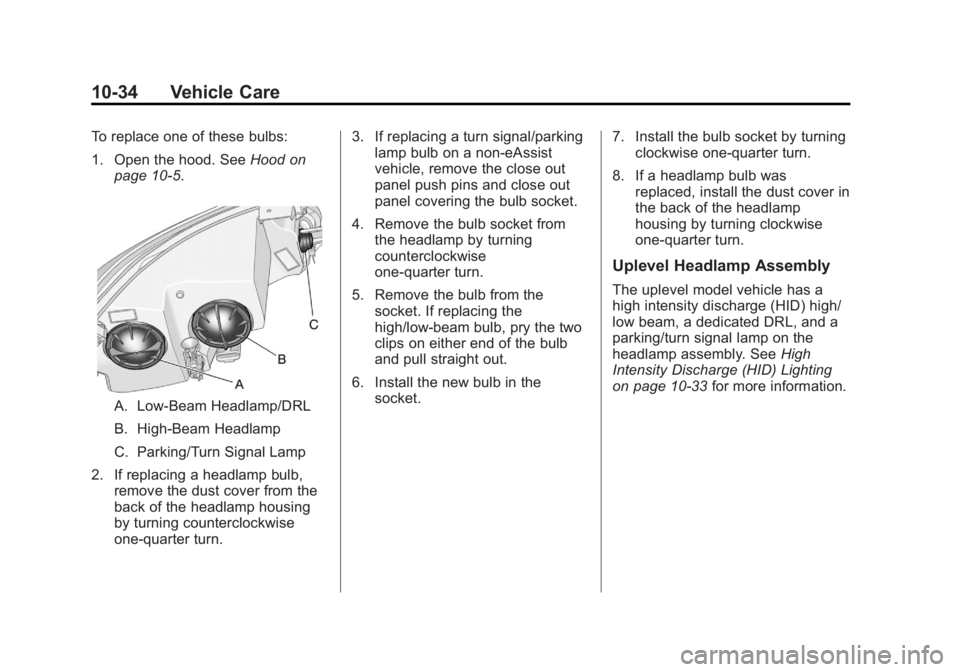
To replace one of these bulbs:
1. Open the hood. SeeHood on
page 10‑5.
A. Low-Beam Headlamp/DRL
B. High-Beam Headlamp
C. Parking/Turn Signal Lamp
2. If replacing a headlamp bulb, remove the dust cover from the
back of the headlamp housing
by turning counterclockwise
one‐quarter turn. 3. If replacing a turn signal/parking
lamp bulb on a non‐eAssist
vehicle, remove the close out
panel push pins and close out
panel covering the bulb socket.
4. Remove the bulb socket from the headlamp by turning
counterclockwise
one‐quarter turn.
5. Remove the bulb from the socket. If replacing the
high/low‐beam bulb, pry the two
clips on either end of the bulb
and pull straight out.
6. Install the new bulb in the socket. 7. Install the bulb socket by turning
clockwise one‐quarter turn.
8. If a headlamp bulb was replaced, install the dust cover in
the back of the headlamp
housing by turning clockwise
one‐quarter turn.
Uplevel Headlamp Assembly
The uplevel model vehicle has a
high intensity discharge (HID) high/
low beam, a dedicated DRL, and a
parking/turn signal lamp on the
headlamp assembly. See High
Intensity Discharge (HID) Lighting
on page 10‑33 for more information.
Page 373 of 512
Black plate (35,1)Buick LaCrosse Owner Manual - 2012
Vehicle Care 10-35
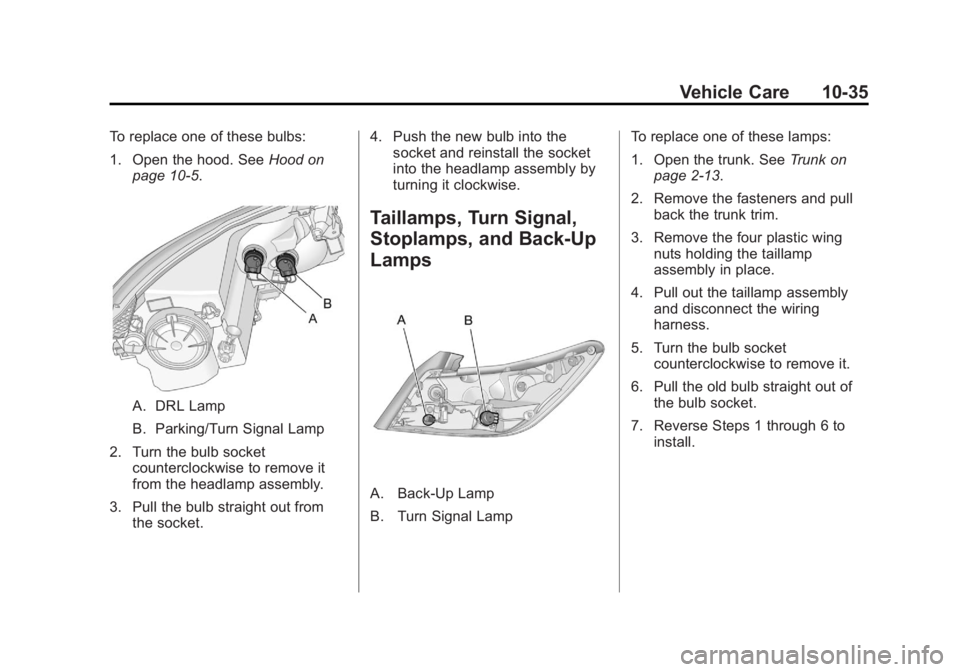
To replace one of these bulbs:
1. Open the hood. SeeHood on
page 10‑5.
A. DRL Lamp
B. Parking/Turn Signal Lamp
2. Turn the bulb socket counterclockwise to remove it
from the headlamp assembly.
3. Pull the bulb straight out from the socket. 4. Push the new bulb into the
socket and reinstall the socket
into the headlamp assembly by
turning it clockwise.
Taillamps, Turn Signal,
Stoplamps, and Back-Up
Lamps
A. Back‐Up Lamp
B. Turn Signal Lamp To replace one of these lamps:
1. Open the trunk. See
Trunk on
page 2‑13.
2. Remove the fasteners and pull back the trunk trim.
3. Remove the four plastic wing nuts holding the taillamp
assembly in place.
4. Pull out the taillamp assembly and disconnect the wiring
harness.
5. Turn the bulb socket counterclockwise to remove it.
6. Pull the old bulb straight out of the bulb socket.
7. Reverse Steps 1 through 6 to install.
Page 374 of 512

Black plate (36,1)Buick LaCrosse Owner Manual - 2012
10-36 Vehicle Care
License Plate Lamp
The license plate lamps for this
vehicle are on the trunk lid.
To replace one of these bulbs:
1. Open the trunk. SeeTrunk on
page 2‑13 for more information.
2. Push the end on either of the
lamp assemblies (passenger
side shown) and then move the
lamp assembly down to remove
it from the trunk lid.
A. Bulb Socket
B. Bulb
C. Lamp Assembly
3. Turn the bulb socket (A) counterclockwise to remove it
from the lamp assembly (C).
4. Pull the bulb (B) straight out of the bulb socket.
5. Push the replacement bulb straight into the bulb socket and
turn the bulb socket clockwise to
install it into the lamp assembly.
6. Move the lamp assembly into the trunk lid, engaging the clip
side first. 7. Push on the lamp side opposite
the clip until the lamp assembly
snaps into place.
Replacement Bulbs
Exterior Lamp Bulb
Number
Back-Up Lamp 921LL
Daytime Running
Lamp (Uplevel) 3157K LCP
Front Turn Signal/
Parking Lamp 3757NAK
LCP
Headlamp High
Beam (Base) H9
Headlamp Low
Beam (Base) H11LL
License Plate Lamp W5WLL
Rear Turn Signal 3757NAK
LCP
For replacement bulbs not listed
here, contact your dealer.
Page 397 of 512
Black plate (59,1)Buick LaCrosse Owner Manual - 2012
Vehicle Care 10-59
.Replacement tires or wheels do
not match the original equipment
tires or wheels. Tires and wheels
other than those recommended
could prevent the TPMS from
functioning properly. SeeBuying
New Tires on page 10‑63.
.Operating electronic devices or
being near facilities using radio
wave frequencies similar to the
TPMS could cause the TPMS
sensors to malfunction.
If the TPMS is not functioning
properly it cannot detect or signal a
low tire condition. See your dealer
for service if the TPMS malfunction
light and DIC message comes on
and stays on.
TPMS Sensor Matching
Process
Each TPMS sensor has a unique
identification code. The identification
code needs to be matched to a new
tire/wheel position after rotating the
vehicle’s tires or replacing one or
more of the TPMS sensors. The
TPMS sensor matching process
should also be performed after
replacing a spare tire with a road
tire containing the TPMS sensor.
The malfunction light and the DIC
message should go off at the next
ignition cycle. The sensors are
matched to the tire/wheel positions,
using a TPMS relearn tool, in the
following order: driver side front tire,
passenger side front tire, passenger
side rear tire, and driver side rear.
See your dealer for service or to
purchase a relearn tool. There are two minutes to match the
first tire/wheel position, and
five minutes overall to match all four
tire/wheel positions. If it takes
longer, the matching process stops
and must be restarted.
The TPMS sensor matching
process is:
1. Set the parking brake.
2. Turn the ignition to ON/RUN with
the engine off.
3. Use the MENU button to select the Vehicle Information Menu in
the Driver Information
Center (DIC).
4. Use the thumbwheel to scroll to the Tire Pressure Menu Item
screen.
5. Press the SET/CLR button to begin the sensor matching
process.
A message asking if the process
should begin should appear.
Page 398 of 512
Black plate (60,1)Buick LaCrosse Owner Manual - 2012
10-60 Vehicle Care
6. Press the SET/CLR button againto confirm the selection.
The horn sounds twice to signal
the receiver is in relearn mode
and the TIRE LEARNING
ACTIVE message displays on
the DIC screen.
7. Start with the driver side front tire.
8. Place the relearn tool against the tire sidewall, near the valve
stem. Then press the button to
activate the TPMS sensor.
A horn chirp confirms that the
sensor identification code has
been matched to this tire and
wheel position.
9. Proceed to the passenger side front tire, and repeat the
procedure in Step 8.
10. Proceed to the passenger side rear tire, and repeat the
procedure in Step 8. 11. Proceed to the driver side rear
tire, and repeat the procedure
in Step 8. The horn sounds two
times to indicate the sensor
identification code has been
matched to the driver side rear
tire, and the TPMS sensor
matching process is no longer
active. The TIRE LEARNING
ACTIVE message on the DIC
display screen goes off.
12. Turn the ignition to LOCK/OFF.
13. Set all four tires to the recommended air pressure
level as indicated on the Tire
and Loading Information label.
Tire Inspection
We recommend that the tires,
including the spare tire, if the
vehicle has one, be inspected
for signs of wear or damage at
least once a month. Replace the tire if:
.The indicators at three or
more places around the tire
can be seen.
.There is cord or fabric
showing through the tire's
rubber.
.The tread or sidewall is
cracked, cut, or snagged
deep enough to show cord or
fabric.
.The tire has a bump, bulge,
or split.
.The tire has a puncture, cut,
or other damage that cannot
be repaired well because of
the size or location of the
damage.
Page 432 of 512
Black plate (94,1)Buick LaCrosse Owner Manual - 2012
10-94 Vehicle Care
Jump Starting
Jump Starting (On-board
with eAssist Only)
If the vehicle fails to crank, it may
be jump started by using the eAssist
battery to charge the 12-volt battery.
Use the following procedure to
activate the on‐board jump start
using the DIC controls.
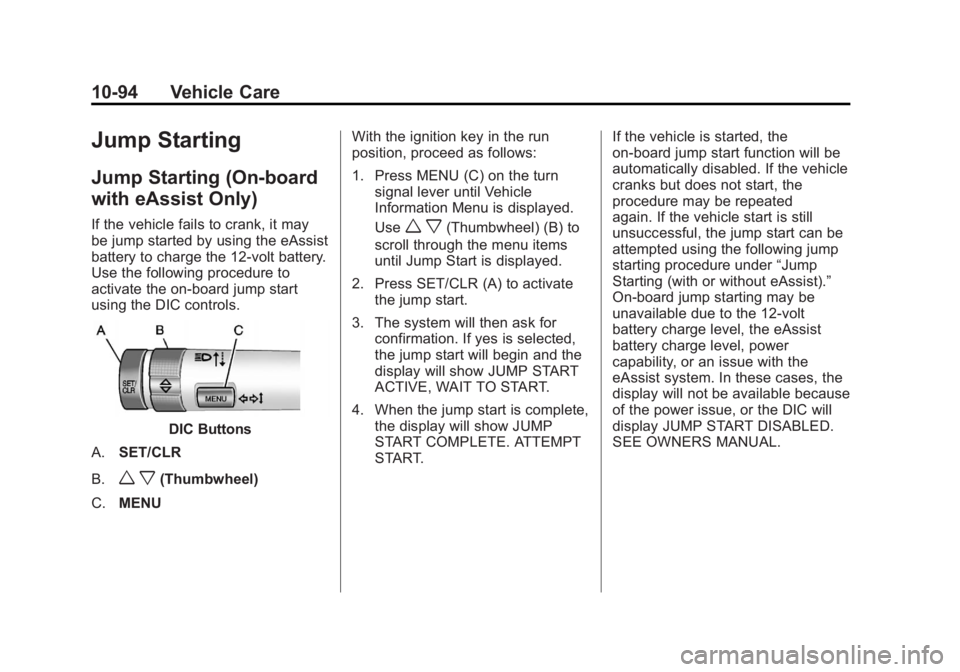
DIC Buttons
A. SET/CLR
B.
w x(Thumbwheel)
C. MENU With the ignition key in the run
position, proceed as follows:
1. Press MENU (C) on the turn
signal lever until Vehicle
Information Menu is displayed.
Use
w x(Thumbwheel) (B) to
scroll through the menu items
until Jump Start is displayed.
2. Press SET/CLR (A) to activate the jump start.
3. The system will then ask for confirmation. If yes is selected,
the jump start will begin and the
display will show JUMP START
ACTIVE, WAIT TO START.
4. When the jump start is complete, the display will show JUMP
START COMPLETE. ATTEMPT
START. If the vehicle is started, the
on‐board jump start function will be
automatically disabled. If the vehicle
cranks but does not start, the
procedure may be repeated
again. If the vehicle start is still
unsuccessful, the jump start can be
attempted using the following jump
starting procedure under
“Jump
Starting (with or without eAssist).”
On‐board jump starting may be
unavailable due to the 12-volt
battery charge level, the eAssist
battery charge level, power
capability, or an issue with the
eAssist system. In these cases, the
display will not be available because
of the power issue, or the DIC will
display JUMP START DISABLED.
SEE OWNERS MANUAL.
Page 496 of 512
Black plate (6,1)Buick LaCrosse Owner Manual - 2012
14-6 OnStar
OnStar service cannot work unless
your vehicle is in a place where
OnStar has an agreement with a
wireless service provider for service
in that area, and the wireless
service provider has coverage,
network capacity, reception, and
technology compatible with OnStar’s
service. Service involving location
information about the vehicle cannot
work unless GPS signals are
available, unobstructed, and
compatible with the OnStar
hardware. OnStar service may not
work if the OnStar equipment is not
properly installed or it has not been
properly maintained. If equipment or
software is added, connected,
or modified, OnStar service may not
work. Other problems beyond
OnStar ’s control may prevent
service such as hills, tall buildings,
tunnels, weather, electrical system
design and architecture of the
vehicle, damage to the vehicle in a
crash, or wireless phone network
congestion or jamming. See
Radio Frequency Statement on
page 13‑22 for information
regarding Part 15 of the Federal
Communications Commission (FCC)
rules and Industry Canada
Standards RSS-GEN/210/220/310.
Services for People with
Disabilities
Advisors provide services to help
subscribers with physical disabilities
and medical conditions.
Push
Qfor help with:
.Locating a gas station with an
attendant to pump gas.
.Finding a hotel, restaurant, etc.,
that meets accessibility needs.
.Providing directions to the
closest hospital or pharmacy in
urgent situations.
TTY Users
OnStar has the ability to
communicate to the deaf,
hard‐of‐hearing, or speech‐impaired
customers while in the vehicle. The
available dealer‐installed TTY
system can provide in-vehicle
access to all of the OnStar services,
except Virtual Advisor and OnStar
Turn‐by‐Turn Navigation.
Onstar.com
The website provides access to
account information, manages the
OnStar subscription, and allows
viewing of videos of each service.
Get subscription plan pricing and
sign up for OnStar Vehicle
Diagnostics. Click on the “My
Account” tab on the home page.
Page 497 of 512
Black plate (7,1)Buick LaCrosse Owner Manual - 2012
OnStar 14-7
OnStar Personal Identification
Number (PIN)
A PIN is needed to access some of
the OnStar services, like Remote
Door Unlock and Stolen Vehicle
Assistance. You will be prompted to
change the PIN the first time when
speaking with an Advisor. To
change the OnStar PIN, call OnStar
and provide the Advisor with the
current number.
Warranty
OnStar equipment may be
warranted as part of the new-vehicle
limited warranty. The manufacturer
of the vehicle furnishes detailed
warranty information.
Languages
The vehicle can be programmed to
respond in French or Spanish. Push
Qand ask an Advisor. Advisors
can speak French or Spanish.
Potential Issues
Some OnStar services are disabled
after five days. OnStar cannot
perform Remote Door Unlock or
Stolen Vehicle Assistance after the
vehicle has been off continuously
for five days. After five days, OnStar
can contact Roadside Assistance
and a locksmith to help gain access
to the vehicle.
Global Positioning
System (GPS)
.Obstruction of the GPS can
occur in a large city with tall
buildings; in parking garages;
around airports; in tunnels,
underpasses, or parking
garages; or in an area with very
dense trees. If GPS signals are
not available, the OnStar system
should still operate to call
OnStar. However, OnStar could
have difficulty identifying the
exact location.
.In emergency situations, OnStar
can use the last stored GPS
location to send to emergency
responders.
.A temporary loss of GPS can
cause loss of the ability to send
a Turn-by-Turn Navigation route.
The Advisor may give a verbal
route or may ask for a call back
after the vehicle is driven into an
open area.
Cellular and GPS Antennas
Avoid placing items over or near the
antenna to prevent blocking cellular
and GPS signal reception. Cellular
reception is required for OnStar to
send remote signals to the vehicle.
Page 500 of 512
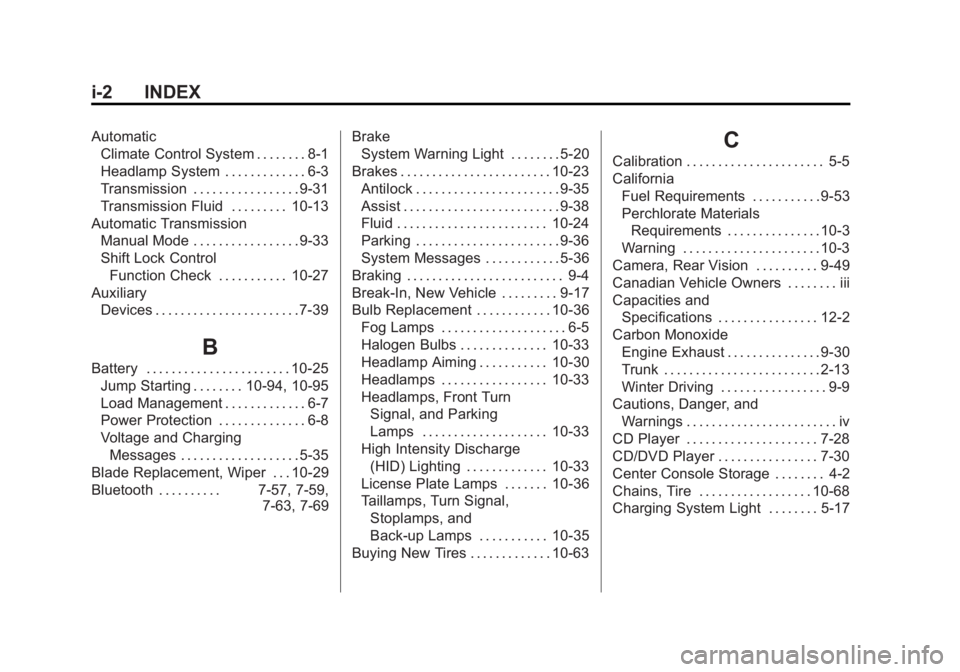
Black plate (2,1)Buick LaCrosse Owner Manual - 2012
i-2 INDEX
AutomaticClimate Control System . . . . . . . . 8-1
Headlamp System . . . . . . . . . . . . . 6-3
Transmission . . . . . . . . . . . . . . . . . 9-31
Transmission Fluid . . . . . . . . . 10-13
Automatic Transmission Manual Mode . . . . . . . . . . . . . . . . . 9-33
Shift Lock Control
Function Check . . . . . . . . . . . 10-27
Auxiliary Devices . . . . . . . . . . . . . . . . . . . . . . . 7-39
B
Battery . . . . . . . . . . . . . . . . . . . . . . . 10-25
Jump Starting . . . . . . . . 10-94, 10-95
Load Management . . . . . . . . . . . . . 6-7
Power Protection . . . . . . . . . . . . . . 6-8
Voltage and ChargingMessages . . . . . . . . . . . . . . . . . . . 5-35
Blade Replacement, Wiper . . . 10-29
Bluetooth . . . . . . . . . . 7-57, 7-59, 7-63, 7-69Brake
System Warning Light . . . . . . . . 5-20
Brakes . . . . . . . . . . . . . . . . . . . . . . . . 10-23 Antilock . . . . . . . . . . . . . . . . . . . . . . . 9-35
Assist . . . . . . . . . . . . . . . . . . . . . . . . . 9-38
Fluid . . . . . . . . . . . . . . . . . . . . . . . . 10-24
Parking . . . . . . . . . . . . . . . . . . . . . . . 9-36
System Messages . . . . . . . . . . . . 5-36
Braking . . . . . . . . . . . . . . . . . . . . . . . . . 9-4
Break-In, New Vehicle . . . . . . . . . 9-17
Bulb Replacement . . . . . . . . . . . . 10-36 Fog Lamps . . . . . . . . . . . . . . . . . . . . 6-5
Halogen Bulbs . . . . . . . . . . . . . . 10-33
Headlamp Aiming . . . . . . . . . . . 10-30
Headlamps . . . . . . . . . . . . . . . . . 10-33
Headlamps, Front TurnSignal, and Parking
Lamps . . . . . . . . . . . . . . . . . . . . 10-33
High Intensity Discharge (HID) Lighting . . . . . . . . . . . . . 10-33
License Plate Lamps . . . . . . . 10-36
Taillamps, Turn Signal,
Stoplamps, and
Back-up Lamps . . . . . . . . . . . 10-35
Buying New Tires . . . . . . . . . . . . . 10-63
C
Calibration . . . . . . . . . . . . . . . . . . . . . . 5-5
California
Fuel Requirements . . . . . . . . . . . 9-53
Perchlorate MaterialsRequirements . . . . . . . . . . . . . . . 10-3
Warning . . . . . . . . . . . . . . . . . . . . . . 10-3
Camera, Rear Vision . . . . . . . . . . 9-49
Canadian Vehicle Owners . . . . . . . . iii
Capacities and Specifications . . . . . . . . . . . . . . . . 12-2
Carbon Monoxide Engine Exhaust . . . . . . . . . . . . . . . 9-30
Trunk . . . . . . . . . . . . . . . . . . . . . . . . . 2-13
Winter Driving . . . . . . . . . . . . . . . . . 9-9
Cautions, Danger, and
Warnings . . . . . . . . . . . . . . . . . . . . . . . . iv
CD Player . . . . . . . . . . . . . . . . . . . . . 7-28
CD/DVD Player . . . . . . . . . . . . . . . . 7-30
Center Console Storage . . . . . . . . 4-2
Chains, Tire . . . . . . . . . . . . . . . . . . 10-68
Charging System Light . . . . . . . . 5-17