lamp BUICK LACROSSE 2012 Service Manual
[x] Cancel search | Manufacturer: BUICK, Model Year: 2012, Model line: LACROSSE, Model: BUICK LACROSSE 2012Pages: 512, PDF Size: 6.21 MB
Page 330 of 512
Black plate (56,1)Buick LaCrosse Owner Manual - 2012
9-56 Driving and Operating
{WARNING
If a fire starts while you are
refueling, do not remove the
nozzle. Shut off the flow of fuel by
shutting off the pump or by
notifying the station attendant.
Leave the area immediately.
Notice: If a new fuel cap is
needed, be sure to get the right
type of cap from your dealer. The
wrong type of fuel cap might not
fit properly, might cause the
malfunction indicator lamp to
light, and could damage the fuel
tank and emissions system. See
Malfunction Indicator Lamp on
page 5‑17.
Filling a Portable Fuel
Container
{WARNING
Never fill a portable fuel container
while it is in the vehicle. Static
electricity discharge from the
container can ignite the fuel
vapor. You can be badly burned
and the vehicle damaged if this
occurs. To help avoid injury to you
and others:
.Dispense fuel only into
approved containers.
.Do not fill a container while it
is inside a vehicle, in a
vehicle's trunk, pickup bed,
or on any surface other than
the ground.
(Continued)
WARNING (Continued)
.Bring the fill nozzle in contact
with the inside of the fill
opening before operating the
nozzle. Contact should be
maintained until the filling is
complete.
.Do not smoke while
pumping fuel.
.Do not use a cellular phone
while pumping fuel.
Page 332 of 512
Black plate (58,1)Buick LaCrosse Owner Manual - 2012
9-58 Driving and Operating
Pulling a Trailer
Here are some important points:
.There are many laws, including
speed limit restrictions that apply
to trailering. Check for legal
requirements.
.Do not tow a trailer at all during
the first 1 600 km (1,000 mi) the
new vehicle is driven. The
engine, axle, or other parts could
be damaged.
.During the first 800 km (500 mi)
that a trailer is towed, do not
drive over 80 km/h (50 mph) and
do not make starts at full throttle.
This reduces wear on the
vehicle.
.The vehicle can tow in D (Drive).
Use a lower gear if the
transmission shifts too often.
.Obey speed limit restrictions. Do
not drive faster than the
maximum posted speed for
trailers, or no more than 90 km/h
(55 mph), to reduce wear on the
vehicle.
Driving with a Trailer
Towing a trailer requires experience.
Get familiar with handling and
braking with the added trailer
weight. The vehicle is now longer
and not as responsive as the
vehicle is by itself.
Check all trailer hitch parts and
attachments, safety chains,
electrical connectors, lamps, tires,
and mirror adjustments. If the trailer
has electric brakes, start the vehicle
and trailer moving and then apply
the trailer brake controller by hand
to be sure the brakes are working.
During the trip, check regularly to be
sure that the load is secure, and the
lamps and trailer brakes are working
properly.
Towing with a Stability Control
System
When towing, the sound of the
stability control system might be
heard. The system is reacting to the
vehicle movement caused by the
trailer, which mainly occurs during
cornering. This is normal when
towing heavier trailers.
Following Distance
Stay at least twice as far behind the
vehicle ahead as you would when
driving the vehicle without a trailer.
This can help to avoid situations
that require heavy braking and
sudden turns.
Passing
More passing distance is needed
when towing a trailer. Because the
rig is longer, it is necessary to go
farther beyond the passed vehicle
before returning to the lane.
Page 333 of 512
Black plate (59,1)Buick LaCrosse Owner Manual - 2012
Driving and Operating 9-59
Backing Up
Hold the bottom of the steering
wheel with one hand. To move the
trailer to the left, move that hand to
the left. To move the trailer to the
right, move your hand to the right.
Always back up slowly and,
if possible, have someone
guide you.
Making Turns
Notice:Making very sharp turns
while trailering could cause the
trailer to come in contact with the
vehicle. The vehicle could be
damaged. Avoid making very
sharp turns while trailering.
When turning with a trailer, make
wider turns than normal so the
trailer will not strike soft shoulders,
curbs, road signs, trees, or other
objects. Use the turn signal well in
advance and avoid jerky or sudden
maneuvers.
Turn Signals when Towing a
Trailer
The turn signal indicators on the
instrument panel flash whenever
signaling a turn or lane change.
Properly hooked up, the trailer
lamps also flash, telling other
drivers the vehicle is turning,
changing lanes, or stopping.
When towing a trailer, the arrows on
the instrument panel flash for turns
even if the bulbs on the trailer are
burned out. Check occasionally to
be sure the trailer bulbs are still
working.
Driving on Grades
Reduce speed and shift to a lower
gear before starting down a long or
steep downgrade. If the
transmission is not shifted down, the
brakes might have to be used so
much that they would get hot and no
longer work well. The vehicle can tow in D (Drive).
Use a lower gear if the transmission
shifts too often.
When towing at high altitude on
steep uphill grades, engine coolant
boils at a lower temperature than at
normal altitudes. If the engine is
turned off immediately after towing
at high altitude on steep uphill
grades, the vehicle could show
signs similar to engine overheating.
To avoid this, let the engine run
while parked, preferably on level
ground, with the transmission in
P (Park) for a few minutes before
turning the engine off. If the
overheat warning comes on, see
Engine Overheating on page 10‑19.
Page 339 of 512
Black plate (1,1)Buick LaCrosse Owner Manual - 2012
Vehicle Care 10-1
Vehicle Care
General Information
General Information . . . . . . . . . . 10-2
California Proposition65 Warning . . . . . . . . . . . . . . . . . 10-3
California Perchlorate Materials Requirements . . . . 10-3
Accessories and Modifications . . . . . . . . . . . . . . . 10-3
Vehicle Checks
Doing Your OwnService Work . . . . . . . . . . . . . . . 10-4
Hood . . . . . . . . . . . . . . . . . . . . . . . . 10-5
Engine Compartment Overview . . . . . . . . . . . . . . . . . . . 10-6
Engine Oil . . . . . . . . . . . . . . . . . . . 10-9
Engine Oil Life System . . . . . 10-12
Automatic Transmission Fluid . . . . . . . . . . . . . . . . . . . . . . 10-13
Engine Air Cleaner/Filter . . . . 10-13
Cooling System . . . . . . . . . . . . 10-15
Engine Coolant . . . . . . . . . . . . . 10-16
Engine Overheating . . . . . . . . 10-19
Overheated Engine Protection
Operating Mode . . . . . . . . . . . 10-21 Power Steering Fluid (2.4L
L4 Engine) . . . . . . . . . . . . . . . . 10-21
Power Steering Fluid (3.6L V6 Engine) . . . . . . . . . . . . . . . . 10-21
Washer Fluid . . . . . . . . . . . . . . . 10-22
Brakes . . . . . . . . . . . . . . . . . . . . . 10-23
Brake Fluid . . . . . . . . . . . . . . . . . 10-24
Battery . . . . . . . . . . . . . . . . . . . . . 10-25
Starter Switch Check . . . . . . . 10-27
Automatic Transmission Shift
Lock Control Function
Check . . . . . . . . . . . . . . . . . . . . . 10-27
Ignition Transmission Lock Check . . . . . . . . . . . . . . . . . . . . . 10-28
Park Brake and P (Park) Mechanism Check . . . . . . . . 10-28
Wiper Blade Replacement . . . . . . . . . . . . . . 10-29
Headlamp Aiming
Headlamp Aiming . . . . . . . . . . 10-30
Bulb Replacement
Bulb Replacement . . . . . . . . . . 10-33
Halogen Bulbs . . . . . . . . . . . . . . 10-33
High Intensity Discharge(HID) Lighting . . . . . . . . . . . . . 10-33 Headlamps, Front Turn
Signal and Parking
Lamps . . . . . . . . . . . . . . . . . . . . 10-33
Taillamps, Turn Signal, Stoplamps, and Back-Up
Lamps . . . . . . . . . . . . . . . . . . . . 10-35
License Plate Lamp . . . . . . . . 10-36
Replacement Bulbs . . . . . . . . . 10-36
Electrical System
High Voltage Devices and Wiring . . . . . . . . . . . . . . . . . . . . . 10-37
Electrical System Overload . . . . . . . . . . . . . . . . . . 10-37
Fuses and Circuit Breakers . . . . . . . . . . . . . . . . . . 10-38
Engine Compartment Fuse
Block . . . . . . . . . . . . . . . . . . . . . 10-38
Instrument Panel Fuse Block . . . . . . . . . . . . . . . . . . . . . 10-42
Rear Compartment Fuse Block . . . . . . . . . . . . . . . . . . . . . 10-44
Wheels and Tires
Tires . . . . . . . . . . . . . . . . . . . . . . . . 10-47
Winter Tires . . . . . . . . . . . . . . . . 10-48
Tire Sidewall Labeling . . . . . . 10-48
Tire Designations . . . . . . . . . . . 10-51
Page 368 of 512
Black plate (30,1)Buick LaCrosse Owner Manual - 2012
10-30 Vehicle Care
Headlamp Aiming
The headlamp aiming system has
been preset at the factory.
If the vehicle is damaged in an
accident, the aim of the headlamps
may be affected and adjustment
may be necessary.
It is recommended that a dealer
adjust the headlamps. To re-aim the
headlamps yourself, use the
following procedure.
The vehicle should be properly
prepared as follows:
.The vehicle should be placed so
the headlamps are 7.6 m (25 ft)
from a light‐colored wall.
.The vehicle must have all four
tires on a level surface which is
level all the way to the wall.
.The vehicle should be placed so
it is perpendicular to the wall or
other flat surface.
.The vehicle should not have any
snow, ice, or mud on it.
.The vehicle should be fully
assembled and all other work
stopped while headlamp aiming
is being performed.
.The vehicle should be normally
loaded with a full tank of fuel and
one person or 75 kg (160 lbs)
sitting in the driver seat.
.Tires should be properly inflated.
Headlamp aiming is done with the
vehicle's low-beam headlamps. The
high-beam headlamps will be
correctly aimed if the low-beam
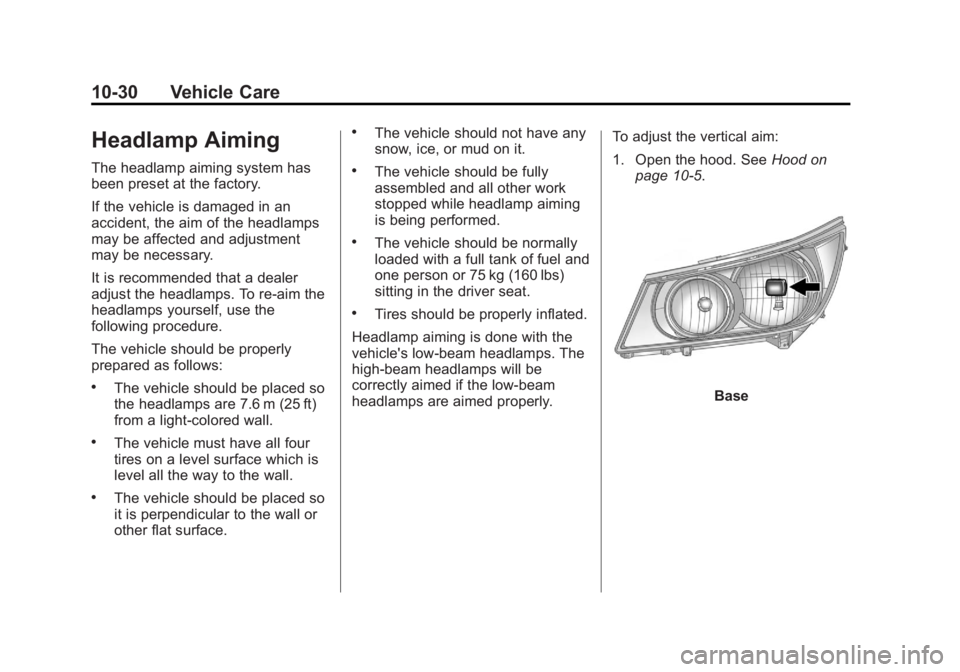
headlamps are aimed properly. To adjust the vertical aim:
1. Open the hood. See
Hood on
page 10‑5.
Base
Page 369 of 512
Black plate (31,1)Buick LaCrosse Owner Manual - 2012
Vehicle Care 10-31
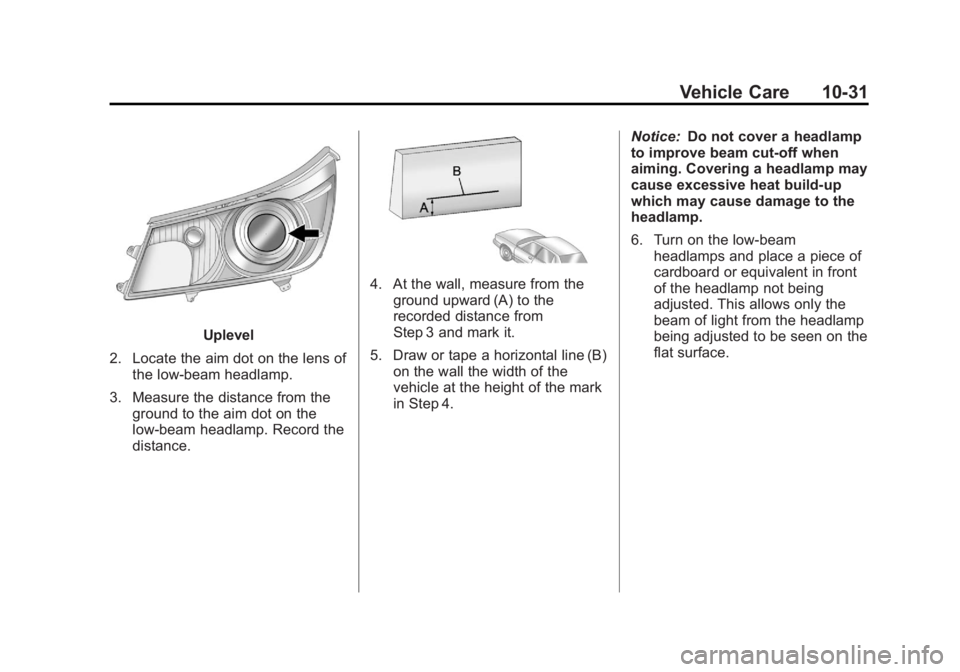
Uplevel
2. Locate the aim dot on the lens of the low‐beam headlamp.
3. Measure the distance from the ground to the aim dot on the
low‐beam headlamp. Record the
distance.
4. At the wall, measure from theground upward (A) to the
recorded distance from
Step 3 and mark it.
5. Draw or tape a horizontal line (B) on the wall the width of the
vehicle at the height of the mark
in Step 4. Notice:
Do not cover a headlamp
to improve beam cut-off when
aiming. Covering a headlamp may
cause excessive heat build-up
which may cause damage to the
headlamp.
6. Turn on the low-beam
headlamps and place a piece of
cardboard or equivalent in front
of the headlamp not being
adjusted. This allows only the
beam of light from the headlamp
being adjusted to be seen on the
flat surface.
Page 370 of 512
Black plate (32,1)Buick LaCrosse Owner Manual - 2012
10-32 Vehicle Care
Base
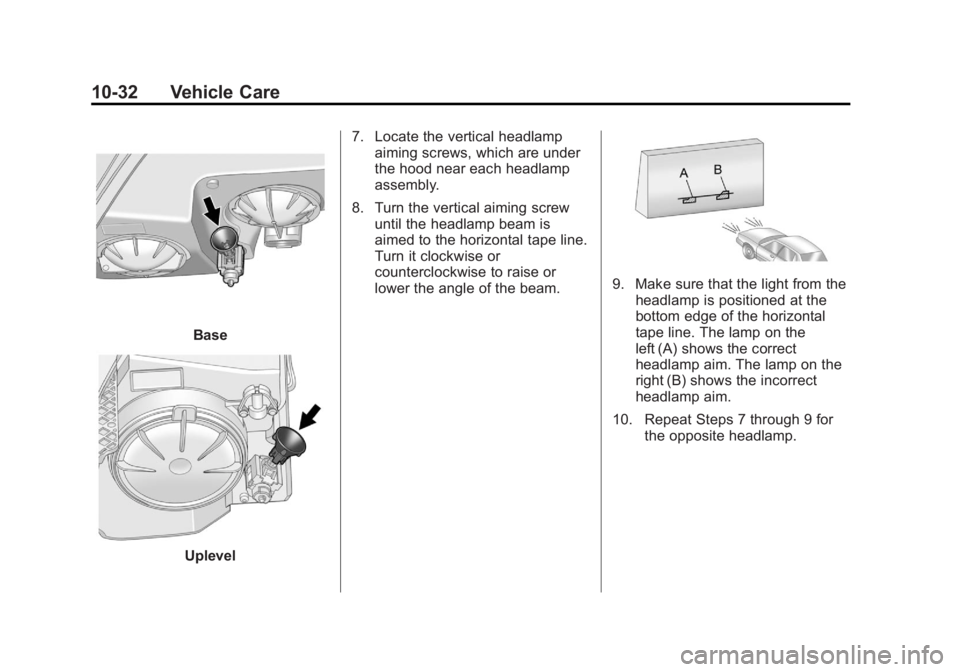
Uplevel7. Locate the vertical headlamp
aiming screws, which are under
the hood near each headlamp
assembly.
8. Turn the vertical aiming screw until the headlamp beam is
aimed to the horizontal tape line.
Turn it clockwise or
counterclockwise to raise or
lower the angle of the beam.
9. Make sure that the light from the
headlamp is positioned at the
bottom edge of the horizontal
tape line. The lamp on the
left (A) shows the correct
headlamp aim. The lamp on the
right (B) shows the incorrect
headlamp aim.
10. Repeat Steps 7 through 9 for the opposite headlamp.
Page 371 of 512
Black plate (33,1)Buick LaCrosse Owner Manual - 2012
Vehicle Care 10-33
Bulb Replacement
For the proper type of replacement
bulbs, seeReplacement Bulbs on
page 10‑36.
For any bulb changing procedure
not listed in this section, contact
your dealer.
Halogen Bulbs
{WARNING
Halogen bulbs have pressurized
gas inside and can burst if you
drop or scratch the bulb. You or
others could be injured. Be sure
to read and follow the instructions
on the bulb package.
High Intensity Discharge
(HID) Lighting
{WARNING
The low beam high intensity
discharge lighting system
operates at a very high voltage.
If you try to service any of the
system components, you could be
seriously injured. Have your
dealer or a qualified technician
service them.
After an HID headlamp bulb has
been replaced, the beam might be a
slightly different shade than it was
originally. This is normal.
Headlamps, Front Turn
Signal and Parking
Lamps
Base Headlamp Assembly
The base model vehicle has a
halogen high-beam headlamp, a
low-beam/Daytime Running Lamp
(DRL) headlamp, and a turn signal/
parking lamp on the headlamp
assembly.
For replacement of the turn signal/
parking lamp bulb on an eAssist
vehicle, contact your dealer.
Page 372 of 512
Black plate (34,1)Buick LaCrosse Owner Manual - 2012
10-34 Vehicle Care
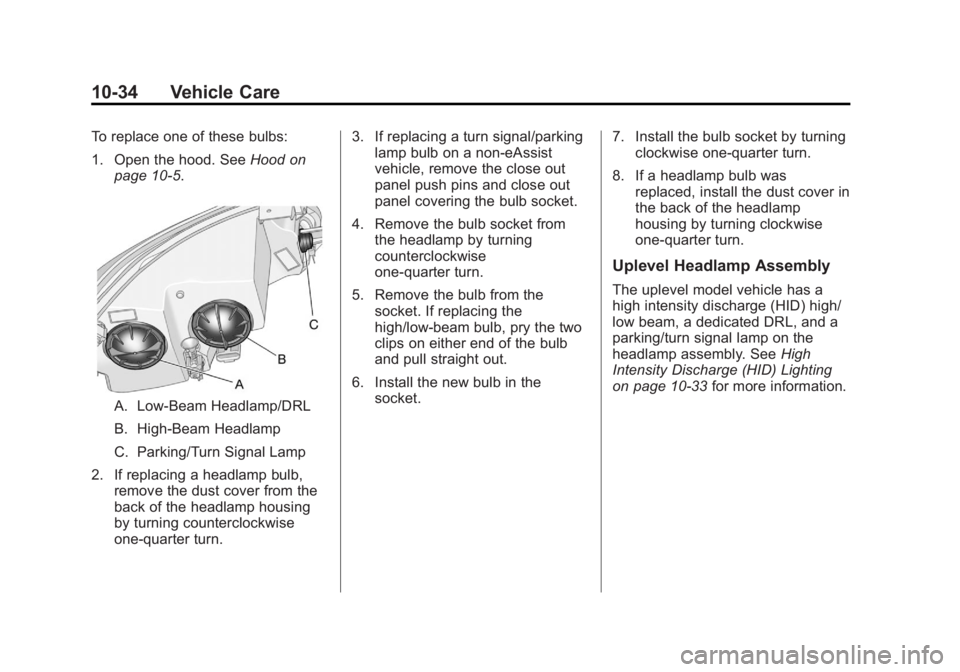
To replace one of these bulbs:
1. Open the hood. SeeHood on
page 10‑5.
A. Low-Beam Headlamp/DRL
B. High-Beam Headlamp
C. Parking/Turn Signal Lamp
2. If replacing a headlamp bulb, remove the dust cover from the
back of the headlamp housing
by turning counterclockwise
one‐quarter turn. 3. If replacing a turn signal/parking
lamp bulb on a non‐eAssist
vehicle, remove the close out
panel push pins and close out
panel covering the bulb socket.
4. Remove the bulb socket from the headlamp by turning
counterclockwise
one‐quarter turn.
5. Remove the bulb from the socket. If replacing the
high/low‐beam bulb, pry the two
clips on either end of the bulb
and pull straight out.
6. Install the new bulb in the socket. 7. Install the bulb socket by turning
clockwise one‐quarter turn.
8. If a headlamp bulb was replaced, install the dust cover in
the back of the headlamp
housing by turning clockwise
one‐quarter turn.
Uplevel Headlamp Assembly
The uplevel model vehicle has a
high intensity discharge (HID) high/
low beam, a dedicated DRL, and a
parking/turn signal lamp on the
headlamp assembly. See High
Intensity Discharge (HID) Lighting
on page 10‑33 for more information.
Page 373 of 512
Black plate (35,1)Buick LaCrosse Owner Manual - 2012
Vehicle Care 10-35
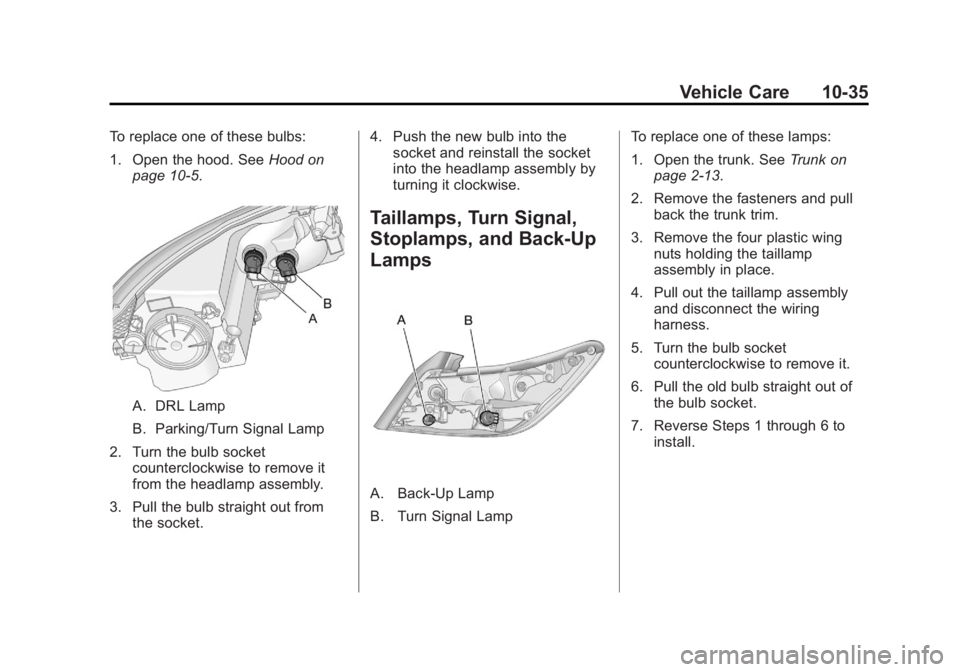
To replace one of these bulbs:
1. Open the hood. SeeHood on
page 10‑5.
A. DRL Lamp
B. Parking/Turn Signal Lamp
2. Turn the bulb socket counterclockwise to remove it
from the headlamp assembly.
3. Pull the bulb straight out from the socket. 4. Push the new bulb into the
socket and reinstall the socket
into the headlamp assembly by
turning it clockwise.
Taillamps, Turn Signal,
Stoplamps, and Back-Up
Lamps
A. Back‐Up Lamp
B. Turn Signal Lamp To replace one of these lamps:
1. Open the trunk. See
Trunk on
page 2‑13.
2. Remove the fasteners and pull back the trunk trim.
3. Remove the four plastic wing nuts holding the taillamp
assembly in place.
4. Pull out the taillamp assembly and disconnect the wiring
harness.
5. Turn the bulb socket counterclockwise to remove it.
6. Pull the old bulb straight out of the bulb socket.
7. Reverse Steps 1 through 6 to install.