set clock BUICK LACROSSE 2013 Get To Know Guide
[x] Cancel search | Manufacturer: BUICK, Model Year: 2013, Model line: LACROSSE, Model: BUICK LACROSSE 2013Pages: 102, PDF Size: 0.85 MB
Page 5 of 102
Black plate (5,1)Buick LaCrosse Infotainment System - 2013 - CRC - 12/12/12
Infotainment System 5
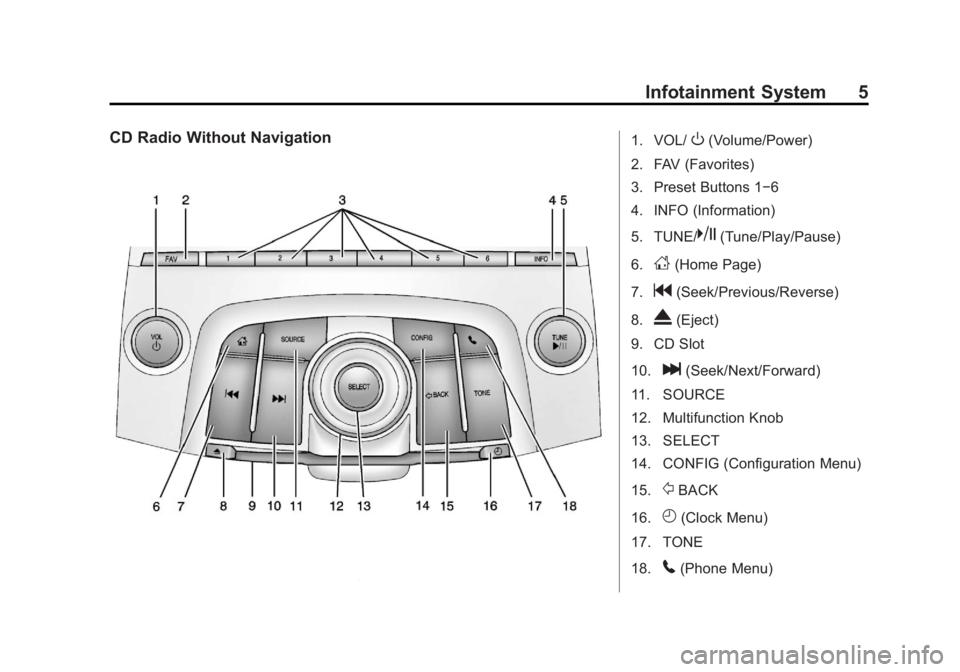
CD Radio Without Navigation1. VOL/O(Volume/Power)
2. FAV (Favorites)
3. Preset Buttons 1−6
4. INFO (Information)
5. TUNE/
k(Tune/Play/Pause)
6.
D(Home Page)
7.
g(Seek/Previous/Reverse)
8.
X(Eject)
9. CD Slot
10.
l(Seek/Next/Forward)
11. SOURCE
12. Multifunction Knob
13. SELECT
14. CONFIG (Configuration Menu)
15.
/BACK
16.
H(Clock Menu)
17. TONE
18.
5(Phone Menu)
Page 6 of 102
Black plate (6,1)Buick LaCrosse Infotainment System - 2013 - CRC - 12/12/12
6 Infotainment System
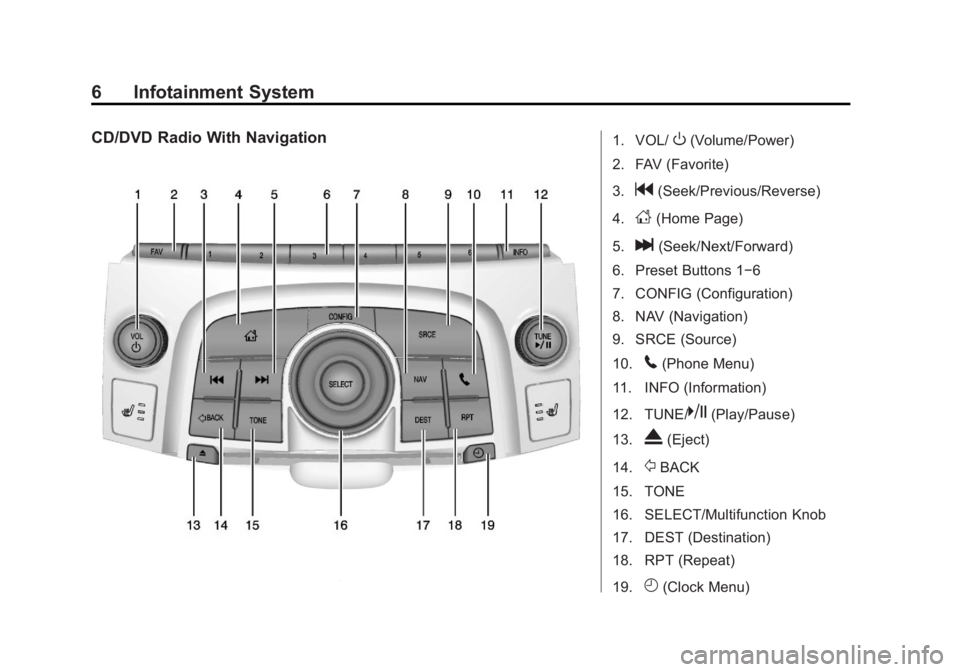
CD/DVD Radio With Navigation1. VOL/O(Volume/Power)
2. FAV (Favorite)
3.
g(Seek/Previous/Reverse)
4.
D(Home Page)
5.
l(Seek/Next/Forward)
6. Preset Buttons 1−6
7. CONFIG (Configuration)
8. NAV (Navigation)
9. SRCE (Source)
10.
5(Phone Menu)
11. INFO (Information)
12. TUNE/
k(Play/Pause)
13.
X(Eject)
14.
/BACK
15. TONE
16. SELECT/Multifunction Knob
17. DEST (Destination)
18. RPT (Repeat)
19.
H(Clock Menu)
Page 7 of 102
Black plate (7,1)Buick LaCrosse Infotainment System - 2013 - CRC - 12/12/12
Infotainment System 7
Infotainment Control Buttons
The buttons on the faceplate are
used to start primary functions while
using the infotainment system.
VOL/
O(Volume/Power):
.Press to turn the system on
and off.
.Turn to adjust the volume.
FAV (Favorite Pages 1-6): Press
to display the current favorite page
number above the preset buttons.
Keep pressing to scroll through the
favorites pages. The stored stations
for each list displays on the bottom
of the screen.
To change the number of preset
Favorite Pages:
1. Press the CONFIG button on the
Home Page.
2. Press Radio Settings.
3. Press Number of Favorite Pages.
g(Seek/Previous/Reverse):
.Press to seek to the beginning of
the current or previous track.
If the track has been playing for
less than five seconds, it seeks
the previous track. If longer than
five seconds, the current track
starts from the beginning.
.Press and hold to quickly
reverse through a track. Release
the button to return to playing
speed. See CD Player on
page 36, USB on page 38,
or Bluetooth Audio on page 45.
.For AM, FM, XM (if equipped),
press to seek to the previous
strong station.
D(Home Page): Press to go to
the Home Page. See “Home Page”
in this section.
l(Seek/Next/Forward):
.CD, USB, Bluetooth Audio:
Press to seek the next track.
.CD, USB, Bluetooth Audio:
Press and hold to fast forward
through a track. Release the
button to return to playing
speed. See CD Player on
page 36, USB on page 38,
or Bluetooth Audio on page 45.
.AM, FM, XM (if equipped): Press
to seek to the next strong
station.
Preset Buttons (1-6): The preset
buttons numbered one through six
can be used to select stored AM
and FM stations.
CONFIG (Configure): Press to
adjust features for Languages, Time
and Date, Radio Settings, Phone
Settings, Display Settings, and
Vehicle Settings. See Configure
Menu on page 71.
H(Clock): Press to enable the
time program.
Page 36 of 102
Black plate (36,1)Buick LaCrosse Infotainment System - 2013 - CRC - 12/12/12
36 Infotainment System
E:Press to manually rotate a
picture 90 degrees
counterclockwise.
Menu: Press to open the Picture
Viewer Settings screen. Slide
Picture Viewer Main, Slideshow
Timer, and Shuffle Images display
as options for configuring the view
of images stored in the system.
If the displayed picture screen is not
used within six seconds, the upper
and lower bar options will disappear.
Touch-tap the screen to re-display
the upper and lower bar.Audio Players
CD Player
The CD player is capable of playing:
.Most audio CDs
.CD-R
.CD-RW
.MP3, unprotected WMA, and
AAC formats
When playing any compatible
recordable disc, the sound quality
may be reduced due to the disc, the
method of recording, the quality of
the music recorded, or how the disc
has been handled.
There may be increased skipping,
difficulty reading recorded tracks,
finding tracks, and/or loading and
ejecting. If these problems occur,
check the disc for damage or try a
known good disc. To avoid damage to the CD player:
.Do not use scratched or
damaged discs.
.Do not apply labels to discs. The
labels could get caught in the
player.
.Insert only one disc at a time.
.Keep the loading slot free of
foreign materials, liquids, and
debris.
.Use a marking pen to label the
top of the disc.
Loading and Ejecting Discs
To load a disc:
1. Turn the vehicle on.
2. Insert a disc into the slot, right
side up. The player pulls it in the
rest of the way. If the disc is
damaged or improperly loaded,
there is an error and the disc
ejects.
The disc automatically plays once
loaded.
Page 71 of 102
Black plate (71,1)Buick LaCrosse Infotainment System - 2013 - CRC - 12/12/12
Infotainment System 71
.All other buttons on the pop-up
screen operate as described
under“Route Guidance Not
Active.”
Previous Destinations
Previously downloaded OnStar
destinations are saved under
Previous Destinations in the
navigation system, where they can
be accessed or saved to the
Address Book.
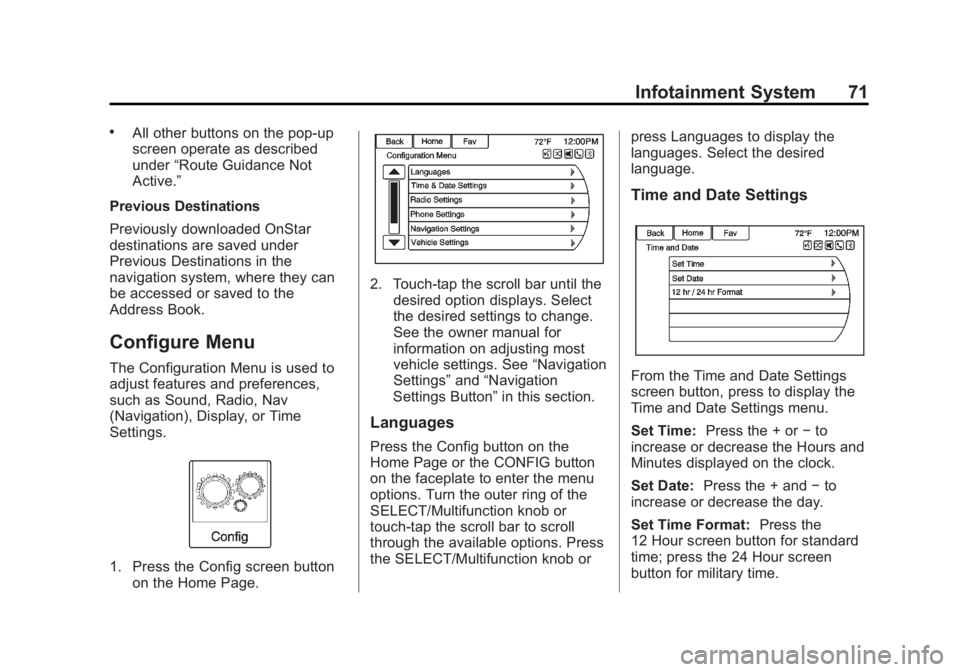
Configure Menu
The Configuration Menu is used to
adjust features and preferences,
such as Sound, Radio, Nav
(Navigation), Display, or Time
Settings.
1. Press the Config screen button on the Home Page.
2. Touch-tap the scroll bar until thedesired option displays. Select
the desired settings to change.
See the owner manual for
information on adjusting most
vehicle settings. See “Navigation
Settings” and“Navigation
Settings Button” in this section.
Languages
Press the Config button on the
Home Page or the CONFIG button
on the faceplate to enter the menu
options. Turn the outer ring of the
SELECT/Multifunction knob or
touch-tap the scroll bar to scroll
through the available options. Press
the SELECT/Multifunction knob or press Languages to display the
languages. Select the desired
language.
Time and Date Settings
From the Time and Date Settings
screen button, press to display the
Time and Date Settings menu.
Set Time:
Press the + or −to
increase or decrease the Hours and
Minutes displayed on the clock.
Set Date: Press the + and −to
increase or decrease the day.
Set Time Format: Press the
12 Hour screen button for standard
time; press the 24 Hour screen
button for military time.