run flat BUICK LACROSSE 2014 Owner's Manual
[x] Cancel search | Manufacturer: BUICK, Model Year: 2014, Model line: LACROSSE, Model: BUICK LACROSSE 2014Pages: 402, PDF Size: 4.37 MB
Page 245 of 402
Black plate (65,1)Buick LaCrosse Owner Manual (GMNA-Localizing-U.S./Canada/Mexico-
6043609) - 2014 - 2nd Edition - 10/17/13
Driving and Operating 9-65
Vehicles can tow in D (Drive). Shift
the transmission to a lower gear if
the transmission shifts too often
under heavy loads and/or hilly
conditions.
When towing at high altitude on
steep uphill grades, consider the
following: Engine coolant will boil at
a lower temperature than at normal
altitudes. If the engine is turned off
immediately after towing at high
altitude on steep uphill grades, the
vehicle may show signs similar to
engine overheating. To avoid this,
let the engine run while parked,
preferably on level ground, with the
automatic transmission in P (Park)
for a few minutes before turning the
engine off. If the overheat warning
comes on, seeEngine Overheating
on page 10-21.Parking on Hills
{Warning
Parking the vehicle on a hill with
the trailer attached can be
dangerous. If something goes
wrong, the rig could start to move.
People can be injured, and both
the vehicle and the trailer can be
damaged. When possible, always
park the rig on a flat surface.
If parking the rig on a hill:
1. Press the brake pedal, but do not shift into P (Park) yet. Turn
the wheels into the curb if facing
downhill or into traffic if facing
uphill.
2. Have someone place chocks under the trailer wheels.
3. When the wheel chocks are in place, release the regular brakes
until the chocks absorb the load. 4. Reapply the brake pedal. Then
apply the parking brake and shift
into P (Park).
5. Release the brake pedal.Leaving After Parking on a Hill
1. Apply and hold the brake pedal.
2. Start the engine.
3. Shift into a gear.
4. Release the parking brake.
5. Let up on the brake pedal.
6. Drive slowly until the trailer is clear of the chocks.
7. Stop and have someone pick up and store the chocks.
Maintenance when Trailer
Towing
The vehicle needs service more
often when pulling a trailer. See
Maintenance Schedule on
page 11-2. Things that are
especially important in trailer
operation are automatic
transmission fluid, engine oil, axle
Page 312 of 402
Black plate (64,1)Buick LaCrosse Owner Manual (GMNA-Localizing-U.S./Canada/Mexico-
6043609) - 2014 - 2nd Edition - 10/17/13
10-64 Vehicle Care
Then seeTire Changing on
page 10-71. To use the tire sealant
and compressor kit, see Tire
Sealant and Compressor Kit on
page 10-64.
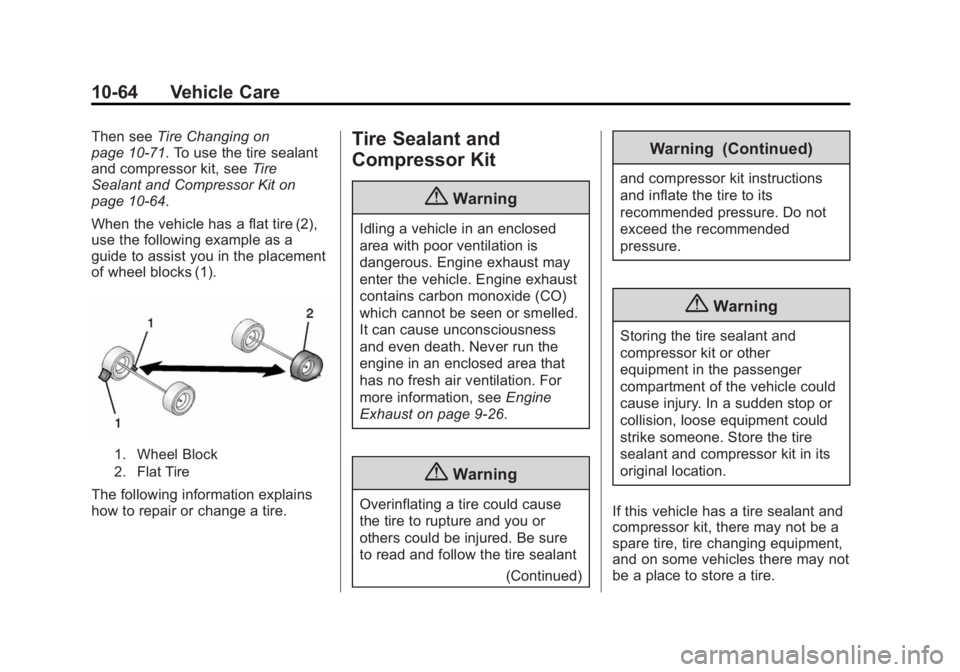
When the vehicle has a flat tire (2),
use the following example as a
guide to assist you in the placement
of wheel blocks (1).
1. Wheel Block
2. Flat Tire
The following information explains
how to repair or change a tire.
Tire Sealant and
Compressor Kit
{Warning
Idling a vehicle in an enclosed
area with poor ventilation is
dangerous. Engine exhaust may
enter the vehicle. Engine exhaust
contains carbon monoxide (CO)
which cannot be seen or smelled.
It can cause unconsciousness
and even death. Never run the
engine in an enclosed area that
has no fresh air ventilation. For
more information, see Engine
Exhaust on page 9-26.
{Warning
Overinflating a tire could cause
the tire to rupture and you or
others could be injured. Be sure
to read and follow the tire sealant
(Continued)
Warning (Continued)
and compressor kit instructions
and inflate the tire to its
recommended pressure. Do not
exceed the recommended
pressure.
{Warning
Storing the tire sealant and
compressor kit or other
equipment in the passenger
compartment of the vehicle could
cause injury. In a sudden stop or
collision, loose equipment could
strike someone. Store the tire
sealant and compressor kit in its
original location.
If this vehicle has a tire sealant and
compressor kit, there may not be a
spare tire, tire changing equipment,
and on some vehicles there may not
be a place to store a tire.
Page 314 of 402
Black plate (66,1)Buick LaCrosse Owner Manual (GMNA-Localizing-U.S./Canada/Mexico-
6043609) - 2014 - 2nd Edition - 10/17/13
10-66 Vehicle Care
When using the tire sealant and
compressor kit during cold
temperatures, warm the kit in a
heated environment for five minutes.
This will help to inflate the tire
faster.
If a tire goes flat, avoid further tire
and wheel damage by driving slowly
to a level place. Turn on the hazard
warning flashers. SeeHazard
Warning Flashers on page 6-4.
See If a Tire Goes Flat on
page 10-62 for other important
safety warnings. Do not remove any objects that
have penetrated the tire.
1. Remove the tire sealant and
compressor kit from its storage
location. See Storing the Tire
Sealant and Compressor Kit on
page 10-70.
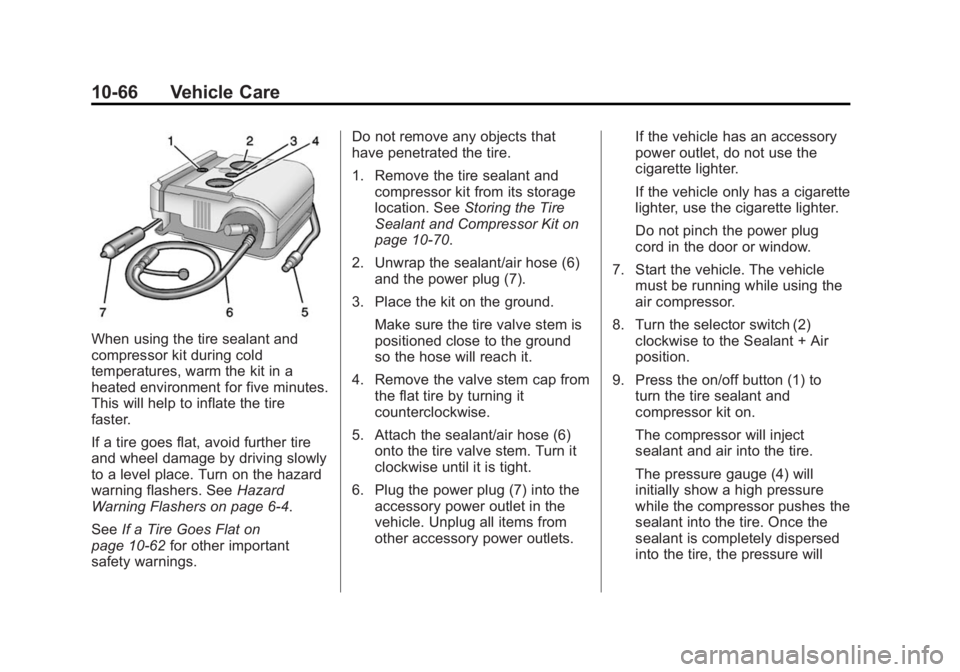
2. Unwrap the sealant/air hose (6) and the power plug (7).
3. Place the kit on the ground. Make sure the tire valve stem is
positioned close to the ground
so the hose will reach it.
4. Remove the valve stem cap from the flat tire by turning it
counterclockwise.
5. Attach the sealant/air hose (6) onto the tire valve stem. Turn it
clockwise until it is tight.
6. Plug the power plug (7) into the accessory power outlet in the
vehicle. Unplug all items from
other accessory power outlets. If the vehicle has an accessory
power outlet, do not use the
cigarette lighter.
If the vehicle only has a cigarette
lighter, use the cigarette lighter.
Do not pinch the power plug
cord in the door or window.
7. Start the vehicle. The vehicle must be running while using the
air compressor.
8. Turn the selector switch (2) clockwise to the Sealant + Air
position.
9. Press the on/off button (1) to turn the tire sealant and
compressor kit on.
The compressor will inject
sealant and air into the tire.
The pressure gauge (4) will
initially show a high pressure
while the compressor pushes the
sealant into the tire. Once the
sealant is completely dispersed
into the tire, the pressure will
Page 317 of 402
Black plate (69,1)Buick LaCrosse Owner Manual (GMNA-Localizing-U.S./Canada/Mexico-
6043609) - 2014 - 2nd Edition - 10/17/13
Vehicle Care 10-69
SeeIf a Tire Goes Flat on
page 10-62 for other important
safety warnings.
1. Remove the tire sealant and compressor kit from its storage
location. See Storing the Tire
Sealant and Compressor Kit on
page 10-70.
2. Unwrap the air only hose (5) and the power plug (7).
3. Place the kit on the ground. Make sure the tire valve stem is
positioned close to the ground
so the hose will reach it.
4. Remove the tire valve stem cap from the flat tire by turning it
counterclockwise.
5. Attach the air only hose (5) onto the tire valve stem by turning it
clockwise until it is tight. 6. Plug the power plug (7) into the
accessory power outlet in the
vehicle. Unplug all items from
other accessory power outlets.
If the vehicle has an accessory
power outlet, do not use the
cigarette lighter.
If the vehicle only has a cigarette
lighter, use the cigarette lighter.
Do not pinch the power plug
cord in the door or window.
7. Start the vehicle. The vehicle must be running while using the
air compressor.
8. Turn the selector switch (2) counterclockwise to the Air Only
position.
9. Press the on/off button (1) to turn the compressor on.
The compressor will inflate the
tire with air only. 10. Inflate the tire to the
recommended inflation
pressure using the pressure
gauge (4). The recommended
inflation pressure can be found
on the Tire and Loading
Information label. See Tire
Pressure on page 10-49.
The pressure gauge (4) may
read higher than the actual tire
pressure while the compressor
is on. Turn the compressor off
to get an accurate reading. The
compressor may be turned on/
off until the correct pressure is
reached. If the tire is inflated
higher than the recommended
pressure, press the pressure
relief button (3), if equipped,
until the proper pressure
reading is reached. This option
is only functional when using
the air only hose (5).
Page 319 of 402
Black plate (71,1)Buick LaCrosse Owner Manual (GMNA-Localizing-U.S./Canada/Mexico-
6043609) - 2014 - 2nd Edition - 10/17/13
Vehicle Care 10-71
4. Remove the tire sealant andcompressor kit.
To store the tire sealant and
compressor kit, reverse the steps.
Tire Changing
Removing the Spare Tire and
Tools
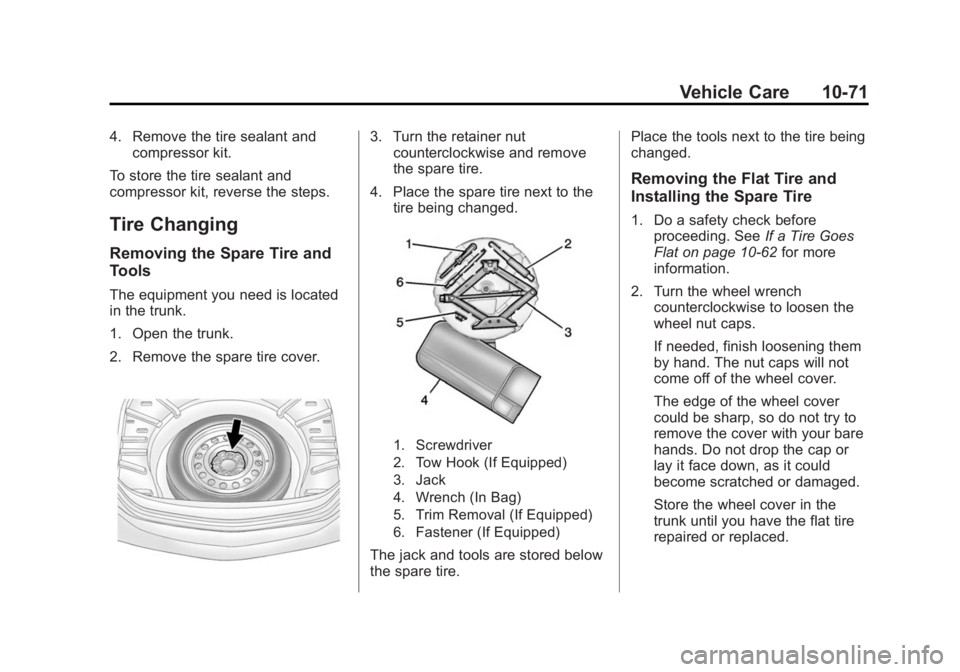
The equipment you need is located
in the trunk.
1. Open the trunk.
2. Remove the spare tire cover.
3. Turn the retainer nut counterclockwise and remove
the spare tire.
4. Place the spare tire next to the tire being changed.
1. Screwdriver
2. Tow Hook (If Equipped)
3. Jack
4. Wrench (In Bag)
5. Trim Removal (If Equipped)
6. Fastener (If Equipped)
The jack and tools are stored below
the spare tire. Place the tools next to the tire being
changed.
Removing the Flat Tire and
Installing the Spare Tire
1. Do a safety check before
proceeding. See If a Tire Goes
Flat on page 10-62 for more
information.
2. Turn the wheel wrench counterclockwise to loosen the
wheel nut caps.
If needed, finish loosening them
by hand. The nut caps will not
come off of the wheel cover.
The edge of the wheel cover
could be sharp, so do not try to
remove the cover with your bare
hands. Do not drop the cap or
lay it face down, as it could
become scratched or damaged.
Store the wheel cover in the
trunk until you have the flat tire
repaired or replaced.
Page 392 of 402
Black plate (4,1)Buick LaCrosse Owner Manual (GMNA-Localizing-U.S./Canada/Mexico-
6043609) - 2014 - 2nd Edition - 10/17/13
i-4 INDEX
Driving (cont'd)Vehicle Load Limits . . . . . . . . . . . 9-10
Wet Roads . . . . . . . . . . . . . . . . . . . . 9-6
Winter . . . . . . . . . . . . . . . . . . . . . . . . . 9-8
Dual Automatic Climate Control System . . . . . . . . . . . . . . . . 8-1
E
E85 or FlexFuel . . . . . . . . . . . . . . . 9-60
Electric Parking Brake Light . . . 5-19
Electrical Equipment,Add-On . . . . . . . . . . . . . . . . . . . . . . 9-68
Electrical System Engine CompartmentFuse Block . . . . . . . . . . . . . . . . 10-35
Fuses and Circuit
Breakers . . . . . . . . . . . . . . . . . . 10-35
Instrument Panel Fuse Block . . . . . . . . . . . . . . . . . . . . . . 10-39
Overload . . . . . . . . . . . . . . . . . . . 10-34
Emergency OnStar
®. . . . . . . . . . . . . . . . . . . . . . 14-2
Energy Information . . . . . . . . . . . . 5-26 Engine
Air Cleaner/Filter . . . . . . . . . . . 10-15
Check and Service Engine
Soon Light . . . . . . . . . . . . . . . . . . 5-16
Compartment Overview . . . . . . . 10-6
Coolant . . . . . . . . . . . . . . . . . . . . . 10-19
Coolant Temperature Gauge . . . . . . . . . . . . . . . . . . . . . . 5-13
Coolant Temperature Warning Light . . . . . . . . . . . . . . . 5-22
Cooling System . . . . . . . . . . . . . 10-17
Cooling System Messages . . . 5-36
Drive Belt Routing . . . . . . . . . . . . 12-4
Exhaust . . . . . . . . . . . . . . . . . . . . . . 9-26
Heater . . . . . . . . . . . . . . . . . . . . . . . . 9-22
Oil Life System . . . . . . . . . . . . . 10-13
Oil Messages . . . . . . . . . . . . . . . . . 5-37
Overheated Protection
Operating Mode . . . . . . . . . . . 10-23
Overheating . . . . . . . . . . . . . . . . 10-21
Power Messages . . . . . . . . . . . . . 5-37
Pressure Light . . . . . . . . . . . . . . . . 5-23
Running While Parked . . . . . . . . 9-27
Starting . . . . . . . . . . . . . . . . . . . . . . . 9-18
Entry Lighting . . . . . . . . . . . . . . . . . . . 6-6
Equipment, Towing . . . . . . . . . . . . 9-67 Event Data Recorders . . . . . . . . 13-14
Exit Lighting . . . . . . . . . . . . . . . . . . . . 6-7
Extender, Safety Belt . . . . . . . . . . 3-18
Exterior Lamp Controls . . . . . . . . . 6-1
Exterior Lamps Off Reminder . . . 6-2
F
Features
Memory . . . . . . . . . . . . . . . . . . . . . . . . 1-8
Filter, Engine Air Cleaner . . . . . . . . . 10-15
Flash-to-Pass . . . . . . . . . . . . . . . . . . . 6-2
Flashers, Hazard Warning . . . . . . 6-4
Flat Tire . . . . . . . . . . . . . . . . . . . . . . 10-62 Changing . . . . . . . . . . . . . . . . . . . 10-71
FlexFuel E85 . . . . . . . . . . . . . . . . . . . . . . . . . . . 9-60
Floor Mats . . . . . . . . . . . . . . . . . . . . 10-92
Fluid
Automatic Transmission . . . . 10-14
Brakes . . . . . . . . . . . . . . . . . . . . . . 10-25
Power Steering . . . . . . . . . . . . . 10-23
Washer . . . . . . . . . . . . . . . . . . . . . 10-24
Fog Lamps Bulb Replacement . . . . . . . . . . . . . 6-4
Folding Mirrors . . . . . . . . . . . . . . . . 2-18