warning BUICK LACROSSE 2016 Owner's Manual
[x] Cancel search | Manufacturer: BUICK, Model Year: 2016, Model line: LACROSSE, Model: BUICK LACROSSE 2016Pages: 367, PDF Size: 5.33 MB
Page 286 of 367
Buick LaCrosse Owner Manual (GMNA-Localizing-U.S./Canada/Mexico-
9159288) - 2016 - CRC - 10/5/15
Vehicle Care 285
Warning (Continued)
2. Put an automatictransmission in P (Park) or a
manual transmission in
1 (First) or R (Reverse).
3. Turn off the engine and do not restart while the vehicle
is raised.
4. Do not allow passengers to remain in the vehicle.
5. Place wheel blocks, if equipped, on both sides of
the tire at the opposite
corner of the tire being
changed.
This vehicle may come with a jack
and spare tire or a tire sealant and
compressor kit. To use the jacking
equipment to change a spare tire
safely, follow the instructions below.
Then see Tire Changing 0291. To
use the tire sealant and compressor
kit, see Tire Sealant and
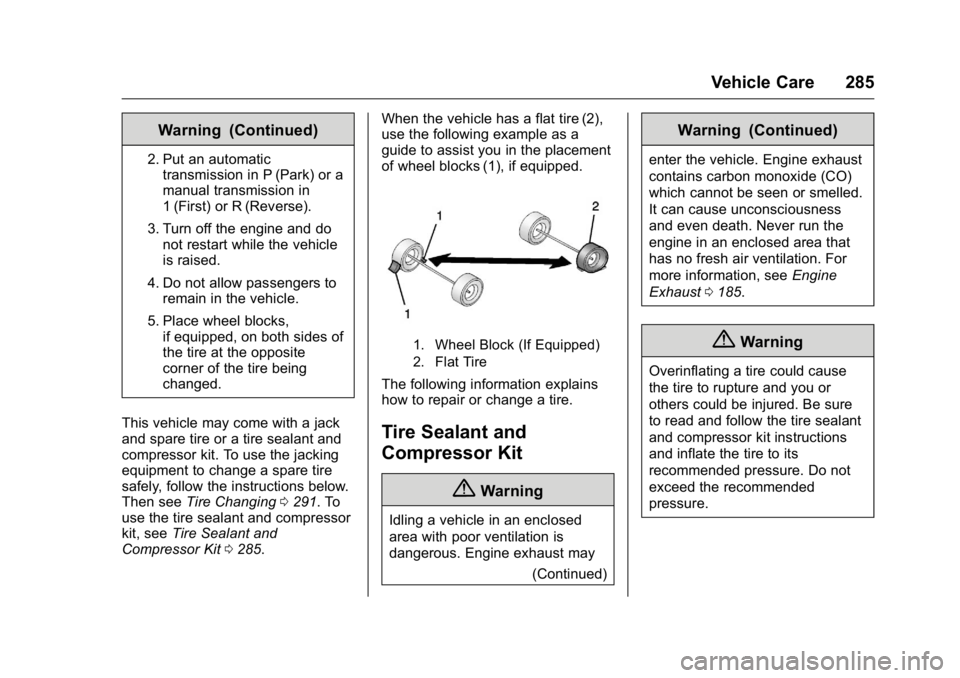
Compressor Kit 0285. When the vehicle has a flat tire (2),
use the following example as a
guide to assist you in the placement
of wheel blocks (1), if equipped.
1. Wheel Block (If Equipped)
2. Flat Tire
The following information explains
how to repair or change a tire.
Tire Sealant and
Compressor Kit
{Warning
Idling a vehicle in an enclosed
area with poor ventilation is
dangerous. Engine exhaust may
(Continued)
Warning (Continued)
enter the vehicle. Engine exhaust
contains carbon monoxide (CO)
which cannot be seen or smelled.
It can cause unconsciousness
and even death. Never run the
engine in an enclosed area that
has no fresh air ventilation. For
more information, seeEngine
Exhaust 0185.
{Warning
Overinflating a tire could cause
the tire to rupture and you or
others could be injured. Be sure
to read and follow the tire sealant
and compressor kit instructions
and inflate the tire to its
recommended pressure. Do not
exceed the recommended
pressure.
Page 287 of 367
Buick LaCrosse Owner Manual (GMNA-Localizing-U.S./Canada/Mexico-
9159288) - 2016 - CRC - 10/5/15
286 Vehicle Care
{Warning
Storing the tire sealant and
compressor kit or other
equipment in the passenger
compartment of the vehicle could
cause injury. In a sudden stop or
collision, loose equipment could
strike someone. Store the tire
sealant and compressor kit in its
original location.
If this vehicle has a tire sealant and
compressor kit, there may not be a
spare tire, tire changing equipment,
and on some vehicles there may not
be a place to store a tire.
The tire sealant and compressor
can be used to temporarily seal
punctures up to 6 mm (0.25 in) in
the tread area of the tire. It can also
be used to inflate an under
inflated tire.
If the tire has been separated from
the wheel, has damaged sidewalls,
or has a large puncture, the tire is
too severely damaged for the tire sealant and compressor kit to be
effective. See
Roadside Assistance
Program 0334.
Read and follow all of the tire
sealant and compressor kit
instructions.
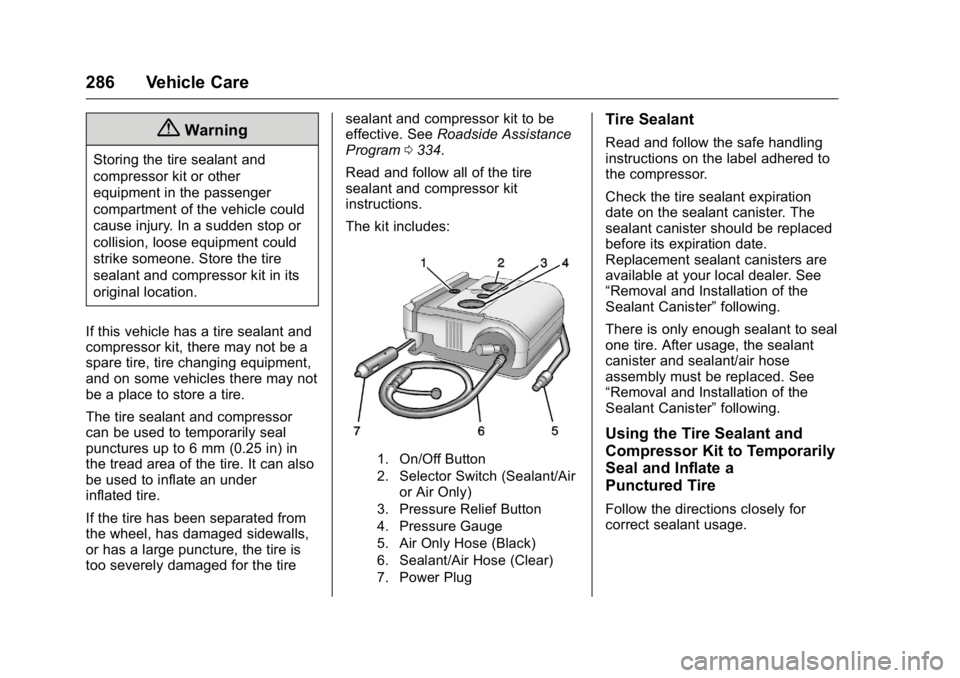
The kit includes:
1. On/Off Button
2. Selector Switch (Sealant/Air or Air Only)
3. Pressure Relief Button
4. Pressure Gauge
5. Air Only Hose (Black)
6. Sealant/Air Hose (Clear)
7. Power Plug
Tire Sealant
Read and follow the safe handling
instructions on the label adhered to
the compressor.
Check the tire sealant expiration
date on the sealant canister. The
sealant canister should be replaced
before its expiration date.
Replacement sealant canisters are
available at your local dealer. See
“Removal and Installation of the
Sealant Canister” following.
There is only enough sealant to seal
one tire. After usage, the sealant
canister and sealant/air hose
assembly must be replaced. See
“Removal and Installation of the
Sealant Canister” following.
Using the Tire Sealant and
Compressor Kit to Temporarily
Seal and Inflate a
Punctured Tire
Follow the directions closely for
correct sealant usage.
Page 288 of 367
Buick LaCrosse Owner Manual (GMNA-Localizing-U.S./Canada/Mexico-
9159288) - 2016 - CRC - 10/5/15
Vehicle Care 287
When using the tire sealant and
compressor kit during cold
temperatures, warm the kit in a
heated environment for five minutes.
This will help to inflate the tire
faster.
If a tire goes flat, avoid further tire
and wheel damage by driving slowly
to a level place. Turn on the hazard
warning flashers. SeeHazard
Warning Flashers 0151.
See If a Tire Goes Flat 0284 for
other important safety warnings.
Do not remove any objects that
have penetrated the tire. 1. Remove the tire sealant and
compressor kit from its storage
location. See Storing the Tire
Sealant and Compressor
Kit 0291.
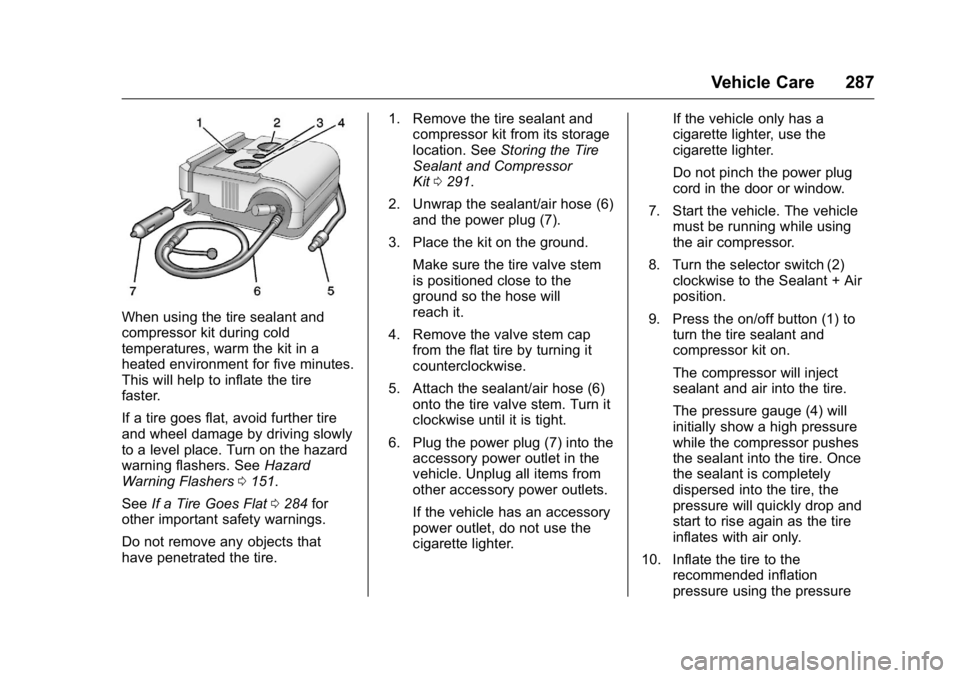
2. Unwrap the sealant/air hose (6) and the power plug (7).
3. Place the kit on the ground. Make sure the tire valve stem
is positioned close to the
ground so the hose will
reach it.
4. Remove the valve stem cap from the flat tire by turning it
counterclockwise.
5. Attach the sealant/air hose (6) onto the tire valve stem. Turn it
clockwise until it is tight.
6. Plug the power plug (7) into the accessory power outlet in the
vehicle. Unplug all items from
other accessory power outlets.
If the vehicle has an accessory
power outlet, do not use the
cigarette lighter. If the vehicle only has a
cigarette lighter, use the
cigarette lighter.
Do not pinch the power plug
cord in the door or window.
7. Start the vehicle. The vehicle must be running while using
the air compressor.
8. Turn the selector switch (2) clockwise to the Sealant + Air
position.
9. Press the on/off button (1) to turn the tire sealant and
compressor kit on.
The compressor will inject
sealant and air into the tire.
The pressure gauge (4) will
initially show a high pressure
while the compressor pushes
the sealant into the tire. Once
the sealant is completely
dispersed into the tire, the
pressure will quickly drop and
start to rise again as the tire
inflates with air only.
10. Inflate the tire to the recommended inflation
pressure using the pressure
Page 290 of 367
Buick LaCrosse Owner Manual (GMNA-Localizing-U.S./Canada/Mexico-
9159288) - 2016 - CRC - 10/5/15
Vehicle Care 289
If the tire pressure has fallen
more than 68 kPa (10 psi)
below the recommended
inflation pressure, stop driving
the vehicle. The tire is too
severely damaged and the tire
sealant cannot seal the tire.
SeeRoadside Assistance
Program 0334.
If the tire pressure has not
dropped more than 68 kPa
(10 psi) from the recommended
inflation pressure, use the
compressor kit to inflate the tire
to the recommended inflation
pressure.
20. Wipe off any sealant from the wheel, tire, and vehicle.
21. Dispose of the used sealant canister and sealant/air hose
(6) assembly at a local dealer
or in accordance with local
state codes and practices.
22. Replace it with a new canister available from your dealer.
23. After temporarily sealing a tire using the tire sealant and
compressor kit, take the vehicle to an authorized dealer
within 161 km (100 mi) of
driving to have the tire repaired
or replaced.
Using the Tire Sealant and
Compressor Kit without
Sealant to Inflate a Tire (Not
Punctured)
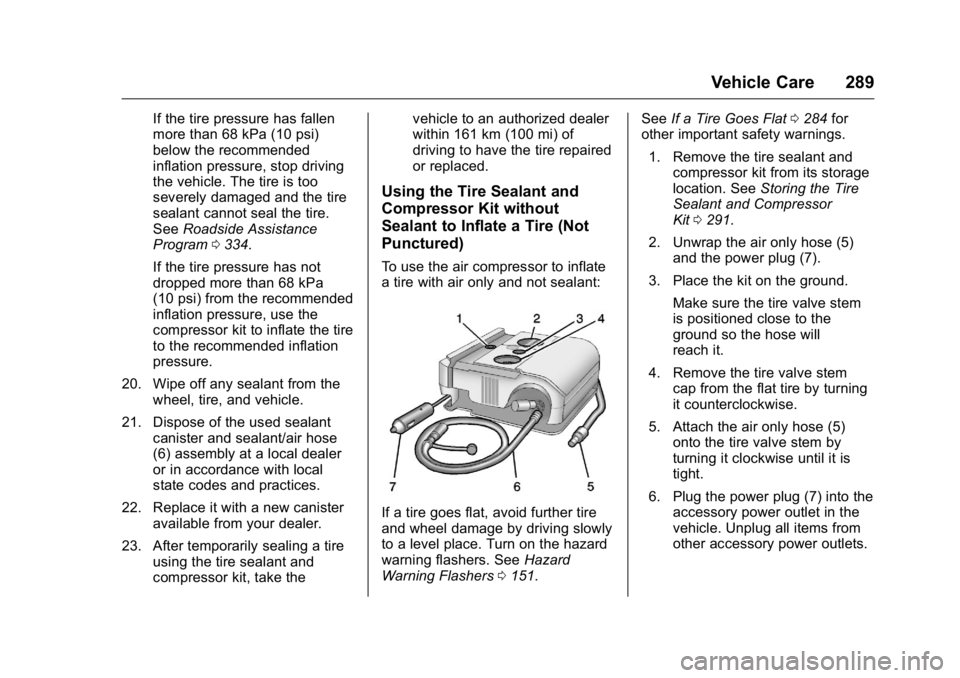
To use the air compressor to inflate
a tire with air only and not sealant:
If a tire goes flat, avoid further tire
and wheel damage by driving slowly
to a level place. Turn on the hazard
warning flashers. See
Hazard
Warning Flashers 0151. See
If a Tire Goes Flat 0284 for
other important safety warnings.
1. Remove the tire sealant and compressor kit from its storage
location. See Storing the Tire
Sealant and Compressor
Kit 0291.
2. Unwrap the air only hose (5) and the power plug (7).
3. Place the kit on the ground. Make sure the tire valve stem
is positioned close to the
ground so the hose will
reach it.
4. Remove the tire valve stem cap from the flat tire by turning
it counterclockwise.
5. Attach the air only hose (5) onto the tire valve stem by
turning it clockwise until it is
tight.
6. Plug the power plug (7) into the accessory power outlet in the
vehicle. Unplug all items from
other accessory power outlets.
Page 294 of 367
Buick LaCrosse Owner Manual (GMNA-Localizing-U.S./Canada/Mexico-
9159288) - 2016 - CRC - 10/5/15
Vehicle Care 293
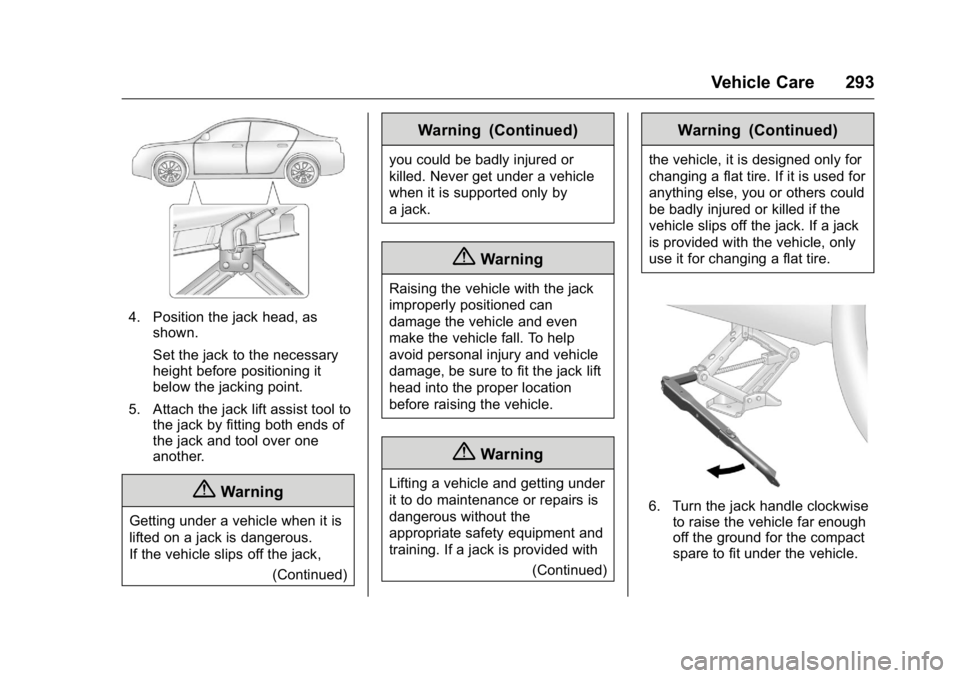
4. Position the jack head, asshown.
Set the jack to the necessary
height before positioning it
below the jacking point.
5. Attach the jack lift assist tool to the jack by fitting both ends of
the jack and tool over one
another.
{Warning
Getting under a vehicle when it is
lifted on a jack is dangerous.
If the vehicle slips off the jack,
(Continued)
Warning (Continued)
you could be badly injured or
killed. Never get under a vehicle
when it is supported only by
a jack.
{Warning
Raising the vehicle with the jack
improperly positioned can
damage the vehicle and even
make the vehicle fall. To help
avoid personal injury and vehicle
damage, be sure to fit the jack lift
head into the proper location
before raising the vehicle.
{Warning
Lifting a vehicle and getting under
it to do maintenance or repairs is
dangerous without the
appropriate safety equipment and
training. If a jack is provided with
(Continued)
Warning (Continued)
the vehicle, it is designed only for
changing a flat tire. If it is used for
anything else, you or others could
be badly injured or killed if the
vehicle slips off the jack. If a jack
is provided with the vehicle, only
use it for changing a flat tire.
6. Turn the jack handle clockwiseto raise the vehicle far enough
off the ground for the compact
spare to fit under the vehicle.
Page 295 of 367
Buick LaCrosse Owner Manual (GMNA-Localizing-U.S./Canada/Mexico-
9159288) - 2016 - CRC - 10/5/15
294 Vehicle Care
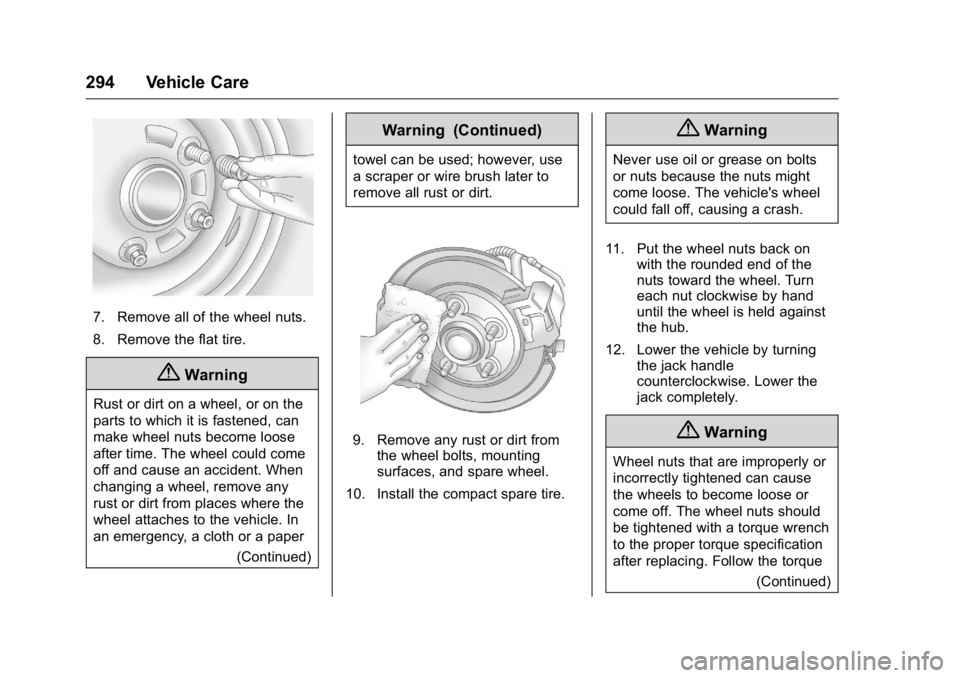
7. Remove all of the wheel nuts.
8. Remove the flat tire.
{Warning
Rust or dirt on a wheel, or on the
parts to which it is fastened, can
make wheel nuts become loose
after time. The wheel could come
off and cause an accident. When
changing a wheel, remove any
rust or dirt from places where the
wheel attaches to the vehicle. In
an emergency, a cloth or a paper(Continued)
Warning (Continued)
towel can be used; however, use
a scraper or wire brush later to
remove all rust or dirt.
9. Remove any rust or dirt fromthe wheel bolts, mounting
surfaces, and spare wheel.
10. Install the compact spare tire.
{Warning
Never use oil or grease on bolts
or nuts because the nuts might
come loose. The vehicle's wheel
could fall off, causing a crash.
11. Put the wheel nuts back on with the rounded end of the
nuts toward the wheel. Turn
each nut clockwise by hand
until the wheel is held against
the hub.
12. Lower the vehicle by turning the jack handle
counterclockwise. Lower the
jack completely.
{Warning
Wheel nuts that are improperly or
incorrectly tightened can cause
the wheels to become loose or
come off. The wheel nuts should
be tightened with a torque wrench
to the proper torque specification
after replacing. Follow the torque
(Continued)
Page 296 of 367
Buick LaCrosse Owner Manual (GMNA-Localizing-U.S./Canada/Mexico-
9159288) - 2016 - CRC - 10/5/15
Vehicle Care 295
Warning (Continued)
specification supplied by the
aftermarket manufacturer when
using accessory locking wheel
nuts. SeeCapacities and
Specifications 0327 for original
equipment wheel nut torque
specifications.
Caution
Improperly tightened wheel nuts
can lead to brake pulsation and
rotor damage. To avoid expensive
brake repairs, evenly tighten the
wheel nuts in the proper
sequence and to the proper
torque specification. See
Capacities and Specifications
0 327 for the wheel nut torque
specification.
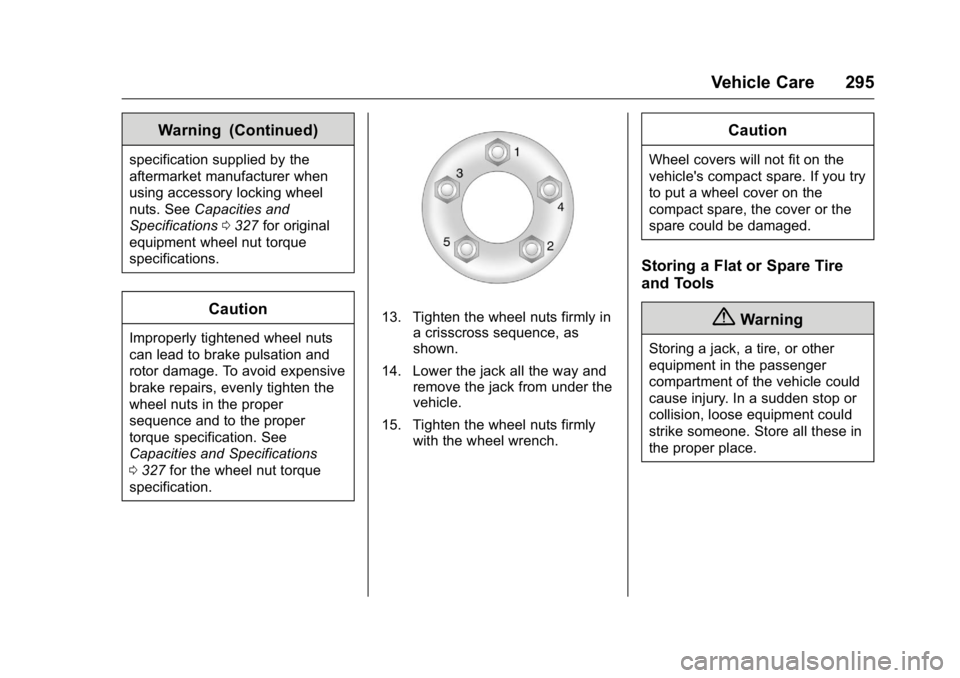
13. Tighten the wheel nuts firmly in a crisscross sequence, as
shown.
14. Lower the jack all the way and remove the jack from under the
vehicle.
15. Tighten the wheel nuts firmly with the wheel wrench.
Caution
Wheel covers will not fit on the
vehicle's compact spare. If you try
to put a wheel cover on the
compact spare, the cover or the
spare could be damaged.
Storing a Flat or Spare Tire
and Tools
{Warning
Storing a jack, a tire, or other
equipment in the passenger
compartment of the vehicle could
cause injury. In a sudden stop or
collision, loose equipment could
strike someone. Store all these in
the proper place.
Page 297 of 367
Buick LaCrosse Owner Manual (GMNA-Localizing-U.S./Canada/Mexico-
9159288) - 2016 - CRC - 10/5/15
296 Vehicle Care
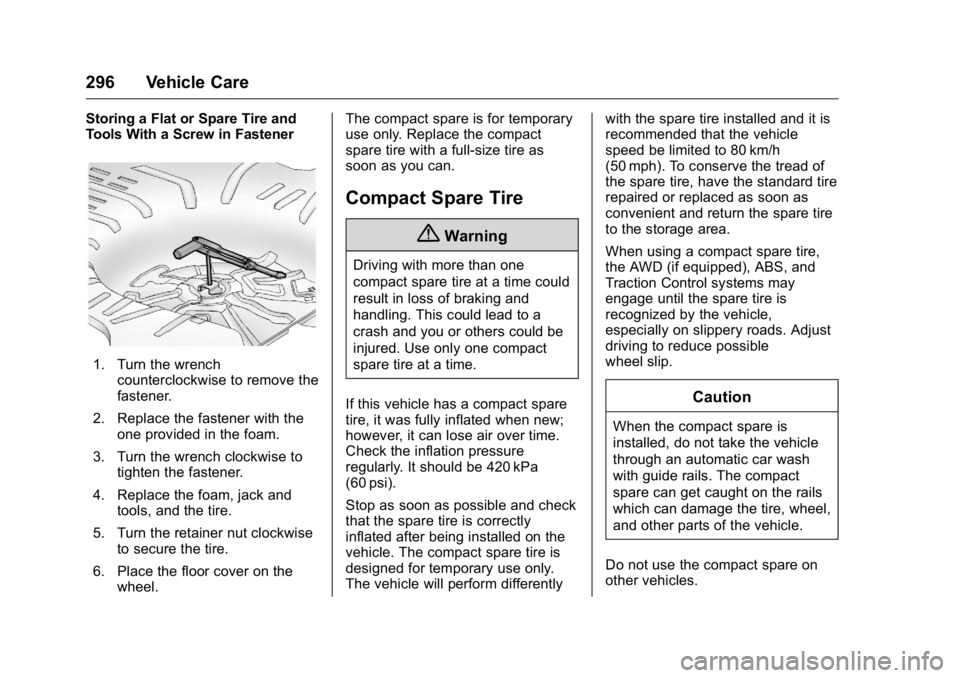
Storing a Flat or Spare Tire and
Tools With a Screw in Fastener
1. Turn the wrenchcounterclockwise to remove the
fastener.
2. Replace the fastener with the one provided in the foam.
3. Turn the wrench clockwise to tighten the fastener.
4. Replace the foam, jack and tools, and the tire.
5. Turn the retainer nut clockwise to secure the tire.
6. Place the floor cover on the wheel. The compact spare is for temporary
use only. Replace the compact
spare tire with a full-size tire as
soon as you can.
Compact Spare Tire
{Warning
Driving with more than one
compact spare tire at a time could
result in loss of braking and
handling. This could lead to a
crash and you or others could be
injured. Use only one compact
spare tire at a time.
If this vehicle has a compact spare
tire, it was fully inflated when new;
however, it can lose air over time.
Check the inflation pressure
regularly. It should be 420 kPa
(60 psi).
Stop as soon as possible and check
that the spare tire is correctly
inflated after being installed on the
vehicle. The compact spare tire is
designed for temporary use only.
The vehicle will perform differently with the spare tire installed and it is
recommended that the vehicle
speed be limited to 80 km/h
(50 mph). To conserve the tread of
the spare tire, have the standard tire
repaired or replaced as soon as
convenient and return the spare tire
to the storage area.
When using a compact spare tire,
the AWD (if equipped), ABS, and
Traction Control systems may
engage until the spare tire is
recognized by the vehicle,
especially on slippery roads. Adjust
driving to reduce possible
wheel slip.
Caution
When the compact spare is
installed, do not take the vehicle
through an automatic car wash
with guide rails. The compact
spare can get caught on the rails
which can damage the tire, wheel,
and other parts of the vehicle.
Do not use the compact spare on
other vehicles.
Page 299 of 367
Buick LaCrosse Owner Manual (GMNA-Localizing-U.S./Canada/Mexico-
9159288) - 2016 - CRC - 10/5/15
298 Vehicle Care
Keyless Access
With the brake pedal not applied,
press and hold the ENGINE START/
STOP button for more than
five seconds. This will place the
vehicle in the Service Only Mode.
Proceed as follows:1. Press
Sthen scrollyorz
until the Settings menu
displays.
2. Press
Vto enter the
Settings menu.
3. Press
Tthen scrollyorz
until Jump Start displays.
4. Press
Vto activate the jump
start.
5. The system will then ask for confirmation. If Yes is selected,
the jump start will begin and
the display will show WAIT TO
START.
6. When the jump start is complete, the display will show
ATTEMPT START or JUMP
START DISABLED. If the vehicle is started, the
on-board jump start function will be
automatically disabled. If the vehicle
cranks but does not start, the
procedure may be repeated again.
If the vehicle start is still
unsuccessful, the jump start can be
attempted using the following jump
starting procedure under
“Jump
Starting (with or without eAssist).”
On-board jump starting may be
unavailable due to the 12-volt
battery charge level, the eAssist
battery charge level, power
capability, or an issue with the
eAssist system. In these cases, the
display will not be available because
of the power issue, or the DIC will
display JUMP START DISABLED
SEE OWNERS MANUAL.
Jump Starting - North
America (with or without
eAssist)
For more information about the
vehicle battery, see Battery - North
America 0250. If the battery has run down, try to
use another vehicle and some
jumper cables to start your vehicle.
Be sure to use the following steps to
do it safely.
{Warning
WARNING:
Battery posts,
terminals, and related
accessories contain lead and lead
compounds, chemicals known to
the State of California to cause
cancer and birth defects or other
reproductive harm. Batteries also
contain other chemicals known to
the State of California to cause
cancer. WASH HANDS AFTER
HANDLING. SeeCalifornia
Proposition 65 Warning 0227.
{Warning
Batteries can hurt you. They can
be dangerous because:
. They contain acid that can
burn you.
(Continued)
Page 300 of 367
Buick LaCrosse Owner Manual (GMNA-Localizing-U.S./Canada/Mexico-
9159288) - 2016 - CRC - 10/5/15
Vehicle Care 299
Warning (Continued)
.They contain gas that can
explode or ignite.
. They contain enough
electricity to burn you.
If you do not follow these steps
exactly, some or all of these
things can hurt you.
Caution
Ignoring these steps could result
in costly damage to the vehicle
that would not be covered by the
vehicle warranty. Trying to start
the vehicle by pushing or pulling it
will not work, and it could damage
the vehicle.
The vehicle has a battery cover
which must be removed to gain
access to the battery for jump
starting.
1. Clips
2. Pivot Points
To remove the battery cover: 1. Release the two rear clips (1).
2. Lift the battery cover up toward the front of the vehicle to
release it from the pivot
points (2) and remove.
3. Reverse Steps 1 and 2 to reinstall the battery cover.
The vehicle has a remote
positive (+) terminal under a trim
cover. It is under the battery cover
on the driver side of the engine
compartment. See Engine
Compartment Overview 0231. You
should always use this remote
positive terminal.
The jump start negative grounding
point for the discharged battery is
the engine block or an engine
mounting bolt. Connect to a spot as
far away from the discharged
battery as possible.
1. Check the other vehicle. It must have a 12-volt battery
with a negative ground system.