headlamp BUICK LESABRE 2002 Owner's Guide
[x] Cancel search | Manufacturer: BUICK, Model Year: 2002, Model line: LESABRE, Model: BUICK LESABRE 2002Pages: 398, PDF Size: 2.65 MB
Page 310 of 398

6-38
Headlamp Vertical Aiming
NOTICE:
Horizontal aiming must be performed before
making any adjustments to the vertical aim.
Adjusting the vertical aim first will result in
an incorrect headlamp aim.
1. Find the aim dot on the lens of the low beam lamps.
2. Measure the distance from the ground to the aim dot
on each lamp; if left low beam, subtract two inches.
Record this distance.3. At the wall or other flat surface, measure from the
ground upward the recorded distance from step 2 and
draw or tape a horizontal line the width of the vehicle.
4. Turn on the low-beam headlamps and place a piece
of cardboard or equivalent in front of the headlamp
not being aimed. This should allow only the beam
of light from the headlamp being aimed to be seen
on the flat surface.
Page 311 of 398

6-39
NOTICE:
Do not cover a headlamp to improve beam
cut
-off when aiming. Covering a headlamp may
cause excessive heat build
-up which may cause
damage to the headlamp.
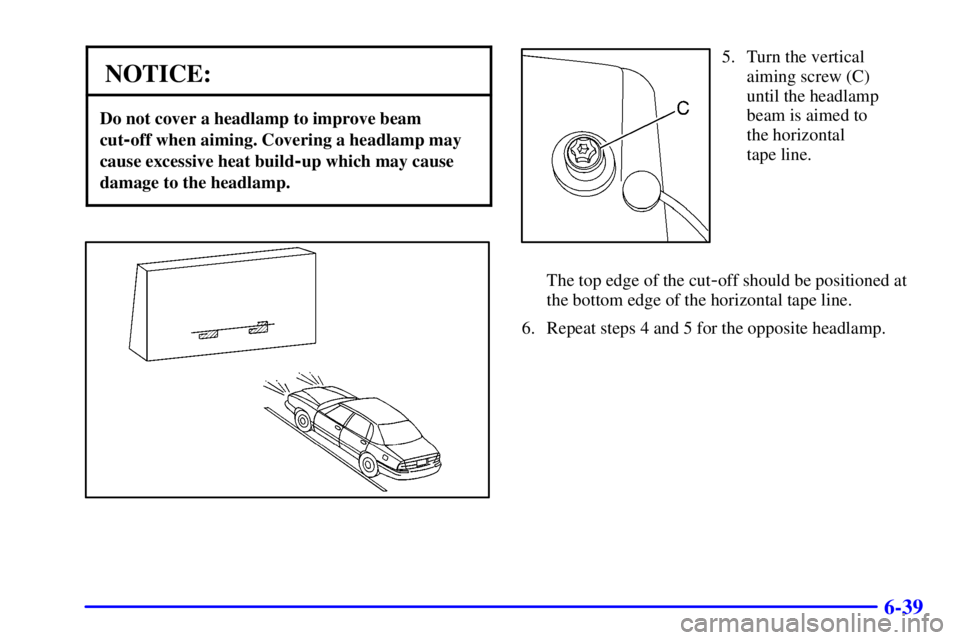
5. Turn the vertical
aiming screw (C)
until the headlamp
beam is aimed to
the horizontal
tape line.
The top edge of the cut
-off should be positioned at
the bottom edge of the horizontal tape line.
6. Repeat steps 4 and 5 for the opposite headlamp.
Page 312 of 398

6-40 Front Turn Signal
Once the headlamp assembly has been removed from
the vehicle, the front turn signal bulbs can be accessed.
1. Reach down into the space provided by the removal
of the headlamp assembly and, while pushing in the
tab on the bulb assembly, turn the assembly
counterclockwise and remove it.
2. Remove the old bulb by pulling it straight out of
the retainer.
3. Install the new bulb and turn the bulb assembly
back into place.
Trunk-Mounted Back-Up and Taillamps
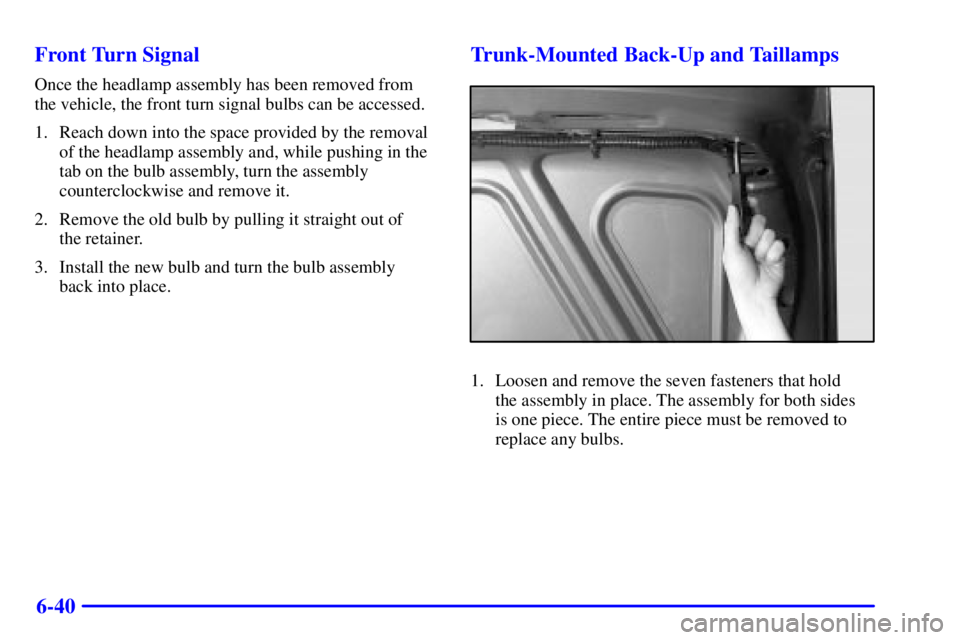
1. Loosen and remove the seven fasteners that hold
the assembly in place. The assembly for both sides
is one piece. The entire piece must be removed to
replace any bulbs.
Page 324 of 398

6-52
If you need to replace any of your wheels, wheel bolts
or wheel nuts, replace them only with new GM original
equipment parts. This way, you will be sure to have the
right wheel, wheel bolts and wheel nuts for your vehicle.
CAUTION:
Using the wrong replacement wheels, wheel bolts
or wheel nuts on your vehicle can be dangerous.
It could affect the braking and handling of your
vehicle, make your tires lose air and make you
lose control. You could have a collision in which
you or others could be injured. Always use
the correct wheel, wheel bolts and wheel nuts
for replacement.
NOTICE:
The wrong wheel can also cause problems with
bearing life, brake cooling, speedometer or
odometer calibration, headlamp aim, bumper
height, vehicle ground clearance and tire or
tire chain clearance to the body and chassis.
See ªChanging a Flat Tireº in the Index for
more information.
Used Replacement Wheels
CAUTION:
Putting a used wheel on your vehicle is
dangerous. You can't know how it's been used or
how far it's been driven. It could fail suddenly
and cause a crash. If you have to replace a wheel,
use a new GM original equipment wheel.
Page 336 of 398

6-64
Engine Compartment Fuse Block
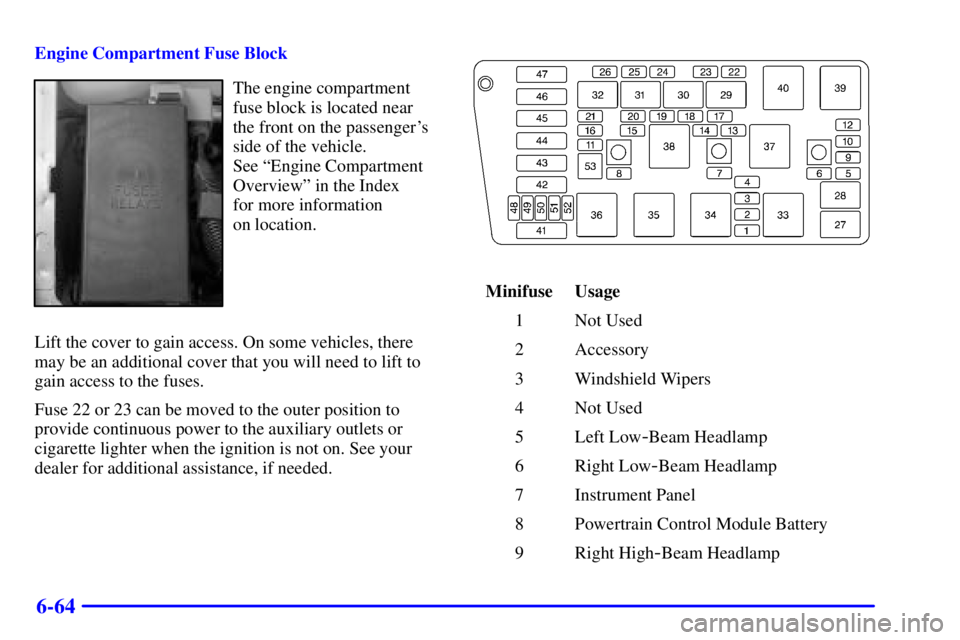
The engine compartment
fuse block is located near
the front on the passenger's
side of the vehicle.
See ªEngine Compartment
Overviewº in the Index
for more information
on location.
Lift the cover to gain access. On some vehicles, there
may be an additional cover that you will need to lift to
gain access to the fuses.
Fuse 22 or 23 can be moved to the outer position to
provide continuous power to the auxiliary outlets or
cigarette lighter when the ignition is not on. See your
dealer for additional assistance, if needed.
Minifuse Usage
1 Not Used
2 Accessory
3 Windshield Wipers
4 Not Used
5 Left Low
-Beam Headlamp
6 Right Low
-Beam Headlamp
7 Instrument Panel
8 Powertrain Control Module Battery
9 Right High
-Beam Headlamp
Page 337 of 398

6-65
Minifuse Usage
10 Left High
-Beam Headlamp
11 Ignition 1
12 Not Used
13 Transaxle
14 Cruise Control
15 Direct Ignition System
16 Injector Bank #2
17 Not Used
18 Not Used
19 Powertrain Control Module Ignition
20 Oxygen Sensor
21 Injector Bank #1
22 Auxiliary Power
23 Cigarette Lighter
24 Fog Lamps/Daytime Running Lamps
25 Horn
26 Air Conditioner ClutchMicro Relays Usage
27 High-Beam Headlamp
28 Low
-Beam Headlamp
29 Fog Lamps
30 Daytime Running Lamps
31 Horn
32 Air Conditioner Clutch
33 HVAC Solenoid
Mini Relays Usage
34 Accessory
35 Air Pump
36 Starter 1
37 Cooling Fan 2
38 Ignition 1
39 Cooling Fan Series/Parallel
40 Cooling Fan 1
Page 343 of 398

6-71
Replacement Bulbs
Front Exterior Lamps Bulb Number
Headlamps
Low Beam 9006. . . . . . . . . . . . . . . . . . . . . . . . . . . .
High Beam 9005. . . . . . . . . . . . . . . . . . . . . . . . . . .
Front Turn Signal 3157. . . . . . . . . . . . . . . . . . . . . .
Rear Exterior Lamps Bulb Number
Trunk Mounted Back
-Up Lamps 3057. . . . . . . . . .
Trunk Mounted Tail Lamps 194. . . . . . . . . . . . . . .
Tail/Stop/Turn Signal Lamps 3357. . . . . . . . . . . . .
For any bulb not listed here contact your dealer.
Capacities and Specifications
The following approximate capacities are given in
English and metric conversions. Please refer to
ªRecommended Fluids and Lubricantsº in the Index for
more information.
Engine Specifications
VIN Engine Code K. . . . . . . . . . . . . . . . . . . . . . . . .
Type V6. . . . . . . . . . . . . . . . . . . . . . . . . . . . . . . . . . .
Displacement 3.8 L. . . . . . . . . . . . . . . . . . . . . . . . . .
Firing Order 1
-6-5-4-3-2 . . . . . . . . . . . . . . . . . . . .
Wheel Nut Torque
100 1b-ft (140 N´m)
Capacities
Automatic Transaxle 7.4 quarts (7.0 L). . . . . . . . . .
Engine Cooling System 10.0 quarts (9.5 L). . . . . . .
Engine Oil with Filter 4.5 quarts (4.3 L). . . . . . . . .
Fuel Tank 18.5 U.S. gallons (70.0 L). . . . . . . . . . . .
All capacities are approximate. When adding, be sure to
fill to the appropriate level, as recommended in this
manual. Recheck fluid level after filling.