fluids BUICK LESABRE 2003 Owner's Manual
[x] Cancel search | Manufacturer: BUICK, Model Year: 2003, Model line: LESABRE, Model: BUICK LESABRE 2003Pages: 380, PDF Size: 2.75 MB
Page 213 of 380
Here are some things you can check before a trip:
·Windshield Washer Fluid:Is the reservoir full? Are
all windows clean inside and outside?
·Wiper Blades:Are they in good shape?
·Fuel, Engine Oil, Other Fluids:Have you checked
all levels?
·Lamps:Are they all working? Are the lenses clean?
·Tires:They are vitally important to a safe,
trouble-free trip. Is the tread good enough for
long-distance driving? Are the tires all in¯ated to the
recommended pressure?
·Weather Forecasts:What's the weather outlook
along your route? Should you delay your trip a
short time to avoid a major storm system?
·Maps:Do you have up-to-date maps?
Highway Hypnosis
Is there actually such a condition as ªhighway
hypnosisº? Or is it just plain falling asleep at the wheel?
Call it highway hypnosis, lack of awareness, or
whatever.
There is something about an easy stretch of road with
the same scenery, along with the hum of the tires on the
road, the drone of the engine, and the rush of the
wind against the vehicle that can make you sleepy. Don't
let it happen to you! If it does, your vehicle can leave
the road in
less than a second,and you could crash and
be injured.
What can you do about highway hypnosis? First, be
aware that it can happen.
Then here are some tips:
·Make sure your vehicle is well ventilated, with a
comfortably cool interior.
·Keep your eyes moving. Scan the road ahead and
to the sides. Check your rearview mirrors and your
instruments frequently.
·If you get sleepy, pull off the road into a rest,
service or parking area and take a nap, get some
exercise, or both. For safety, treat drowsiness
on the highway as an emergency.
4-23
Page 255 of 380

3. Check both sides of the dipstick, and read the
lower level. The ¯uid level must be in the
cross-hatched area.
4. If the ¯uid level is in the acceptable range, push the
dipstick back in all the way.
How to Add Fluid
Refer to the Maintenance Schedule to determine what
kind of transaxle ¯uid to use. SeePart D:
Recommended Fluids and Lubricants on page 6-23.
If the ¯uid level is low, add only enough of the proper
¯uid to bring the level into the cross-hatched area on the
dipstick.
1. Pull out the dipstick.
2. Using a long-neck funnel, add enough ¯uid at the
dipstick hole to bring it to the proper level.
It doesn't take much ¯uid, generally less than
one pint (0.5 L).
Don't over®ll.Notice:
We recommend you use only ¯uid labeled
DEXRONž±III, because ¯uid with that label is
made especially for your automatic transaxle.
Damage caused by ¯uid other than DEXRON
ž±III is
not covered by your new vehicle warranty.
3. After adding ¯uid, recheck the ¯uid level as
described under ªHow to Check,º earlier in this
section.
4. When the correct ¯uid level is obtained, push the
dipstick back in all the way.
Engine Coolant
The cooling system in your vehicle is ®lled with
DEX-COOLžengine coolant. This coolant is designed
to remain in your vehicle for 5 years or 150,000 miles
(240 000 km), whichever occurs ®rst, if you add
only DEX-COOL
žextended life coolant.
The following explains your cooling system and how to
add coolant when it is low. If you have a problem
with engine overheating, see
Engine Overheating on
page 5-26.
5-23
Page 268 of 380
When to Check Power Steering Fluid
It is not necessary to regularly check power steering ¯uid
unless you suspect there is a leak in the system or
you hear an unusual noise. A ¯uid loss in this system
could indicate a problem. Have the system inspected
and repaired.
How to Check Power Steering Fluid
Turn the key off, let the engine compartment cool down,
wipe the cap and the top of the reservoir clean, then
unscrew the cap and wipe the dipstick with a clean rag.
Replace the cap and completely tighten it. Then
remove the cap again and look at the ¯uid level on the
dipstick.
The level should be at the FULL COLD mark. If
necessary, add only enough ¯uid to bring the level up to
the mark.
What to Use
To determine what kind of ¯uid to use, seePart D:
Recommended Fluids and Lubricants on page 6-23.
Always use the proper ¯uid. Failure to use the proper
¯uid can cause leaks and damage hoses and seals.
Windshield Washer Fluid
What to Use
When you need windshield washer ¯uid, be sure to read
the manufacturer's instructions before use. If you will
be operating your vehicle in an area where the
temperature may fall below freezing, use a ¯uid that has
sufficient protection against freezing. See
Engine
Compartment Overview on page 5-12for reservoir
location.
Adding Washer Fluid
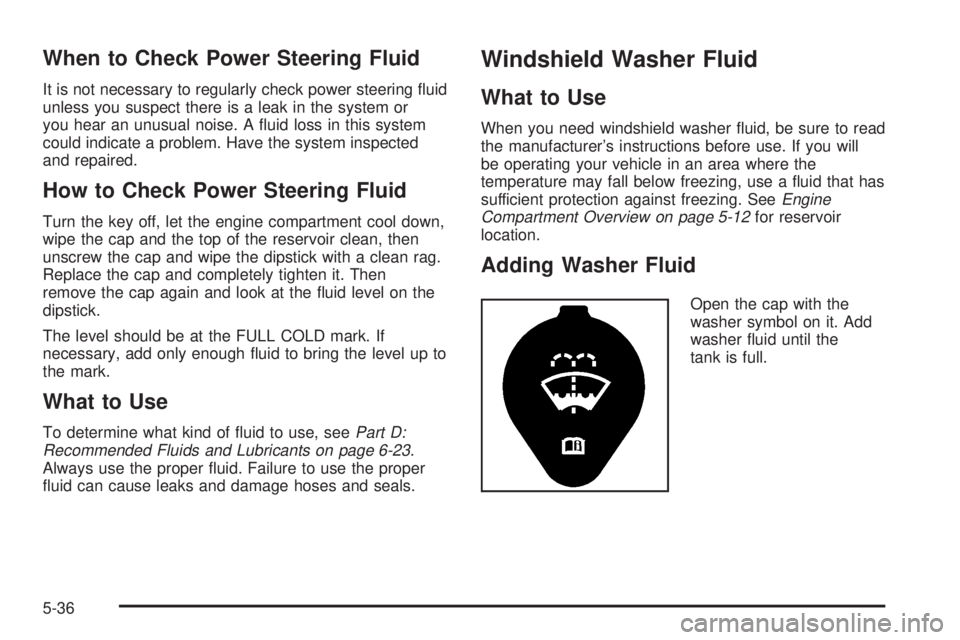
Open the cap with the
washer symbol on it. Add
washer ¯uid until the
tank is full.
5-36
Page 270 of 380
The other reason is that ¯uid is leaking out of the brake
system. If it is, you should have your brake system
®xed, since a leak means that sooner or later your
brakes won't work well, or won't work at all.
So, it isn't a good idea to ªtop offº your brake ¯uid.
Adding brake ¯uid won't correct a leak. If you add ¯uid
when your linings are worn, then you'll have too
much ¯uid when you get new brake linings. You should
add (or remove) brake ¯uid, as necessary, only when
work is done on the brake hydraulic system.
{CAUTION:
If you have too much brake ¯uid, it can spill on
the engine. The ¯uid will burn if the engine is
hot enough. You or others could be burned,
and your vehicle could be damaged. Add brake
¯uid only when work is done on the brake
hydraulic system.
When your brake ¯uid falls to a low level, your brake
warning light will come on. A chime will sound if you try
to drive with this warning light on. See
Brake System
Warning Light on page 3-37.
What to Add
When you do need brake ¯uid, use only DOT-3 brake
¯uid. Refer toPart D: Recommended Fluids and
Lubricants on page 6-23. Use new brake ¯uid from a
sealed container only.
Always clean the brake ¯uid reservoir cap and the area
around the cap before removing it. This will help
keep dirt from entering the reservoir.
{CAUTION:
With the wrong kind of ¯uid in your brake
system, your brakes may not work well, or
they may not even work at all. This could
cause a crash. Always use the proper
brake ¯uid.
Notice:
·Using the wrong ¯uid can badly damage brake
system parts. For example, just a few drops of
mineral-based oil, such as engine oil, in your
brake system can damage brake system
parts so badly that they'll have to be replaced.
Don't let someone put in the wrong kind of ¯uid.
5-38
Page 312 of 380

Care of Safety Belts
Keep belts clean and dry.
{CAUTION:
Do not bleach or dye safety belts. If you do, it
may severely weaken them. In a crash, they
might not be able to provide adequate
protection. Clean safety belts only with mild
soap and lukewarm water.
Weatherstrips
Silicone grease on weatherstrips will make them last
longer, seal better, and not stick or squeak. Apply
silicone grease with a clean cloth at least every six
months. During very cold, damp weather more frequent
application may be required. See
Part D: Recommended
Fluids and Lubricants on page 6-23.
Cleaning the Outside of Your
Vehicle
The paint ®nish on your vehicle provides beauty, depth
of color, gloss retention and durability.
Washing Your Vehicle
The best way to preserve your vehicle's ®nish is to
keep it clean by washing it often with lukewarm or
cold water.
Don't wash your vehicle in the direct rays of the sun.
Use a car washing soap. Don't use strong soaps
or chemical detergents. Be sure to rinse the vehicle
well, removing all soap residue completely. You can get
GM-approved cleaning products from your dealer.
See
Vehicle Care/Appearance Materials on page 5-84.
Don't use cleaning agents that are petroleum based,
or that contain acid or abrasives. All cleaning agents
should be ¯ushed promptly and not allowed to dry on the
surface, or they could stain. Dry the ®nish with a soft,
clean chamois or an all-cotton towel to avoid surface
scratches and water spotting.
High pressure car washes may cause water to enter
your vehicle.
5-80
Page 316 of 380

Vehicle Care/Appearance Materials
See your GM dealer for more information on purchasing
the following products.
Vehicle Care/Appearance Materials
Description Usage
Polishing Cloth
Wax-TreatedInterior and exterior
polishing cloth.
Tar and Road Oil
RemoverRemoves tar, road oil and
asphalt.
Chrome Cleaner and
PolishUse on chrome or stainless
steel.
White Sidewall Tire
CleanerRemoves soil and black
marks from whitewalls.
Vinyl CleanerCleans vinyl tops,
upholstery and convertible
tops.
Glass CleanerRemoves dirt, grime,
smoke and ®ngerprints.
Chrome and Wire
Wheel CleanerRemoves dirt and grime
from chrome wheels and
wire wheel covers.
Finish EnhancerRemoves dust, ®ngerprints,
and surface contaminants.
Spray on wipe off.
Vehicle Care/Appearance Materials
(cont'd)
Description Usage
Swirl Remover PolishRemoves swirl marks, ®ne
scratches and other light
surface contamination.
Cleaner WaxRemoves light scratches
and protects ®nish.
Foaming Tire Shine
Low GlossCleans, shines and protects
in one easy step, no wiping
necessary.
Wash Wax ConcentrateMedium foaming shampoo.
Cleans and lightly waxes.
Biodegradable and
phosphate free.
Spot LifterQuickly and easily removes
spots and stains from
carpets, vinyl and cloth
upholstery.
Odor EliminatorOdorless spray odor
eliminator used on fabrics,
vinyl, leather and carpet.
See your General Motors parts department for these
products. See
Part D: Recommended Fluids and
Lubricants on page 6-23.
5-84
Page 325 of 380
Capacities and Speci®cations
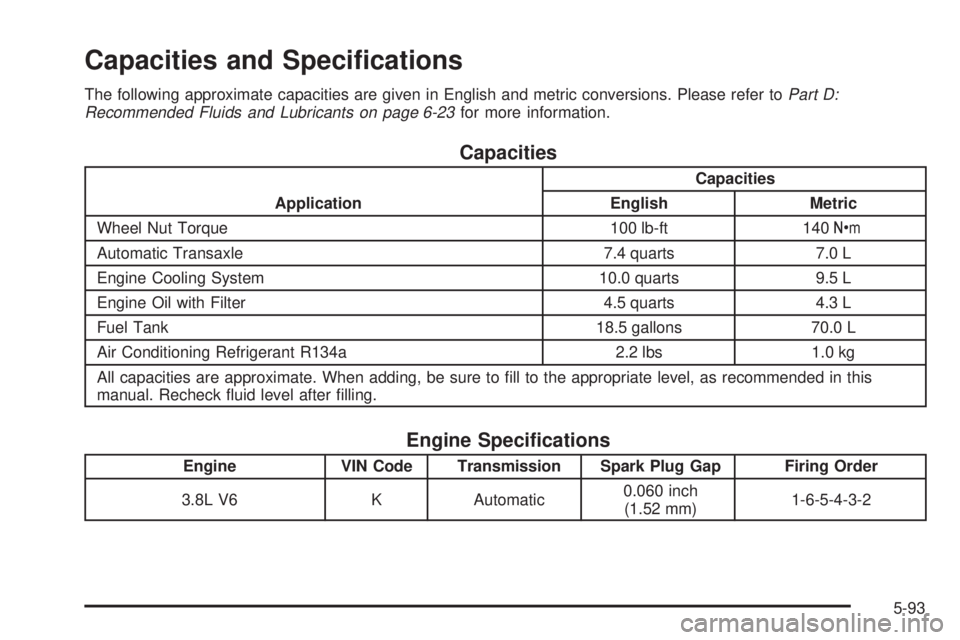
The following approximate capacities are given in English and metric conversions. Please refer toPart D:
Recommended Fluids and Lubricants on page 6-23for more information.
Capacities
ApplicationCapacities
English Metric
Wheel Nut Torque 100 lb-ft 140Y
Automatic Transaxle 7.4 quarts 7.0 L
Engine Cooling System 10.0 quarts 9.5 L
Engine Oil with Filter 4.5 quarts 4.3 L
Fuel Tank 18.5 gallons 70.0 L
Air Conditioning Refrigerant R134a 2.2 lbs 1.0 kg
All capacities are approximate. When adding, be sure to ®ll to the appropriate level, as recommended in this
manual. Recheck ¯uid level after ®lling.
Engine Speci®cations
Engine VIN Code Transmission Spark Plug Gap Firing Order
3.8L V6 K Automatic0.060 inch
(1.52 mm)1-6-5-4-3-2
5-93
Page 327 of 380
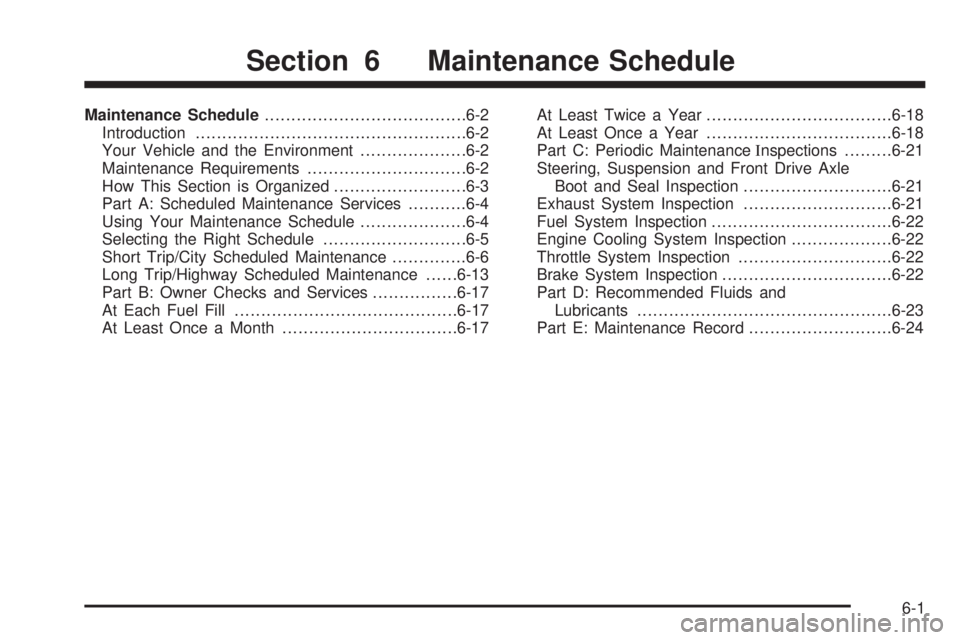
Maintenance Schedule......................................6-2
Introduction...................................................6-2
Your Vehicle and the Environment....................6-2
Maintenance Requirements..............................6-2
How This Section is Organized.........................6-3
Part A: Scheduled Maintenance Services...........6-4
Using Your Maintenance Schedule....................6-4
Selecting the Right Schedule...........................6-5
Short Trip/City Scheduled Maintenance..............6-6
Long Trip/Highway Scheduled Maintenance......6-13
Part B: Owner Checks and Services................6-17
At Each Fuel Fill..........................................6-17
At Least Once a Month.................................6-17At Least Twice a Year...................................6-18
At Least Once a Year...................................6-18
Part C: Periodic MaintenanceInspections.........6-21
Steering, Suspension and Front Drive Axle
Boot and Seal Inspection............................6-21
Exhaust System Inspection............................6-21
Fuel System Inspection..................................6-22
Engine Cooling System Inspection...................6-22
Throttle System Inspection.............................6-22
Brake System Inspection................................6-22
Part D: Recommended Fluids and
Lubricants................................................6-23
Part E: Maintenance Record...........................6-24
Section 6 Maintenance Schedule
6-1
Page 329 of 380

How This Section is Organized
This maintenance schedule is divided into ®ve parts:
ªPart A: Scheduled Maintenance Servicesºexplains
what to have done and how often. Some of these
services can be complex, so unless you are technically
quali®ed and have the necessary equipment, you
should let your GM dealer's service department do
these jobs.
Your GM dealer has GM-trained and supported
service people that will perform the work using genuine
GM parts.
{CAUTION:
Performing maintenance work on a vehicle can
be dangerous. In trying to do some jobs, you
can be seriously injured. Do your own
maintenance work only if you have the
required know-how and the proper tools and
equipment for the job. If you have any doubt,
have a quali®ed technician do the work.If you want to get the service information, see
Service
Publications Ordering Information on page 7-10.
ªPart B: Owner Checks and Servicesºtells you what
should be checked and when. It also explains what
you can easily do to help keep your vehicle in good
condition.
ªPart C: Periodic MaintenanceInspectionsºexplains
important inspections that your dealer's service
department can perform for you.
ªPart D: Recommended Fluids and Lubricantsºlists
some recommended products necessary to help
keep your vehicle properly maintained. These products,
or their equivalents, should be used whether you do
the work yourself or have it done.
ªPart E: Maintenance Recordºis a place for you to
record and keep track of the maintenance performed on
your vehicle. Keep your maintenance receipts. They
may be needed to qualify your vehicle for warranty
repairs.
6-3
Page 344 of 380
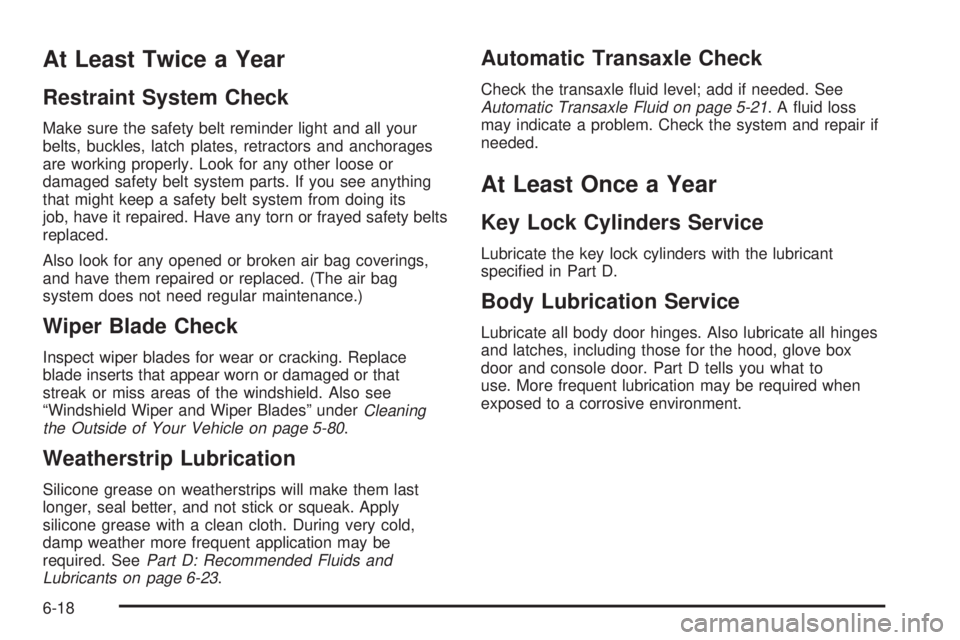
At Least Twice a Year
Restraint System Check
Make sure the safety belt reminder light and all your
belts, buckles, latch plates, retractors and anchorages
are working properly. Look for any other loose or
damaged safety belt system parts. If you see anything
that might keep a safety belt system from doing its
job, have it repaired. Have any torn or frayed safety belts
replaced.
Also look for any opened or broken air bag coverings,
and have them repaired or replaced. (The air bag
system does not need regular maintenance.)
Wiper Blade Check
Inspect wiper blades for wear or cracking. Replace
blade inserts that appear worn or damaged or that
streak or miss areas of the windshield. Also see
ªWindshield Wiper and Wiper Bladesº under
Cleaning
the Outside of Your Vehicle on page 5-80.
Weatherstrip Lubrication
Silicone grease on weatherstrips will make them last
longer, seal better, and not stick or squeak. Apply
silicone grease with a clean cloth. During very cold,
damp weather more frequent application may be
required. See
Part D: Recommended Fluids and
Lubricants on page 6-23.
Automatic Transaxle Check
Check the transaxle ¯uid level; add if needed. SeeAutomatic Transaxle Fluid on page 5-21. A ¯uid loss
may indicate a problem. Check the system and repair if
needed.
At Least Once a Year
Key Lock Cylinders Service
Lubricate the key lock cylinders with the lubricant
speci®ed in Part D.
Body Lubrication Service
Lubricate all body door hinges. Also lubricate all hinges
and latches, including those for the hood, glove box
door and console door. Part D tells you what to
use. More frequent lubrication may be required when
exposed to a corrosive environment.
6-18