audio BUICK LUCERNE 2006 Get To Know Guide
[x] Cancel search | Manufacturer: BUICK, Model Year: 2006, Model line: LUCERNE, Model: BUICK LUCERNE 2006Pages: 35, PDF Size: 1 MB
Page 2 of 35

Section V: Adjusting System Settings
Changing the Language Setting
Setting the Clock
Changing from Metric Units to English Units
Adjusting Screen Contrast and Brightness
Turning the Display Off
Setting a Destination across Regions
Adjusting the Voice Volume
Restoring System Defaults
Recalibrating the System
Troubleshooting GPS
Section VI: Voice Recognition
Using Voice Commands
Troubleshooting Voice Recognition
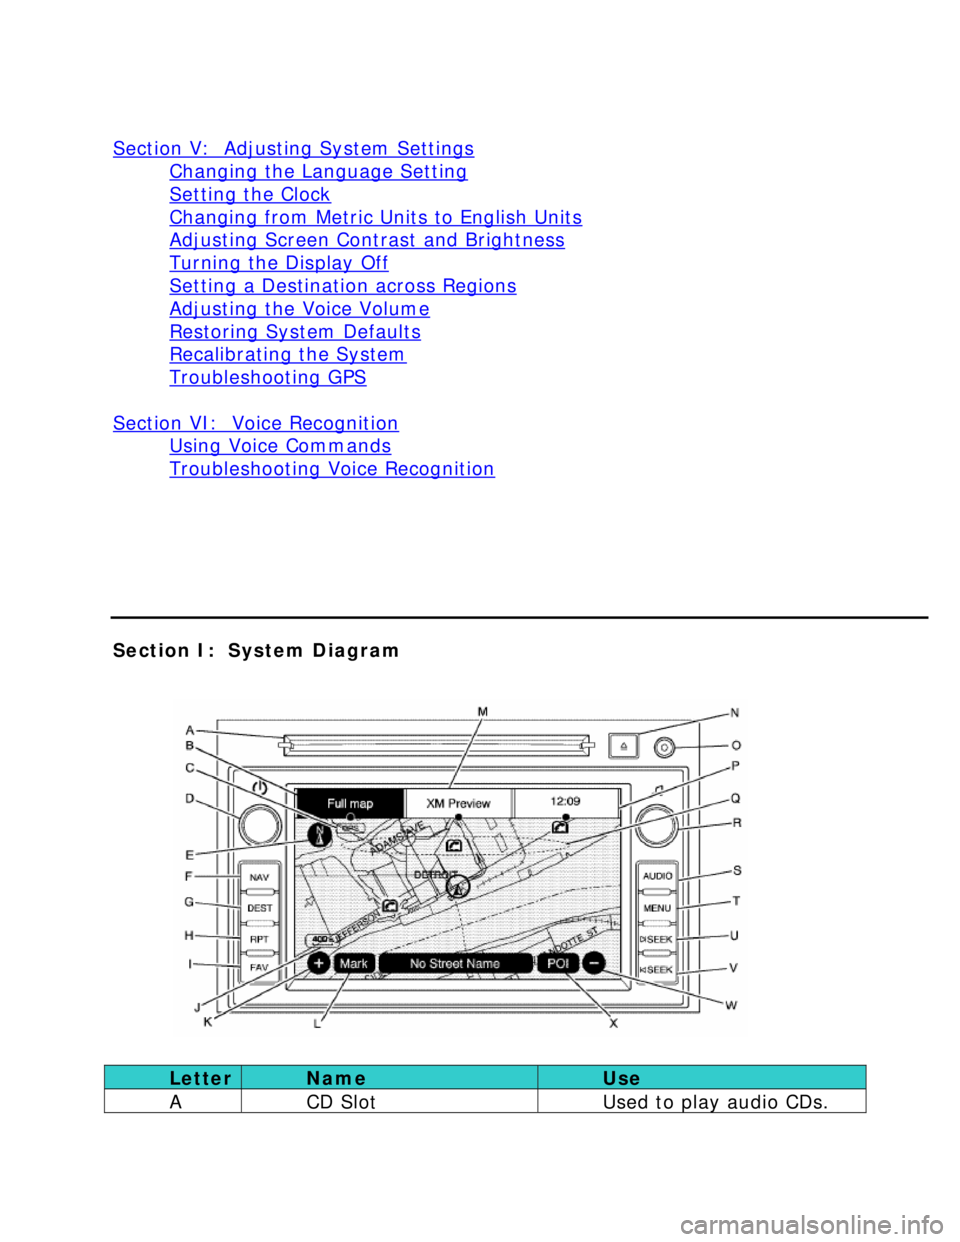
Section I: System Diagram
Letter Name Use
A CD Slot Used to play audio CDs.
Page 3 of 35

B. FULL MAP screen
button Touching this screen
button displays the screen
in full map view.
Touching the audio screen
button next to it will split
the screen between the
map and the current audio
source menu.
C. No GPS symbol When this symbol
appears, the vehicle is not
receiving a Global
Positioning System (GPS)
signal.
D. Power/Volume knob Press this knob to turn the
system on and off. Turn
the knob to increase or
decrease the volume to
the audio system.
E. North Up/Heading Up
symbol Indicates the orientation
of the screen. Touch this
screen button to change
the map orientation.
F. NAV (Navigation) hard
key Press this key to view
your vehicle’s current
position on the map. Each
press of this key cycles
you through the F
ULL MAP
tab and the current audio
source tab.
G. DEST (Destination)
hard key Press this key to access
the DESTINATION ENTRY
screen. When a route has
been planned, pressing
the button will access the
ROUTE screen.
H. RPT (Repeat) hard key Press this key to repeat
the last voice command.
I. FAV (Favorite) hard
key Press this key to access
the preset stations.
J. Map Scale Displays the current map
scale.
K. (Zoom In) screen
button Zooms in on the map.
L. MARK screen button Allows you to add a
Page 4 of 35

destination to the address
book.
M. (Source) screen button Allows you to view the
audio menu for the
current audit source.
N. (CD Eject) key Ejects audio CDs.
O. Auxiliary Jack Allows you to connect an
auxiliary source to the
audio system.
P. Clock screen button Displays the current time.
Touch this button to
adjust the time.
Q. Map DVD slot Allows you to insert the
map DVD (located behind
the screen).
R. (Tune/Sound) knob Turn this knob to go to
the next or previous radio
station. Press this knob to
access the SOUND screen.
S. AUDIO hard key Press this key to access
the full AUDIO screen.
T. MENU hard key Press this key to adjust
features for sound, radio,
navigation, and the
display.
U. Seek (next) hard key Allows you to tune to the
next radio station or CD
track. Also allows you to
scan radio stations.
V. Seek (previous) hard
key Allows you to tune to the
previous radio station or
CD track. Also allows you
to scan radio stations.
W. (Zoom Out) screen
button Zooms out on the map.
X. POI screen button Allows you to display
Points of Interest (POI) on
the screen.
Section II: Map DVD
Page 34 of 35

1. If the vehicle is located in a parking garage, tunnel, or an area where there are tall
buildings or large trucks, those obstructions may be interfering with the GPS signal.
Once the vehicle moves out of this area, the GPS signal should work.
2. If there are objects placed on top of the instrument panel, these may be interfering
with the GPS receiver. Remove any objects from the dashboard.
3. After-market glass tinting will interfere with the system’s ability to receive GPS
signals and cause the system to malfunction. Customers might have to replace the
window to correct the problem. This would NOT be covered by their warranty.
4. You may not be able to receive a GPS signal if the satellites are being repaired or
improved.
If the vehicle is not in the correct position on the map, see the instructions for
recalibrating the vehicle.
Refer to the following for further info:
Recalibrating the System
Section VI: Voice Recognition
Using Voice Commands
To use voice recognition, do the following:
1. Press the Talk symbol steering wheel control and release it when you hear a
beep. If the audio system is on, it will mute.
2. Clearly state the command. The commands are listed in the Navigation System
Supplement (words in brackets are optional). Commands are available for
navigation, radio, CDs, auxiliary devices, and OnStar.
Refer to the following for further info:
Storing Voice Tags
Setting a Destination through Voice Recognition
Troubleshooting Voice Recognition