headlamp BUICK LUCERNE 2006 Owner's Manual
[x] Cancel search | Manufacturer: BUICK, Model Year: 2006, Model line: LUCERNE, Model: BUICK LUCERNE 2006Pages: 416, PDF Size: 2.6 MB
Page 1 of 416
Seats and Restraint Systems........................... 1-1
Front Seats
............................................... 1-2
Rear Seats
..............................................1-10
Safety Belts
.............................................1-10
Child Restraints
.......................................1-30
Airbag System
.........................................1-52
Restraint System Check
............................1-69
Features and Controls..................................... 2-1
Keys
........................................................ 2-3
Doors and Locks
......................................2-11
Windows
.................................................2-16
Theft-Deterrent Systems
............................2-18
Starting and Operating Your Vehicle
...........2-21
Mirrors
....................................................2-33
OnStar
®System
......................................2-38
Universal Home Remote System
................2-40
Storage Areas
.........................................2-44
Sunroof
..................................................2-46
Vehicle Personalization
.............................2-46
Instrument Panel............................................. 3-1
Instrument Panel Overview
.......................... 3-4
Climate Controls
......................................3-23
Warning Lights, Gages, and Indicators
........3-33Driver Information Center (DIC)
..................3-50
Audio System(s)
.......................................3-74
Driving Your Vehicle....................................... 4-1
Your Driving, the Road, and Your Vehicle
..... 4-2
Towing
...................................................4-34
Service and Appearance Care.......................... 5-1
Service
..................................................... 5-3
Fuel
......................................................... 5-5
Checking Things Under the Hood
...............5-10
Headlamp Aiming
.....................................5-49
Bulb Replacement
....................................5-52
Windshield Wiper Blade Replacement
.........5-55
Tires
......................................................5-56
Appearance Care
.....................................5-83
Vehicle Identi�cation
.................................5-92
Electrical System
......................................5-93
Capacities and Speci�cations
...................5-101
Maintenance Schedule..................................... 6-1
Maintenance Schedule
................................ 6-2
Customer Assistance and Information.............. 7-1
Customer Assistance and Information
........... 7-2
Reporting Safety Defects
...........................7-13
Index................................................................ 1
2006 Buick Lucerne Owner ManualM
Page 100 of 416
Engine Coolant Heater
If your vehicle has this feature, in very cold weather, 0°F
(−18°C) or colder, the engine coolant heater can help.
You’ll get easier starting and better fuel economy during
engine warm-up. Usually, the coolant heater should be
plugged in a minimum of four hours prior to starting your
vehicle. At temperatures above 32°F (0°C), use of the
coolant heater is not required.
To Use the Engine Coolant Heater
1. Turn off the engine.
2. Open the hood and unwrap the electrical cord.
On vehicles with the 3.8L V6 engine, the coolant
heater cord is located on the passenger’s side of the
vehicle, above the headlamp assembly. On
vehicles with the 4.6L V8 engine, the cord is located
on the driver’s side of the vehicle on the right
side of the engine air cleaner. It is between the
engine cover and the engine air cleaner.
{CAUTION:
Plugging the cord into an ungrounded outlet
could cause an electrical shock. Also, the
wrong kind of extension cord could overheat
and cause a �re. You could be seriously
injured. Plug the cord into a properly grounded
three-prong 110-volt AC outlet. If the cord will
not reach, use a heavy-duty three-prong
extension cord rated for at least 15 amps.
3. Plug the cord into a normal, grounded 110-volt AC
outlet.
4. Before starting the engine, be sure to unplug and
store the cord as it was before to keep it away
from moving engine parts. If you do not, it could be
damaged.
How long should you keep the coolant heater plugged
in? The answer depends on the outside temperature, the
kind of oil you have, and some other things. Instead
of trying to list everything here, we ask that you contact
your dealer in the area where you will be parking
your vehicle. The dealer can give you the best advice
for that particular area.
2-24
Page 109 of 416

Mirrors
Manual Rearview Mirror
While sitting in a comfortable driving position, adjust the
mirror so you can see clearly behind your vehicle.
Grip the mirror in the center to move it up or down and
side to side. The control at the bottom of the mirror
is the day/night feature that allows adjustment to
the mirror so that the glare of headlamps from behind is
reduced. Push the control for daytime use; pull it for
night use.
Automatic Dimming Rearview Mirror
The vehicle may have an automatic dimming rearview
mirror. It may also have OnStar®controls. SeeOnStar®
System on page 2-38for more information.
At night, when glare from lights is high, the mirror will
gradually darken. This change may take a few seconds.
The mirror will return to its clear daytime state when
glare is reduced.
Mirror Operation
AUTO:Press this button to turn on the automatic
dimming feature.
OFF:Press this button to turn off the automatic
dimming feature.
O(On/Off):For mirrors equipped with OnStar®
controls, press this button to turn the automatic dimming
feature on or off.
The indicator light will be illuminated when this
feature is on.
Automatic Dimming Rearview Mirror
with Compass
Your vehicle may have an automatic dimming rearview
mirror with a compass. It may also have OnStar®
controls. SeeOnStar®System on page 2-38for more
information.
When cleaning the mirror, use a paper towel or similar
material dampened with glass cleaner. Do not spray
glass cleaner directly on the mirror as that may cause
the liquid cleaner to enter the mirror housing.
2-33
Page 113 of 416

Outside Convex Mirror
The passenger’s side mirror is convex. A convex
mirror’s surface is curved so more can be seen from the
driver’s seat.
{CAUTION:
A convex mirror can make things (like other
vehicles) look farther away than they really are.
If you cut too sharply into the right lane, you
could hit a vehicle on your right. Check your
inside mirror or glance over your shoulder
before changing lanes.
Outside Automatic Dimming
Heated Mirror
If you have this feature, the outside driver’s mirror will
adjust for the glare of headlamps behind you.
When you operate the rear window defogger, the
heated driver’s and passenger’s outside rearview mirrors
are warmed to help clear them of ice and snow. See
“Rear Window Defogger” underClimate Control System
on page 3-23orDual Automatic Climate Control
System on page 3-26for more information.
Your vehicle may also have a turn signal indicator on
the mirror. An arrow on the outside rearview mirror
will �ash in the direction of the turn or lane change. See
Turn and Lane-Change Signals on page 3-7for more
information.
2-37
Page 125 of 416
Instrument Panel Overview...............................3-4
Hazard Warning Flashers................................3-6
Other Warning Devices...................................3-6
Horn .............................................................3-6
Tilt Wheel.....................................................3-6
Turn Signal/Multifunction Lever.........................3-7
Turn and Lane-Change Signals........................3-7
Headlamp High/Low-Beam Changer..................3-8
Flash-to-Pass.................................................3-8
Windshield Wipers..........................................3-8
Rainsense™ II Wipers.....................................3-9
Windshield Washer.......................................3-10
Cruise Control..............................................3-11
Exterior Lamps.............................................3-14
Wiper Activated Headlamps............................3-15
Headlamps on Reminder................................3-15
Daytime Running Lamps (DRL).......................3-15
Fog Lamps ..................................................3-16
Cornering Lamps..........................................3-16
Exterior Lighting Battery Saver........................3-16
Instrument Panel Brightness...........................3-16
Courtesy Lamps...........................................3-17
Entry Lighting...............................................3-17
Delayed Entry Lighting...................................3-17
Theater Dimming..........................................3-17
Delayed Exit Lighting.....................................3-17Perimeter Lighting.........................................3-17
Front Reading Lamps....................................3-18
Battery Load Management.............................3-18
Inadvertent Power Battery Saver.....................3-18
Ultrasonic Rear Parking Assist (URPA)............3-18
Accessory Power Outlet(s).............................3-21
Ashtray(s) and Cigarette Lighter......................3-22
Climate Controls............................................3-23
Climate Control System.................................3-23
Dual Automatic Climate Control System...........3-26
Outlet Adjustment.........................................3-31
Passenger Compartment Air Filter...................3-31
Warning Lights, Gages, and Indicators............3-33
Instrument Panel Cluster................................3-34
Speedometer and Odometer...........................3-35
Trip Odometer..............................................3-35
Tachometer.................................................3-35
Safety Belt Reminder Light.............................3-35
Passenger Safety Belt Reminder Light.............3-36
Airbag Readiness Light..................................3-36
Passenger Airbag Status Indicator...................3-37
Charging System Light..................................3-39
Brake System Warning Light..........................3-40
Anti-Lock Brake System Warning Light.............3-41
Traction Control System (TCS) Warning Light . . .3-41
Section 3 Instrument Panel
3-1
Page 131 of 416
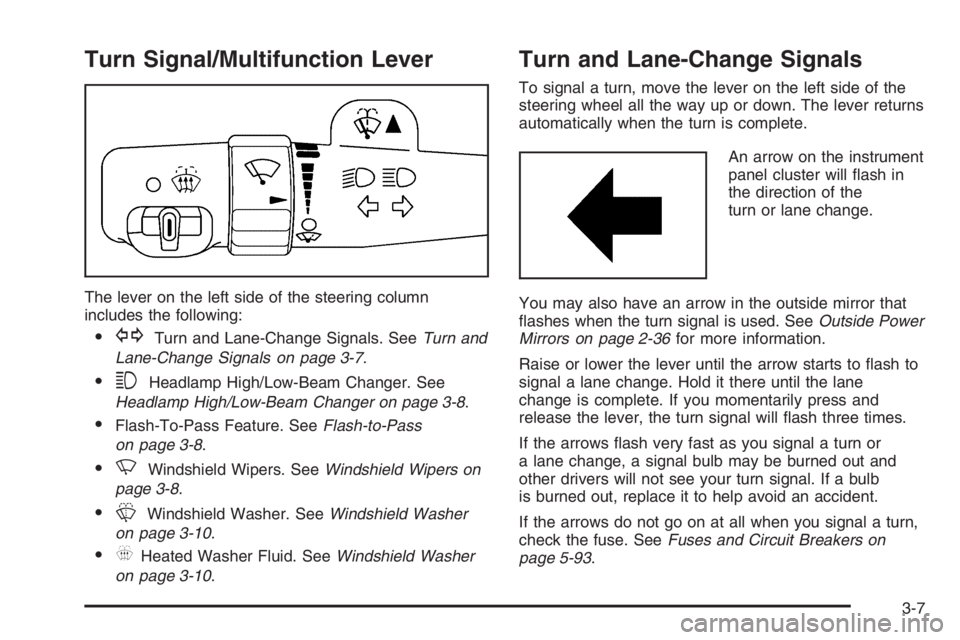
Turn Signal/Multifunction Lever
The lever on the left side of the steering column
includes the following:
GTurn and Lane-Change Signals. SeeTurn and
Lane-Change Signals on page 3-7.
3Headlamp High/Low-Beam Changer. See
Headlamp High/Low-Beam Changer on page 3-8.
Flash-To-Pass Feature. SeeFlash-to-Pass
on page 3-8.
NWindshield Wipers. SeeWindshield Wipers on
page 3-8.
LWindshield Washer. SeeWindshield Washer
on page 3-10.
_Heated Washer Fluid. SeeWindshield Washer
on page 3-10.
Turn and Lane-Change Signals
To signal a turn, move the lever on the left side of the
steering wheel all the way up or down. The lever returns
automatically when the turn is complete.
An arrow on the instrument
panel cluster will �ash in
the direction of the
turn or lane change.
You may also have an arrow in the outside mirror that
�ashes when the turn signal is used. SeeOutside Power
Mirrors on page 2-36for more information.
Raise or lower the lever until the arrow starts to �ash to
signal a lane change. Hold it there until the lane
change is complete. If you momentarily press and
release the lever, the turn signal will �ash three times.
If the arrows �ash very fast as you signal a turn or
a lane change, a signal bulb may be burned out and
other drivers will not see your turn signal. If a bulb
is burned out, replace it to help avoid an accident.
If the arrows do not go on at all when you signal a turn,
check the fuse. SeeFuses and Circuit Breakers on
page 5-93.
3-7
Page 132 of 416

Turn Signal On Chime
If your turn signal is left on for more than 0.8 miles
(1.3 km), a chime will sound at each �ash of the turn
signal. To turn off the chime, move the turn signal lever
to the off position.
Headlamp High/Low-Beam Changer
To change the headlamps from low beam to high
beam, push the turn signal lever away from you. To
change from high beam to low beam, pull the turn signal
lever toward you.
While the high beams are
on, this light located on the
instrument panel cluster
will also be on.
Flash-to-Pass
This feature lets you use the high-beam headlamps to
signal the driver in front of you that you want to pass.
It works even if your headlamps are off.
Pull the turn signal lever toward you brie�y to �ash-to-pass.
If the headlamps are off or on low beam, the high-beam
headlamps will turn on. They will stay on as long as
you hold the lever toward you and the high-beam
indicator on the instrument panel cluster will come on.
Windshield Wipers
You control the windshield wipers by turning the band
with the wiper symbol on it.
8(Mist):For a single wiping cycle, turn the band to
mist. Hold it there until the wipers start. Then let go.
The wipers will stop after one wipe. If you want
more wipes, hold the band on mist longer.
N(Delay):You can set the wiper speed for a long or
short delay between wipes. This can be very useful
in light rain or snow. Turn the band to choose the delay
time. The closer to the top of the lever, the shorter
the delay.
6(Low Speed):For steady wiping at low speed,
turn the band away from you to the �rst solid band past
the delay settings.
1(High Speed):For high-speed wiping, turn the
band further, to the second solid band past the
delay settings.
9(Off):To stop the wipers, move the band to off.
3-8
Page 133 of 416

Be sure to clear ice and snow from the wiper blades
before using them. If they are frozen to the windshield,
carefully loosen or thaw them. If your blades do
become worn or damaged, replace with new blades or
blade inserts.
Heavy snow or ice can overload the wiper motor.
A circuit breaker will stop the motor until it cools.
Clear away snow or ice to prevent an overload.
Your vehicle is equipped with wiper-activated
headlamps. After the windshield wipers have been on
for approximately six seconds, the headlamps will
automatically turn on. SeeWiper Activated Headlamps
on page 3-15for more information.
Rainsense™ II Wipers
If your vehicle has this feature, the moisture sensor
is mounted on the interior of the windshield beside the
rearview mirror and is used to automatically operate
the wipers. This system operates by monitoring
the amount of moisture build-up on the windshield.
Wipes occur as needed to clear the windshield
depending on the driving conditions and the sensitivity
setting. In light rain or snow, fewer wipes will occur.
In heavy rain or snow, wipes will occur more frequently.The system will operate in the delay, low speed and
high speed modes. If the system is left on for long
periods of time, occasional wipes may occur without
any moisture on the windshield. This is normal and
indicates that the Rainsense™ system is active.
The Rainsense™ system is activated by turning the
wiper control band to one of the �ve sensitivity levels
within the delay area. The delay position closest to
9(off) is the lowest sensitivity setting, level one.
The highest sensitivity setting, level �ve, is closest to
6(low). A single wipe will occur each time you turn
the wiper control band to a higher sensitivity level to
indicate that the sensitivity level has been increased.
Notice:Going through an automatic car wash with
the wipers on can damage them. Turn the wipers
off when going through an automatic car wash.
The MIST and wash cycles operate as normal and are
not affected by the Rainsense™ function. The system
can be overridden at any time by manually changing the
wiper control to
6(low) or1(high) speed.
Notice:Do not place stickers or other items on the
exterior glass surface directly in front of the rain
sensor. Doing this could cause the rain sensor
to malfunction.
3-9
Page 138 of 416
Exterior Lamps
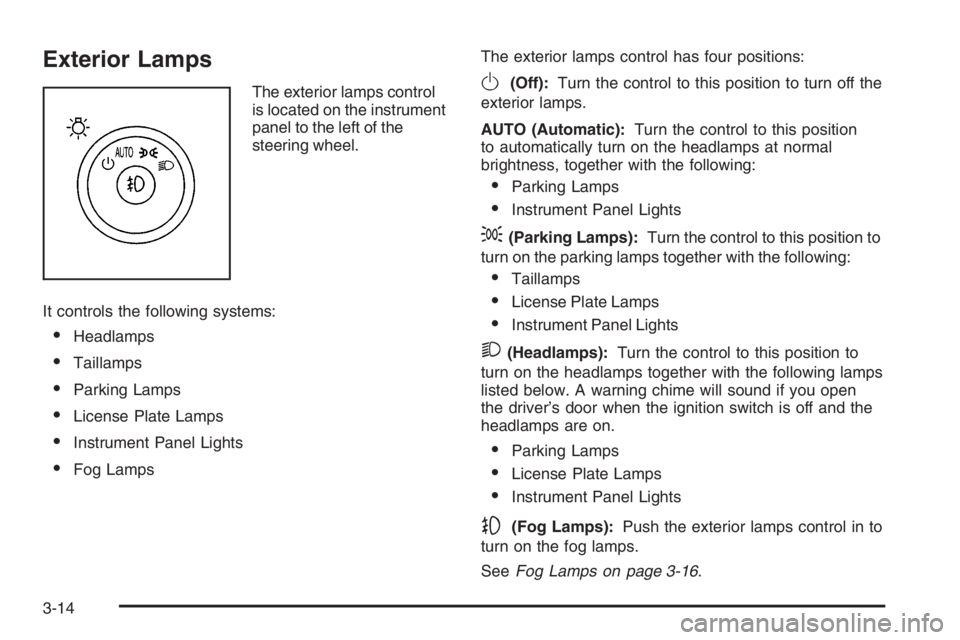
The exterior lamps control
is located on the instrument
panel to the left of the
steering wheel.
It controls the following systems:
Headlamps
Taillamps
Parking Lamps
License Plate Lamps
Instrument Panel Lights
Fog LampsThe exterior lamps control has four positions:
O(Off):Turn the control to this position to turn off the
exterior lamps.
AUTO (Automatic):Turn the control to this position
to automatically turn on the headlamps at normal
brightness, together with the following:
Parking Lamps
Instrument Panel Lights
;(Parking Lamps):Turn the control to this position to
turn on the parking lamps together with the following:
Taillamps
License Plate Lamps
Instrument Panel Lights
2(Headlamps):Turn the control to this position to
turn on the headlamps together with the following lamps
listed below. A warning chime will sound if you open
the driver’s door when the ignition switch is off and the
headlamps are on.
Parking Lamps
License Plate Lamps
Instrument Panel Lights
-(Fog Lamps):Push the exterior lamps control in to
turn on the fog lamps.
SeeFog Lamps on page 3-16.
3-14
Page 139 of 416
Wiper Activated Headlamps
This feature turns on the low-beam headlamps,
instrument panel cluster backlighting and taillamps
when the windshield wipers have been in use for about
six seconds.
If the wiper activated headlamps are on and the ignition
switch is turned to C (RUN), the wiper activated
headlamps will continue. When you turn the key to
A (OFF), the wiper activated headlamps will immediately
turn off. The wiper activated headlamps will also turn
off if you turn off the windshield wipers.
Headlamps on Reminder
If you leave the exterior lamp buttons for the headlamps
or parking lamps on, remove the key from the ignition
and open the driver’s door, you will hear a continuous
warning chime. The chime will turn off when the lamps
are turned off.
Daytime Running Lamps (DRL)
Daytime Running Lamps (DRL) can make it easier for
others to see the front of your vehicle during the
day. DRL can be helpful in many different driving
conditions, but they can be especially helpful in the short
periods after dawn and before sunset. Fully functional
daytime running lamps are required on all vehicles
�rst sold in Canada.A light sensor on top of the instrument panel monitors
the exterior light level for the operation of DRL, so
be sure it is not covered.
The DRL system will make your low-beam headlamps
turn on at reduced brightness in daylight when the
following conditions are met:
The ignition is on.
The exterior lamp button for the headlamps is off.
The automatic transaxle is not in PARK (P).
When the DRL are on, only your low-beam headlamps
will be on. The parking lamps, taillamps, sidemarker
and other lamps will not be on.
When it is dark enough outside, your low-beam
headlamps will come on. The other lamps that turn on
with your headlamps will also turn on. When it is
bright enough outside, the regular lamps will go off, and
your low-beam headlamps change to the reduced
brightness of DRL.
To turn off all exterior lighting at night when you are
parked, turn the exterior lamp control to the off position.
The exterior lamps will turn back on automatically
when you move the transaxle out of PARK (P).
SeeExterior Lamps on page 3-14for more information.
As with any vehicle, you should turn on the regular
headlamp system when you need it.
3-15