steering BUICK LUCERNE 2007 Get To Know Guide
[x] Cancel search | Manufacturer: BUICK, Model Year: 2007, Model line: LUCERNE, Model: BUICK LUCERNE 2007Pages: 20, PDF Size: 0.45 MB
Page 1 of 20
DRIVER INFORMATION
Instrument Panel . . . . . . . . . . . . . . . . . . . . . . . . . .2
Instrument Panel Cluster . . . . . . . . . . . . . . . . . . .3
Driver Information Center . . . . . . . . . . . . . . . . . . .4
SAFETY & SECURITY
Remote Vehicle Start . . . . . . . . . . . . . . . . . . . . . . .5
Remote Keyless Entry . . . . . . . . . . . . . . . . . . . . . .5
Passenger Air Bag Status Indicator . . . . . . . . . .6OnStar
® . . . . . . . . . . . . . . . . . . . . . . . . . . . . . . . . . .6
COMFORT
Power Seat Controls . . . . . . . . . . . . . . . . . . . . . . . .7Memory Settings . . . . . . . . . . . . . . . . . . . . . . . . . . .8
Heated and Cooled Seats . . . . . . . . . . . . . . . . . . . .8
Dual�Zone Climate Controls . . . . . . . . . . . . . . . . .10
ENTERTAINMENT
Audio System Features . . . . . . . . . . . . . . . . . . . .12
Multiple�Disc CD Player . . . . . . . . . . . . . . . . . . . .14
XM Satellite Radio . . . . . . . . . . . . . . . . . . . . . . . . .14
Touch Screen Navigation
Entertainment System . . . . . . . . . . . . . . . . . . . . . .14CONVENIENCE
Cruise Control . . . . . . . . . . . . . . . . . . . . . . . . . . . .15
Audio Steering Wheel Controls . . . . . . . . . . . . . .15
Exterior Lamps . . . . . . . . . . . . . . . . . . . . . . . . . . .16
Ultrasonic Rear Park Assist . . . . . . . . . . . . . . . . .16
Rainsense™ II Windshield Wipers . . . . . . . . . . . .17
Heated Washer Fluid . . . . . . . . . . . . . . . . . . . . . . .17
PERFORMANCE & MAINTENANCE
StabiliTrak – Stability Control System . . . . . . . .18
Traction Control . . . . . . . . . . . . . . . . . . . . . . . . . . .18
Brake Assist . . . . . . . . . . . . . . . . . . . . . . . . . . . . . .18Magnetic Ride Control . . . . . . . . . . . . . . . . . . . . .18
Tire Pressure Monitor . . . . . . . . . . . . . . . . . . . . . .19
Resetting the Engine Oil Life System . . . . . . . . .19
Recommended Fuel . . . . . . . . . . . . . . . . . . . . . . .19
OWNER INFORMATION
Roadside Assistance . . . . . . . . . . . . . . . . . . . . . .20
My GMLink . . . . . . . . . . . . . . . . . . . . . . . . . . . . . . .20
Congratulations on your purchase of a Buick Lucerne. Please read this information about your vehicle’s features and
your Owner Manual to ensure an outstanding ownership experience. Note that your vehicle may not include all thefeatures described in this booklet. Keep this booklet with your Owner Manual for easy reference.
Page 2 of 20
Getting to Know YourLucerne2
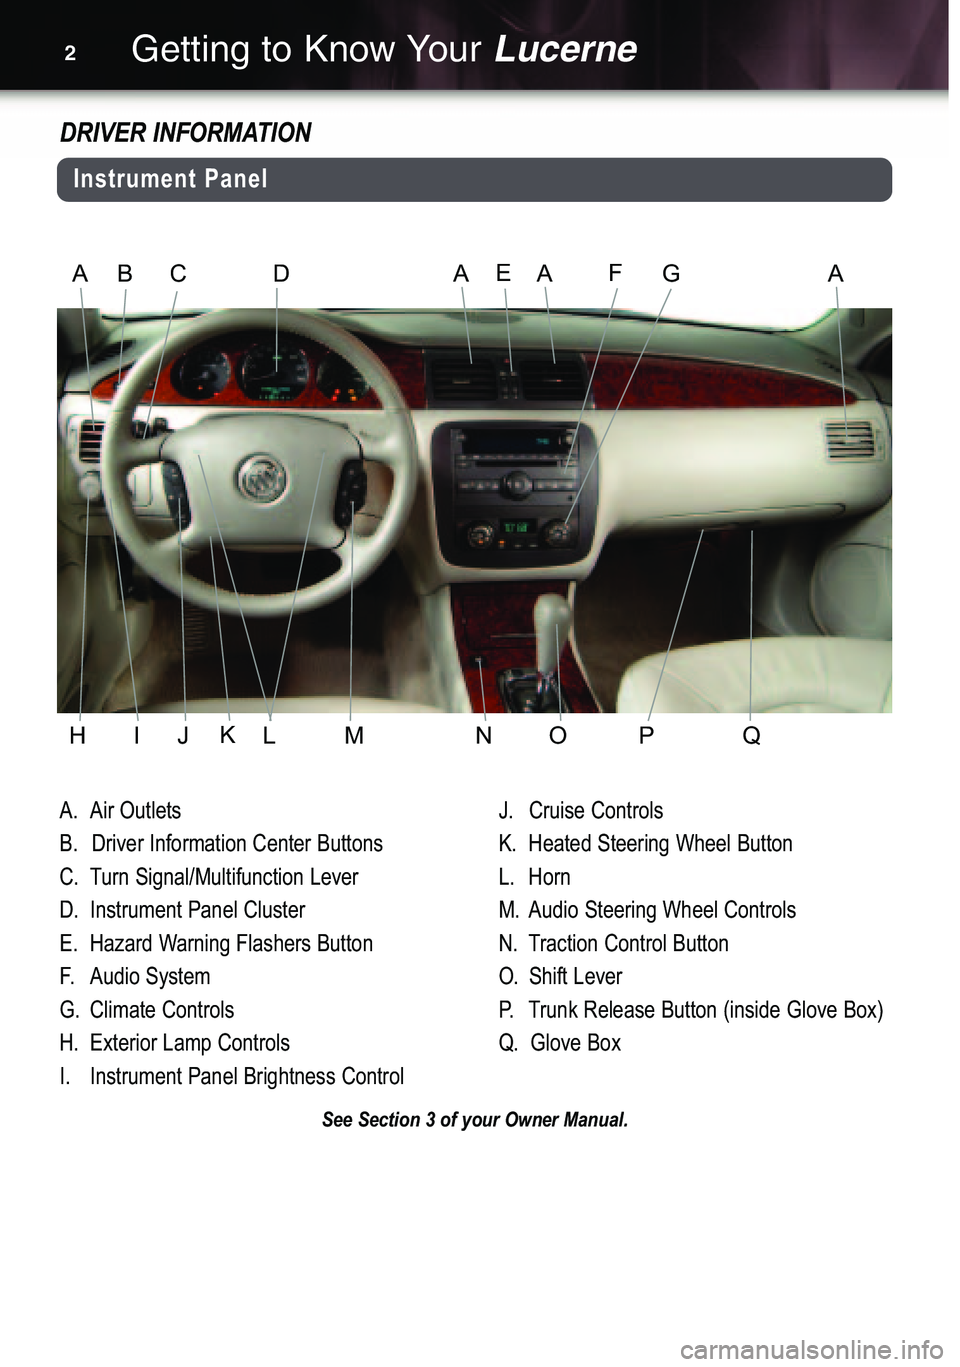
A.Air Outlets
B. Driver Information Center Buttons
C. Turn Signal/Multifunction Lever
D. Instrument Panel Cluster
E. Hazard Warning Flashers Button
F.Audio System
G. Climate Controls
H. Exterior Lamp Controls
I. Instrument Panel Brightness ControlJ.Cruise Controls
K. Heated Steering Wheel Button
L. Horn
M. Audio Steering Wheel Controls
N. Traction Control Button
O.Shift Lever
P. Trunk Release Button (inside Glove Box)
Q. Glove Box
See Section 3 of your Owner Manual.
AB
HIJLMNOPQ C
AAADEFG
DRIVER INFORMATION
K
Instrument Panel
Page 4 of 20
• Trip A and Trip B
• Fuel Range (until empty)
• Average Fuel Economy
• Instantaneous
Fuel Economy
• Average Speed
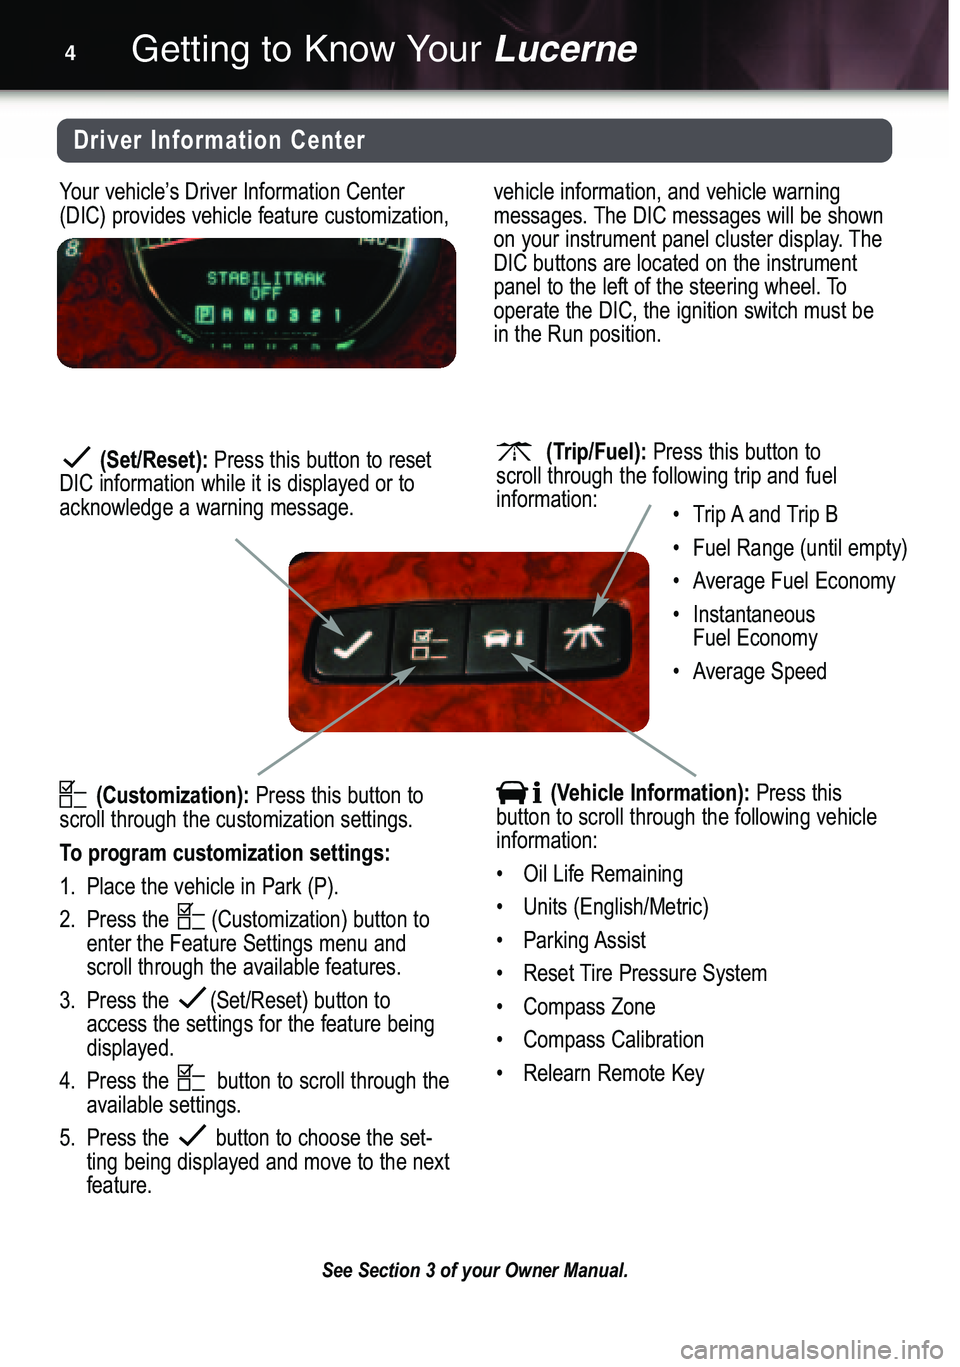
(Trip/Fuel):Press this button to
scroll through the following trip and fuelinformation:(Set/Reset):Press this button to reset
DIC information while it is displayed or toacknowledge a warning message.
Getting to Know YourLucerne4
Your vehicle’s Driver Information Center
(DIC) provides vehicle feature customization,vehicle information, and vehicle warning
messages. The DIC messages will be shown
on your instrument panel cluster display. TheDIC buttons are located on the instrument
panel to the left of the steering wheel. Tooperate the DIC, the ignition switch must bein the Run position.
See Section 3 of your Owner Manual.
(Vehicle Information):Press this
button to scroll through the following vehicleinformation:
• Oil Life Remaining
• Units (English/Metric)(Customization):Press this button to
scroll through the customization settings.
To program customization settings:
1. Place the vehicle in Park (P).
2. Press the (Customization) button to
enter the Feature Settings menu andscroll through the available features.
3. Press the (Set/Reset) button to
access the settings for the feature beingdisplayed.
4. Press the button to scroll through the
available settings.
5.Press the button to choose the set�
ting being displayed and move to the nextfeature.
Driver Information Center
Page 8 of 20
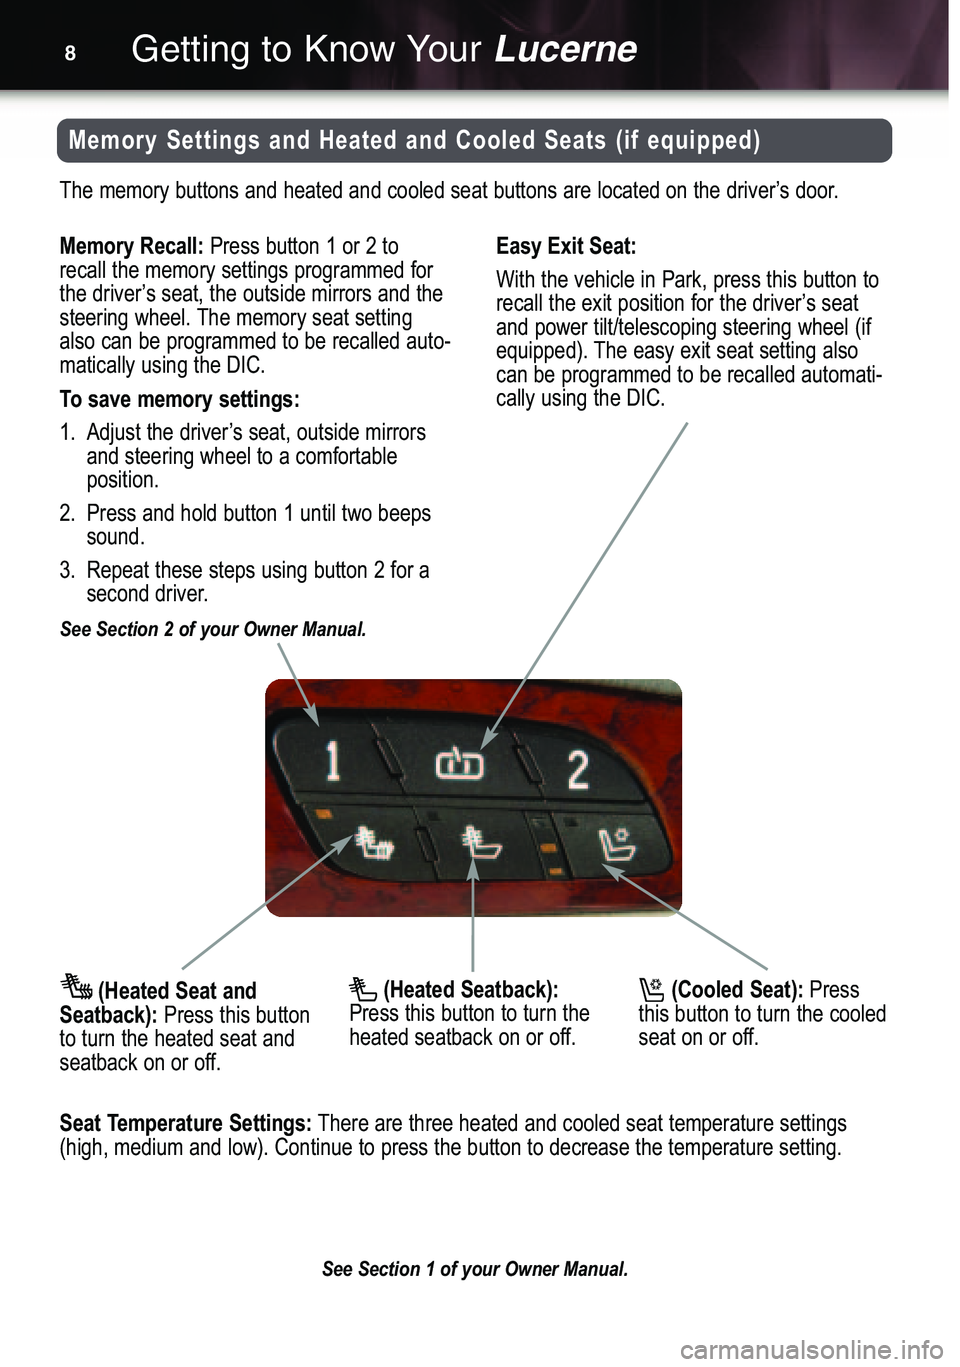
(Cooled Seat):Press
this button to turn the cooledseat on or off.
Getting to Know YourLucerne8
(Heated Seat and
Seatback):Press this button
to turn the heated seat andseatback on or off.
The memory buttons and heated and cooled seat buttons are located on the driver’s door.
See Section 1 of your Owner Manual.
Memory Settings and Heated and Cooled Seats (if equipped)
Memory Recall: Press button 1 or 2 to
recall the memory settings programmed for
the driver’s seat, the outside mirrors and the
steering wheel. The memory seat setting
also can be programmed to be recalled auto�matically using the DIC.
To save memory settings:
1. Adjust the driver’s seat, outside mirrors
and steering wheel to a comfortable position.
2. Press and hold button 1 until two beeps
sound.
3. Repeat these steps using button 2 for a
second driver.
See Section 2 of your Owner Manual.
Easy Exit Seat:
With the vehicle in Park, press this button to
recall the exit position for the driver’s seatand power tilt/telescoping steering wheel (if
equipped). The easy exit seat setting also
can be programmed to be recalled automati�cally using the DIC.
Seat Temperature Settings:There are three heated and cooled seat temperature settings
(high, medium and low). Continue to press the button to decrease the temperature setting.
(Heated Seatback):Press this button to turn the
heated seatback on or off.
Page 15 of 20

(Next): Press the up arrow to go to the next preset
radio station or, when a CD is playing, to the next track.
+ (Volume): Press the plus button to increase the volume.
SRCE (Source): Press this button to switch to AM, FM,
XM (if equipped) or CD operation.
(Voice Recognition/ Mute): Press this button to
interact with the OnStar system. Without OnStar, press
this button to mute the audio system. Press it again to
turnon the sound.
(Seek): Press the seek arrow to go to the next radio
station or, when a CD is playing, to the next track.
Press and hold the seek arrow for two seconds to scan
radio stations in the selected band or, when a CD isplaying, the tracks of the CD.
– (Volume): Press the minus button to decrease the
volume.
(Previous): Press the down arrow to go to the previ�
ous preset radio station or, when a CD is playing, to the
previous track.
+ RES (Resume/Accelerate): Press this button to resume a
set speed, or to increase the speed when the system is set.
(Cancel): Press this button to cancel the cruise control
but retain the set speed in memory. Applying the brakes willalso cancel the cruise control.
(On/Off):Press this button to turn the cruise control on
or off.
– SET (Set): Press this button to set a speed, or to decrease
the speed when the system is set. When the cruise control isset, the cruise light will illuminate on the instrument panel
cluster.
CONVENIENCE
Cruise Control and Audio Steering Wheel Controls
15
See Section 3 of your Owner Manual.
The cruise control buttons and some audio controls are located on the steering wheel.
Page 17 of 20
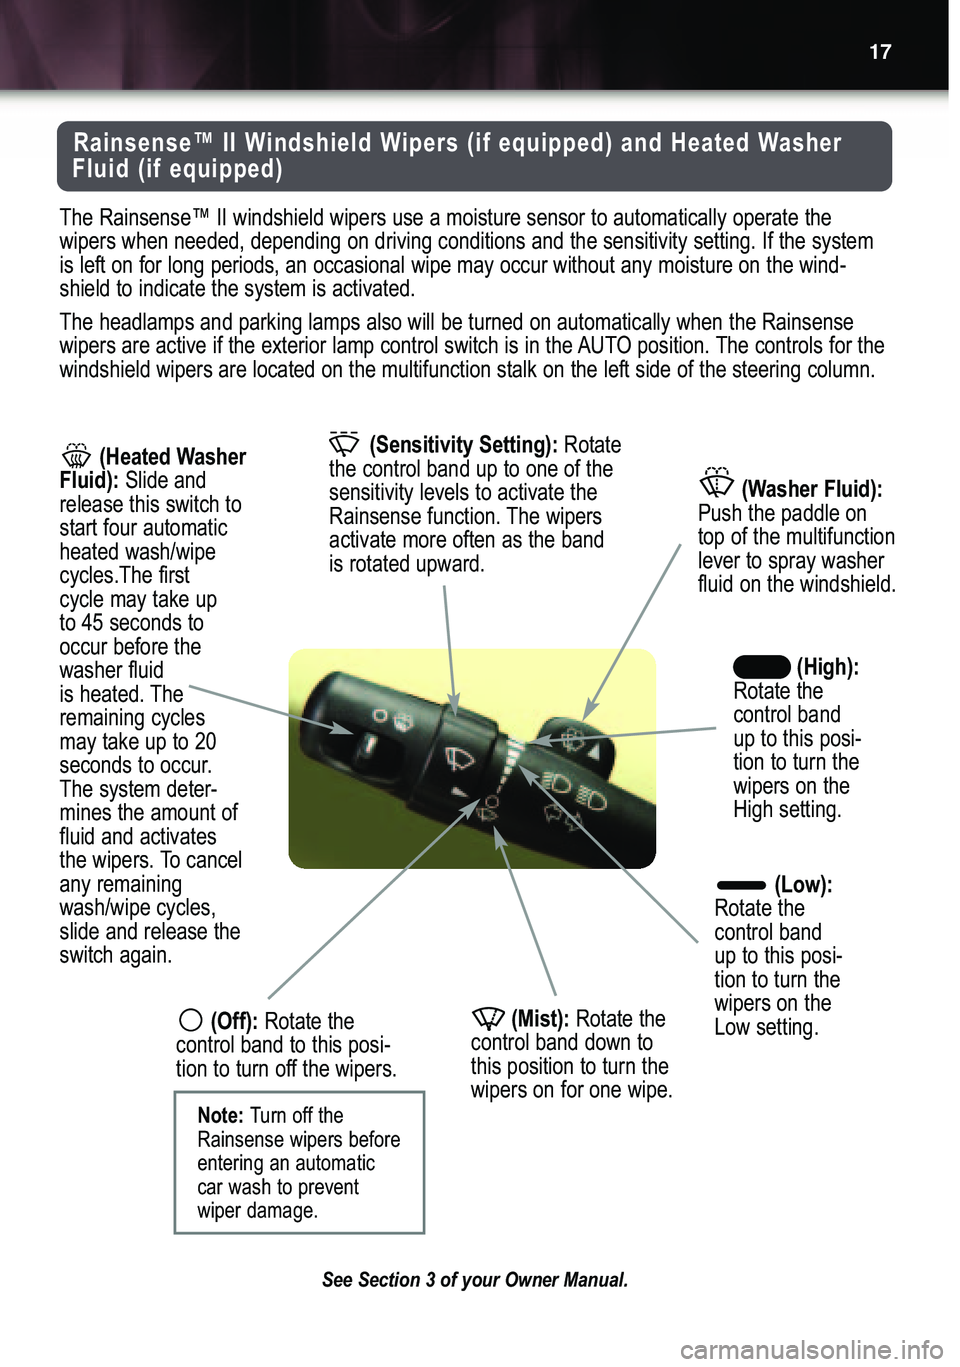
The Rainsense™ II windshield wipers use a moisture sensor to automatically operate the
wipers when needed, depending on driving conditions and the sensitivity setting. If the system
is left on for long periods, an occasional wipe may occur without any moisture on the wind�shield to indicate the system is activated.
The headlamps and parking lamps also will be turned on automatically when the Rainsense
wipers are active if the exterior lamp control switch is in the AUTO position. The controls for thewindshield wipers are located on the multifunction stalk on the left side of the steering column.
Rainsense™ II Windshield Wipers (if equipped) and Heated Washer
Fluid (if equipped)
(Washer Fluid):Push the paddle on
top of the multifunction lever to spray washerfluid on the windshield.
(Sensitivity Setting): Rotate
the control band up to one of thesensitivity levels to activate the
Rainsense function. The wipersactivate more often as the bandis rotated upward.
(High):Rotate the
control band
up to this posi�tion to turn thewipers on the High setting.
17
(Heated Washer
Fluid): Slide and
release this switch tostart four automaticheated wash/wipecycles.The first cycle may take up to 45 seconds tooccur before thewasher fluid
is heated. Theremaining cycles
may take up to 20
seconds to occur.
The system deter�mines the amount offluid and activates
the wipers. To cancelany remainingwash/wipe cycles,slide and release theswitch again.
(Low):Rotate the
control band
up to this posi�tion to turn thewipers on the Low setting.
(Off):Rotate the
control band to this posi�
tion to turn off the wipers.(Mist):Rotate the
control band down tothis position to turn thewipers on for one wipe.
See Section 3 of your Owner Manual.
Note: Turn off the
Rainsense wipers beforeentering an automaticcar wash to preventwiper damage.
Page 18 of 20

StabiliTrak®is an advanced computer�
controlled vehicle stability enhancementsystem that assists with directional control
of the vehicle in difficult driving conditions.
It turns on automatically every time you startyour vehicle.
When the system senses a discrepancy
between your intended path and the directionthe vehicle is actually traveling, it selectivelyapplies brake pressure at any one of thewheels to help steer the vehicle in the direction in which you are steering.
See Section 4 of your Owner Manual.
StabiliTrak®– Stability Control
System (if equipped)
Getting to Know YourLucerne18
The brake assist system monitors the inten�
tion of the driver while braking. If the systemsenses that hard/fast pressure has beenapplied to the brake pedal, the system will
generate additional pressure, making it easi�er to maintain brake application. When thishappens, the brake pedal may feel easier to
push. This is normal; just hold the brake
pedal down firmly.
See Section 4 of your Owner Manual.
Brake Assist (if equipped)PERFORMANCE & MAINTENANCE
Magnetic Ride Control automatically adjusts
the ride of your vehicle through a computerused to control and monitor the suspension
system. The computer receives input from
various sensors to determine the proper sys�tem response. This provides enhanced con�
trol and ride comfort under a variety of roadconditions.
See Section 4 of your Owner Manual.
Magnetic Ride Control
(if equipped)
The traction control system limits wheelspin,
which is especially useful in slippery road
conditions. You should always leave the sys�
tem on. However, if your vehicle becomesstuck and rocking the vehicle is required, the
system should be turned off.
To turn off the system, press the traction
control button located on the center console.For vehicles without a center console, thebutton is located at the end of the gearshift
lever.
See Section 4 of your Owner Manual.
Traction Control