display BUICK LUCERNE 2010 Owner's Manual
[x] Cancel search | Manufacturer: BUICK, Model Year: 2010, Model line: LUCERNE, Model: BUICK LUCERNE 2010Pages: 474
Page 9 of 474

A.Outlet Adjustment on page 4‑27.
B. DIC Operation and Displays
on page 4‑47(If Equipped).
C. Turn Signal/Multifunction Lever on page 4‑5.
D. Instrument Panel Cluster on page 4‑30.
E. Hazard Warning Flashers on page 4‑3.
F. Audio System(s) on page 4‑74.
G. Exterior Lamps on page 4‑12.
H. Trunk Release. See Trunk on page 3‑12.
I. Instrument Panel Brightness on page 4‑14.
J. Hood Release on page 6‑13.
K. Lane Departure Warning (LDW)
on page 3‑42(If Equipped). L.
Cruise Control
on page 4‑9.Heated Steering
Wheelon page 4‑4(If Equipped).
M. Parking Brake on page 3‑26.
N. Audio Steering Wheel Controls
on page 4‑105(If Equipped).
O. Climate Control System
on page 4‑18orDual
Automatic Climate Control System on page 4‑22.
P. Traction Control System (TCS)
on page 5‑6and
StabiliTrak®System on page 5‑6.
Q. Front Storage Area on page 3‑51.
R. Shift Lever. See Automatic Transmission Operation
on page 3‑24.
S. Accessory Power Outlet(s) on page 4‑17.
T. Glove Box on page 3‑51.
1-3
Page 20 of 474
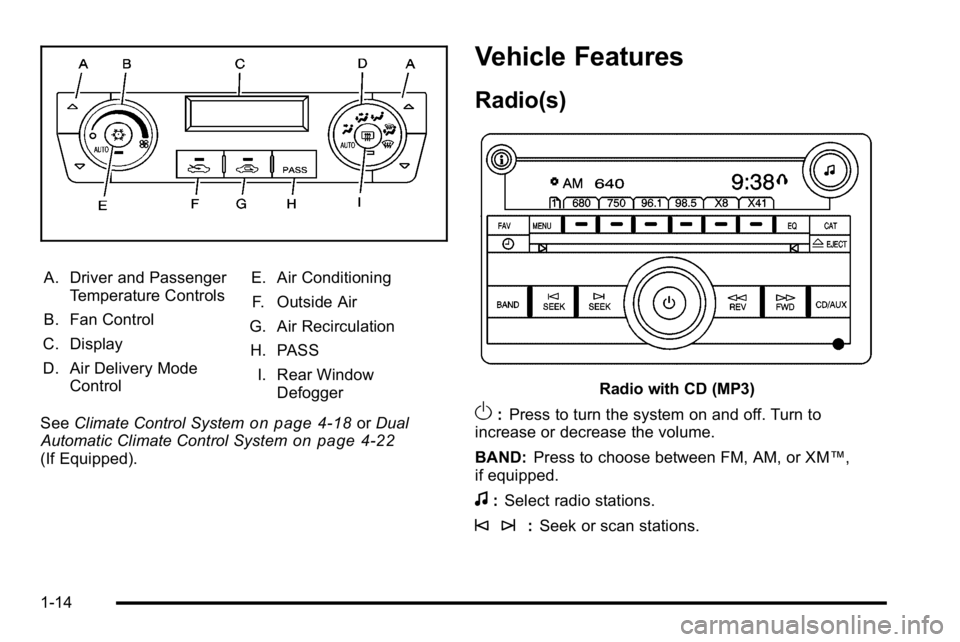
A. Driver and PassengerTemperature Controls
B. Fan Control
C. Display
D. Air Delivery Mode Control E. Air Conditioning
F. Outside Air
G. Air Recirculation
H. PASS I. Rear Window Defogger
See Climate Control System
on page 4‑18orDual
Automatic Climate Control Systemon page 4‑22(If Equipped).
Vehicle Features
Radio(s)
Radio with CD (MP3)
O: Press to turn the system on and off. Turn to
increase or decrease the volume.
BAND: Press to choose between FM, AM, or XM™,
if equipped.
f: Select radio stations.
© ¨: Seek or scan stations.
1-14
Page 21 of 474
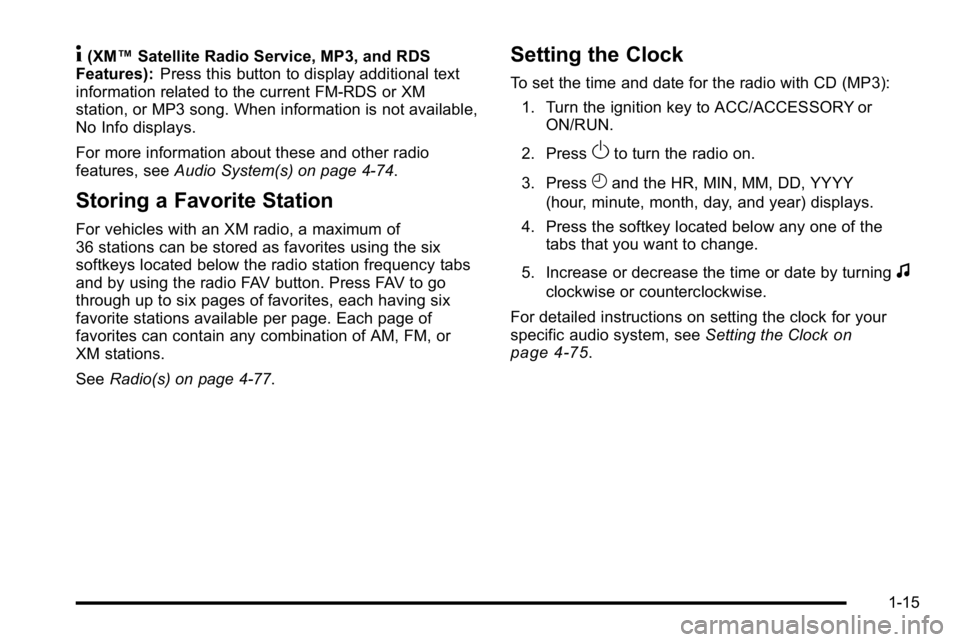
4(XM™Satellite Radio Service, MP3, and RDS
Features): Press this button to display additional text
information related to the current FM-RDS or XM
station, or MP3 song. When information is not available,
No Info displays.
For more information about these and other radio
features, see Audio System(s) on page 4‑74.
Storing a Favorite Station
For vehicles with an XM radio, a maximum of
36 stations can be stored as favorites using the six
softkeys located below the radio station frequency tabs
and by using the radio FAV button. Press FAV to go
through up to six pages of favorites, each having six
favorite stations available per page. Each page of
favorites can contain any combination of AM, FM, or
XM stations.
SeeRadio(s) on page 4‑77.
Setting the Clock
To set the time and date for the radio with CD (MP3):
1. Turn the ignition key to ACC/ACCESSORY or ON/RUN.
2. Press
Oto turn the radio on.
3. Press
Hand the HR, MIN, MM, DD, YYYY
(hour, minute, month, day, and year) displays.
4. Press the softkey located below any one of the tabs that you want to change.
5. Increase or decrease the time or date by turning
f
clockwise or counterclockwise.
For detailed instructions on setting the clock for your
specific audio system, see Setting the Clock
on
page 4‑75.
1-15
Page 24 of 474
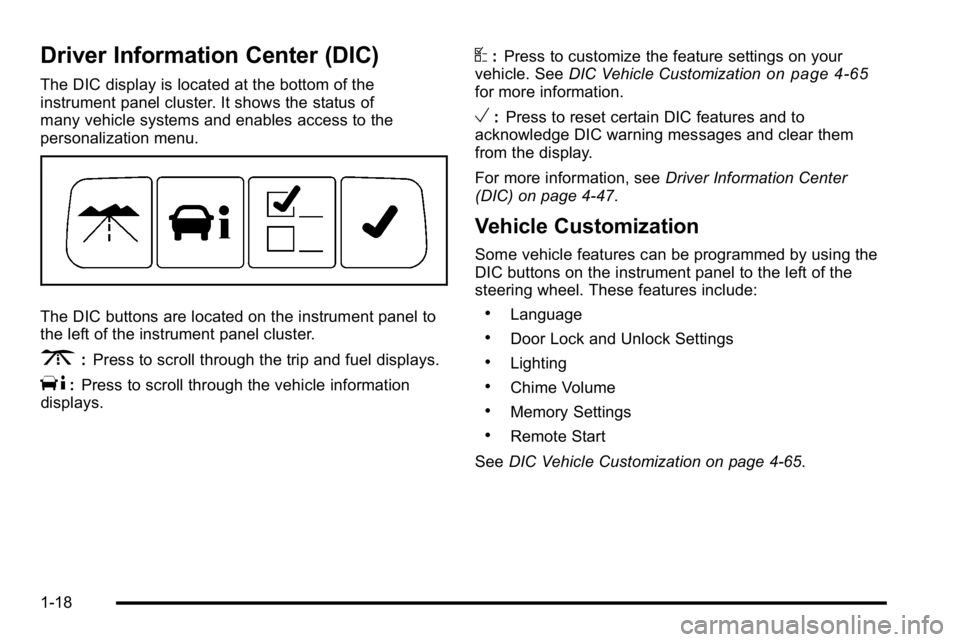
Driver Information Center (DIC)
The DIC display is located at the bottom of the
instrument panel cluster. It shows the status of
many vehicle systems and enables access to the
personalization menu.
The DIC buttons are located on the instrument panel to
the left of the instrument panel cluster.
3:Press to scroll through the trip and fuel displays.
T:Press to scroll through the vehicle information
displays.
U: Press to customize the feature settings on your
vehicle. See DIC Vehicle Customizationon page 4‑65for more information.
V:Press to reset certain DIC features and to
acknowledge DIC warning messages and clear them
from the display.
For more information, see Driver Information Center
(DIC) on page 4‑47.
Vehicle Customization
Some vehicle features can be programmed by using the
DIC buttons on the instrument panel to the left of the
steering wheel. These features include:
.Language
.Door Lock and Unlock Settings
.Lighting
.Chime Volume
.Memory Settings
.Remote Start
See DIC Vehicle Customization on page 4‑65.
1-18
Page 26 of 474
Side Blind Zone Alert (SBZA)
For vehicles with this feature, it may alert you to
vehicles located in your side blind zone. When the
system detects a vehicle in the side blind zone, an
SBZA display will light up in the corresponding outside
side mirror indicating that it may not be safe to change
lanes.
The system is enabled at every vehicle startup. It can
be disabled through the Driver Information Center (DIC).
If the message SIDE BLIND ZONE SYS.
UNAVAILABLE appears on the DIC, the system
has been disabled because the sensor is blocked
and cannot detect vehicles in the blind zone. The
sensors, located behind the rear quarter panels, may
be blocked by mud, dirt, snow, ice, slush, or even heavy
rainstorms. The vehicle does not need service.
SeeSide Blind Zone Alert (SBZA)
on page 3‑39for
more information.
Ultrasonic Parking Assist
For vehicles with this feature, it uses sensors on the
rear bumper to detect objects while parking the vehicle.
It operates at speeds less than 8 km/h (5 mph) while in
R (Reverse).
Keep the sensors on the vehicle's rear bumper clean to
ensure proper operation.
The system can be disabled through the Driver
Information Center (DIC).
See Ultrasonic Rear Parking Assist (URPA)
on
page 3‑37for more information.
Power Outlets
The accessory power outlets can be used to plug in
electrical equipment, such as a cellular telephone.
The vehicle may have up to three power outlets
depending on the type of front seat installed.
If the vehicle has front bucket seats with a center
console, there are two outlets inside the rear storage
compartment. An extra power outlet can be found
under the climate control system next to the ashtray.
See Accessory Power Outlet(s) on page 4‑17.
1-20
Page 27 of 474

Universal Remote System
The Universal Home Remote System allows for garage
door openers, security systems, and home automation
devices to be programmed to work with these buttons in
the vehicle.
SeeUniversal Home Remote System
on page 3‑44.
Performance and Maintenance
Traction Control System (TCS)
The traction control system limits wheel spin. The
system turns on automatically every time the vehicle is
started.
.To turn off traction control, press and releaseiin
front of the shift lever.
Filluminates and the
appropriate DIC message is displayed. See DIC
Warnings and Messages on page 4‑55.
.Press and release the button again to turn on
traction control.
For more information, see Traction Control System
(TCS) on page 5‑6.
1-21
Page 29 of 474

Tire Sealant and Compressor Kit
This vehicle may come with a jack and spare tire or a
tire sealant and compressor kit. The kit can be used to
seal small punctures in the tread area of the tire.
SeeTire Sealant and Compressor Kit
on page 6‑82for
complete operating information.
Engine Oil Life System
The engine oil life system calculates engine oil life
based on vehicle use and displays a DIC message
when it is necessary to change the engine oil and filter.
The oil life system should be reset to 100% only
following an oil change.
Resetting the Oil Life System
1. Display the OIL LIFE REMAINING on the DIC.
2. Press and hold the SET/RESET button on the DIC for more than five seconds. The oil life will change
to 100%.
See Engine Oil Life System on page 6‑20.
Fuel E85 (85% Ethanol)
Vehicles that have the 3.9L V6 engine (VIN Code M)
have a yellow fuel cap and can use either unleaded
gasoline or ethanol fuel containing up to 85% ethanol
(E85). See Fuel E85 (85% Ethanol)
on page 6‑8.
In all other engines, use only the unleaded gasoline
described under Gasoline Octane on page 6‑6.
Driving for Better Fuel Economy
Driving habits can affect fuel mileage. Here are some
driving tips to get the best fuel economy possible.
.Avoid fast starts and accelerate smoothly.
.Brake gradually and avoid abrupt stops.
.Avoid idling the engine for long periods of time.
.When road and weather conditions are
appropriate, use cruise control, if equipped.
.Always follow posted speed limits or drive more
slowly when conditions require.
.Keep vehicle tires properly inflated.
.Combine several trips into a single trip.
.Replace the vehicle's tires with the same TPC
Spec number molded into the tire's sidewall near
the size.
.Follow recommended scheduled maintenance.
1-23
Page 37 of 474
J(Heated Seat Cushion and Seatback): Press
this button to turn on the heated seat cushion and
seatback.
I (Heated Seatback): Press this button to turn on the
heated seatback.
When either button is pressed, an indicator light on that
button shows that the feature is on.
There are three temperature settings for each feature.
A column of three lights next to the buttons will display
which setting the feature is in: high, medium or low.
Three lights indicate the highest setting, two lights
indicate medium and one light indicates the lowest
setting. When you press a button, the feature will turn on at the
highest setting. Each time you press the button, the
feature will decrease one temperature setting.
To turn the feature off, keep pressing the button until the
display lights turn off.
If your vehicle has remote vehicle start and is started
using the RKE transmitter, the front heated seats will be
turned on to the high setting if it is cold outside. See
“Remote Vehicle Start”
underRemote Keyless Entry
(RKE) System Operation
on page 3‑4. When the key
is inserted into the ignition and the ignition is turned on,
the heated seat feature will turn off. To turn the heated
seat feature back on, press the desired button.
2-5
Page 38 of 474
Heated and Ventilated Seats
On vehicles with heated and ventilated seats, the
ignition must be on to use the feature.
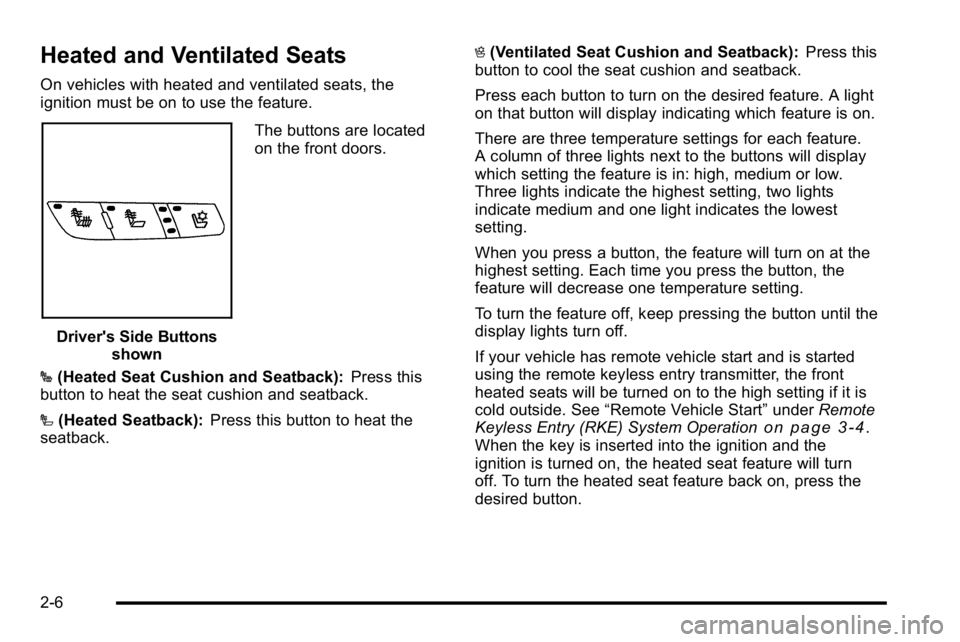
Driver's Side Buttonsshown The buttons are located
on the front doors.
J (Heated Seat Cushion and Seatback): Press this
button to heat the seat cushion and seatback.
I (Heated Seatback): Press this button to heat the
seatback. H
(Ventilated Seat Cushion and Seatback): Press this
button to cool the seat cushion and seatback.
Press each button to turn on the desired feature. A light
on that button will display indicating which feature is on.
There are three temperature settings for each feature.
A column of three lights next to the buttons will display
which setting the feature is in: high, medium or low.
Three lights indicate the highest setting, two lights
indicate medium and one light indicates the lowest
setting.
When you press a button, the feature will turn on at the
highest setting. Each time you press the button, the
feature will decrease one temperature setting.
To turn the feature off, keep pressing the button until the
display lights turn off.
If your vehicle has remote vehicle start and is started
using the remote keyless entry transmitter, the front
heated seats will be turned on to the high setting if it is
cold outside. See “Remote Vehicle Start” underRemote
Keyless Entry (RKE) System Operation
on page 3‑4.
When the key is inserted into the ignition and the
ignition is turned on, the heated seat feature will turn
off. To turn the heated seat feature back on, press the
desired button.
2-6
Page 114 of 474
Programming Transmitters to the
Vehicle
Only RKE transmitters programmed to the vehicle will
work. If a transmitter is lost or stolen, a replacement can
be purchased and programmed through your dealer.
When the replacement transmitter is programmed to
the vehicle, all remaining transmitters must also be
programmed. Any lost or stolen transmitters no longer
work once the new transmitter is programmed. Each
vehicle can have up to eight transmitters programmed
to it. See“Remote Key” underDIC Operation and
Displays on page 4‑47.
Battery Replacement
Replace the battery if the REPLACE BATTERY IN
REMOTE KEY message appears in the DIC. See
“REPLACE BATTERY IN REMOTE KEY” underDIC
Warnings and Messages
on page 4‑55for additional
information.
Notice: When replacing the battery, do not touch
any of the circuitry on the transmitter. Static from
your body could damage the transmitter.
To replace the battery:
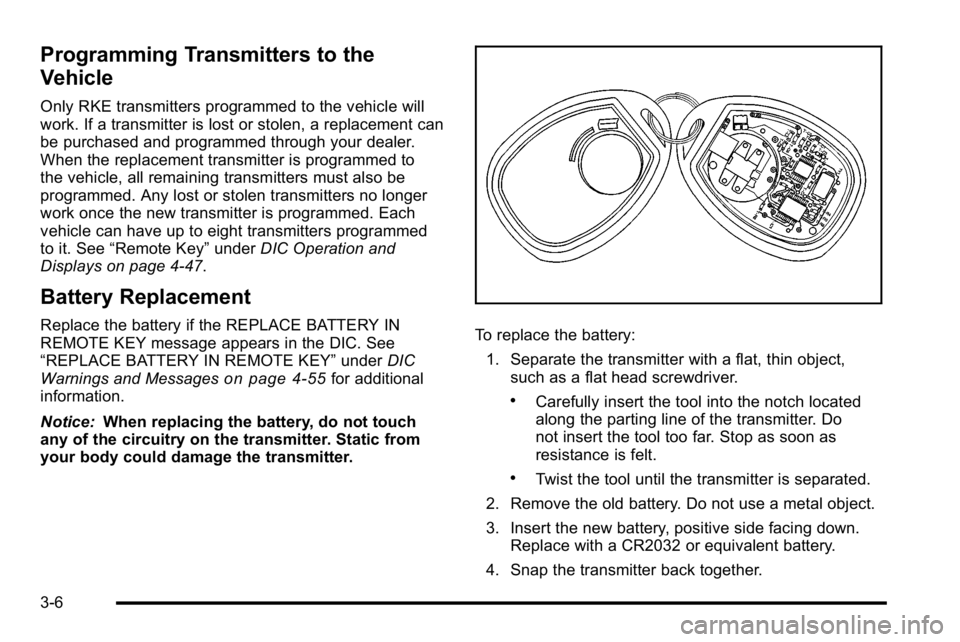
1. Separate the transmitter with a flat, thin object, such as a flat head screwdriver.
.Carefully insert the tool into the notch located
along the parting line of the transmitter. Do
not insert the tool too far. Stop as soon as
resistance is felt.
.Twist the tool until the transmitter is separated.
2. Remove the old battery. Do not use a metal object.
3. Insert the new battery, positive side facing down. Replace with a CR2032 or equivalent battery.
4. Snap the transmitter back together.
3-6