height BUICK LUCERNE 2010 Owner's Manual
[x] Cancel search | Manufacturer: BUICK, Model Year: 2010, Model line: LUCERNE, Model: BUICK LUCERNE 2010Pages: 474
Page 34 of 474
Head Restraints
The front seats have adjustable head restraints in the
outboard seating positions.
{WARNING:
With head restraints that are not installed and
adjusted properly, there is a greater chance that
occupants will suffer a neck/spinal injury in a
crash. Do not drive until the head restraints for all
occupants are installed and adjusted properly.
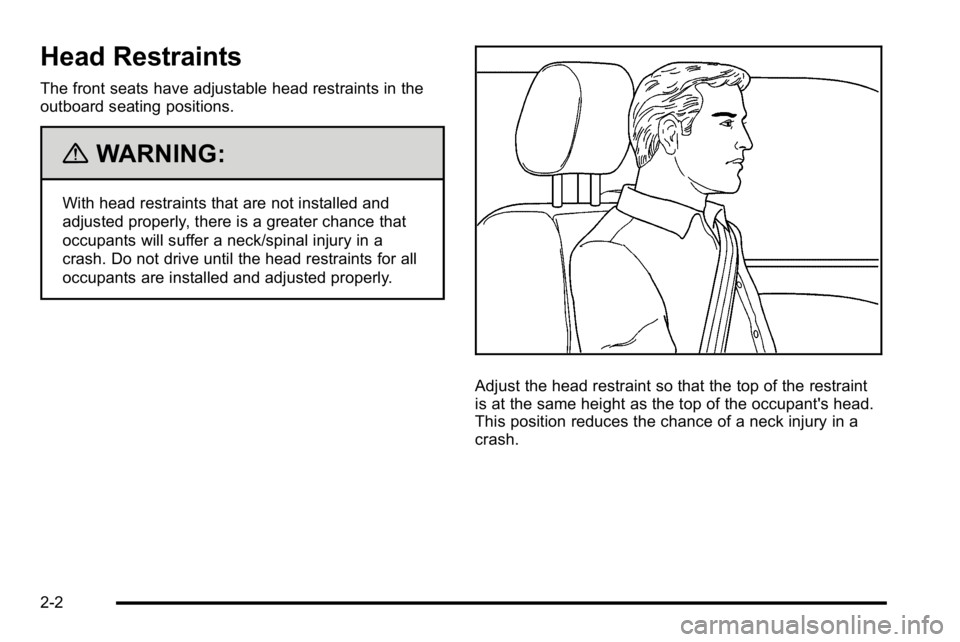
Adjust the head restraint so that the top of the restraint
is at the same height as the top of the occupant's head.
This position reduces the chance of a neck injury in a
crash.
2-2
Page 59 of 474
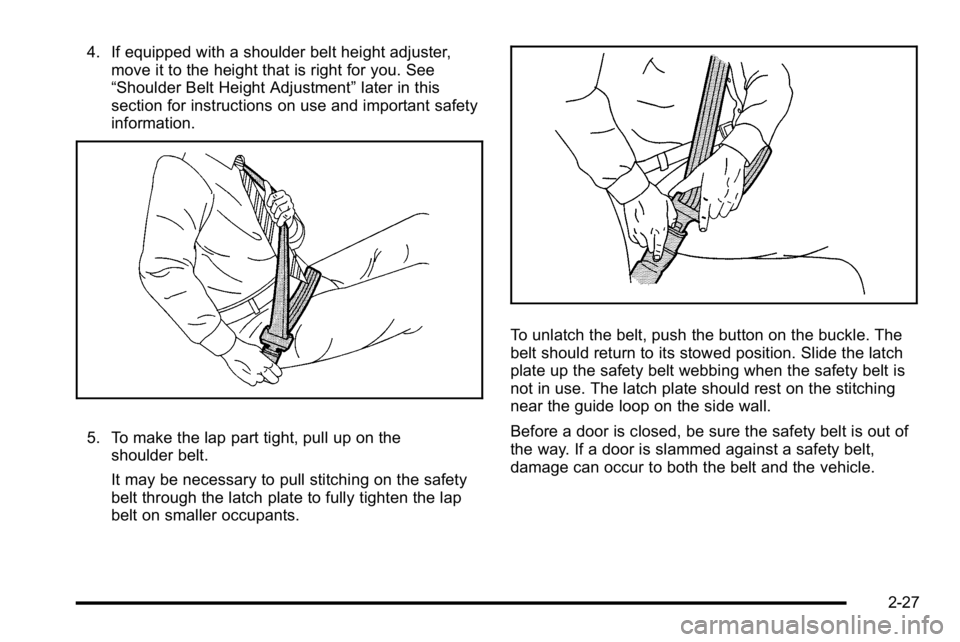
4. If equipped with a shoulder belt height adjuster,move it to the height that is right for you. See
“Shoulder Belt Height Adjustment” later in this
section for instructions on use and important safety
information.
5. To make the lap part tight, pull up on the shoulder belt.
It may be necessary to pull stitching on the safety
belt through the latch plate to fully tighten the lap
belt on smaller occupants.
To unlatch the belt, push the button on the buckle. The
belt should return to its stowed position. Slide the latch
plate up the safety belt webbing when the safety belt is
not in use. The latch plate should rest on the stitching
near the guide loop on the side wall.
Before a door is closed, be sure the safety belt is out of
the way. If a door is slammed against a safety belt,
damage can occur to both the belt and the vehicle.
2-27
Page 60 of 474
Shoulder Belt Height Adjuster
The vehicle has a shoulder belt height adjuster for the
driver and right front passenger seating positions.
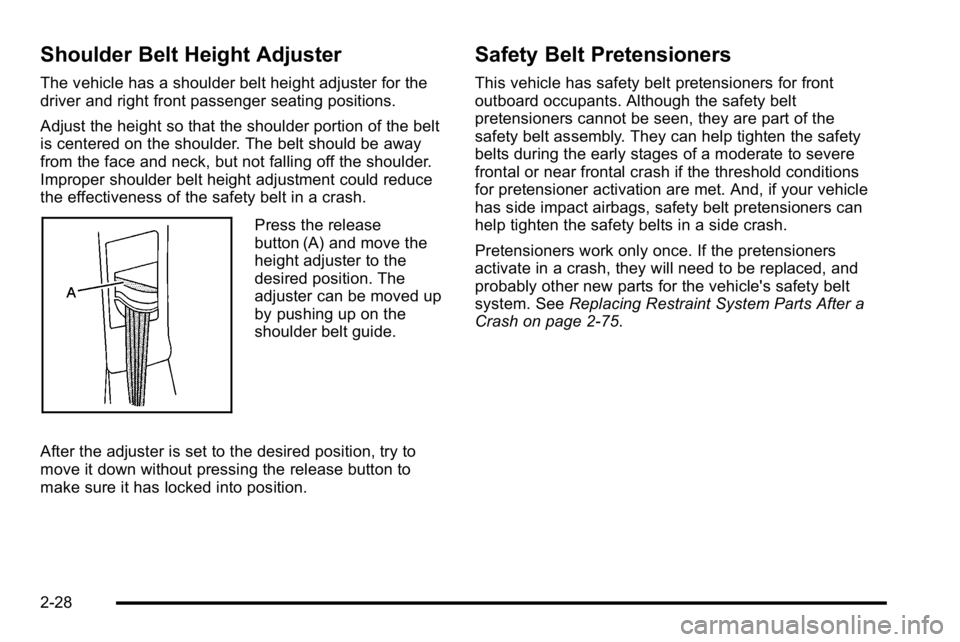
Adjust the height so that the shoulder portion of the belt
is centered on the shoulder. The belt should be away
from the face and neck, but not falling off the shoulder.
Improper shoulder belt height adjustment could reduce
the effectiveness of the safety belt in a crash.
Press the release
button (A) and move the
height adjuster to the
desired position. The
adjuster can be moved up
by pushing up on the
shoulder belt guide.
After the adjuster is set to the desired position, try to
move it down without pressing the release button to
make sure it has locked into position.
Safety Belt Pretensioners
This vehicle has safety belt pretensioners for front
outboard occupants. Although the safety belt
pretensioners cannot be seen, they are part of the
safety belt assembly. They can help tighten the safety
belts during the early stages of a moderate to severe
frontal or near frontal crash if the threshold conditions
for pretensioner activation are met. And, if your vehicle
has side impact airbags, safety belt pretensioners can
help tighten the safety belts in a side crash.
Pretensioners work only once. If the pretensioners
activate in a crash, they will need to be replaced, and
probably other new parts for the vehicle's safety belt
system. See Replacing Restraint System Parts After a
Crash on page 2‑75.
2-28
Page 66 of 474
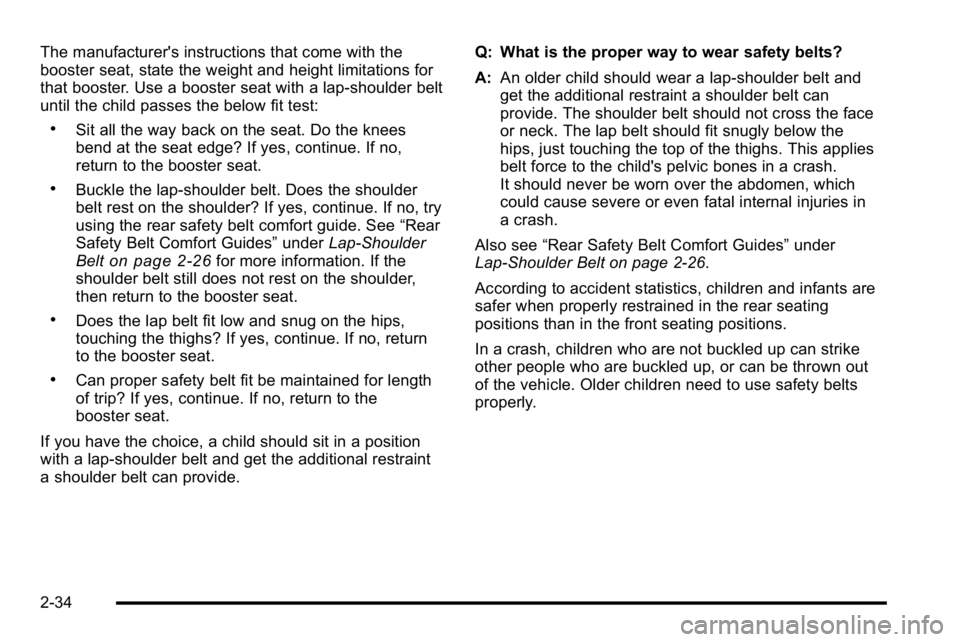
The manufacturer's instructions that come with the
booster seat, state the weight and height limitations for
that booster. Use a booster seat with a lap-shoulder belt
until the child passes the below fit test:
.Sit all the way back on the seat. Do the knees
bend at the seat edge? If yes, continue. If no,
return to the booster seat.
.Buckle the lap-shoulder belt. Does the shoulder
belt rest on the shoulder? If yes, continue. If no, try
using the rear safety belt comfort guide. See“Rear
Safety Belt Comfort Guides” underLap-Shoulder
Belt
on page 2‑26for more information. If the
shoulder belt still does not rest on the shoulder,
then return to the booster seat.
.Does the lap belt fit low and snug on the hips,
touching the thighs? If yes, continue. If no, return
to the booster seat.
.Can proper safety belt fit be maintained for length
of trip? If yes, continue. If no, return to the
booster seat.
If you have the choice, a child should sit in a position
with a lap-shoulder belt and get the additional restraint
a shoulder belt can provide. Q: What is the proper way to wear safety belts?
A:
An older child should wear a lap-shoulder belt and
get the additional restraint a shoulder belt can
provide. The shoulder belt should not cross the face
or neck. The lap belt should fit snugly below the
hips, just touching the top of the thighs. This applies
belt force to the child's pelvic bones in a crash.
It should never be worn over the abdomen, which
could cause severe or even fatal internal injuries in
a crash.
Also see “Rear Safety Belt Comfort Guides” under
Lap-Shoulder Belt on page 2‑26.
According to accident statistics, children and infants are
safer when properly restrained in the rear seating
positions than in the front seating positions.
In a crash, children who are not buckled up can strike
other people who are buckled up, or can be thrown out
of the vehicle. Older children need to use safety belts
properly.
2-34
Page 71 of 474
Q: What are the different types of add-on childrestraints?
A: Add-on child restraints, which are purchased by the
vehicle's owner, are available in four basic types.
Selection of a particular restraint should take into
consideration not only the child's weight, height, and
age but also whether or not the restraint will be
compatible with the motor vehicle in which it will
be used.
For most basic types of child restraints, there are
many different models available. When purchasing a
child restraint, be sure it is designed to be used in a
motor vehicle. If it is, the restraint will have a label
saying that it meets federal motor vehicle safety
standards.
The restraint manufacturer's instructions that come
with the restraint state the weight and height
limitations for a particular child restraint. In addition,
there are many kinds of restraints available for
children with special needs.
{WARNING:
To reduce the risk of neck and head injury during
a crash, infants need complete support. This is
because an infant's neck is not fully developed
(Continued)
WARNING: (Continued)
and its head weighs so much compared with
the rest of its body. In a crash, an infant in a
rear-facing child restraint settles into the restraint,
so the crash forces can be distributed across the
strongest part of an infant's body, the back and
shoulders. Infants should always be secured in
rear-facing child restraints.
{WARNING:
A young child's hip bones are still so small that
the vehicle's regular safety belt may not remain
low on the hip bones, as it should. Instead, it may
settle up around the child's abdomen. In a crash,
the belt would apply force on a body area that is
unprotected by any bony structure. This alone
could cause serious or fatal injuries. To reduce the
risk of serious or fatal injuries during a crash,
young children should always be secured in
appropriate child restraints.
2-39
Page 105 of 474
Adding Equipment to Your
Airbag-Equipped Vehicle
Q: Is there anything I might add to or change aboutthe vehicle that could keep the airbags from
working properly?
A: Yes. If you add things that change your vehicle's
frame, bumper system, height, front end or side
sheet metal, they may keep the airbag system from
working properly. Changing or moving any parts of
the front seats, safety belts, the airbag sensing and
diagnostic module, steering wheel, instrument panel,
roof-rail airbag modules, ceiling headliner or pillar
garnish trim, overhead console, front sensors, side
impact sensors, or airbag wiring can affect the
operation of the airbag system.
In addition, your vehicle has a passenger sensing
system for the right front passenger's position, which
includes sensors that are part of the passenger's
seat. The passenger sensing system may not
operate properly if the original seat trim is replaced
with non-GM covers, upholstery or trim, or with GM
covers, upholstery or trim designed for a different
vehicle. Any object, such as an aftermarket seat
heater or a comfort enhancing pad or device,
installed under or on top of the seat fabric, could also interfere with the operation of the passenger
sensing system. This could either prevent proper
deployment of the passenger airbag(s) or prevent
the passenger sensing system from properly turning
off the passenger airbag(s). See
Passenger Sensing
System on page 2‑67.
If you have any questions about this, you should
contact Customer Assistance before you modify
your vehicle. The phone numbers and addresses for
Customer Assistance are in Step Two of the
Customer Satisfaction Procedure in this manual.
See Customer Satisfaction Procedure on page 8‑2.
Q: Because I have a disability, I have to get my vehicle modified. How can I find out whether this
will affect my airbag system?
A: If you have questions, call Customer Assistance.
The phone numbers and addresses for Customer
Assistance are in Step Two of the Customer
Satisfaction Procedure in this manual. See
Customer Satisfaction Procedure on page 8‑2.
In addition, your dealer and the service manual have
information about the location of the airbag sensors,
sensing and diagnostic module and airbag wiring.
2-73
Page 147 of 474

Side Blind Zone Alert (SBZA)
The vehicle may have a Side Blind Zone Alert (SBZA)
system. Read this entire section before using the
system.
{WARNING:
SBZA is only a lane changing aid and does not
replace driver vision. SBZA does not detect:
.Vehicles outside the side blind zones which
may be rapidly approaching.
.Pedestrians, bicyclists, or animals.
Failure to use proper care when changing lanes
may result in damage to the vehicle, injury,
or death. Always check the outside and rearview
mirrors, glance over your shoulder, and use the
turn signal before changing lanes.
When the system detects a vehicle in the side blind
zone, amber SBZA displays will light up in the side
mirrors. This indicates that it may be unsafe to change
lanes. Before making a lane change, always check the SBZA display, check the outside and rearview mirrors,
look over your shoulder for vehicles and hazards, and
use the turn signal.
SBZA Detection Zones
The SBZA sensor covers a zone of approximately one
lane over from both sides of the vehicle, 3.5 m (11 ft).
This zone starts at each side mirror and goes back
approximately 5 m (16 ft). The height of the zone is
approximately between 0.5 m (1.5 ft) and 2.0 m (6 ft) off
the ground.
3-39
Page 344 of 474
Brake linings should always be replaced as complete
axle sets.
Brake Pedal Travel
See your dealer if the brake pedal does not return to
normal height, or if there is a rapid increase in pedal
travel. This could be a sign that brake service might be
required.
Brake Adjustment
Every time the brakes are applied, with or without the
vehicle moving, the brakes adjust for wear.
Replacing Brake System Parts
The braking system on a vehicle is complex. Its many
parts have to be of top quality and work well together if
the vehicle is to have really good braking. The vehicle
was designed and tested with top-quality brake parts.
When parts of the braking system are replaced—for
example, when the brake linings wear down and new
ones are installed —be sure to get new approved
replacement parts. If this is not done, the brakes might
not work properly. For example, if someone puts in
brake linings that are wrong for the vehicle, the balance
between the front and rear brakes can change —for the
worse. The braking performance expected can change
in many other ways if the wrong replacement brake
parts are installed.
Battery
Refer to the replacement number on the original battery
label when a new battery is needed.
{DANGER:
Battery posts, terminals, and related accessories
contain lead and lead compounds, chemicals
known to the State of California to cause cancer
and reproductive harm. Wash hands after
handling.
The battery is under the rear seat cushion. To access
the battery, see “Removing the Rear Seat Cushion”
under Rear Underseat Fuse Block
on page 6‑113.
Access to the battery is not necessary to jump start the
vehicle. See Jump Starting on page 6‑44.
6-42
Page 352 of 474
Headlamp aiming is done with the vehicle's low-beam
headlamps. The high-beam headlamps will be correctly
aimed if the low-beam headlamps are aimed properly.
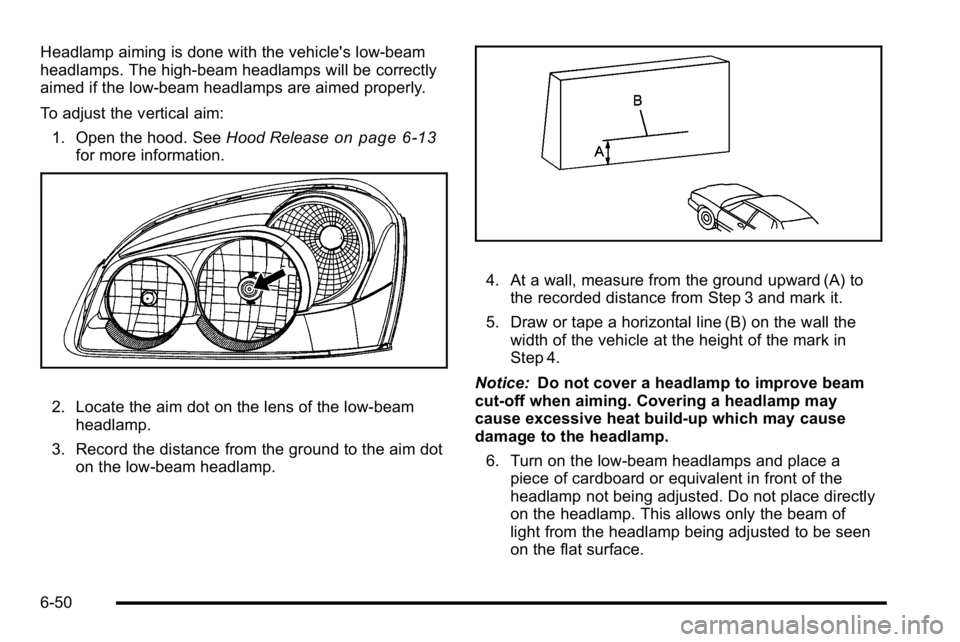
To adjust the vertical aim:1. Open the hood. See Hood Release
on page 6‑13for more information.
2. Locate the aim dot on the lens of the low‐beam
headlamp.
3. Record the distance from the ground to the aim dot on the low‐beam headlamp.
4. At a wall, measure from the ground upward (A) tothe recorded distance from Step 3 and mark it.
5. Draw or tape a horizontal line (B) on the wall the width of the vehicle at the height of the mark in
Step 4.
Notice: Do not cover a headlamp to improve beam
cut-off when aiming. Covering a headlamp may
cause excessive heat build-up which may cause
damage to the headlamp.
6. Turn on the low-beam headlamps and place a piece of cardboard or equivalent in front of the
headlamp not being adjusted. Do not place directly
on the headlamp. This allows only the beam of
light from the headlamp being adjusted to be seen
on the flat surface.
6-50
Page 360 of 474
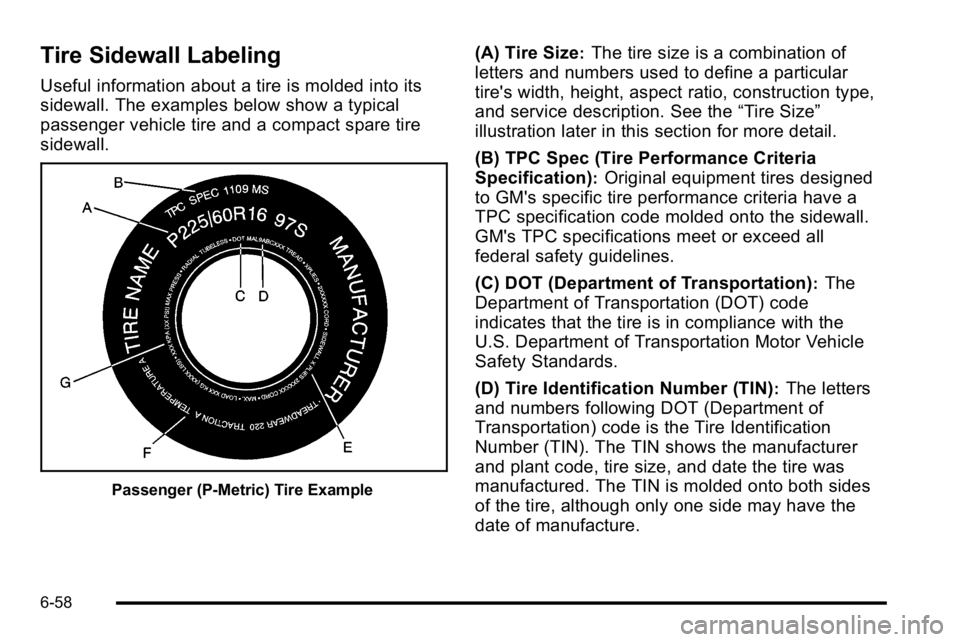
Tire Sidewall Labeling
Useful information about a tire is molded into its
sidewall. The examples below show a typical
passenger vehicle tire and a compact spare tire
sidewall.
Passenger (P‐Metric) Tire Example
(A) Tire Size:The tire size is a combination of
letters and numbers used to define a particular
tire's width, height, aspect ratio, construction type,
and service description. See the “Tire Size”
illustration later in this section for more detail.
(B) TPC Spec (Tire Performance Criteria
Specification)
:Original equipment tires designed
to GM's specific tire performance criteria have a
TPC specification code molded onto the sidewall.
GM's TPC specifications meet or exceed all
federal safety guidelines.
(C) DOT (Department of Transportation)
:The
Department of Transportation (DOT) code
indicates that the tire is in compliance with the
U.S. Department of Transportation Motor Vehicle
Safety Standards.
(D) Tire Identification Number (TIN)
:The letters
and numbers following DOT (Department of
Transportation) code is the Tire Identification
Number (TIN). The TIN shows the manufacturer
and plant code, tire size, and date the tire was
manufactured. The TIN is molded onto both sides
of the tire, although only one side may have the
date of manufacture.
6-58