height BUICK PARK AVENUE 2004 Owner's Manual
[x] Cancel search | Manufacturer: BUICK, Model Year: 2004, Model line: PARK AVENUE, Model: BUICK PARK AVENUE 2004Pages: 410, PDF Size: 4.45 MB
Page 38 of 410
Q:What are the different types of add-on child
restraints?
A:Add-on child restraints, which are purchased by
the vehicle’s owner, are available in four basic
types. Selection of a particular restraint should
take into consideration not only the child’s weight,
height, and age but also whether or not the
restraint will be compatible with the motor vehicle
in which it will be used.
For most basic types of child restraints, there are
many different models available. When purchasing a
child restraint, be sure it is designed to be used
in a motor vehicle. If it is, the restraint will have a
label saying that it meets federal motor vehicle
safety standards.
The restraint manufacturer’s instructions that come
with the restraint state the weight and height
limitations for a particular child restraint. In addition,
there are many kinds of restraints available for
children with special needs.
{CAUTION:
Newborn infants need complete support,
including support for the head and neck.
This is necessary because a newborn infant’s
neck is weak and its head weighs so much
compared with the rest of its body. In a crash,
an infant in a rear-facing seat settles into
the restraint, so the crash forces can be
distributed across the strongest part of an
infant’s body, the back and shoulders. Infants
always should be secured in appropriate infant
restraints.
1-32
Page 113 of 410
Storage Areas
Glove Box
Use the key to lock and unlock the glove box. To open the
glove box, pull the handle upward until the latch opens.
Garage Door Opener Compartment
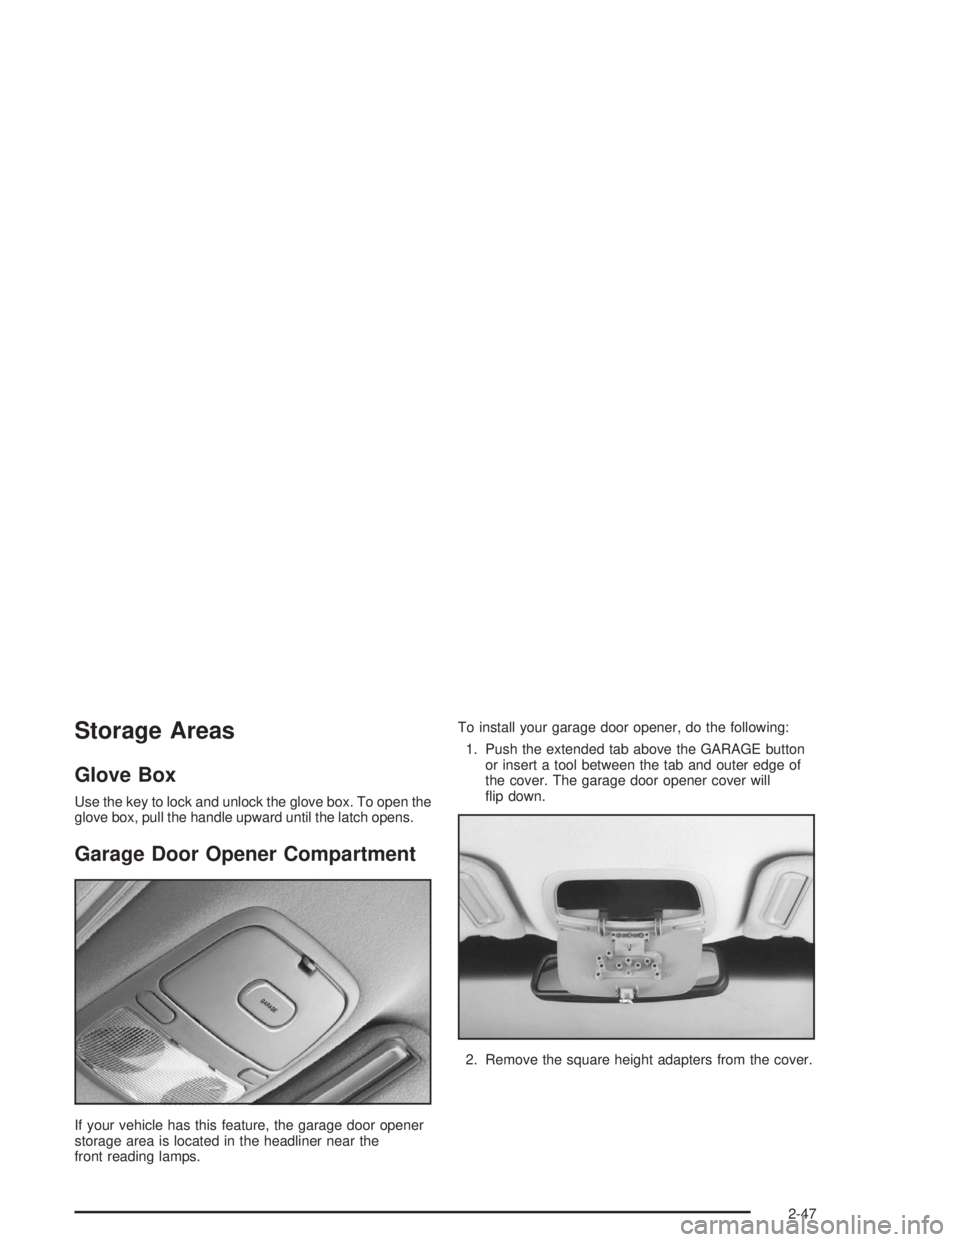
If your vehicle has this feature, the garage door opener
storage area is located in the headliner near the
front reading lamps.To install your garage door opener, do the following:
1. Push the extended tab above the GARAGE button
or insert a tool between the tab and outer edge of
the cover. The garage door opener cover will
�ip down.
2. Remove the square height adapters from the cover.
2-47
Page 114 of 410
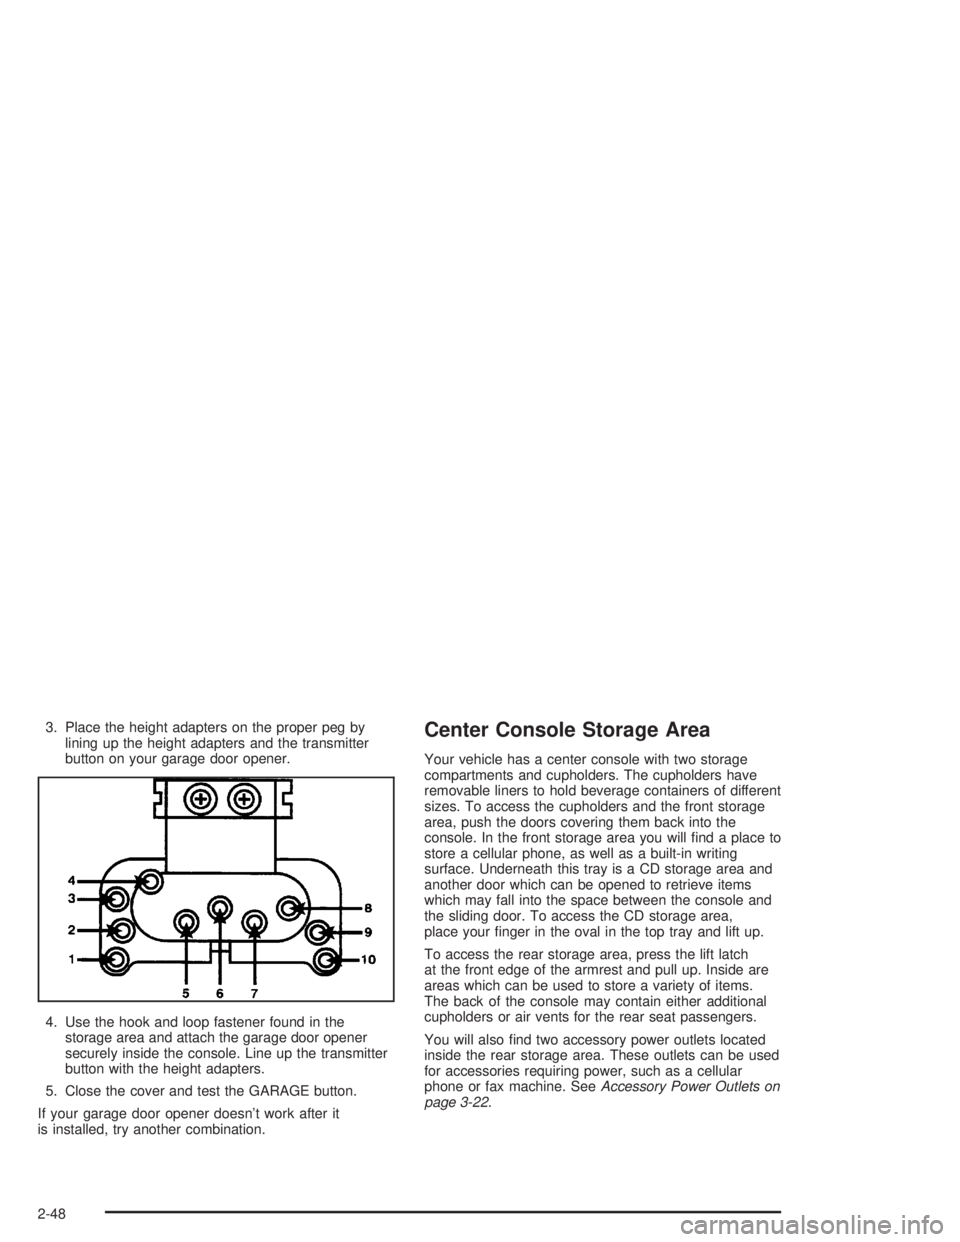
3. Place the height adapters on the proper peg by
lining up the height adapters and the transmitter
button on your garage door opener.
4. Use the hook and loop fastener found in the
storage area and attach the garage door opener
securely inside the console. Line up the transmitter
button with the height adapters.
5. Close the cover and test the GARAGE button.
If your garage door opener doesn’t work after it
is installed, try another combination.Center Console Storage Area
Your vehicle has a center console with two storage
compartments and cupholders. The cupholders have
removable liners to hold beverage containers of different
sizes. To access the cupholders and the front storage
area, push the doors covering them back into the
console. In the front storage area you will �nd a place to
store a cellular phone, as well as a built-in writing
surface. Underneath this tray is a CD storage area and
another door which can be opened to retrieve items
which may fall into the space between the console and
the sliding door. To access the CD storage area,
place your �nger in the oval in the top tray and lift up.
To access the rear storage area, press the lift latch
at the front edge of the armrest and pull up. Inside are
areas which can be used to store a variety of items.
The back of the console may contain either additional
cupholders or air vents for the rear seat passengers.
You will also �nd two accessory power outlets located
inside the rear storage area. These outlets can be used
for accessories requiring power, such as a cellular
phone or fax machine. SeeAccessory Power Outlets on
page 3-22.
2-48
Page 137 of 410
Be sure to continue scanning your displays, controls
and driving environment just as you would in a vehicle
without HUD. If you never look at your instrument
panel, you may not see something important, such as a
warning light.
Notice:If you try to use the HUD image as a
parking aid, you may misjudge the distance and
damage your vehicle. Do not use the HUD image as
a parking aid.
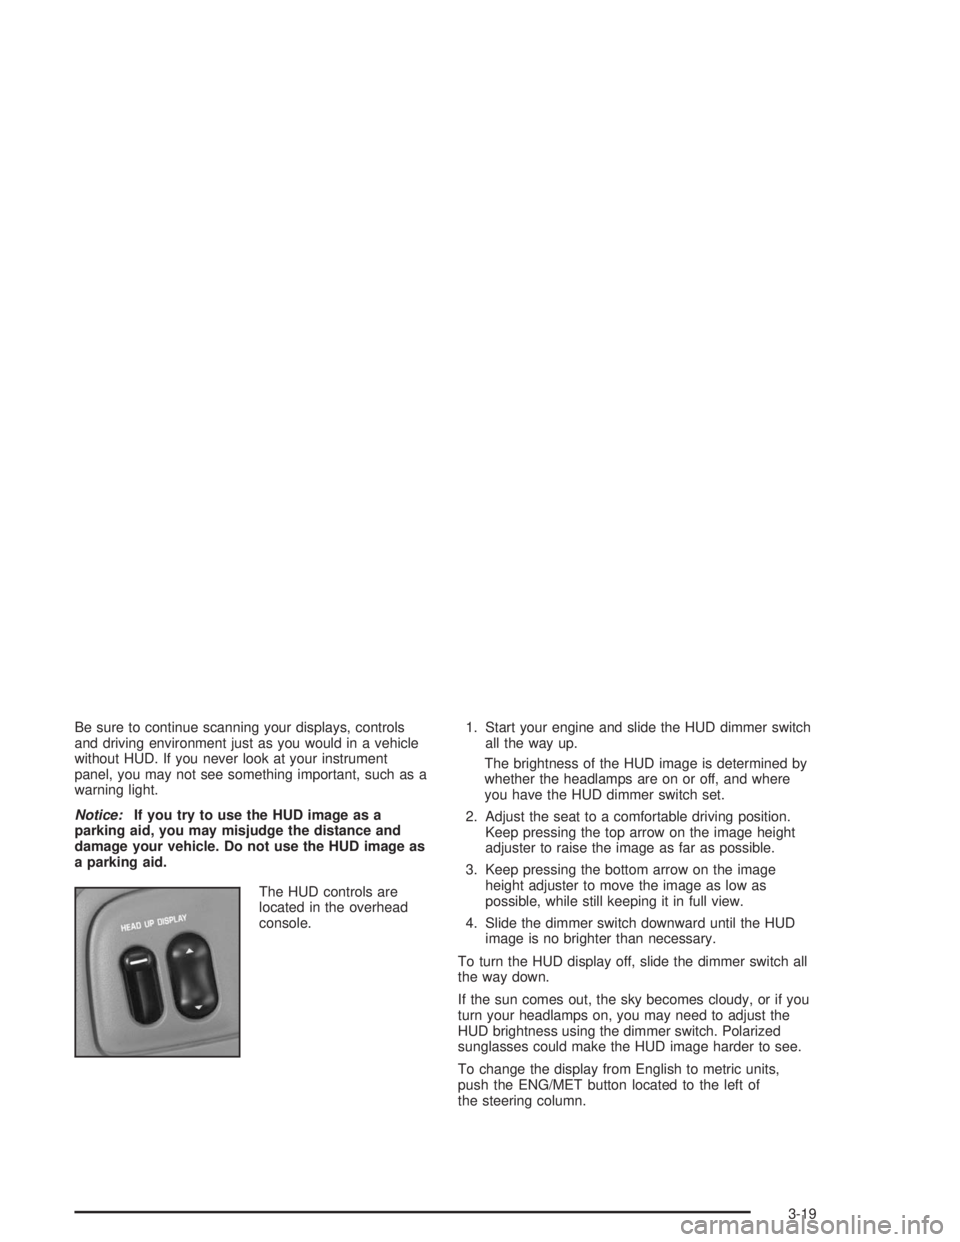
The HUD controls are
located in the overhead
console.1. Start your engine and slide the HUD dimmer switch
all the way up.
The brightness of the HUD image is determined by
whether the headlamps are on or off, and where
you have the HUD dimmer switch set.
2. Adjust the seat to a comfortable driving position.
Keep pressing the top arrow on the image height
adjuster to raise the image as far as possible.
3. Keep pressing the bottom arrow on the image
height adjuster to move the image as low as
possible, while still keeping it in full view.
4. Slide the dimmer switch downward until the HUD
image is no brighter than necessary.
To turn the HUD display off, slide the dimmer switch all
the way down.
If the sun comes out, the sky becomes cloudy, or if you
turn your headlamps on, you may need to adjust the
HUD brightness using the dimmer switch. Polarized
sunglasses could make the HUD image harder to see.
To change the display from English to metric units,
push the ENG/MET button located to the left of
the steering column.
3-19
Page 138 of 410
Care of the HUD
Clean the inside of the windshield as necessary to
remove any dirt or �lm that reduces the sharpness or
clarity of the HUD image.
To clean the HUD lens, spray household glass cleaner
on a soft, clean cloth. Gently wipe and dry the HUD
lens. Do not spray cleaner directly on the lens to avoid
cleaner leaking inside the unit.
If You Can’t See The HUD Image When
the Ignition is On
If the ignition is on and you can’t see the HUD image,
check to see if:
The headlamps are on.
Something is covering the HUD unit.
The HUD dimmer control is adjusted properly.
The HUD image is adjusted to the proper height.
A fuse is blown. SeeFuses and Circuit Breakers on
page 5-99.
Keep in mind that your windshield is part of the HUD
system. If you ever have to have your windshield
replaced, be sure to get one that is designed for HUD
or your HUD image may look blurred or out of focus.
Ultrasonic Rear Parking Assist
(URPA)
Your vehicle may be equipped with Ultrasonic Rear
Parking Assist (URPA). URPA is designed to help you
park while in REVERSE (R) and operates only at
speeds less than 3 mph (5 km/h). URPA can help you
avoid colliding with objects such as parked vehicles.
The system can detect objects 5 feet (1.5 m) behind
your vehicle and tell you how close those objects are to
your rear bumper.
The URPA display is located inside the vehicle, above
the rear window. It has three color-coded lights that can
be seen through the rearview mirror.
{CAUTION:
Even with the Ultrasonic Rear Park Assist
system, the driver must check carefully before
backing up. The system does not operate above
typical backing speeds of 3 mph (5 km/h) while
CAUTION: (Continued)
3-20
Page 286 of 410
Brake Wear
Your vehicle has four-wheel disc brakes.
Disc brake pads have built-in wear indicators that make a
high-pitched warning sound when the brake pads are
worn and new pads are needed. The sound may come
and go or be heard all the time your vehicle is moving
(except when you are pushing on the brake pedal �rmly).
{CAUTION:
The brake wear warning sound means that
soon your brakes will not work well. That
could lead to an accident. When you hear the
brake wear warning sound, have your vehicle
serviced.
Notice:Continuing to drive with worn-out brake
pads could result in costly brake repair.Some driving conditions or climates may cause a brake
squeal when the brakes are �rst applied or lightly
applied. This does not mean something is wrong with
your brakes.
Properly torqued wheel nuts are necessary to help
prevent brake pulsation. When tires are rotated, inspect
brake pads for wear and evenly tighten wheel nuts in
the proper sequence to GM torque speci�cations.
Brake linings should always be replaced as complete
axle sets.
SeeBrake System Inspection on page 6-24.Brake Pedal Travel
See your dealer if the brake pedal does not return to
normal height, or if there is a rapid increase in
pedal travel. This could be a sign of brake trouble.
Brake Adjustment
Every time you apply the brakes, with or without the
vehicle moving, your brakes adjust for wear.
5-42
Page 307 of 410
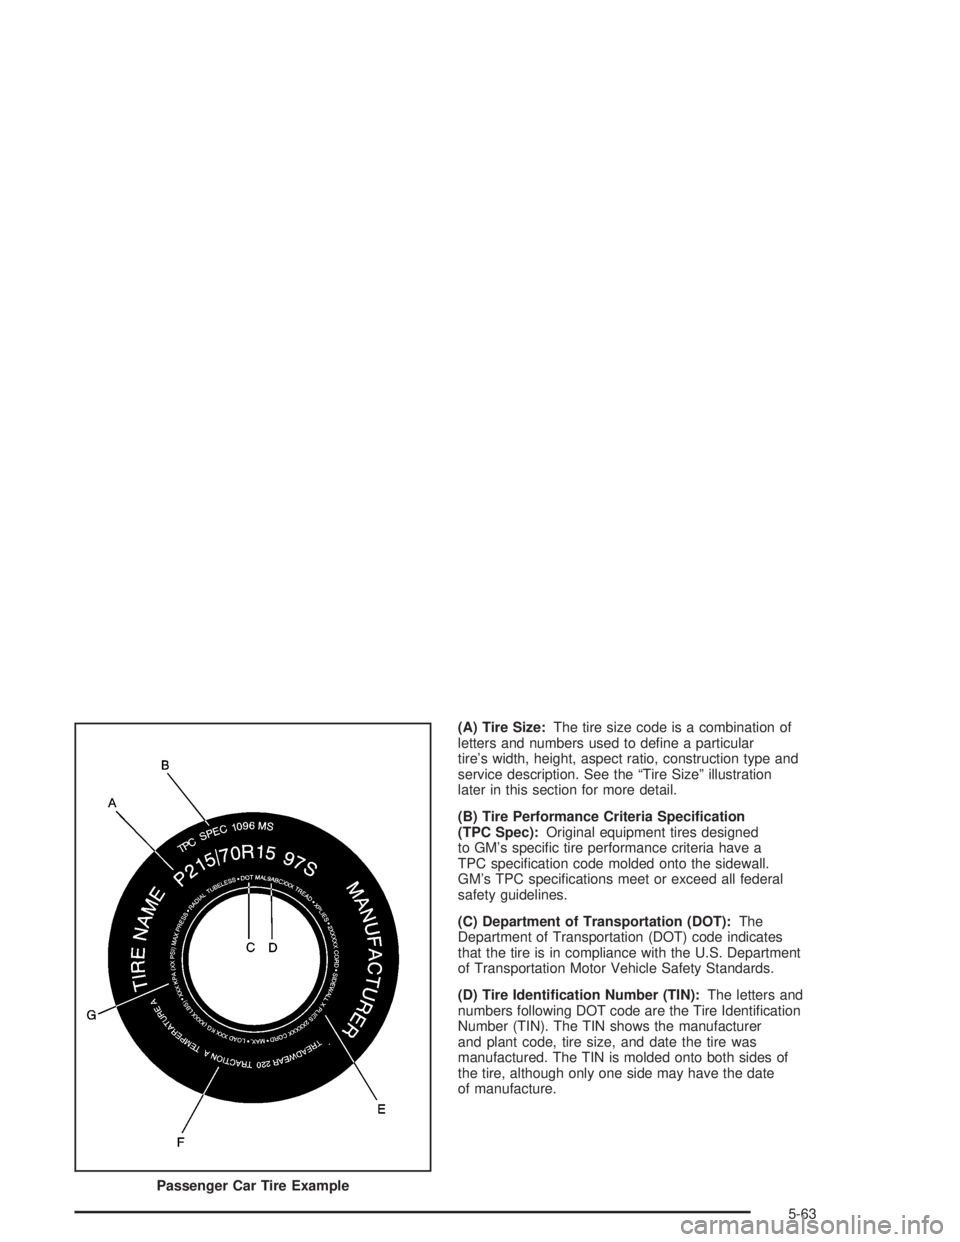
(A) Tire Size:The tire size code is a combination of
letters and numbers used to de�ne a particular
tire’s width, height, aspect ratio, construction type and
service description. See the “Tire Size” illustration
later in this section for more detail.
(B) Tire Performance Criteria Speci�cation
(TPC Spec):Original equipment tires designed
to GM’s speci�c tire performance criteria have a
TPC speci�cation code molded onto the sidewall.
GM’s TPC speci�cations meet or exceed all federal
safety guidelines.
(C) Department of Transportation (DOT):The
Department of Transportation (DOT) code indicates
that the tire is in compliance with the U.S. Department
of Transportation Motor Vehicle Safety Standards.
(D) Tire Identi�cation Number (TIN):The letters and
numbers following DOT code are the Tire Identi�cation
Number (TIN). The TIN shows the manufacturer
and plant code, tire size, and date the tire was
manufactured. The TIN is molded onto both sides of
the tire, although only one side may have the date
of manufacture.
Passenger Car Tire Example
5-63
Page 309 of 410
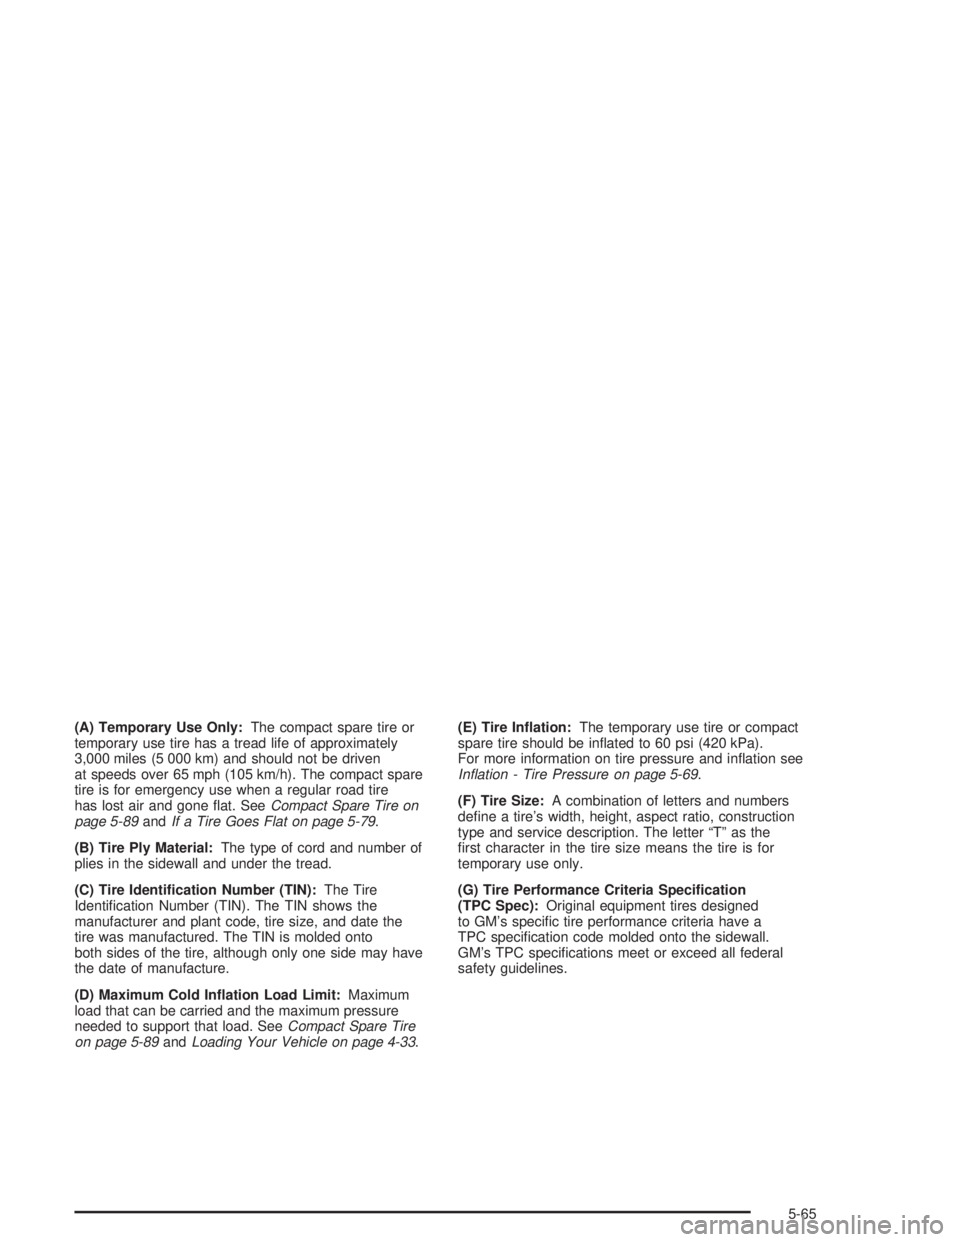
(A) Temporary Use Only:The compact spare tire or
temporary use tire has a tread life of approximately
3,000 miles (5 000 km) and should not be driven
at speeds over 65 mph (105 km/h). The compact spare
tire is for emergency use when a regular road tire
has lost air and gone �at. SeeCompact Spare Tire on
page 5-89andIf a Tire Goes Flat on page 5-79.
(B) Tire Ply Material:The type of cord and number of
plies in the sidewall and under the tread.
(C) Tire Identi�cation Number (TIN):The Tire
Identi�cation Number (TIN). The TIN shows the
manufacturer and plant code, tire size, and date the
tire was manufactured. The TIN is molded onto
both sides of the tire, although only one side may have
the date of manufacture.
(D) Maximum Cold In�ation Load Limit:Maximum
load that can be carried and the maximum pressure
needed to support that load. SeeCompact Spare Tire
on page 5-89andLoading Your Vehicle on page 4-33.(E) Tire In�ation:The temporary use tire or compact
spare tire should be in�ated to 60 psi (420 kPa).
For more information on tire pressure and in�ation see
In�ation - Tire Pressure on page 5-69.
(F) Tire Size:A combination of letters and numbers
de�ne a tire’s width, height, aspect ratio, construction
type and service description. The letter “T” as the
�rst character in the tire size means the tire is for
temporary use only.
(G) Tire Performance Criteria Speci�cation
(TPC Spec):Original equipment tires designed
to GM’s speci�c tire performance criteria have a
TPC speci�cation code molded onto the sidewall.
GM’s TPC speci�cations meet or exceed all federal
safety guidelines.
5-65
Page 310 of 410
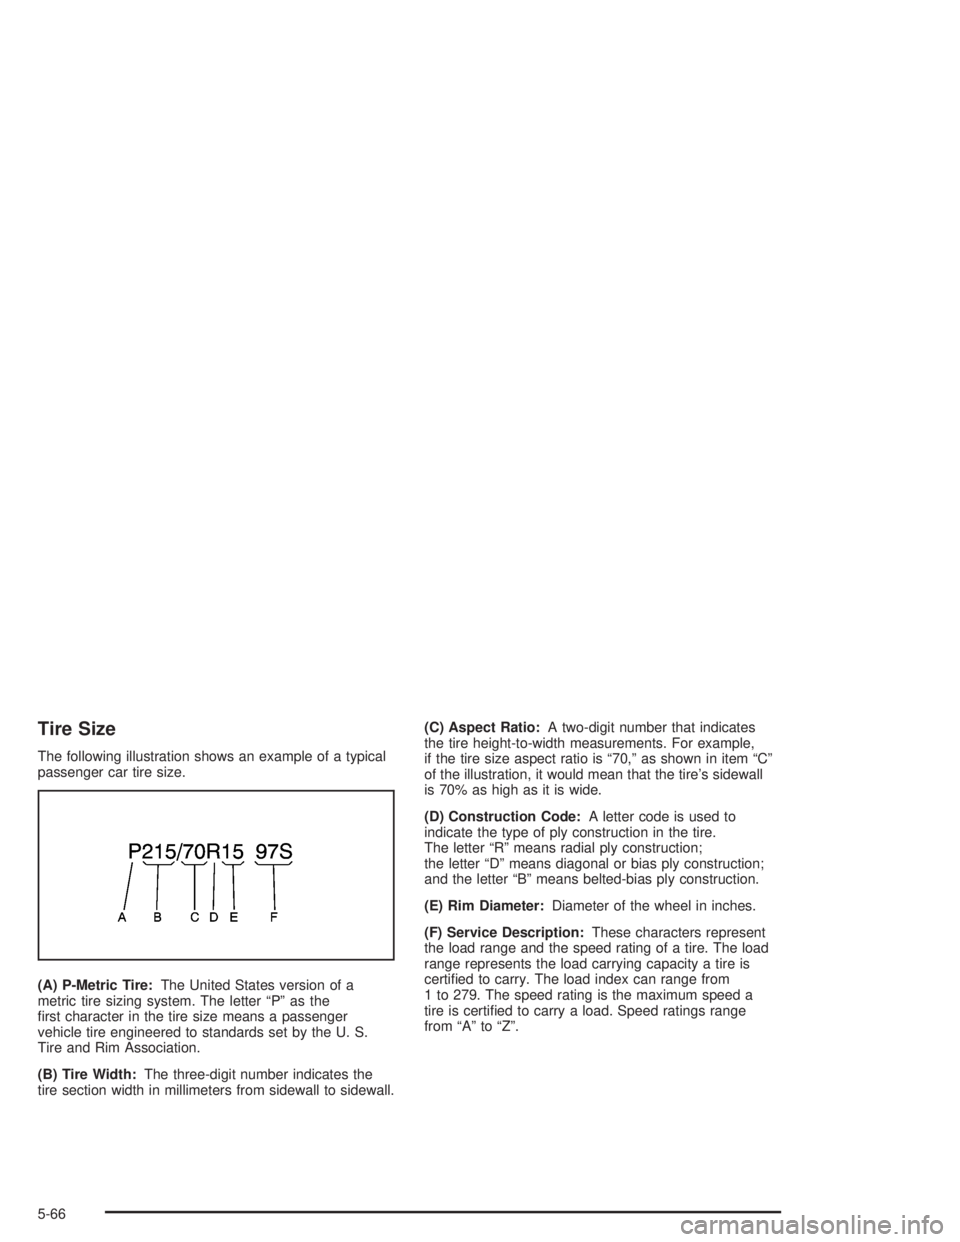
Tire Size
The following illustration shows an example of a typical
passenger car tire size.
(A) P-Metric Tire:The United States version of a
metric tire sizing system. The letter “P” as the
�rst character in the tire size means a passenger
vehicle tire engineered to standards set by the U. S.
Tire and Rim Association.
(B) Tire Width:The three-digit number indicates the
tire section width in millimeters from sidewall to sidewall.(C) Aspect Ratio:A two-digit number that indicates
the tire height-to-width measurements. For example,
if the tire size aspect ratio is “70,” as shown in item “C”
of the illustration, it would mean that the tire’s sidewall
is 70% as high as it is wide.
(D) Construction Code:A letter code is used to
indicate the type of ply construction in the tire.
The letter “R” means radial ply construction;
the letter “D” means diagonal or bias ply construction;
and the letter “B” means belted-bias ply construction.
(E) Rim Diameter:Diameter of the wheel in inches.
(F) Service Description:These characters represent
the load range and the speed rating of a tire. The load
range represents the load carrying capacity a tire is
certi�ed to carry. The load index can range from
1 to 279. The speed rating is the maximum speed a
tire is certi�ed to carry a load. Speed ratings range
from “A” to “Z”.
5-66
Page 311 of 410
Tire Terminology and De�nitions
Air Pressure:The amount of air inside the tire pressing
outward on each square inch of the tire. Air pressure
is expressed in pounds per square inch (psi) or
kilopascal (kPa).
Accessory Weight:This means the combined weight
of optional accessories. Some examples of optional
accessories are, automatic transmission, power steering,
power brakes, power windows, power seats, and air
conditioning.
Aspect Ratio:The relationship of a tire’s height to
its width.
Belt:A rubber coated layer of cords that is located
between the plies and the tread. Cords may be made
from steel or other reinforcing materials.
Bead:The tire bead contains steel wires wrapped by
steel cords that hold the tire onto the rim.
Bias Ply Tire:A pneumatic tire in which the plies
are laid at alternate angles substantially less than
90 degrees to the centerline of the tread.
Cold In�ation Pressure:The amount of air pressure
in a tire, measured in pounds per square inch (psi)
before a tire has built up heat from driving.
SeeIn�ation - Tire Pressure on page 5-69.Curb Weight:This means the weight of a motor
vehicle with standard and optional equipment including
the maximum capacity of fuel, oil and coolant, but
without passengers and cargo.
DOT Markings:A code molded into the sidewall of a
tire signifying that the tire is in compliance with the
U.S. Department of Transportation motor vehicle safety
standards. The DOT code includes the Tire Identi�cation
Number (TIN), an alphanumeric designator which can
also identify the tire manufacturer, production plant,
brand and date of production.
GVWR:Gross Vehicle Weight Rating, seeLoading
Your Vehicle on page 4-33.
GAWR FRT:Gross Axle Weight Rating for the front
axle, seeLoading Your Vehicle on page 4-33.
GAWR RR:Gross Axle Weight Rating for the rear axle,
seeLoading Your Vehicle on page 4-33.
Intended Outboard Sidewall:The side of an
asymmetrical tire that must always face outward when
mounted on a vehicle.
Kilopascal (kPa):The metric unit for air pressure.
There are 6.9 kPa’s to one psi.
5-67