air filter BUICK PARK AVENUE 2005 Owner's Manual
[x] Cancel search | Manufacturer: BUICK, Model Year: 2005, Model line: PARK AVENUE, Model: BUICK PARK AVENUE 2005Pages: 388, PDF Size: 2.55 MB
Page 115 of 388

Instrument Panel Overview...............................3-4
Hazard Warning Flashers................................3-6
Other Warning Devices...................................3-6
Horn.............................................................3-6
Tilt Wheel.....................................................3-6
Turn Signal/Multifunction Lever.........................3-7
Turn and Lane-Change Signals........................3-7
Headlamp High/Low-Beam Changer..................3-8
Flash-to-Pass.................................................3-9
Windshield Wipers..........................................3-9
Rainsense™ II Wipers.....................................3-9
Windshield Washer.......................................3-10
Cruise Control..............................................3-10
Exterior Lamps.............................................3-14
Headlamps on Reminder................................3-14
Daytime Running Lamps................................3-15
Cornering Lamps..........................................3-15
Twilight Sentinel
®..........................................3-16
Instrument Panel Brightness...........................3-16
Courtesy Lamps...........................................3-16
Entry Lighting...............................................3-16
Delayed Entry Lighting...................................3-17
Theater Dimming..........................................3-17
Delayed Exit Lighting.....................................3-17
Perimeter Lighting.........................................3-17
Parade Dimming...........................................3-18Glove Box Lamp...........................................3-18
Front Reading Lamps....................................3-18
Rear Reading Lamps....................................3-19
Trunk Lamp.................................................3-19
Battery Run-Down Protection..........................3-19
Head-Up Display (HUD).................................3-19
Ultrasonic Rear Parking Assist (URPA)............3-22
Accessory Power Outlets...............................3-24
Ashtrays and Cigarette Lighter........................3-25
Climate Controls............................................3-25
Dual Automatic Climate Control System...........3-25
Outlet Adjustment.........................................3-30
Passenger Compartment Air Filter...................3-30
Steering Wheel Climate Controls.....................3-31
Climate Controls Personalization.....................3-31
Warning Lights, Gages, and Indicators............3-32
Instrument Panel Cluster................................3-33
Speedometer and Odometer...........................3-35
Trip Odometer..............................................3-35
Tachometer.................................................3-35
Safety Belt Reminder Light.............................3-36
Airbag Readiness Light..................................3-36
Battery Warning Light....................................3-37
Brake System Warning Light..........................3-38
Section 3 Instrument Panel
3-1
Page 140 of 388
Automatic Operation
AUTO (Automatic):Press the AUTO button for
automatic control of the inside temperature, the air
delivery mode and the fan speed.
1. Press the AUTO button.
2. Adjust the temperature to 75° F (24° C).
Choosing the coldest or warmest temperature
setting will not cause the system to heat or cool any
faster. If you set the system at the warmest
temperature setting, the system will remain in
manual mode at that temperature and it will not go
into automatic mode.
In cold weather, the system will start at reduced fan
speeds to avoid blowing cold air into your vehicle
until warmer air is available. The system will
start out blowing air at the �oor but may change
modes automatically as the vehicle warms up
to maintain the chosen temperature setting. The
length of time needed for warm up will depend on
the outside temperature and the length of time
that has elapsed since your vehicle was last driven.
3. Wait for the system to regulate. This may take
from 10 to 30 minutes. Then adjust the temperature,
if necessary.Do not cover the solar sensor located in the center of
the instrument panel, near the windshield. For more
information on the solar sensor, see “Sensors” later in
this section.
Manual Operation
Pressing the FAN or AIR FLOW buttons cancels
automatic operation and places the system in
manual mode. Press the AUTO button to return to
automatic operation.
TEMP (Temperature):To manually adjust the
temperature inside the vehicle, push the TEMP arrow.
Push the TEMP up arrow for warmer temperature
settings and the TEMP down arrow for cooler
temperature settings. The setting will be shown on the
display. The display will return to the outside
temperature after a few seconds.
9FAN:Pressing the FAN button will display and hold
the current fan speed while in manual mode. If you
want the fan to run at a lower speed, push the down
arrow on the FAN button. If you want to increase the fan
speed, push the up arrow on the FAN button. The fan
indicators will also be shown on the display.
If the air�ow seems low when the fan is at the highest
setting, the passenger compartment air �lter may
need to be replaced. For more information, see
Passenger Compartment Air Filter on page 3-30.
3-26
Page 144 of 388
Outlet Adjustment
Use the thumbwheel located in the middle of the front
outlets to change the direction of the air�ow and to open
and close the outlets.
Use the thumbwheel located between the rear
passenger outlets to open and close the outlets. Adjust
the direction of the air�ow from side to side with the
levers in the center of each rear outlet.
Operation Tips
Clear away any ice, snow or leaves from the air
inlets at the base of the windshield that may
block the �ow of air into your vehicle.
Use of non-GM approved hood de�ectors may
adversely affect the performance of the system.
Keep the path under the front seats clear of
objects to help circulate the air inside of your vehicle
more effectively.
If the air�ow seems low when the fan is at the
highest setting, the passenger compartment air �lter
may need to be replaced. SeePassenger
Compartment Air Filter on page 3-30.
Passenger Compartment Air Filter
Passenger compartment air, both outside air and
recirculated air, is routed through a passenger
compartment �lter, which is part of a three piece �lter
system. The �lter removes certain particles from the air,
including pollen and dust particles. Reductions in
air�ow, which may occur more quickly in dusty areas,
indicate that the �lter needs to be replaced early.
The particle �lter is located inside of the air control
module. The air control module is located behind
an access panel near the accelerator pedal.
3-30
Page 233 of 388
Service............................................................5-3
Doing Your Own Service Work.........................5-3
Adding Equipment to the Outside of
Your Vehicle..............................................5-4
Fuel................................................................5-4
Gasoline Octane............................................5-4
Gasoline Speci�cations....................................5-5
California Fuel...............................................5-5
Additives.......................................................5-5
Fuels in Foreign Countries...............................5-6
Filling Your Tank............................................5-6
Filling a Portable Fuel Container.......................5-9
Checking Things Under the Hood....................5-10
Hood Release..............................................5-10
Engine Compartment Overview.......................5-12
Engine Oil...................................................5-13
Engine Oil Life System..................................5-17
Supercharger Oil..........................................5-18
Engine Air Cleaner/Filter................................5-19
Automatic Transaxle Fluid..............................5-22
Engine Coolant.............................................5-24
Radiator Pressure Cap..................................5-26
Engine Overheating.......................................5-26
Cooling System............................................5-28
Power Steering Fluid.....................................5-34Windshield Washer Fluid................................5-35
Brakes........................................................5-37
Battery........................................................5-40
Jump Starting...............................................5-41
Headlamp Aiming...........................................5-45
Bulb Replacement..........................................5-47
Halogen Bulbs..............................................5-47
Headlamps..................................................5-47
Front Turn Signal Lamps...............................5-50
Rear Turn Signal, Stoplamps and
Back-Up Lamps........................................5-50
Rear Quarter Panel Turn Signal
and Stoplamps..........................................5-54
Replacement Bulbs.......................................5-56
Windshield Wiper Blade Replacement..............5-57
Tires..............................................................5-58
Tire Sidewall Labelling...................................5-59
Tire Terminology and De�nitions.....................5-61
In�ation - Tire Pressure.................................5-64
Check Tire Pressure System..........................5-65
Tire Inspection and Rotation...........................5-67
When It Is Time for New Tires.......................5-68
Buying New Tires.........................................5-68
Uniform Tire Quality Grading..........................5-69
Section 5 Service and Appearance Care
5-1
Page 245 of 388
A. Battery. SeeBattery on page 5-40.
B. Underhood Fuse Block. SeeUnderhood Fuse Block
on page 5-95.
C. Radiator Pressure Cap. SeeRadiator Pressure Cap
on page 5-26.
D. Engine Oil Dipstick. See “Checking Engine Oil”
underEngine Oil on page 5-13.
E. Engine Oil Fill Cap. See “When to Add Engine Oil”
underEngine Oil on page 5-13.
F. Engine Coolant Air Bleed Valve. See “How to Add
Coolant to the Radiator” underCooling System
on page 5-28.
G. Automatic Transaxle Fluid Dipstick. See “Checking
the Fluid Level” underAutomatic Transaxle Fluid
on page 5-22.
H. Brake Master Cylinder Reservoir. See “Brake Fluid”
underBrakes on page 5-37.
I. Windshield Washer Fluid Reservoir. See “Adding
Washer Fluid” underWindshield Washer Fluid
on page 5-35.
J. Engine Coolant Recovery Tank. SeeCooling System
on page 5-28.
K. Engine Air Cleaner/Filter. SeeEngine Air
Cleaner/Filter on page 5-19.Engine Oil
If the DIC message, ENGINE OIL LOW — CHECK
LEVEL appears on the instrument cluster, it means you
need to check your engine oil level right away. For
more information, seeDriver Information Center (DIC)
on page 3-46.
You should check your engine oil level regularly; this is
an added reminder.
Checking Engine Oil
It is a good idea to check your engine oil every time you
get fuel. In order to get an accurate reading, the oil
must be warm and the vehicle must be on level ground.
The engine oil dipstick handle is a yellow loop. See
Engine Compartment Overview on page 5-12for
the location of the engine oil dipstick.
5-13
Page 251 of 388
How to Check and Add Oil
Park the vehicle on a level surface. Check oil only when
the engine is cold. Allow the engine to cool two to
three hours after running.
{CAUTION:
If you remove the supercharger oil �ll plug
while the engine is hot, pressure may cause
hot oil to blow out of the oil �ll hole. You may
be burned. Do not remove the plug until the
engine cools.
1. Clean the area around the oil �ll plug before
removing it.
2. Remove the oil �ll plug.
3. The oil level is correct when it just reaches the
bottom of the threads of the inspection hole.
4. Replace the oil plug with the O-ring in place.
Tighten to 88 lb-in (10Y).
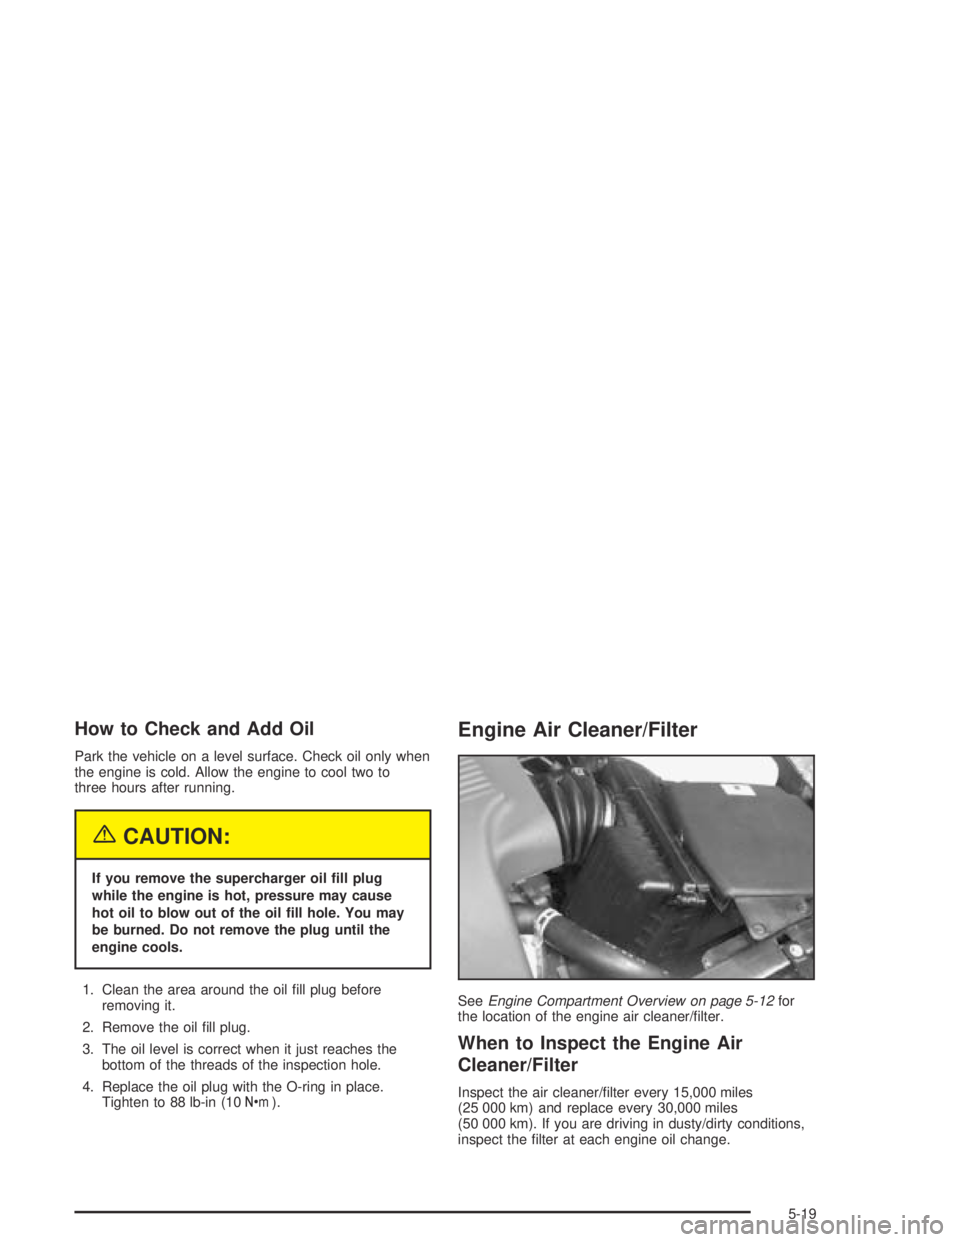
Engine Air Cleaner/Filter
SeeEngine Compartment Overview on page 5-12for
the location of the engine air cleaner/�lter.
When to Inspect the Engine Air
Cleaner/Filter
Inspect the air cleaner/�lter every 15,000 miles
(25 000 km) and replace every 30,000 miles
(50 000 km). If you are driving in dusty/dirty conditions,
inspect the �lter at each engine oil change.
5-19
Page 252 of 388
How to Inspect the Engine Air
Cleaner/Filter
To inspect the air cleaner/�lter remove the �lter from the
vehicle and lightly shake the �lter to release loose
dust and dirt. If the �lter remains caked with dirt, a new
�lter is required.
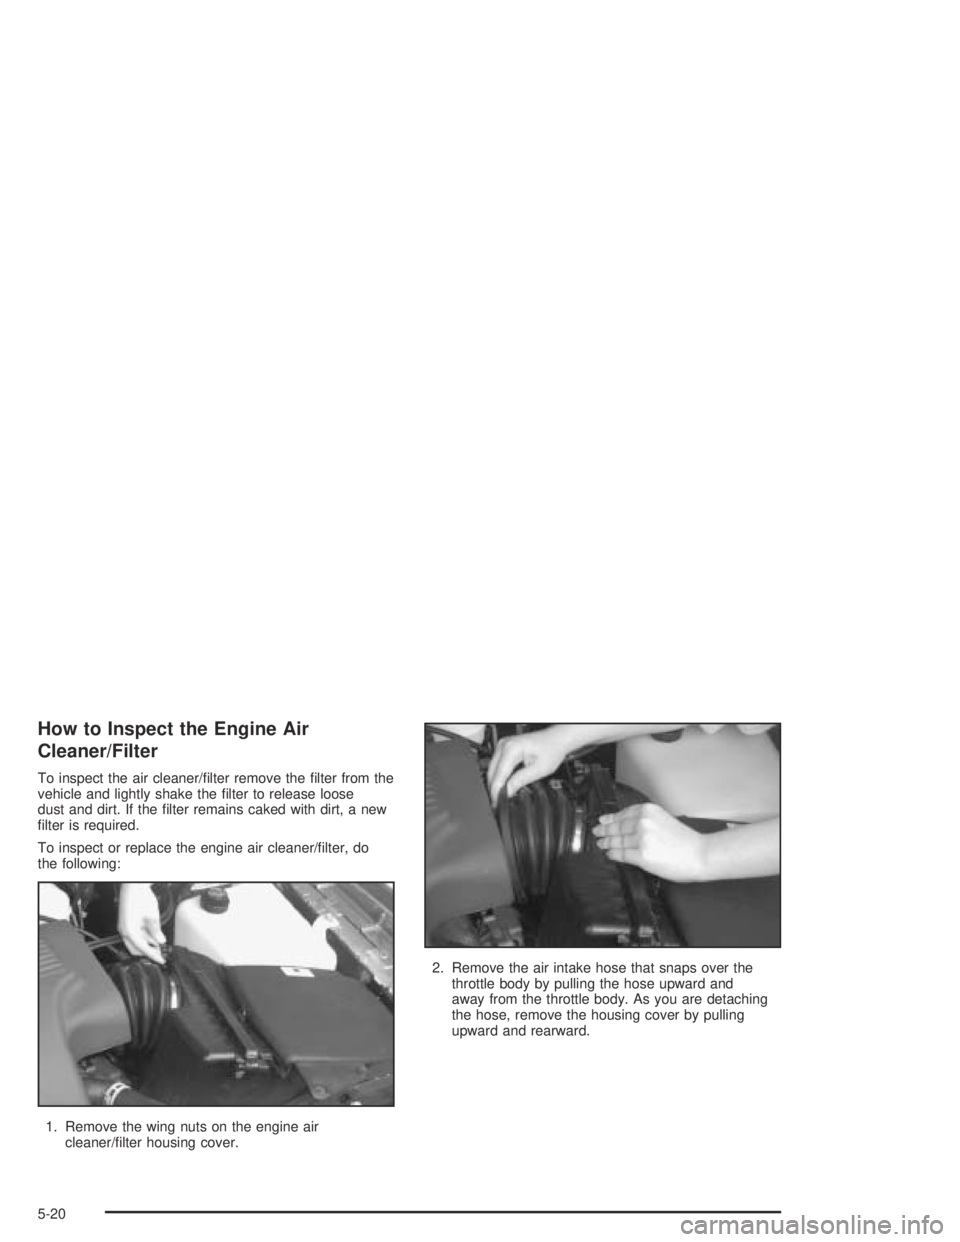
To inspect or replace the engine air cleaner/�lter, do
the following:
1. Remove the wing nuts on the engine air
cleaner/�lter housing cover.2. Remove the air intake hose that snaps over the
throttle body by pulling the hose upward and
away from the throttle body. As you are detaching
the hose, remove the housing cover by pulling
upward and rearward.
5-20
Page 332 of 388
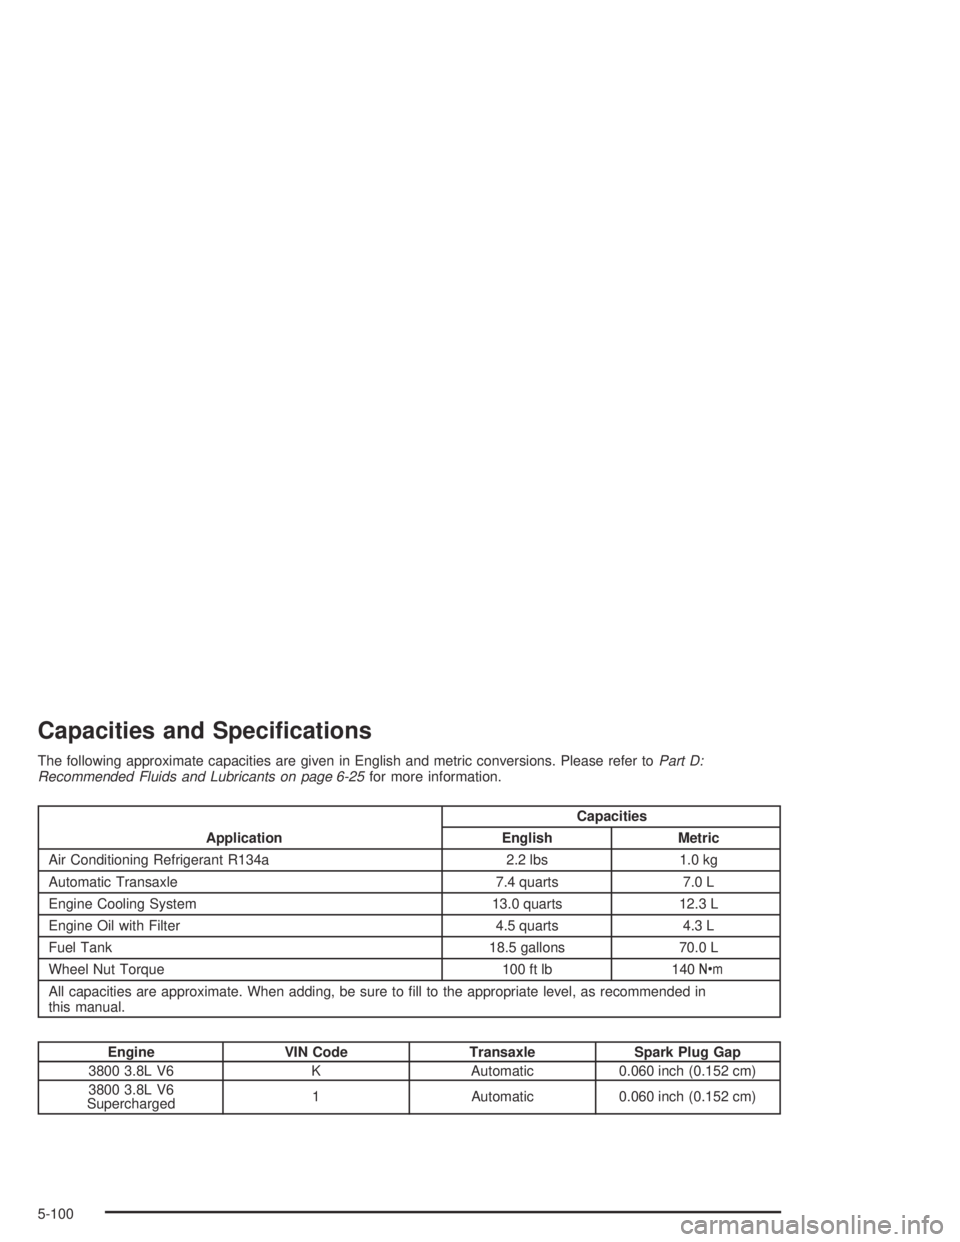
Capacities and Speci�cations
The following approximate capacities are given in English and metric conversions. Please refer toPart D:
Recommended Fluids and Lubricants on page 6-25for more information.
ApplicationCapacities
English Metric
Air Conditioning Refrigerant R134a 2.2 lbs 1.0 kg
Automatic Transaxle 7.4 quarts 7.0 L
Engine Cooling System 13.0 quarts 12.3 L
Engine Oil with Filter 4.5 quarts 4.3 L
Fuel Tank 18.5 gallons 70.0 L
Wheel Nut Torque 100 ft lb 140Y
All capacities are approximate. When adding, be sure to �ll to the appropriate level, as recommended in
this manual.
Engine VIN Code Transaxle Spark Plug Gap
3800 3.8L V6 K Automatic 0.060 inch (0.152 cm)
3800 3.8L V6
Supercharged1 Automatic 0.060 inch (0.152 cm)
5-100
Page 333 of 388
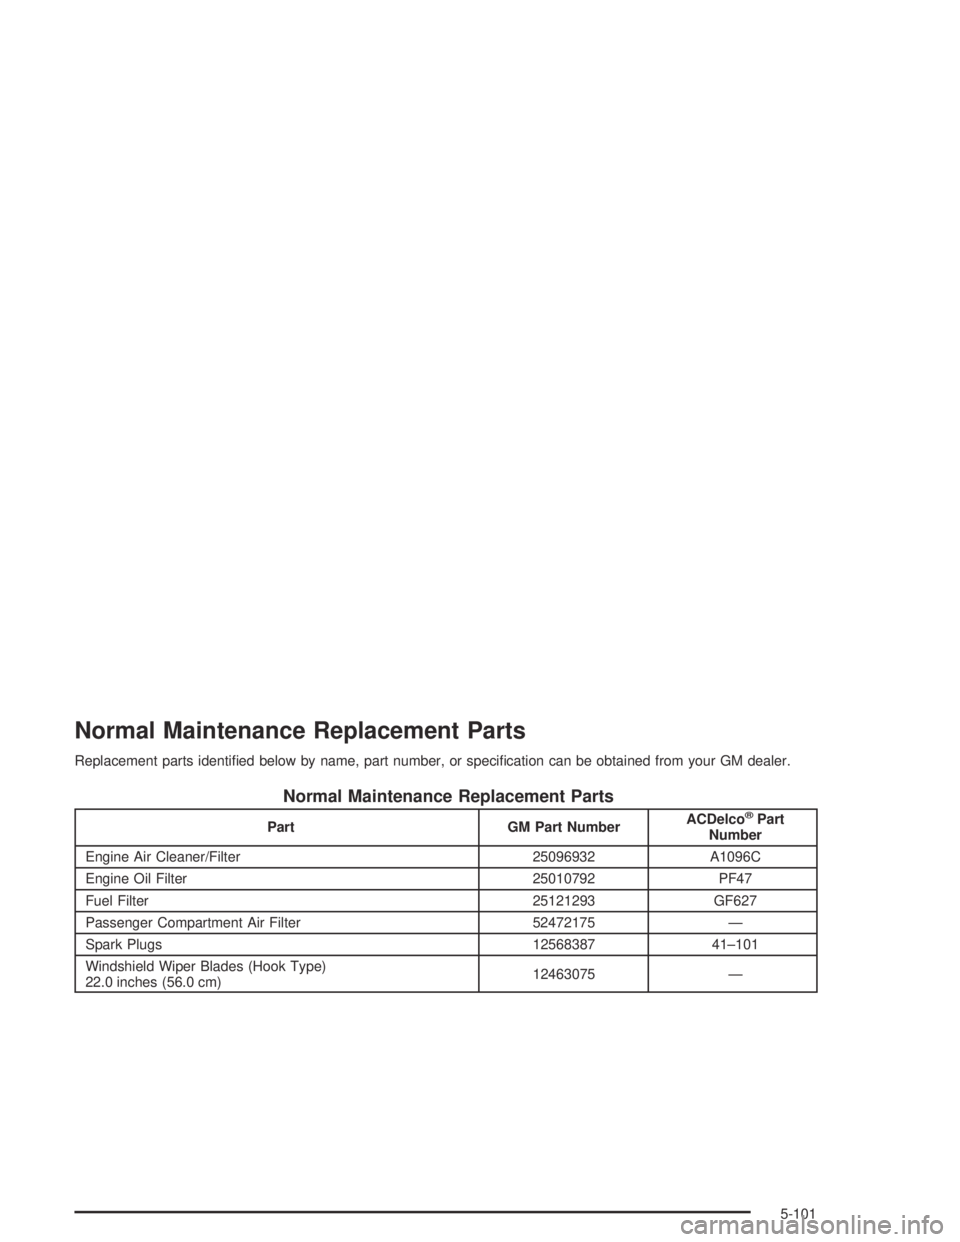
Normal Maintenance Replacement Parts
Replacement parts identi�ed below by name, part number, or speci�cation can be obtained from your GM dealer.
Normal Maintenance Replacement Parts
Part GM Part NumberACDelco®Part
Number
Engine Air Cleaner/Filter 25096932 A1096C
Engine Oil Filter 25010792 PF47
Fuel Filter 25121293 GF627
Passenger Compartment Air Filter 52472175 —
Spark Plugs 12568387 41–101
Windshield Wiper Blades (Hook Type)
22.0 inches (56.0 cm)12463075 —
5-101
Page 339 of 388
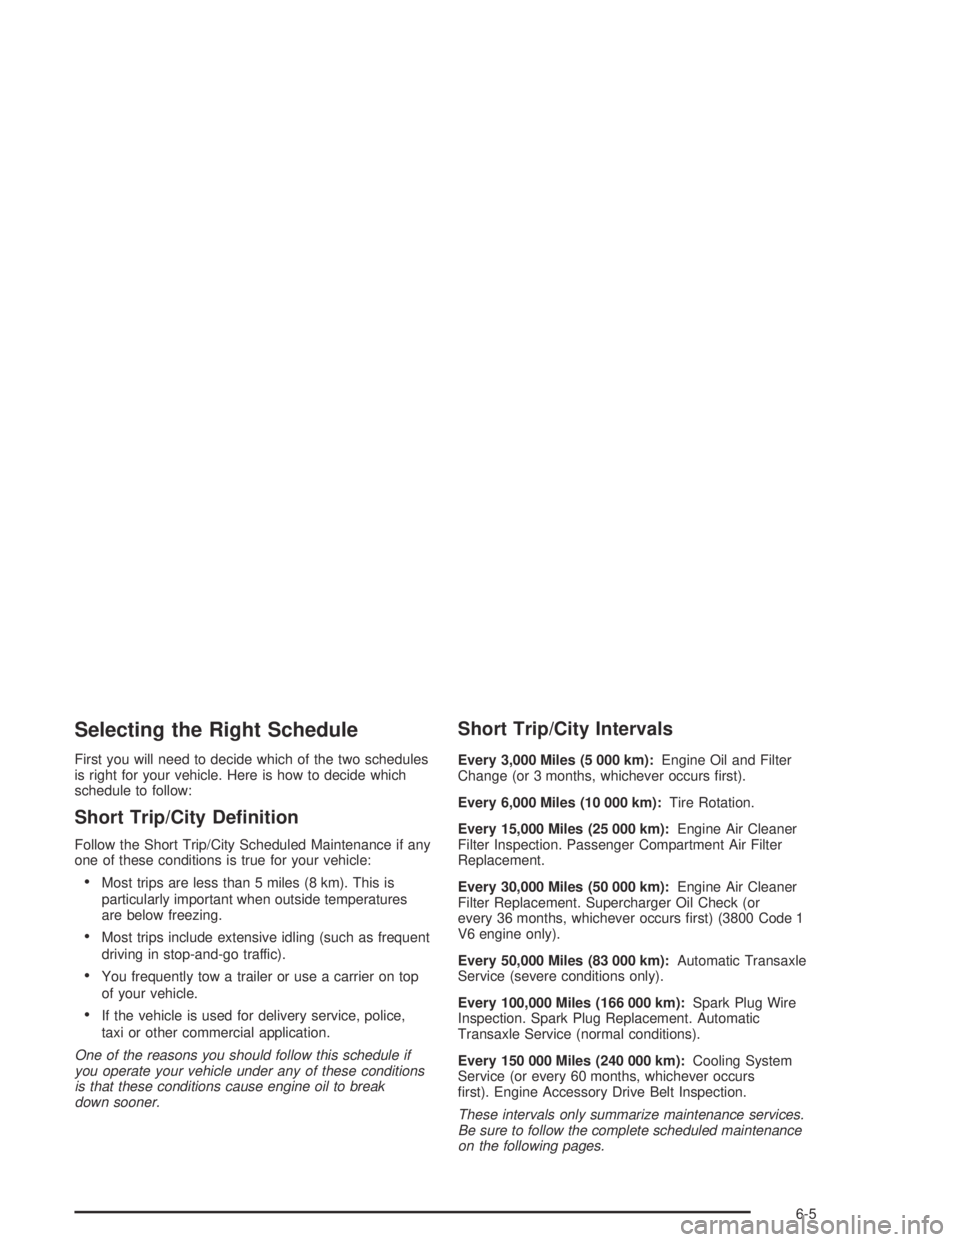
Selecting the Right Schedule
First you will need to decide which of the two schedules
is right for your vehicle. Here is how to decide which
schedule to follow:
Short Trip/City De�nition
Follow the Short Trip/City Scheduled Maintenance if any
one of these conditions is true for your vehicle:
Most trips are less than 5 miles (8 km). This is
particularly important when outside temperatures
are below freezing.
Most trips include extensive idling (such as frequent
driving in stop-and-go traffic).
You frequently tow a trailer or use a carrier on top
of your vehicle.
If the vehicle is used for delivery service, police,
taxi or other commercial application.
One of the reasons you should follow this schedule if
you operate your vehicle under any of these conditions
is that these conditions cause engine oil to break
down sooner.
Short Trip/City Intervals
Every 3,000 Miles (5 000 km):Engine Oil and Filter
Change (or 3 months, whichever occurs �rst).
Every 6,000 Miles (10 000 km):Tire Rotation.
Every 15,000 Miles (25 000 km):Engine Air Cleaner
Filter Inspection. Passenger Compartment Air Filter
Replacement.
Every 30,000 Miles (50 000 km):Engine Air Cleaner
Filter Replacement. Supercharger Oil Check (or
every 36 months, whichever occurs �rst) (3800 Code 1
V6 engine only).
Every 50,000 Miles (83 000 km):Automatic Transaxle
Service (severe conditions only).
Every 100,000 Miles (166 000 km):Spark Plug Wire
Inspection. Spark Plug Replacement. Automatic
Transaxle Service (normal conditions).
Every 150 000 Miles (240 000 km):Cooling System
Service (or every 60 months, whichever occurs
�rst). Engine Accessory Drive Belt Inspection.
These intervals only summarize maintenance services.
Be sure to follow the complete scheduled maintenance
on the following pages.
6-5