stop start BUICK RAINIER 2004 Owner's Guide
[x] Cancel search | Manufacturer: BUICK, Model Year: 2004, Model line: RAINIER, Model: BUICK RAINIER 2004Pages: 452, PDF Size: 4.51 MB
Page 209 of 452
k(Play/Pause):Press this button to start play of a
DVD or CD. Press this button while a DVD or CD
is playing to pause it. Press this button again to continue
the play of the DVD or CD.
y(Main DVD Menu):Press this button to access the
DVD menu. The DVD menu is different on every
DVD. Use the up, down, left, and right arrow buttons to
move the cursor around the DVD menu. After making
a selection press the enter button. This button only
operates when using a DVD.
z(Set-up Menu):Press this button to adjust the
color, tint, brightness, contrast, and display mode
(normal, full, or zoom). The dynamic range compression
feature can be used to reduce loud audio and increase
low audio produced by some DVDs.
n,q,p,o(Menu Navigation Arrows):Use the
arrow buttons to navigate through a menu.
r(Enter):Press this button to select the choices
that are highlighted in any menu.
Playing a Disc
To play a disc, gently insert the disc with the label side
up into the loading slot. The DVD player will continue
loading the disc and the player will automatically start,
if the vehicle ignition is in RUN, ACCESSORY, or
when RAP is active.
If a disc is already in the player, press the play/pause
button on the face of the DVD player or on the
remote control.
Some DVDs will not allow you to fast forward or skip
the copyright information or previews. Some DVDs will
begin playing after the previews have �nished. If the
DVD does not begin to play the main title, refer to the
on-screen instructions, as the DVD may be displaying
its main title menu.
Stopping and Resuming Playback
To stop a disc, press and release the stop button on the
DVD player or the remote control. To resume playback,
press the play/pause button on the DVD player or
the remote control. As long as the disc has not been
ejected and the stop button has not been pressed twice,
the movie should resume play from where it was last
stopped. If the disc has been ejected, or if the stop
button has been pressed twice, the disc will resume play
at the beginning of the DVD or CD.
3-101
Page 212 of 452
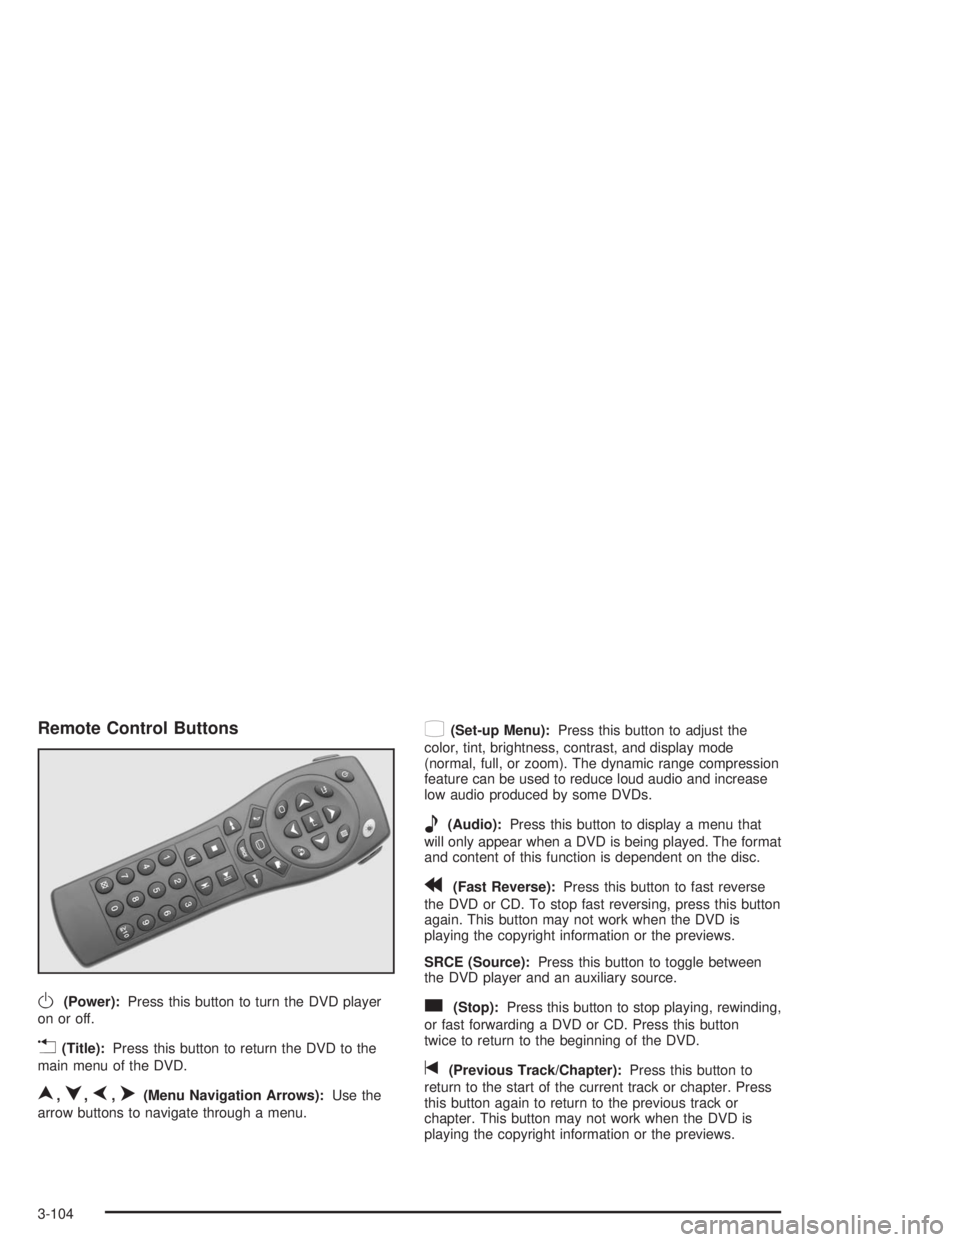
Remote Control Buttons
O(Power):Press this button to turn the DVD player
on or off.
v(Title):Press this button to return the DVD to the
main menu of the DVD.
n,q,p,o(Menu Navigation Arrows):Use the
arrow buttons to navigate through a menu.
z(Set-up Menu):Press this button to adjust the
color, tint, brightness, contrast, and display mode
(normal, full, or zoom). The dynamic range compression
feature can be used to reduce loud audio and increase
low audio produced by some DVDs.
e(Audio):Press this button to display a menu that
will only appear when a DVD is being played. The format
and content of this function is dependent on the disc.
r(Fast Reverse):Press this button to fast reverse
the DVD or CD. To stop fast reversing, press this button
again. This button may not work when the DVD is
playing the copyright information or the previews.
SRCE (Source):Press this button to toggle between
the DVD player and an auxiliary source.
c(Stop):Press this button to stop playing, rewinding,
or fast forwarding a DVD or CD. Press this button
twice to return to the beginning of the DVD.
t(Previous Track/Chapter):Press this button to
return to the start of the current track or chapter. Press
this button again to return to the previous track or
chapter. This button may not work when the DVD is
playing the copyright information or the previews.
3-104
Page 213 of 452
1 through 0 (Numeric Keypad):The remote control
numeric keypad provides you with the capability of direct
chapter, title, and track number selection.
\:Press this button, within 3 seconds after inputting
a numeric selection to clear all numeric inputs. Press
this button before inputting the number.
}10:Press the button, to select chapter, title, and
track numbers greater than 9. Press this button before
inputting the number.
P(Illumination):Press this button to turn the remote
control backlight on. The backlight will time out after
about 7 to 10 seconds if no other button is pressed while
the backlight is on.
y(Main DVD Menu):Press this button to access
the DVD menu. The DVD menu is different on every
DVD. Use the up, down, left, and right arrow buttons to
move the cursor around the DVD menu. After making
a selection press the enter button. This button only
operates when using a DVD.
r(Enter):Press this button to select the choices
that are highlighted in any menu.
q(Return):Press this button to exit the current
active menu and return to the previous menu. This
button will operate only when a DVD is being played
and a menu is active.
|(Camera Angle):This button changes camera
angles on DVDs that have this feature when a DVD is
playing. The format and content of this function is
dependent on the disc.
{(Subtitle):This button turns on subtitles and
moves through subtitle options when a DVD is playing.
The format and content of this function is dependent
on the disc.
[(Fast Forward):Press this button to fast forward
the DVD or CD. To stop fast forwarding, press this
button again. This button may not work when the DVD
is playing the copyright information or the previews.
s(Play/Pause):Press this button to start play of a
DVD or CD. Press this button while a DVD or CD is
playing to pause it. Press this button again to continue
the play of the DVD or CD.
3-105
Page 218 of 452
Problem Recommended Action
After stopping the player,
I push Play but
sometimes the DVD
starts where I left off
and sometimes at the
beginning.If the stop button was
pressed one time, the
DVD player will resume
playing where the DVD
was stopped. If the stop
button was pressed two
times the DVD player will
begin to play from the
beginning of the DVD.
The auxiliary source is
running but there is no
picture or sound.Check that the DVD
player is in the auxiliary
source mode.
Check the auxiliary input
connections at both
devices.
My disc is stuck in the
player. The Load/Eject
button does not work.Turn the DVD power off,
then on and press the
Load/Eject button on the
DVD player.
Do not attempt to forcibly
remove the disc from the
DVD player. This could
permanently damage the
disc and DVD player.Problem Recommended Action
Sometimes the wireless
headphone audio cuts
out or buzzes.Check for obstructions,
low batteries, reception
range, and interference
from cellular telephone
towers or by using your
cellular telephone in
the vehicle.
Check that the
headphones are facing
the front of the vehicle.
I lost the remote and/or
the headphones.See your dealer for
assistance.
The DVD is playing,
but there is no picture
or sound.Check that the DVD
player is in DVD mode.
The audio/video skips
or jumps.The DVD or CD could
be dirty, scratched,
or damaged.
What is the best way to
clean the video screen?Wipe the video screen
with a damp, soft cloth.
The audio from the
radio for the Radio with
Six-Disc CD and XM™
has taken over the
audio from the DVD or
CD when using the
wired headphones.The RSE is working
correctly.
Use the wireless
headphones or have
the front seat passengers
listen to another audio
source.
3-110
Page 231 of 452
Avoid needless heavy braking. Some people drive in
spurts — heavy acceleration followed by heavy
braking — rather than keeping pace with traffic. This is
a mistake. Your brakes may not have time to cool
between hard stops. Your brakes will wear out much
faster if you do a lot of heavy braking. If you keep pace
with the traffic and allow realistic following distances,
you will eliminate a lot of unnecessary braking.
That means better braking and longer brake life.
If your engine ever stops while you are driving, brake
normally but do not pump your brakes. If you do,
the pedal may get harder to push down. If your engine
stops, you will still have some power brake assist.
But you will use it when you brake. Once the power
assist is used up, it may take longer to stop and
the brake pedal will be harder to push.
Anti-lock Brake System
Your vehicle has anti-lock brakes. ABS is an advanced
electronic braking system that will help prevent a
braking skid.When you start your engine and begin to drive away,
your anti-lock brake system will check itself. You
may hear a momentary motor or clicking noise while
this test is going on. This is normal.
If there is a problem with
the anti-lock brake system,
this warning light will
stay on. SeeAnti-Lock
Brake System Warning
Light on page 3-34.
Along with ABS, your vehicle has a Dynamic Rear
Proportioning (DRP) system. If there is a DRP problem,
both the brake and ABS warning lights will come on
accompanied by a 10-second chime. The lights and
chime will come on each time the ignition is turned on
until the problem is repaired. See your dealer for service.
4-7
Page 234 of 452
See “Cruise Control” underTurn Signal/Multifunction
Lever on page 3-7. When the traction control off symbol
on the button is on, the TAS is off and will not limit
wheel spin. Adjust your driving accordingly.
The traction control off symbol on the button will come
on under the following conditions:
The Traction Assist System is turned off, either by
pressing the TAS on/off button or by turning off
the automatic engagement feature of the TAS.
The transmission is in FIRST (1) gear; TAS will not
operate in this gear. This is normal.
The vehicle is driven on an extremely rough road.
When the vehicle leaves the rough surface, slows
down or stops, the light will go off and TAS will
be on again. This is normal.
A Traction Assist System, Anti-Lock Brake System
or engine-related problem has been detected and
the vehicle needs service.
The Traction Assist System, as delivered from the
factory, will automatically come on whenever you start
your vehicle. To limit wheel spin, especially in slippery
road conditions, you should always leave the system on.
But you can turn the TAS off if you ever need to. You
should turn the TAS off if your vehicle ever gets stuck in
sand, mud or snow and rocking the vehicle is required.To turn the system on or off, press the TAS button
located near the shift lever. If you used the button to turn
the system off, the traction control off symbol on the
button will come on and stay on.
You can turn the system back on at any time by
pressing the button again. The traction control off symbol
on the button should go off.
If desired, you can change the TAS automatic
engagement feature so that the system will not come on
automatically when the engine is started. To do so:
1. Turn the ignition to RUN.
2. Move the shift lever to NEUTRAL.
3. Apply the brake pedal and press the accelerator
pedal to the �oor.
4. Press and hold the TAS button for at least
six seconds.
5. Release the TAS button and both pedals.
6. Start the engine and wait a few seconds.
The next time you start your vehicle, the TAS will not
automatically come on. You can restore the automatic
feature by using the same procedure. Whether the TAS
is set to come on automatically or not, you can always
turn the system on or off by pressing the TAS button.
4-10
Page 238 of 452
Do not get too close to the vehicle you want to
pass while you are awaiting an opportunity. For one
thing, following too closely reduces your area of
vision, especially if you are following a larger
vehicle. Also, you will not have adequate space if
the vehicle ahead suddenly slows or stops.
Keep back a reasonable distance.
When it looks like a chance to pass is coming up,
start to accelerate but stay in the right lane and
do not get too close. Time your move so you will be
increasing speed as the time comes to move into
the other lane. If the way is clear to pass, you
will have a “running start” that more than makes up
for the distance you would lose by dropping
back. And if something happens to cause you to
cancel your pass, you need only slow down
and drop back again and wait for another
opportunity.
If other vehicles are lined up to pass a slow vehicle,
wait your turn. But take care that someone is not
trying to pass you as you pull out to pass the slow
vehicle. Remember to glance over your shoulder
and check the blind spot.
Check your mirrors, glance over your shoulder,
and start your left lane change signal before moving
out of the right lane to pass. When you are far
enough ahead of the passed vehicle to see its front
in your inside mirror, activate your right lane
change signal and move back into the right lane.
(Remember that your right outside mirror is convex.
The vehicle you just passed may seem to be
farther away from you than it really is.)
Try not to pass more than one vehicle at a time
on two-lane roads. Reconsider before passing
the next vehicle.
Do not overtake a slowly moving vehicle too rapidly.
Even though the brake lamps are not �ashing, it
may be slowing down or starting to turn.
If you are being passed, make it easy for the
following driver to get ahead of you. Perhaps
you can ease a little to the right.
4-14
Page 239 of 452
Loss of Control
Let us review what driving experts say about what
happens when the three control systems (brakes,
steering and acceleration) do not have enough friction
where the tires meet the road to do what the driver
has asked.
In any emergency, do not give up. Keep trying to steer
and constantly seek an escape route or area of less
danger.
Skidding
In a skid, a driver can lose control of the vehicle.
Defensive drivers avoid most skids by taking reasonable
care suited to existing conditions, and by not “overdriving”
those conditions. But skids are always possible.
The three types of skids correspond to your vehicle’s
three control systems. In the braking skid, your wheels
are not rolling. In the steering or cornering skid, too much
speed or steering in a curve causes tires to slip and lose
cornering force. And in the acceleration skid, too much
throttle causes the driving wheels to spin.
A cornering skid is best handled by easing your foot off
the accelerator pedal.If you have the Traction Assist System, remember: It
helps avoid only the acceleration skid. If you do not have
this system, or if the system is off, then an acceleration
skid is also best handled by easing your foot off the
accelerator pedal.
If your vehicle starts to slide, ease your foot off the
accelerator pedal and quickly steer the way you want
the vehicle to go. If you start steering quickly enough,
your vehicle may straighten out. Always be ready
for a second skid if it occurs.
Of course, traction is reduced when water, snow, ice,
gravel or other material is on the road. For safety,
you will want to slow down and adjust your driving to
these conditions. It is important to slow down on slippery
surfaces because stopping distance will be longer and
vehicle control more limited.
While driving on a surface with reduced traction, try
your best to avoid sudden steering, acceleration
or braking (including engine braking by shifting to a
lower gear). Any sudden changes could cause the tires
to slide. You may not realize the surface is slippery
until your vehicle is skidding. Learn to recognize warning
clues — such as enough water, ice or packed snow
on the road to make a “mirrored surface” — and slow
down when you have any doubt.
Remember: Any anti-lock brake system (ABS) helps
avoid only the braking skid.
4-15
Page 243 of 452
Controlling your vehicle is the key to successful off-road
driving. One of the best ways to control your vehicle
is to control your speed. Here are some things to keep
in mind. At higher speeds:
you approach things faster and you have less time
to scan the terrain for obstacles.
you have less time to react.
you have more vehicle bounce when you drive over
obstacles.
you will need more distance for braking, especially
since you are on an unpaved surface.
{CAUTION:
When you are driving off-road, bouncing and
quick changes in direction can easily throw
you out of position. This could cause you to
lose control and crash. So, whether you’re
driving on or off the road, you and your
passengers should wear safety belts.
Scanning the Terrain
Off-road driving can take you over many different kinds
of terrain. You need to be familiar with the terrain and
its many different features. Here are some things to
consider.
Surface Conditions:Off-roading can take you over
hard-packed dirt, gravel, rocks, grass, sand, mud, snow
or ice. Each of these surfaces affects the steering,
acceleration and braking of your vehicle in different
ways. Depending upon the kind of surface you are on,
you may experience slipping, sliding, wheel spinning,
delayed acceleration, poor traction and longer braking
distances.
Surface Obstacles:Unseen or hidden obstacles can
be hazardous. A rock, log, hole, rut or bump can startle
you if you are not prepared for them. Often these
obstacles are hidden by grass, bushes, snow or even
the rise and fall of the terrain itself. Here are some
things to consider:
Is the path ahead clear?
Will the surface texture change abruptly up ahead?
Does the travel take you uphill or downhill?
(There is more discussion of these subjects later.)
Will you have to stop suddenly or change direction
quickly?
4-19
Page 247 of 452
Q:What should I do if my vehicle stalls, or is
about to stall, and I can not make it up
the hill?
A:If this happens, there are some things you should
do, and there are some things you must not do?
First, here is what youshoulddo:
Push the brake pedal to stop the vehicle and keep
it from rolling backwards. Also, apply the parking
brake.
If your engine is still running, shift the transmission
to REVERSE (R), release the parking brake, and
slowly back down the hill in REVERSE (R).
If your engine has stopped running, you will need to
restart it. With the brake pedal pressed and the
parking brake still applied, shift the transmission to
PARK (P) and restart the engine. Then shift to
REVERSE (R), release the parking brake,
and slowly back down the hill as straight as possible
in REVERSE (R).
As you are backing down the hill, put your left hand
on the steering wheel at the 12 o’clock position.
This way you will be able to tell if your wheels are
straight and maneuver as you back down. It is
best that you back down the hill with your wheels
straight rather than in the left or right direction.
Turning the wheel too far to the left or right
will increase the possibility of a rollover.Here are some things youmust notdo if you stall,
or are about to stall, when going up a hill.
Never attempt to prevent a stall by shifting into
NEUTRAL (N) to “rev-up” the engine and regain
forward momentum. This will not work. Your vehicle
will roll backwards very quickly and you could go
out of control.
Instead, apply the regular brake to stop the vehicle.
Then apply the parking brake. Shift to
REVERSE (R), release the parking brake, and
slowly back straight down.
Never attempt to turn around if you are about to
stall when going up a hill. If the hill is steep
enough to stall your vehicle, it is steep enough to
cause you to roll over if you turn around. If you can
not make it up the hill you must back straight
down the hill.
Q:Suppose, after stalling, I try to back downthe hill
and decide I just can not do it. What should I do?
A:Set the parking brake, put your transmission in
PARK (P) and turn off the engine. Leave the
vehicle and go get some help. Exit on the uphill
side and stay clear of the path the vehicle
would take if it rolled downhill.
4-23