child lock BUICK RAINIER 2007 Owner's Manual
[x] Cancel search | Manufacturer: BUICK, Model Year: 2007, Model line: RAINIER, Model: BUICK RAINIER 2007Pages: 534, PDF Size: 2.87 MB
Page 1 of 534
Seats and Restraint Systems
....................... 7
Front Seats
.............................................. 8
Rear Seats
............................................. 16
Safety Belts
............................................ 18
Child Restraints
...................................... 40
Airbag System
........................................ 68
Restraint System Check
......................... 86
Features and Controls
................................ 89
Keys
....................................................... 91
Doors and Locks
.................................... 96
Windows
............................................... 103
Theft-Deterrent Systems
....................... 105
Starting and Operating Your Vehicle
..... 108
Mirrors
.................................................. 124
OnStar
®System
................................... 129
Universal Home Remote System
.......... 133
Storage Areas
...................................... 144
Sunroof
................................................ 148Instrument Panel
....................................... 149
Instrument Panel Overview
................... 152
Climate Controls
................................... 170
Warning Lights, Gages, and
Indicators
.......................................... 176
Driver Information Center (DIC)
............ 198
Audio System(s)
................................... 215
Driving Your Vehicle
................................. 281
Your Driving, the Road, and
Your Vehicle
..................................... 282
Towing
................................................. 337
Service and Appearance Care
.................. 353
Service
................................................. 356
Fuel
...................................................... 358
Checking Things Under the Hood
......... 364
All-Wheel Drive
..................................... 402
Rear Axle
............................................. 402
Front Axle
............................................ 403
2007 Buick Rainier Owner ManualM
1
Page 24 of 534
How to Wear Safety Belts Properly
This part is only for people of adult size.
Be aware that there are special things to know
about safety belts and children. And there
are different rules for smaller children and babies.
If a child will be riding in your vehicle, see
Older Children on page 40orInfants and Young
Children on page 43. Follow those rules for
everyone’s protection.
First, you will want to know which restraint
systems your vehicle has.
We will start with the driver position.
Driver Position
Lap-Shoulder Belt
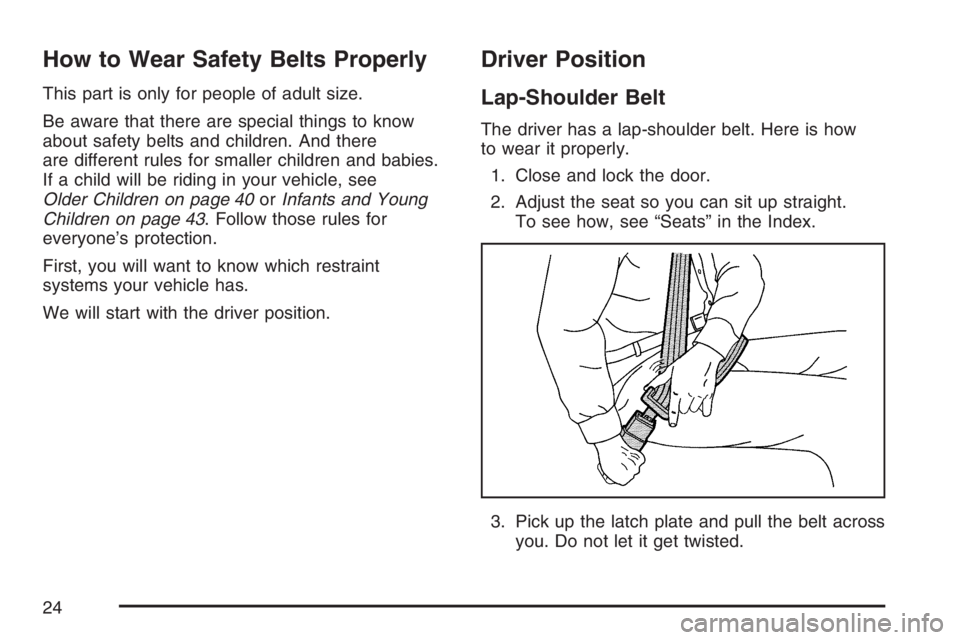
The driver has a lap-shoulder belt. Here is how
to wear it properly.
1. Close and lock the door.
2. Adjust the seat so you can sit up straight.
To see how, see “Seats” in the Index.
3. Pick up the latch plate and pull the belt across
you. Do not let it get twisted.
24
Page 33 of 534
The best way to protect the fetus is to protect
the mother. When a safety belt is worn properly,
it is more likely that the fetus will not be hurt
in a crash. For pregnant women, as for anyone,
the key to making safety belts effective is wearing
them properly.
Right Front Passenger Position
To learn how to wear the right front passenger’s
safety belt properly, seeDriver Position
on page 24.
The right front passenger’s safety belt works the
same way as the driver’s safety belt — except
for one thing. If you ever pull the shoulder portion
of the belt out all the way, you will engage the
child restraint locking feature. If this happens, let
the belt go back all the way and start again.
Rear Seat Passengers
It is very important for rear seat passengers to
buckle up! Accident statistics show that unbelted
people in the rear seat are hurt more often in
crashes than those who are wearing safety belts.
Rear passengers who are not safety belted
can be thrown out of the vehicle in a crash.
And they can strike others in the vehicle who are
wearing safety belts.
33
Page 59 of 534
{CAUTION:
Children can be seriously injured or
strangled if a shoulder belt is wrapped
around their neck and the safety belt
continues to tighten. Secure any unused
safety belts behind the child restraint so
children cannot reach them. Pull the
shoulder belt all the way out of the
retractor to set the lock, if your vehicle
has one, after the child restraint has been
installed. Be sure to follow the instructions
of the child restraint manufacturer.
Notice:Contact between the child restraint or
the LATCH attachment parts and the vehicle’s
safety belt assembly may cause damage to
these parts. Make sure when securing unused
safety belts behind the child restraint that
there is no contact between the child restraint
or the LATCH attachment parts and the
vehicle’s safety belt assembly.Folding an empty rear seat with the safety
belts secured may cause damage to the safety
belt or the seat. When removing the child
restraint, always remember to return the safety
belts to their normal, stowed position before
folding the rear seat.
1. Attach and tighten the lower attachments to
the lower anchors. If the child restraint does
not have lower attachments or the desired
seating position does not have lower anchors,
secure the child restraint with the top tether
and the safety belts. Refer to your child
restraint manufacturer instructions and the
instructions in this manual.
1.1. Find the lower anchors for the desired
seating position.
1.2. Pull the strap at the center of the seat
where the seat cushion meets the
seatback. This will allow you to fold the
seat cushion up and out of the way.
Lift the �ap to expose the anchors and
then lower the seat cushion. See
Rear Seat Operation on page 16for
additional information. Be sure the
cushion is locked into place.
59
Page 62 of 534
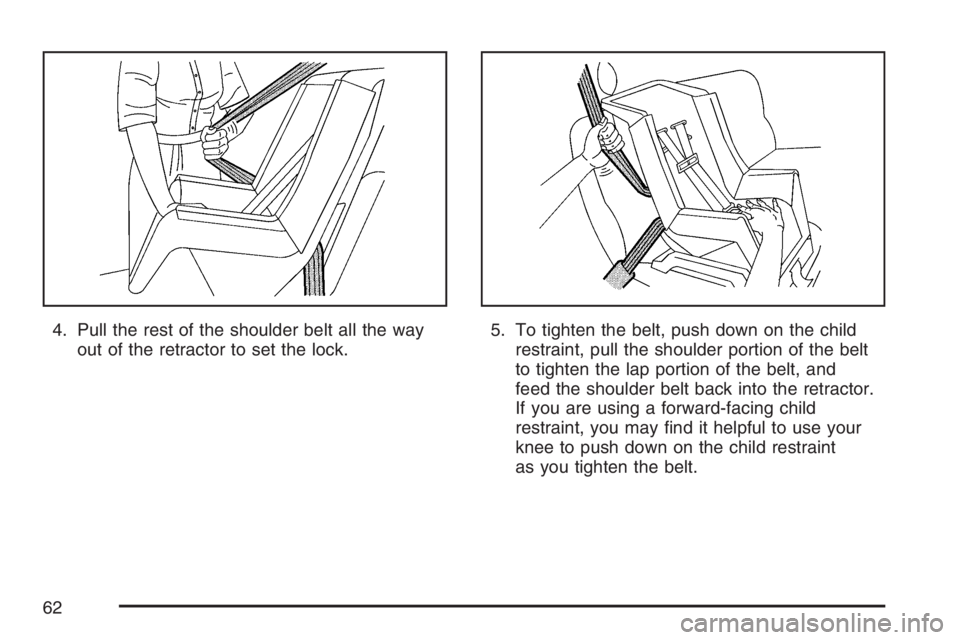
4. Pull the rest of the shoulder belt all the way
out of the retractor to set the lock.5. To tighten the belt, push down on the child
restraint, pull the shoulder portion of the belt
to tighten the lap portion of the belt, and
feed the shoulder belt back into the retractor.
If you are using a forward-facing child
restraint, you may �nd it helpful to use your
knee to push down on the child restraint
as you tighten the belt.
62
Page 66 of 534
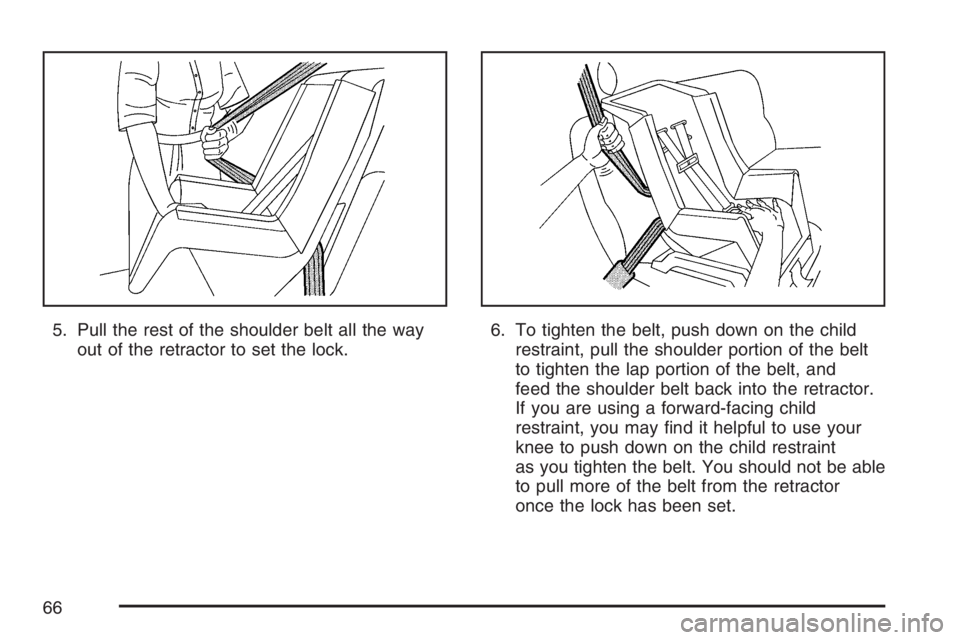
5. Pull the rest of the shoulder belt all the way
out of the retractor to set the lock.6. To tighten the belt, push down on the child
restraint, pull the shoulder portion of the belt
to tighten the lap portion of the belt, and
feed the shoulder belt back into the retractor.
If you are using a forward-facing child
restraint, you may �nd it helpful to use your
knee to push down on the child restraint
as you tighten the belt. You should not be able
to pull more of the belt from the retractor
once the lock has been set.
66
Page 96 of 534
Doors and Locks
Door Locks
{CAUTION:
Unlocked doors can be dangerous.
Passengers, especially children, can
easily open the doors and fall out of
a moving vehicle. When a door is
locked, the handle will not open it.
You increase the chance of being
thrown out of the vehicle in a crash if
the doors are not locked. So, wear
safety belts properly and lock the
doors whenever you drive.
CAUTION: (Continued)
CAUTION: (Continued)
Young children who get into unlocked
vehicles may be unable to get out.
A child can be overcome by extreme
heat and can suffer permanent injuries
or even death from heat stroke.
Always lock your vehicle whenever
you leave it.
Outsiders can easily enter through an
unlocked door when you slow down
or stop your vehicle. Locking your
doors can help prevent this from
happening.
There are several ways to lock and unlock your
vehicle. From the outside, use the remote keyless
entry transmitter or the key.
96
Page 229 of 534
While the radio is tuned to an RDS station, the
station name or call letters display instead of the
frequency. RDS stations may also provide the
time of day, a program type (PTY) for current
programming, and the name of the program being
broadcast.
XM™ Satellite Radio Service
XM™ is a satellite radio service that is based in
the 48 contiguous United States and Canada.
XM™ offers a large variety of coast-to-coast
channels including music, news, sports, talk,
traffic/weather (U.S. subscribers), and children’s
programming. XM™ provides digital quality
audio and text information that includes song title
and artist name. A service fee is required in
order to receive the XM™ service. For more
information, contact XM™; In the U.S. at
www.xmradio.com or call 1-800-852-XMXM (9696)
or in Canada at www.xmradio.ca or call
1-877-GET-XMSR (438-9677).
Playing the Radio
PWR (Power):Press this knob to turn the system
on and off.
oVOLp(Volume):Turn this knob clockwise
or counterclockwise to increase or to decrease
the volume.
DISPL (Display):When the ignition is turned off,
press this knob to display the time.
For RDS, press the DISPL knob to change the
display while using RDS. The display options are
station name, RDS station frequency, PTY,
and the name of the program (if available).
For XM™ (if equipped), press the DISPL knob
while in XM™ mode to retrieve four different
categories of information related to the current
song or channel: Artist, Song Title, Category
or PTY, Channel Number/Channel Name.
To change the default on the display, press the
DISPL knob until you see the desired display, then
press and hold this knob for two seconds. The
radio produces one beep and the selected display
becomes the default.
229
Page 239 of 534
XM™ Satellite Radio Service
XM™ is a satellite radio service that is based in
the 48 contiguous United States and Canada.
XM™ offers a large variety of coast-to-coast
channels including music, news, sports, talk,
traffic/weather (U.S. subscribers), and children’s
programming. XM™ provides digital quality
audio and text information that includes song title
and artist name. A service fee is required in
order to receive the XM™ service. For more
information, contact XM™; In the U.S. at
www.xmradio.com or call 1-800-852-XMXM (9696)
or in Canada at www.xmradio.ca or call
1-877-GET-XMSR (438-9677).
Playing the Radio
PWR (Power):Push this knob to turn the system
on and off.
oVOLUMEp:Turn this knob clockwise or
counterclockwise to increase or to decrease
the volume.
INFO (Information):When the ignition is off,
press this knob to display the time.For RDS, press the INFO knob to change what
appears on the display while using RDS. The
display options are station name, RDS station
frequency, PTY, and the name of the program
(if available).
For XM™ (if equipped), press the INFO knob
while in XM™ mode to retrieve four different
categories of information related to the current
song or channel: Artist, Song Title, Category
or PTY, Channel Number/Channel Name.
To change the default on the display, press the
INFO knob until you see the desired display, then
hold the knob until a beep sounds. The selected
display becomes the default.
AUTO VOL (Automatic Volume):With automatic
volume, the audio system adjusts automatically
to make up for road and wind noise as you drive
by increasing the volume as vehicle speed
increases.
Set the volume at the desired level. Press this
button to select MIN (minimum), MED (medium), or
MAX (maximum). AUTO VOL displays. Each higher
setting provides more volume compensation at
faster vehicle speeds. To turn automatic volume off,
press this button until AUTO VOL OFF displays.
239
Page 295 of 534
Try to adjust your speed so you can “drive”
through the curve. Maintain a reasonable, steady
speed. Wait to accelerate until you are out of
the curve, and then accelerate gently into
the straightaway.
Adding non-GM accessories can affect your
vehicle’s performance. SeeAccessories and
Modi�cations on page 356.
Steering in Emergencies
There are times when steering can be more
effective than braking. For example, you come
over a hill and �nd a truck stopped in your lane, or
a car suddenly pulls out from nowhere, or a
child darts out from between parked cars and
stops right in front of you. You can avoid these
problems by braking — if you can stop in time.
But sometimes you cannot; there is not room.
That is the time for evasive action — steering
around the problem.
Your vehicle can perform very well in emergencies
like these. First apply your brakes.
SeeBraking on page 286. It is better to remove as
much speed as you can from a possible collision.
Then steer around the problem, to the left or
right depending on the space available.An emergency like this requires close attention
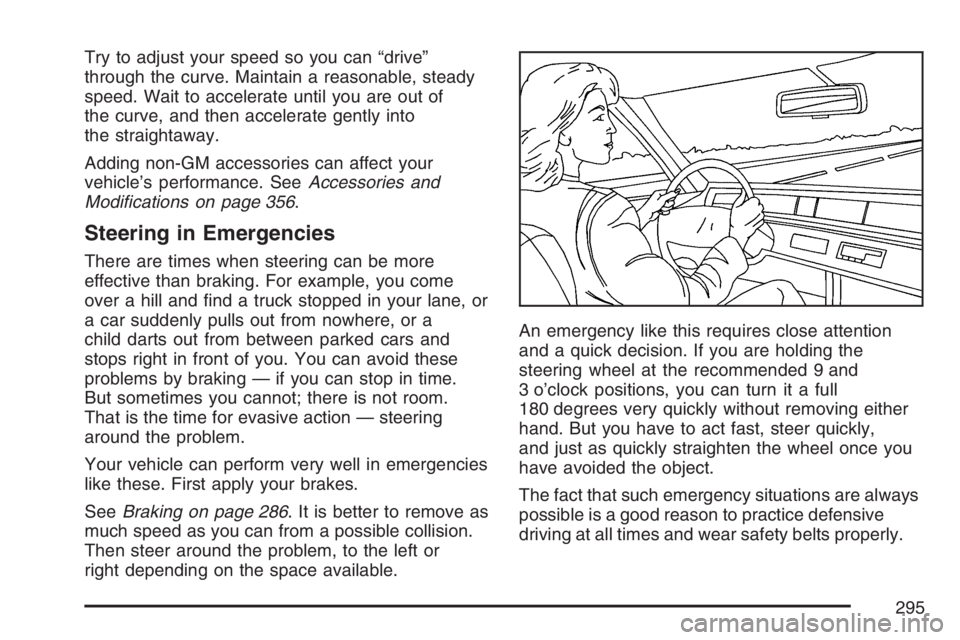
and a quick decision. If you are holding the
steering wheel at the recommended 9 and
3 o’clock positions, you can turn it a full
180 degrees very quickly without removing either
hand. But you have to act fast, steer quickly,
and just as quickly straighten the wheel once you
have avoided the object.
The fact that such emergency situations are always
possible is a good reason to practice defensive
driving at all times and wear safety belts properly.
295