tire pressure reset BUICK RAINIER 2007 Owner's Manual
[x] Cancel search | Manufacturer: BUICK, Model Year: 2007, Model line: RAINIER, Model: BUICK RAINIER 2007Pages: 534, PDF Size: 2.87 MB
Page 199 of 534

DIC Operation and Displays
The DIC comes on when the ignition is on. After a
short delay the DIC will display the information
that was last displayed before the engine
was turned off.
If a problem is detected, a warning message will
appear on the display. Pressing the trip stem
will acknowledge any warning or service
messages. Pressing any of the DIC steering wheel
buttons — trip information, fuel information,
customization, or select button — will also
acknowledge any warnings or service messages.
You should take any message that appears on
the display seriously and remember that clearing
the message will only make the message
disappear, not correct the problem.
The DIC has different modes which can be
accessed by pressing the four DIC buttons located
on the steering wheel. These buttons are trip
information, fuel information, customization, and
select. The button functions are detailed in
the following pages.
Trip Information Button
3
(Trip Information):Press the trip
information button to scroll through the
ODOMETER, TRIP A, TRIP B, TIRE
PRESSURES, and TIMER.
Odometer:Press the trip information button until
ODOMETER appears on the display. This
mode shows the total distance the vehicle has
been driven in either miles or kilometers. Pressing
the reset stem located on the instrument cluster
with the vehicle off will also display the odometer.
Trip A:Press the trip information button until
TRIP A appears on the display. This mode shows
the current distance traveled since the last
reset for TRIP A in either miles or kilometers.
Trip B:Press the trip information button
until TRIP B appears on the display. This mode
shows the current distance traveled since the last
reset for TRIP B in either miles or kilometers.
199
Page 200 of 534

To reset TRIP A or TRIP B information, press and
hold the select button for one second while in
one of the trip modes. This will reset the
information for TRIP A or TRIP B.
You can also reset the TRIP A or TRIP B while they
are displayed by pressing the reset stem on the
cluster. If you press and hold the reset stem or the
select button for more than four seconds, the
display will show the distance traveled since the last
ignition cycle for TRIP A or TRIP B.
Tire Pressures:Press the trip information button
until TIRE PRESSURES appears on the display.
This mode shows the tire pressure in pounds
per square inch (psi) or kilopascals (kPa). Press
the select button to scroll through the following
information:
LF TIRE shows the tire pressure for the front
driver’s side tire.
RF TIRE shows the tire pressure for the front
passenger’s side tire.
LR TIRE shows the tire pressure for the rear
driver’s side tire.
RR TIRE shows the tire pressure for the rear
passenger’s side tire.Timer:The DIC can be used as a timer. Press
the select button while TIMER is displayed to start
the timer. The display will show the amount of
time that has passed since the timer was
last reset, not including time the ignition is off.
Time will continue to be counted as long as
the ignition is on, even if another display is being
shown on the DIC. The timer will record up to
99 hours, 59 minutes and 59 seconds (99:59:59)
after which the display will roll back to zero.
To stop the counting of time, press the select
button brie�y while TIMER is displayed.
To reset the timer to zero, press and hold the
select button while TIMER is displayed.
Fuel Information Button
t
(Fuel Information):Press the fuel information
button to scroll through the range, fuel used,
average fuel economy, and the engine oil
life system.
200
Page 425 of 534

Tire Inspection and Rotation
Tires should be rotated every 5,000 to 8,000 miles
(8 000 to 13 000 km).
Any time you notice unusual wear, rotate your
tires as soon as possible and check wheel
alignment. Also check for damaged tires or wheels.
SeeWhen It Is Time for New Tires on page 426
andWheel Replacement on page 432for
more information.
Make sure the spare tire is stored securely. Push,
pull, and then try to rotate or turn the tire. If it
moves, use the wheel wrench to tighten the cable.
For information on storing or removing the
spare tire, seeChanging a Flat Tire on page 436.
The purpose of regular rotation is to achieve
more uniform wear for all tires on the vehicle. The
�rst rotation is the most important. SeeScheduled
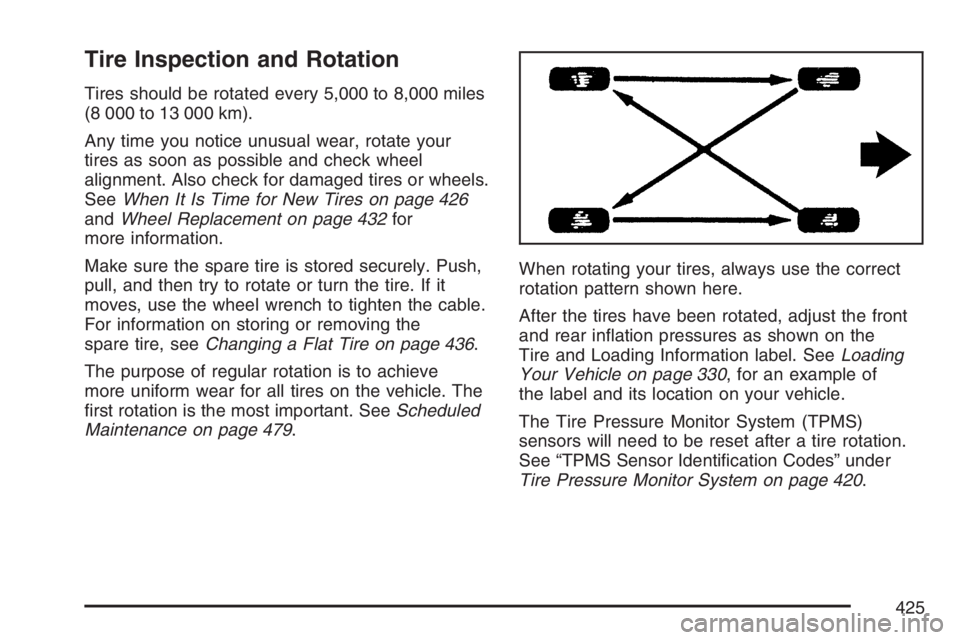
Maintenance on page 479.When rotating your tires, always use the correct
rotation pattern shown here.
After the tires have been rotated, adjust the front
and rear in�ation pressures as shown on the
Tire and Loading Information label. SeeLoading
Your Vehicle on page 330, for an example of
the label and its location on your vehicle.
The Tire Pressure Monitor System (TPMS)
sensors will need to be reset after a tire rotation.
See “TPMS Sensor Identi�cation Codes” under
Tire Pressure Monitor System on page 420.
425
Page 481 of 534

Scheduled Maintenance
Service MaintenanceIMaintenanceII
Change engine oil and �lter. SeeEngine Oil on page 369. Reset oil life system.
SeeEngine Oil Life System on page 372.An Emission Control Service.••
Visually check for any leaks or damage.See footnote (j).••
Inspect engine air cleaner �lter. If necessary, replace �lter. SeeEngine Air
Cleaner/Filter on page 374.See footnote (k).•
Rotate tires and check in�ation pressures and wear. SeeTire Inspection and
Rotation on page 425and “Tire Wear Inspection” inAt Least Once a Month
on page 486.••
Inspect brake system.See footnote (a).••
Check engine coolant and windshield washer �uid levels and add �uid as
needed.••
Perform any needed additional services. See “Additional Required Services”
in this section.••
Inspect suspension and steering components.See footnote (b).•
Inspect engine cooling system.See footnote (c).•
Inspect wiper blades.See footnote (d).•
Inspect restraint system components.See footnote (e).•
Lubricate body components.See footnote (f).•
Check transmission �uid level and add �uid as needed.See footnote (g).•
481