clock BUICK RANDEZVOUS 2002 Owner's Guide
[x] Cancel search | Manufacturer: BUICK, Model Year: 2002, Model line: RANDEZVOUS, Model: BUICK RANDEZVOUS 2002Pages: 455, PDF Size: 2.86 MB
Page 273 of 455

4-14
An emergency like this requires close attention and a
quick decision. If you are holding the steering wheel at
the recommended 9 and 3 o'clock positions, you can
turn it a full 180 degrees very quickly without removing
either hand. But you have to act fast, steer quickly, and
just as quickly straighten the wheel once you have
avoided the object.
The fact that such emergency situations are always
possible is a good reason to practice defensive driving
at all times and wear safety belts properly.
Off-Road Recovery
You may find that your right wheels have dropped
off the edge of a road onto the shoulder while
you're driving.
If the level of the shoulder is only slightly below the
pavement, recovery should be fairly easy. Ease off the
accelerator and then, if there is nothing in the way, steer so
that your vehicle straddles the edge of the pavement. You
can turn the steering wheel up to one
-quarter turn until the
right front tire contacts the pavement edge. Then turn your
steering wheel to go straight down the roadway.
Page 319 of 455

5-16 How to Add Coolant to the Radiator
NOTICE:
Your engine has a specific radiator fill procedure.
Failure to follow this procedure could cause your
engine to overheat and be severely damaged.
1. You can remove the radiator pressure cap when
the cooling system, including the radiator pressure
cap and upper radiator hose, is no longer hot.
Turn the pressure cap slowly counterclockwise
until it first stops. (Don't press down while turning
the pressure cap.)
If you hear a hiss, wait for that to stop. A hiss means
there is still some pressure left.
2. Then keep turning the pressure cap, but now push
down as you turn it. Remove the pressure cap.
Page 324 of 455
5-21 Removing the Spare Tire and Tools
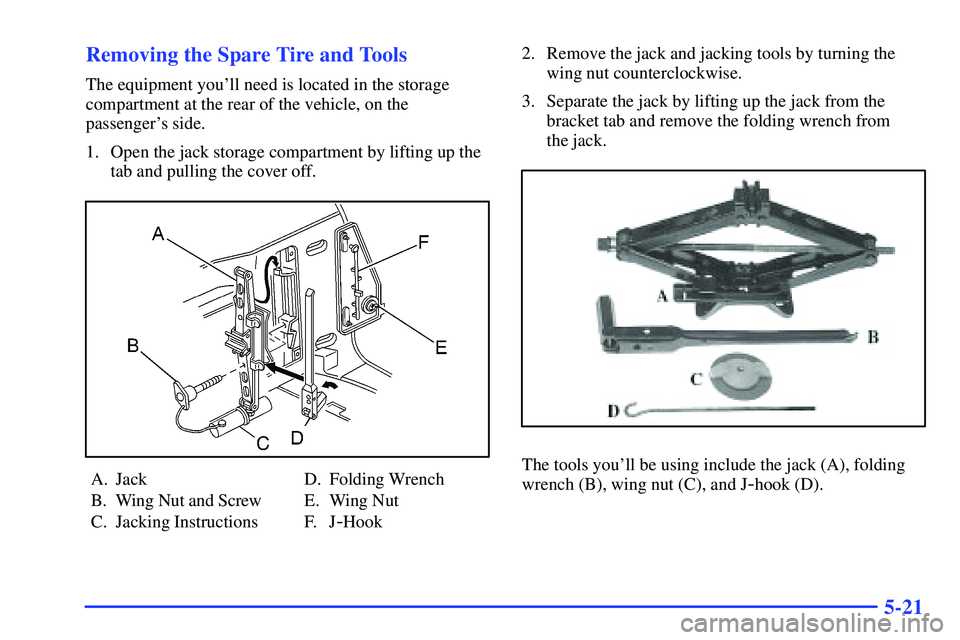
The equipment you'll need is located in the storage
compartment at the rear of the vehicle, on the
passenger's side.
1. Open the jack storage compartment by lifting up the
tab and pulling the cover off.
A. Jack
B. Wing Nut and Screw
C. Jacking InstructionsD. Folding Wrench
E. Wing Nut
F. J
-Hook2. Remove the jack and jacking tools by turning the
wing nut counterclockwise.
3. Separate the jack by lifting up the jack from the
bracket tab and remove the folding wrench from
the jack.
The tools you'll be using include the jack (A), folding
wrench (B), wing nut (C), and J
-hook (D).
Page 325 of 455
5-22
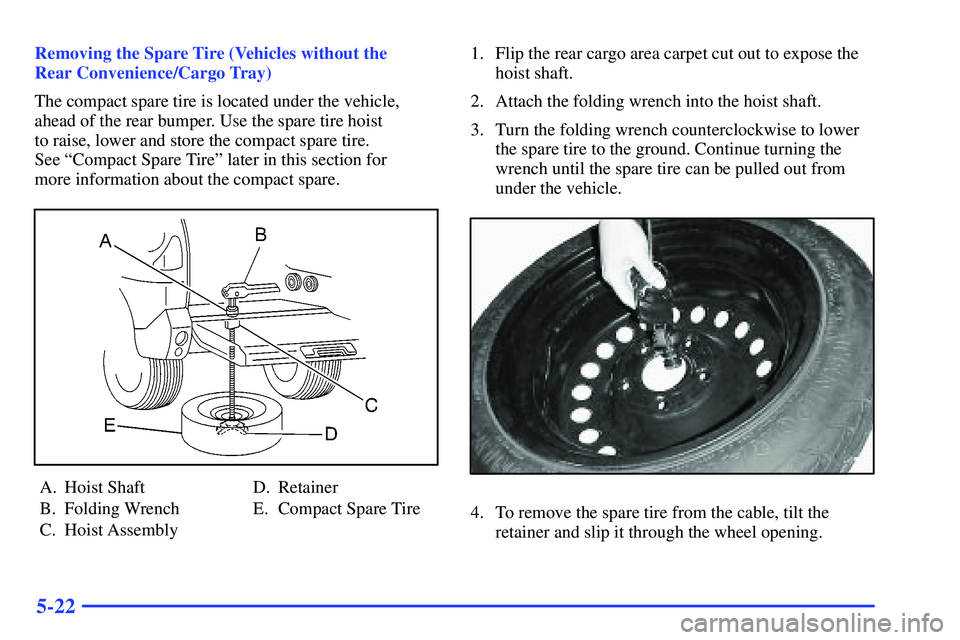
Removing the Spare Tire (Vehicles without the
Rear Convenience/Cargo Tray)
The compact spare tire is located under the vehicle,
ahead of the rear bumper. Use the spare tire hoist
to raise, lower and store the compact spare tire.
See ªCompact Spare Tireº later in this section for
more information about the compact spare.
A. Hoist Shaft
B. Folding Wrench
C. Hoist AssemblyD. Retainer
E. Compact Spare Tire1. Flip the rear cargo area carpet cut out to expose the
hoist shaft.
2. Attach the folding wrench into the hoist shaft.
3. Turn the folding wrench counterclockwise to lower
the spare tire to the ground. Continue turning the
wrench until the spare tire can be pulled out from
under the vehicle.
4. To remove the spare tire from the cable, tilt the
retainer and slip it through the wheel opening.
Page 326 of 455
5-23
5. After removing the spare tire, turn the wrench
clockwise to raise the cable back up.
Do not store a full
-size or a flat road tire under the
vehicle. See ªStoring a Flat or Spare Tire and Toolsº
later in this section.
To continue changing the flat tire see ªRemoving the Flat
Tire and Installing the Spare Tireº later in this section.
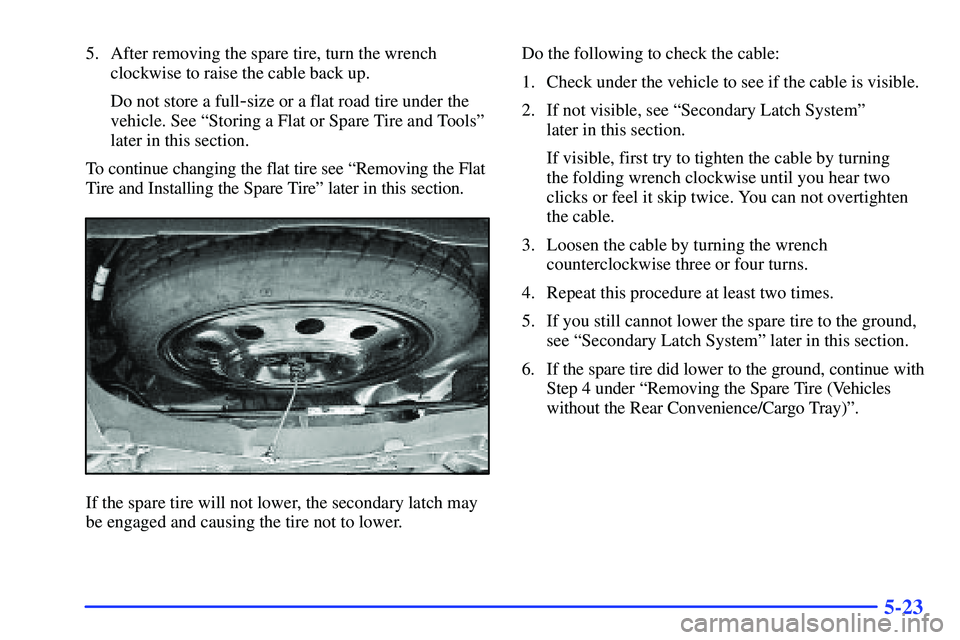
If the spare tire will not lower, the secondary latch may
be engaged and causing the tire not to lower.Do the following to check the cable:
1. Check under the vehicle to see if the cable is visible.
2. If not visible, see ªSecondary Latch Systemº
later in this section.
If visible, first try to tighten the cable by turning
the folding wrench clockwise until you hear two
clicks or feel it skip twice. You can not overtighten
the cable.
3. Loosen the cable by turning the wrench
counterclockwise three or four turns.
4. Repeat this procedure at least two times.
5. If you still cannot lower the spare tire to the ground,
see ªSecondary Latch Systemº later in this section.
6. If the spare tire did lower to the ground, continue with
Step 4 under ªRemoving the Spare Tire (Vehicles
without the Rear Convenience/Cargo Tray)º.
Page 327 of 455
5-24
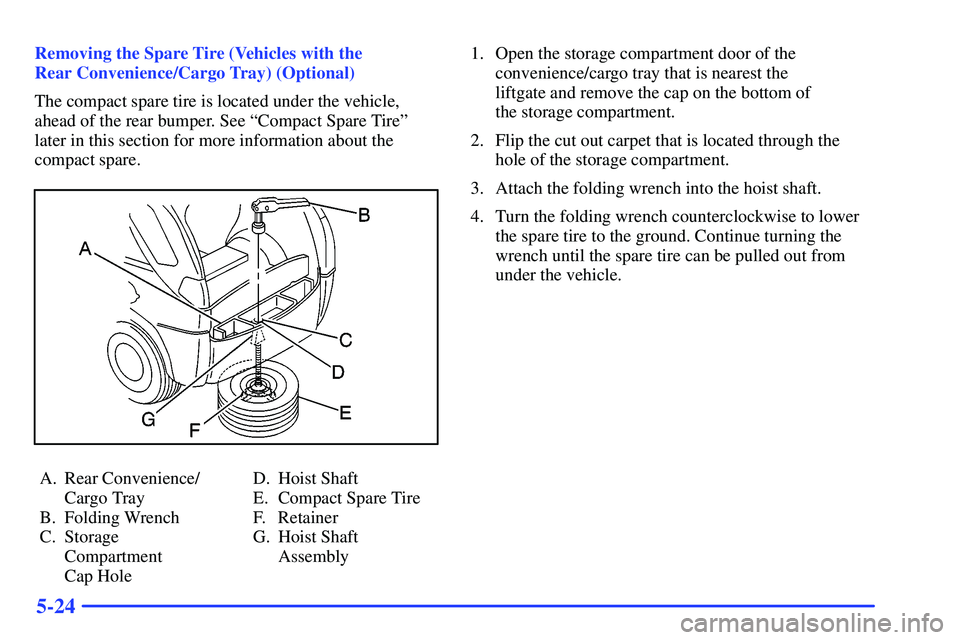
Removing the Spare Tire (Vehicles with the
Rear Convenience/Cargo Tray) (Optional)
The compact spare tire is located under the vehicle,
ahead of the rear bumper. See ªCompact Spare Tireº
later in this section for more information about the
compact spare.
A. Rear Convenience/
Cargo Tray
B. Folding Wrench
C. Storage
Compartment
Cap HoleD. Hoist Shaft
E. Compact Spare Tire
F. Retainer
G. Hoist Shaft
Assembly1. Open the storage compartment door of the
convenience/cargo tray that is nearest the
liftgate and remove the cap on the bottom of
the storage compartment.
2. Flip the cut out carpet that is located through the
hole of the storage compartment.
3. Attach the folding wrench into the hoist shaft.
4. Turn the folding wrench counterclockwise to lower
the spare tire to the ground. Continue turning the
wrench until the spare tire can be pulled out from
under the vehicle.
Page 328 of 455

5-25
5. To remove the spare tire from the cable, tilt the
retainer and slip it through the wheel opening.
6. After removing the spare tire, turn the wrench
clockwise to raise the cable back up.
Do not store a full
-size or a flat road tire under the
vehicle. See ªStoring a Flat or Spare Tire and Toolsº
later in this section.
To continue changing the flat tire see ªRemoving
the Flat Tire and Installing the Spare Tireº later in
this section.
If the spare tire will not lower, the secondary latch may
be engaged and causing the tire not to lower. Do the
following to check the cable:
1. Check under the vehicle to see if the cable is visible.
2. If not visible, see ªSecondary Latch Systemº later
in this section.
If visible, first try to tighten the cable by turning
the folding wrench clockwise until you hear two
clicks or feel it skip twice. You can not overtighten
the cable.
Page 329 of 455

5-26
3. Loosen the cable by turning the wrench
counterclockwise three or four turns.
4. Repeat this procedure at least two times.
5. If you still cannot lower the spare tire to the ground,
see ªSecondary Latch Systemº later in this section.
6. If the spare tire did lower to the ground, continue
with Step 6 under ªRemoving the Spare Tire
(Vehicles with the Rear Convenience/Cargo Tray)º.
Secondary Latch System
Your vehicle has an underbody mounted tire hoist
assembly equipped with a secondary latch system. It's
designed to stop the compact spare tire from suddenly
falling off your vehicle if the cable holding the spare tire
is damaged. For the secondary latch to work, the tire
must be stowed with the valve stem pointing down. See
ªStoring the Spare Tire and Toolsº in the Index for
instructions on storing the spare tire correctly.
CAUTION:
Before beginning this procedure read all the
instructions. Failure to read and follow the
instructions could damage the hoist assembly
and you and others could get hurt. Read and
follow the instructions listed below.
To release the spare tire from the secondary latch,
do the following:
CAUTION:
Someone standing too close during the procedure
could be injured by the jack. If the spare tire does
not slide off the jack completely, make sure no one
is behind you or on either side of you as you pull
the jack out from under the spare.
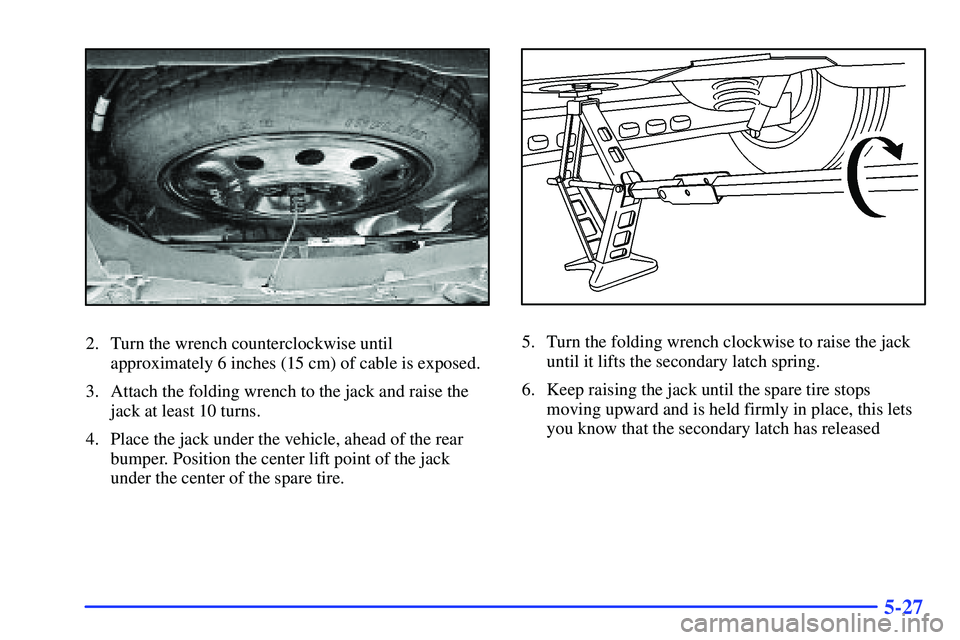
1. If the cable is not visible, start this procedure
at Step 3.
Page 330 of 455
5-27
2. Turn the wrench counterclockwise until
approximately 6 inches (15 cm) of cable is exposed.
3. Attach the folding wrench to the jack and raise the
jack at least 10 turns.
4. Place the jack under the vehicle, ahead of the rear
bumper. Position the center lift point of the jack
under the center of the spare tire.5. Turn the folding wrench clockwise to raise the jack
until it lifts the secondary latch spring.
6. Keep raising the jack until the spare tire stops
moving upward and is held firmly in place, this lets
you know that the secondary latch has released
Page 331 of 455

5-28
7. Lower the jack by turning the folding wrench
counterclockwise. Keep lowering the jack until
the spare tire is resting on the folding wrench.8. Grasp the spare tire with both hands and pull it out
from under the vehicle.
9. Reach under the vehicle and remove the folding
wrench and jack.
10. When the spare tire has been completely lowered,
tilt the retainer and slip it through the wheel opening.
11. If the cable is hanging, turn the wrench clockwise
to raise the cable back up.
Have the hoist assembly inspected as soon as you can.
You will not be able to store a spare or flat tire using the
hoist assembly until it has been repaired or replaced.