lock BUICK RANDEZVOUS 2004 Service Manual
[x] Cancel search | Manufacturer: BUICK, Model Year: 2004, Model line: RANDEZVOUS, Model: BUICK RANDEZVOUS 2004Pages: 486, PDF Size: 3.18 MB
Page 129 of 486

Storage Areas
Glove Box
If the glove box has a lock, put your key into the lock
and turn the key counterclockwise. To open the
glovebox, pull the latch release.
The glove box door has a detent to prevent the door
from lowering too far. Open the glove box until the door
is partway open, then pull the door down if you need
it fully opened.
To close the glove box, the door must be pushed up
past the detent. To lock the glovebox, put your key into
the lock and turn the key clockwise.
Cupholder(s)
There are two cupholders located in the �oor console.
The cupholders have liners that remove for larger
beverage items. Remove the liners by lifting them out.
Your vehicle has cupholders located in the rear seat
armrests if it has a split folding rear seat. If your vehicle
has captain’s chairs, there are cupholders on the
sides of the seats. If your vehicle has a stowable seat,
there are cupholders in the center of the seat.
Cell Phone Storage Area
Your vehicle has a cell phone storage compartment
located on the �oor console storage closest to the
driver’s seat. Lift the lid to use the storage compartment.
The compartment has an accessory power outlet for
charging the cell phone.
Overhead Console
If your vehicle has an overhead console it may contain
compartments for storage and sunglasses and
HomeLink
®Transmitter buttons.
If your vehicle has the OnStar
®System, the OnStar®
buttons will replace the storage compartment. See
OnStar®System on page 2-33for more information.
If your vehicle has a sunroof, the mini console contains
the HomeLink
®Transmitter buttons and the OnStar®
buttons.
Storage Compartment
To open the storage compartment, located at the front
of the overhead console, press the release latch
forward. Then pull the compartment down to the full
open position.
2-39
Page 130 of 486

Sunglasses Storage Compartment
To open the sunglasses storage compartment in the
overhead console, press the release button. Then pull
the compartment down to the full open position.
Floor Console Storage Area
The �oor console storage contains two cupholders, an
ashtray and a cellular phone storage compartment
with a cigarette lighter/accessory power outlet.
Below the �oor console storage is a purse storage area
with two integrated convenience nets.
Front Armrest Storage Area
Your vehicle has a front armrest storage compartment
which contains two storage compartments.
To unlock the front armrest storage compartment, put
your key into the lock and turn the key counterclockwise.
To open the armrest, squeeze the lever while lifting
the top to open it.To close the armrest, push the lid down until you hear a
click. To lock the armrest, put your key into the lock
and turn the key clockwise.
Rear Storage Area
There are four small storage compartments in the rear
of your vehicle. One is on the passenger’s side, two
are on the driver’s side and one is on the �oor by the
tailgate. To remove the covers, lift up on the tabs. If your
vehicle has the 10-speaker system, the compartment
on the passenger’s side and the long compartment
on the driver’s side will be equipped with speakers.
2-40
Page 133 of 486
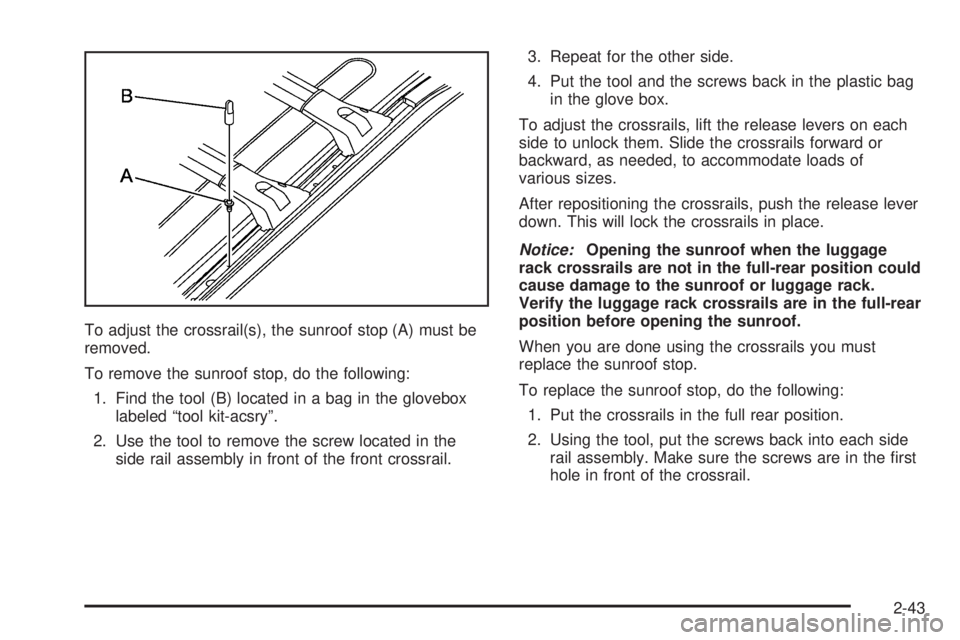
To adjust the crossrail(s), the sunroof stop (A) must be
removed.
To remove the sunroof stop, do the following:
1. Find the tool (B) located in a bag in the glovebox
labeled “tool kit-acsry”.
2. Use the tool to remove the screw located in the
side rail assembly in front of the front crossrail.3. Repeat for the other side.
4. Put the tool and the screws back in the plastic bag
in the glove box.
To adjust the crossrails, lift the release levers on each
side to unlock them. Slide the crossrails forward or
backward, as needed, to accommodate loads of
various sizes.
After repositioning the crossrails, push the release lever
down. This will lock the crossrails in place.
Notice:Opening the sunroof when the luggage
rack crossrails are not in the full-rear position could
cause damage to the sunroof or luggage rack.
Verify the luggage rack crossrails are in the full-rear
position before opening the sunroof.
When you are done using the crossrails you must
replace the sunroof stop.
To replace the sunroof stop, do the following:
1. Put the crossrails in the full rear position.
2. Using the tool, put the screws back into each side
rail assembly. Make sure the screws are in the �rst
hole in front of the crossrail.
2-43
Page 136 of 486
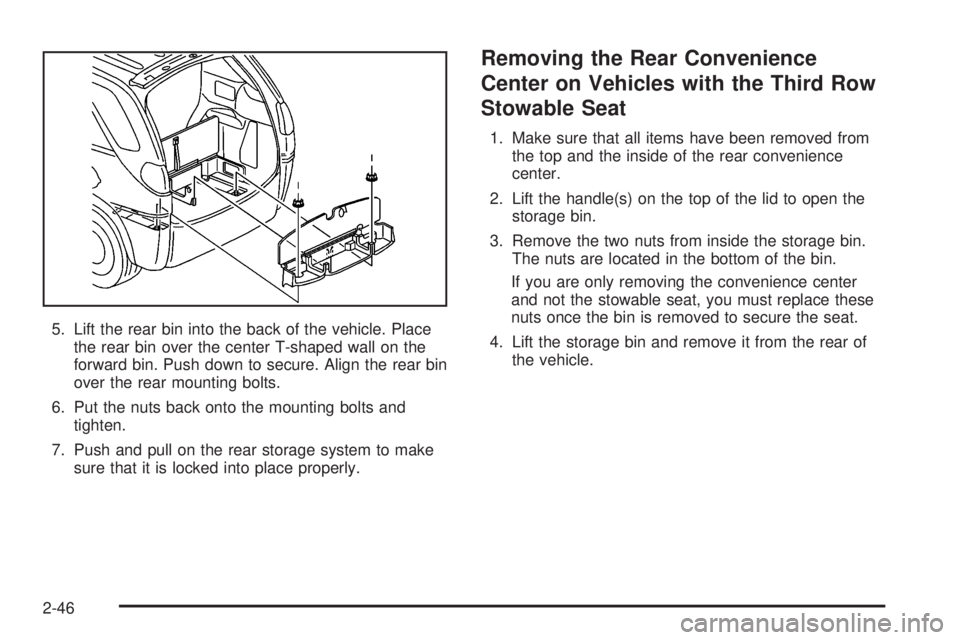
5. Lift the rear bin into the back of the vehicle. Place
the rear bin over the center T-shaped wall on the
forward bin. Push down to secure. Align the rear bin
over the rear mounting bolts.
6. Put the nuts back onto the mounting bolts and
tighten.
7. Push and pull on the rear storage system to make
sure that it is locked into place properly.
Removing the Rear Convenience
Center on Vehicles with the Third Row
Stowable Seat
1. Make sure that all items have been removed from
the top and the inside of the rear convenience
center.
2. Lift the handle(s) on the top of the lid to open the
storage bin.
3. Remove the two nuts from inside the storage bin.
The nuts are located in the bottom of the bin.
If you are only removing the convenience center
and not the stowable seat, you must replace these
nuts once the bin is removed to secure the seat.
4. Lift the storage bin and remove it from the rear of
the vehicle.
2-46
Page 137 of 486
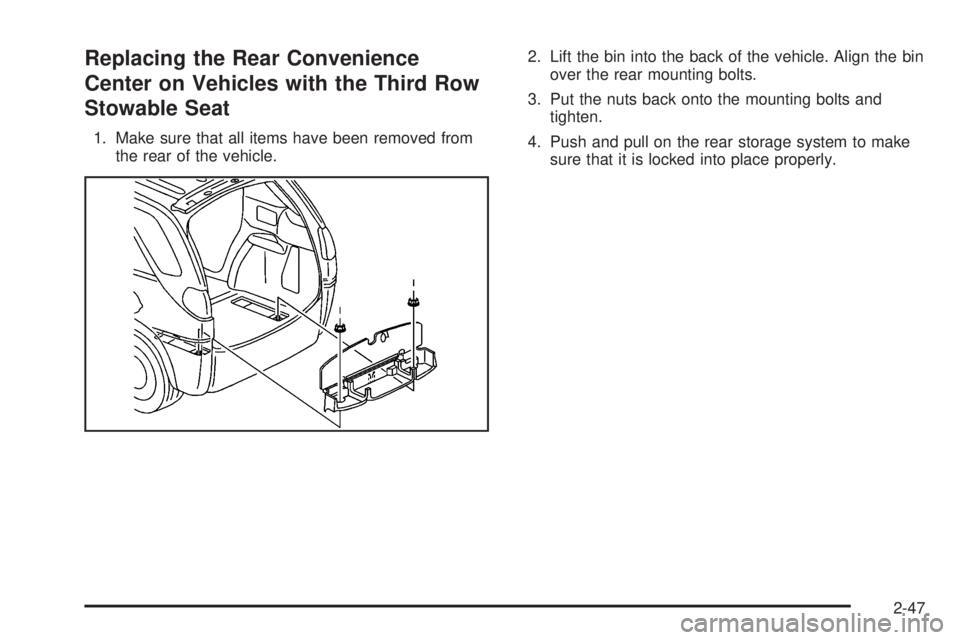
Replacing the Rear Convenience
Center on Vehicles with the Third Row
Stowable Seat
1. Make sure that all items have been removed from
the rear of the vehicle.2. Lift the bin into the back of the vehicle. Align the bin
over the rear mounting bolts.
3. Put the nuts back onto the mounting bolts and
tighten.
4. Push and pull on the rear storage system to make
sure that it is locked into place properly.
2-47
Page 141 of 486
Instrument Panel Overview...............................3-4
Hazard Warning Flashers................................3-6
Other Warning Devices...................................3-7
Horn.............................................................3-7
Tilt Wheel.....................................................3-7
Turn Signal/Multifunction Lever.........................3-8
Exterior Lamps.............................................3-14
Interior Lamps..............................................3-16
Instrument Panel Switchbank..........................3-21
Head-Up Display (HUD).................................3-21
Ultrasonic Rear Parking Assist (URPA)..............3-24
Accessory Power Outlets...............................3-27
Ashtrays and Cigarette Lighter........................3-28
Climate Controls............................................3-28
Climate Control System.................................3-28
Dual Climate Control System..........................3-32
Dual Automatic Climate Control System...........3-35
Outlet Adjustment.........................................3-38
Warning Lights, Gages and Indicators.............3-39
Instrument Panel Cluster................................3-40
Speedometer and Odometer...........................3-41
Tachometer.................................................3-42
Safety Belt Reminder Light.............................3-43Air Bag Readiness Light................................3-43
Brake System Warning Light..........................3-44
Anti-Lock Brake System Warning Light.............3-45
Traction Control System (TCS) Warning Light . . .3-45
Engine Coolant Temperature Gage..................3-46
Malfunction Indicator Lamp.............................3-46
Fuel Gage...................................................3-49
Message Center.............................................3-50
Service Traction System Warning Message......3-50
Traction Active Message................................3-51
Engine Coolant Temperature Warning
Message..................................................3-51
Charging System Indicator Message................3-52
Low Oil Pressure Message............................3-52
Change Engine Oil Message..........................3-53
Low Tire Message........................................3-54
Door Ajar Warning Message...........................3-54
Rear Hatch Ajar Warning Message..................3-54
PASS-Key
®III Security Message....................3-55
All-Wheel Drive Disable Warning Message.......3-55
Low Washer Fluid Warning Message...............3-56
Low Fuel Warning Message...........................3-56
Low Brake Fluid Warning Message.................3-57
Section 3 Instrument Panel
3-1
Page 145 of 486

The main components of the instrument panel are the
following:
A. Exterior/Interior Lamps Control. SeeExterior Lamps
on page 3-14andInterior Lamps on page 3-16.
B. Turn Signal/Multifunction Lever. SeeTurn
Signal/Multifunction Lever on page 3-8.
C. Hazard Warning Flasher Switch. SeeHazard
Warning Flashers on page 3-6.
D. Instrument Panel Cluster. SeeInstrument Panel
Cluster on page 3-40.
E. Shift Lever. SeeAutomatic Transaxle Operation on
page 2-23.
F. Instrument Panel Outlets. SeeOutlet Adjustment on
page 3-38.
G. Audio System. SeeAudio System(s) on page 3-73.
H. Audio Steering Wheel Controls. SeeAudio
Steering Wheel Controls on page 3-129.
I. Head-Up Display Switch and Driver Information
Center (DIC) Controls. SeeHead-Up Display (HUD)
on page 3-21andDIC Controls and Displays on
page 3-62.J. Hood Release. SeeHood Release on page 5-11.
K. Ignition Switch. SeeIgnition Positions on page 2-20.
L. Climate Controls. SeeClimate Control System on
page 3-28,Dual Climate Control System on
page 3-32orDual Automatic Climate Control System
on page 3-35.
M. Instrument Panel Switchbank. SeeInstrument Panel
Switchbank on page 3-21.
N. Front Armrest Storage. SeeFront Armrest Storage
Area on page 2-40.
O. Ashtray/Cigarette Lighter/Accessory Power
Outlet/Cell Phone Storage/Purse
Storage/Cupholders. SeeAshtrays and Cigarette
Lighter on page 3-28,Accessory Power Outlets on
page 3-27,Cell Phone Storage Area on page 2-39,
Floor Console Storage Area on page 2-40and
Cupholder(s) on page 2-39.
P. Floor Console Fuse Block. SeeFuses and Circuit
Breakers on page 5-109.
Q. Glove Box. SeeGlove Box on page 2-39.
3-5
Page 147 of 486

Other Warning Devices
If you carry re�ective triangles, you can set one up at
the side of the road about 300 feet (100 m) behind your
vehicle.
Horn
You can sound the horn by pressing the center of your
steering wheel.
Tilt Wheel
A tilt wheel allows you to adjust the steering wheel
before you drive. You can raise it to the highest level to
give your legs more room when you exit and enter
the vehicle.
The lever that allows you to tilt the steering wheel is
located on the left side of the steering column.To tilt the wheel, hold the
steering wheel and pull
the lever.
Then move the steering wheel to a comfortable position
and release the lever to lock the wheel in place.
3-7
Page 150 of 486
Remember that damaged wiper blades may prevent you
from seeing well enough to drive safely. To avoid
damage, be sure to clear ice and snow from the wiper
blades before using them. If they are frozen to the
windshield, carefully loosen or thaw them. If your blades
do become damaged, get new blades or blade inserts.
Heavy snow or ice can overload your wipers. A
circuit breaker will stop them until the motor cools. Clear
away snow or ice to prevent an overload.
Windshield Washer
L
:To wash your windshield, push and hold the
paddle with the windshield washer symbol. The washers
and wipers will operate. When you release the paddle,
the washers will stop, and the wipers will continue
to operate for two cycles, unless your wipers were
already on. In that case, the wipers will resume the wiper
speed you selected earlier.
{CAUTION:
In freezing weather, do not use your washer
until the windshield is warmed. Otherwise the
washer �uid can form ice on the windshield,
blocking your vision.
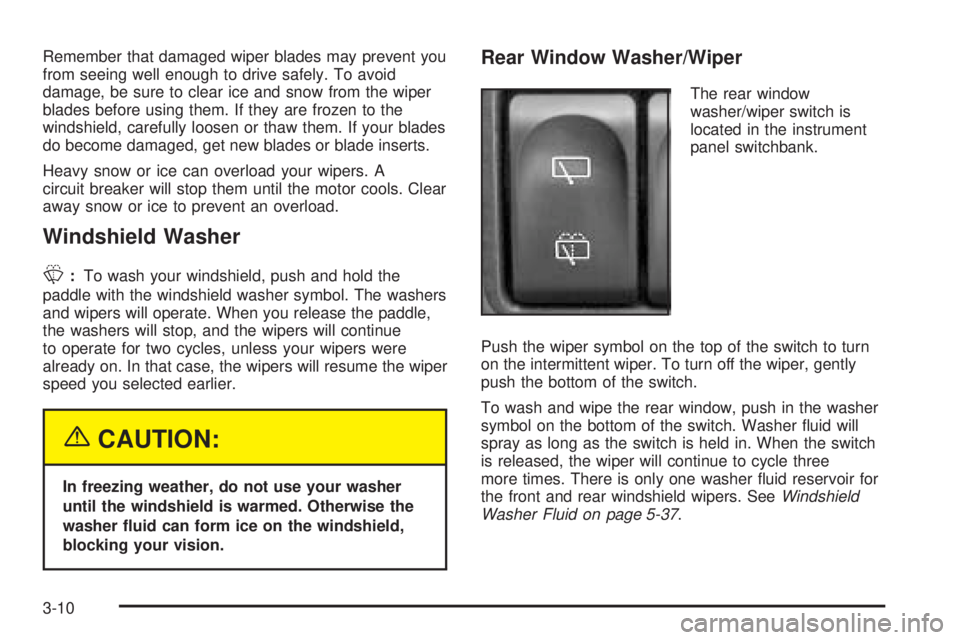
Rear Window Washer/Wiper
The rear window
washer/wiper switch is
located in the instrument
panel switchbank.
Push the wiper symbol on the top of the switch to turn
on the intermittent wiper. To turn off the wiper, gently
push the bottom of the switch.
To wash and wipe the rear window, push in the washer
symbol on the bottom of the switch. Washer �uid will
spray as long as the switch is held in. When the switch
is released, the wiper will continue to cycle three
more times. There is only one washer �uid reservoir for
the front and rear windshield wipers. SeeWindshield
Washer Fluid on page 5-37.
3-10
Page 157 of 486
Interior Lamps Control
OFF:Turn the control to this position to turn off the
interior lamps.
DOOR:Turn the control to this position to turn on the
interior lamps while any door is opened and while
the ignition key is removed from the ignition.
ON:Turn the control to this position to turn on the
interior lamps.
Headlamp Exit Delay
If your vehicle has headlamp exit delay, it will keep the
headlamps and parking lamps on at night for
30 seconds if the following conditions are met:
The ignition is turned to OFF
The exterior lamp control is in the AUTO position
LOCK is pressed on the remote keyless entry
transmitter
It is dark enough outsideAfter 30 seconds, the headlamps and parking lamps will
turn off.
The lamps will turn off before the 30 seconds if the
following conditions are met:
The ignition is turned to ON
The exterior lamp control is turned out of the AUTO
position
If your vehicle is equipped with the Driver Information
Center (DIC), seeDIC Vehicle Personalization on
page 3-64to program the headlamp exit delay feature.
3-17