cruise control BUICK RANDEZVOUS 2004 Owner's Manual
[x] Cancel search | Manufacturer: BUICK, Model Year: 2004, Model line: RANDEZVOUS, Model: BUICK RANDEZVOUS 2004Pages: 486, PDF Size: 3.18 MB
Page 148 of 486

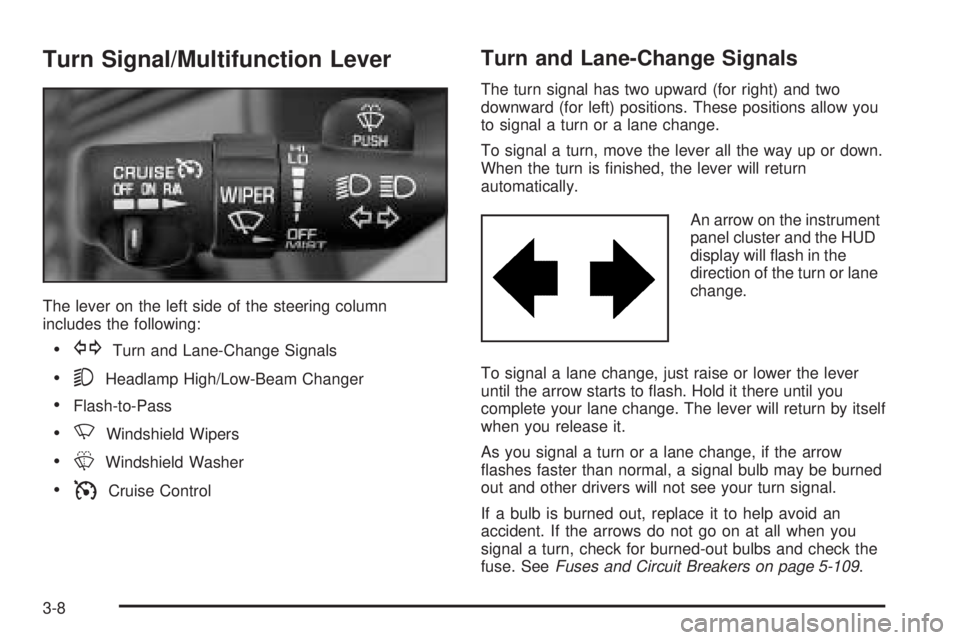
Turn Signal/Multifunction Lever
The lever on the left side of the steering column
includes the following:
GTurn and Lane-Change Signals
5Headlamp High/Low-Beam Changer
Flash-to-Pass
NWindshield Wipers
LWindshield Washer
ICruise Control
Turn and Lane-Change Signals
The turn signal has two upward (for right) and two
downward (for left) positions. These positions allow you
to signal a turn or a lane change.
To signal a turn, move the lever all the way up or down.
When the turn is �nished, the lever will return
automatically.
An arrow on the instrument
panel cluster and the HUD
display will �ash in the
direction of the turn or lane
change.
To signal a lane change, just raise or lower the lever
until the arrow starts to �ash. Hold it there until you
complete your lane change. The lever will return by itself
when you release it.
As you signal a turn or a lane change, if the arrow
�ashes faster than normal, a signal bulb may be burned
out and other drivers will not see your turn signal.
If a bulb is burned out, replace it to help avoid an
accident. If the arrows do not go on at all when you
signal a turn, check for burned-out bulbs and check the
fuse. SeeFuses and Circuit Breakers on page 5-109.
3-8
Page 151 of 486

To wash the rear window while the rear wiper is already
on, push the bottom of the switch. Push in the top of
the switch to continue the intermittent wiper cycle after
the washing cycle is completed.
Cruise Control
{CAUTION:
Cruise control can be dangerous where
you can not drive safely at a steady speed.
So, do not use your cruise control on
winding roads or in heavy traffic.
Cruise control can be dangerous on
slippery roads. On such roads, fast
changes in tire traction can cause
needless wheel spinning, and you could
lose control. Do not use cruise control on
slippery roads.
If your vehicle is in cruise control when the traction
control system begins to limit wheel spin, the cruise
control will automatically disengage. SeeTraction
Control System (TCS) on page 4-11. When road
conditions allow you to safely use it again, you may turn
the cruise control back on.
Setting Cruise Control
{CAUTION:
If you leave your cruise control on when you
are not using cruise, you might hit a button
and go into cruise when you do not want to.
You could be startled and even lose control.
Keep the cruise control switch off until you
want to use cruise control.
1. Move the cruise control switch, located on the turn
signal/multifunction lever, to ON.
2. Get up to the speed you want.
3. Press the SET button at the end of the lever and
release it.
4. Take your foot off the accelerator pedal.
3-11
Page 152 of 486

Resuming a Set Speed
Suppose you set your cruise control at a desired speed
and then you apply the brake. This, of course, shuts
off the cruise control. But you do not need to reset
it. Once you are going about 25 mph (40 km/h) or more,
you can move the cruise control switch from ON to
resume/accelerate (R/A) brie�y.
You will go right back up to your chosen speed
and stay there.
If you hold the switch at R/A, the vehicle will keep going
faster until you release the switch or apply the brake. So
unless you want to go faster, don’t hold the switch at R/A.
Increasing Speed While Using Cruise
Control
There are two ways to increase speed while using
cruise control:
Use the accelerator pedal to get to the higher
speed. Press the SET button at the end of the lever,
then release the button and the accelerator pedal.
You will now cruise at the higher speed.
Move the cruise switch from ON to R/A. Hold it
there until you get up to the speed you want,
and then release the switch. To increase your speed
in very small amounts, move the switch to R/A
brie�y and then release it. Each time you do this,
your vehicle will go about 1 mph (1,6 km/h) faster.
The accelerate feature will work whether or not you have
set an initial cruise control speed.
Reducing Speed While Using Cruise
Control
There are two ways to reduce speed while using cruise
control:
Press the SET button at the end of the lever until you
reach the lower speed you want, then release it.
To slow down in very small amounts, press the SET
button brie�y. Each time you do this, you will go
about 1 mph (1.6 km/h) slower.
3-12
Page 153 of 486

Passing Another Vehicle While Using
Cruise Control
Use the accelerator pedal to increase your speed.
When you take your foot off the pedal, your vehicle will
slow down to the cruise control speed you set earlier.
Using Cruise Control on Hills
How well your cruise control will work on hills depends
upon your speed, load and the steepness of the hills.
When going up steep hills, you may have to step on the
accelerator pedal to maintain your speed. When going
downhill, you may have to brake or shift to a lower gear to
keep your speed down. Of course, applying the brake
takes you out of cruise control. Many drivers �nd this to
be too much trouble and do not use cruise control on
steep hills.
Ending Cruise Control
There are two ways to turn off the cruise control:
Step lightly on the brake pedal
Move the cruise control switch to OFF
Erasing Speed Memory
When you turn off the cruise control or the ignition,
your cruise control set speed memory is erased.
3-13
Page 283 of 486

Traction Control System (TCS)
Your vehicle may have a traction control system that
limits wheel spin. This is especially useful in slippery
road conditions. The system operates only if it senses
that one or both of the front wheels are spinning or
beginning to lose traction. When this happens,
the system works the front brakes and reduces engine
power to limit wheel spin.
The TRACTION ACTIVE message will come on when
the traction control system is limiting wheel spin.
SeeTraction Active Message on page 3-51. You may
feel or hear the system working, but this is normal.
If your vehicle is in cruise control when the traction
control system begins to limit wheel spin, the cruise
control will automatically disengage. When road
conditions allow you to safely use it again, you may
reengage the cruise control. See “Cruise Control” under
Turn Signal/Multifunction Lever on page 3-8.If this message comes on and stays on or comes on
while you are driving, there’s a problem with your
traction control system.
SeeService Traction System Warning Message on
page 3-50. When this warning message is on, the TRAC
OFF light will come on to remind you that the system
will not limit wheel spin. Adjust your driving accordingly.
The traction control system automatically comes on
whenever you start your vehicle. To limit wheel
spin, especially in slippery road conditions, you should
always leave the system on. But you can turn the
traction control system off if you ever need to. You
should turn the system off if your vehicle ever gets stuck
in sand, mud or snow and rocking the vehicle is
required. SeeIf You Are Stuck: In Sand, Mud, Ice or
Snow on page 4-32. United States
Canada
4-11
Page 435 of 486

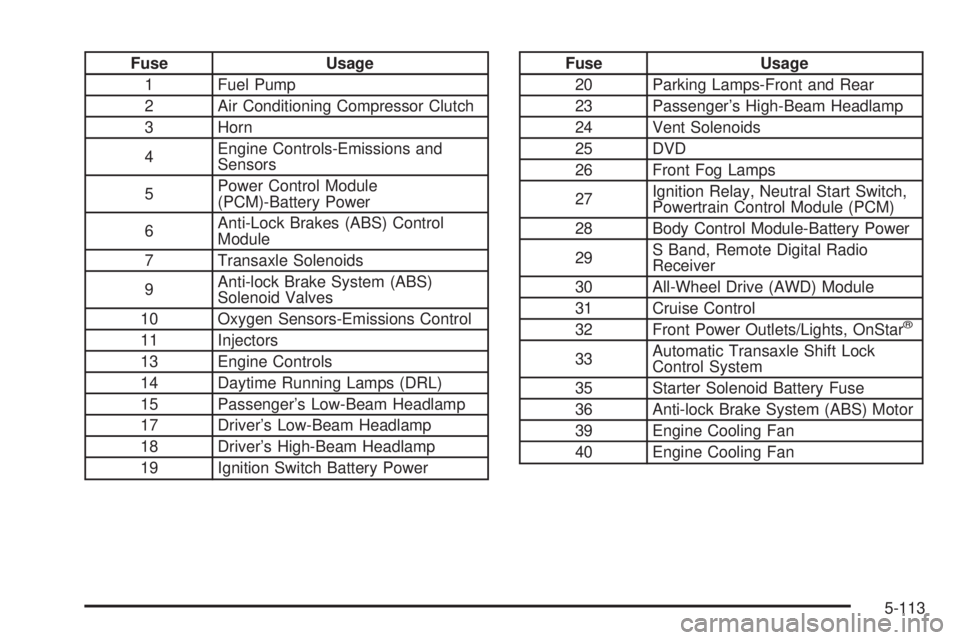
Fuse Usage
1 Fuel Pump
2 Air Conditioning Compressor Clutch
3 Horn
4Engine Controls-Emissions and
Sensors
5Power Control Module
(PCM)-Battery Power
6Anti-Lock Brakes (ABS) Control
Module
7 Transaxle Solenoids
9Anti-lock Brake System (ABS)
Solenoid Valves
10 Oxygen Sensors-Emissions Control
11 Injectors
13 Engine Controls
14 Daytime Running Lamps (DRL)
15 Passenger’s Low-Beam Headlamp
17 Driver’s Low-Beam Headlamp
18 Driver’s High-Beam Headlamp
19 Ignition Switch Battery PowerFuse Usage
20 Parking Lamps-Front and Rear
23 Passenger’s High-Beam Headlamp
24 Vent Solenoids
25 DVD
26 Front Fog Lamps
27Ignition Relay, Neutral Start Switch,
Powertrain Control Module (PCM)
28 Body Control Module-Battery Power
29S Band, Remote Digital Radio
Receiver
30 All-Wheel Drive (AWD) Module
31 Cruise Control
32 Front Power Outlets/Lights, OnStar
®
33Automatic Transaxle Shift Lock
Control System
35 Starter Solenoid Battery Fuse
36 Anti-lock Brake System (ABS) Motor
39 Engine Cooling Fan
40 Engine Cooling Fan
5-113
Page 445 of 486

Maintenance Footnotes
†The U.S. Environmental Protection Agency or the
California Air Resources Board has determined that the
failure to perform this maintenance item will not nullify
the emission warranty or limit recall liability prior to
the completion of the vehicle’s useful life. We, however,
urge that all recommended maintenance services be
performed at the indicated intervals and the
maintenance be recorded.
(a)Visually inspect brake lines and hoses for proper
hook-up, binding, leaks, cracks, cha�ng, etc. Inspect
disc brake pads for wear and rotors for surface
condition. Inspect other brake parts, including calipers,
parking brake, etc. Check parking brake adjustment.
(b)Visually inspect front and rear suspension and
steering system for damaged, loose or missing part or
signs of wear. Inspect power steering lines and
hoses for proper hook-up, binding, leaks, cracks,
cha�ng, etc.
(c)Visually inspect hoses and have them replaced if they
are cracked, swollen or deteriorated. Inspect all pipes,
�ttings and clamps; replace with genuine GM parts as
needed. To help ensure proper operation, a pressure test
of the cooling system and pressure cap and cleaning the
outside of the radiator and air conditioning condenser is
recommended at least once a year.(d)Visually inspect wiper blades for wear or cracking.
Replace blade inserts that appear worn or damaged
or that streak or miss areas of the windshield.
(e)Make sure the safety belt reminder light and all your
belts, buckles, latch plates, retractors and anchorages
are working properly. Look for any other loose or
damaged safety belt system parts. If you see anything
that might keep a safety belt system from doing its
job, have it repaired. Have any torn or frayed safety belts
replaced. Also look for any opened or broken air bag
coverings, and have them repaired or replaced. (The air
bag system does not need regular maintenance.)
(f)Lubricate all key lock cylinders, hood latch
assemblies, secondary latches, pivots, spring anchor
and release pawl, hood and door hinges, rear folding
seats and liftgate hinges. More frequent lubrication may
be required when exposed to a corrosive environment.
Applying silicone grease on weatherstrips with a
clean cloth will make them last longer, seal better and
not stick or squeak.
(g)Check system for interference or binding and for
damaged or missing parts. Replace parts as needed.
Replace any components that have high effort or
excessive wear. Do not lubricate accelerator or cruise
control cables.
6-7
Page 472 of 486

Cleaning Tires..............................................5-105
Cleaning Vinyl..............................................5-101
Climate Control System...................................3-28
Dual..........................................................3-32
Dual Automatic............................................3-35
Outlet Adjustment........................................3-38
Compact Spare Tire........................................5-98
Compass Variance..........................................3-60
Content Theft-Deferrent....................................2-15
Control of a Vehicle.......................................... 4-7
Convenience Center, Rear...............................2-44
Convenience Net............................................2-44
Coolant
Engine Temperature Gage............................3-46
Engine Temperature Warning Message...........3-51
Heater, Engine............................................2-22
Cooling System..............................................5-29
Cruise Control................................................3-11
Cupholder(s)..................................................2-39
Current and Past Model Order Forms................7-13
Customer Assistance Information
Courtesy Transportation.................................. 7-8
Customer Assistance for Text Telephone
(TTY) Users.............................................. 7-4
Customer Assistance Offices........................... 7-5
Customer Satisfaction Procedure..................... 7-2
GM Mobility Program for Persons
with Disabilities.......................................... 7-6Customer Assistance Information (cont.)
Reporting Safety Defects to General Motors....7-11
Reporting Safety Defects to the Canadian
Government............................................7-11
Reporting Safety Defects to the United States
Government............................................7-11
Roadside Assistance Program......................... 7-6
Service Publications Ordering Information........7-12
D
Daytime Running Lamps (DRL).........................3-15
Defensive Driving............................................. 4-3
Defogging and Defrosting.................3-30, 3-34, 3-37
Delayed Lighting.............................................3-18
Delayed Locking.......................................2-9, 3-68
Dinghy Towing................................................4-34
Disarming with the Remote Keyless Entry
Transmitter.................................................2-16
Disarming with Your Key..................................2-16
Doing Your Own Service Work........................... 5-3
Dolly Towing..................................................4-35
Door
Ajar Warning Message.................................3-54
Delayed Locking........................................... 2-9
Locks.......................................................... 2-8
Power Door Locks......................................... 2-9
4