BUICK RANDEZVOUS 2005 Owner's Manual
Manufacturer: BUICK, Model Year: 2005, Model line: RANDEZVOUS, Model: BUICK RANDEZVOUS 2005Pages: 480, PDF Size: 2.96 MB
Page 131 of 480

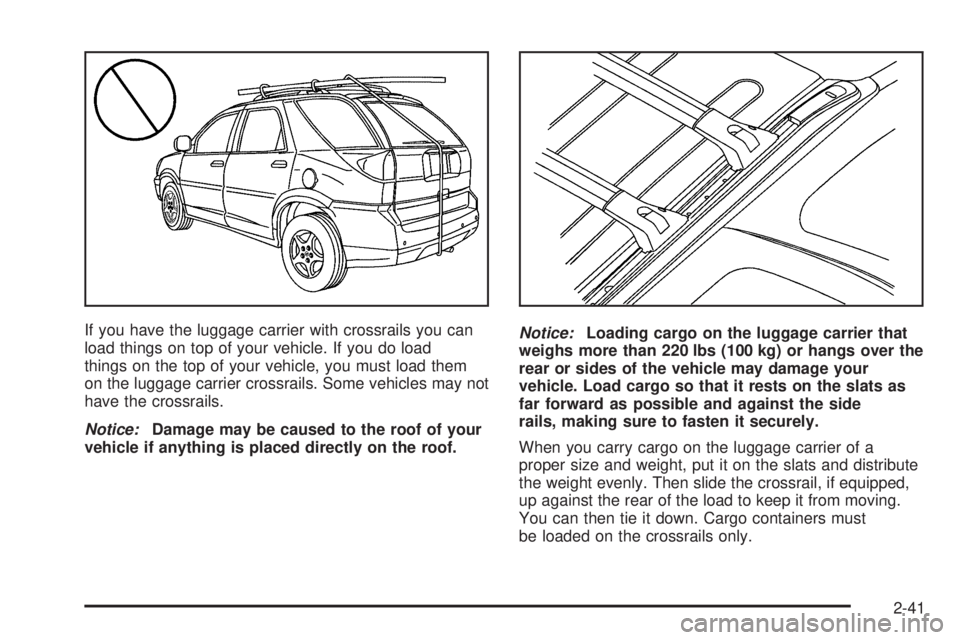
If you have the luggage carrier with crossrails you can
load things on top of your vehicle. If you do load
things on the top of your vehicle, you must load them
on the luggage carrier crossrails. Some vehicles may not
have the crossrails.
Notice:Damage may be caused to the roof of your
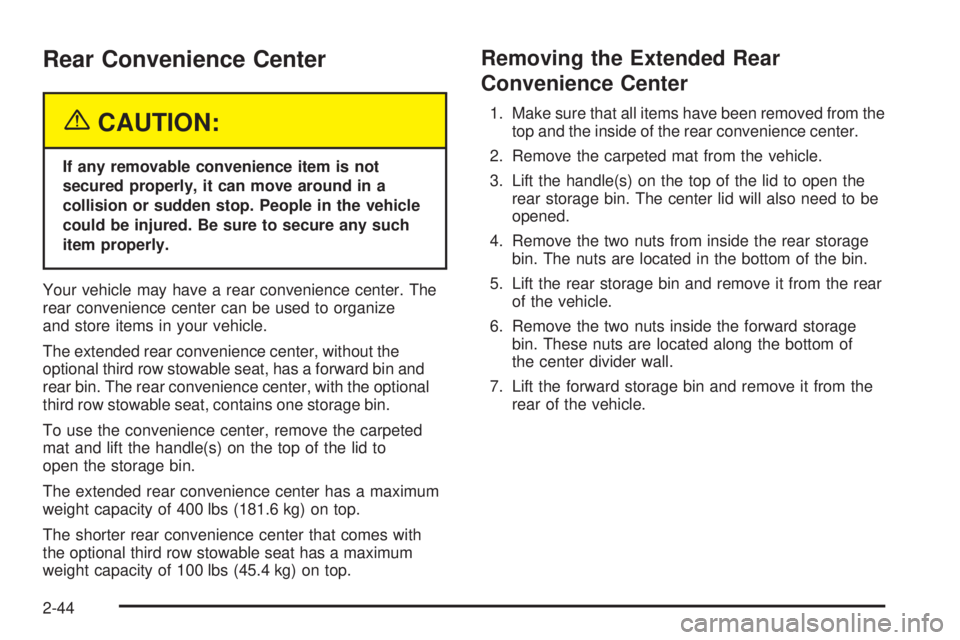
vehicle if anything is placed directly on the roof.Notice:Loading cargo on the luggage carrier that
weighs more than 220 lbs (100 kg) or hangs over the
rear or sides of the vehicle may damage your
vehicle. Load cargo so that it rests on the slats as
far forward as possible and against the side
rails, making sure to fasten it securely.
When you carry cargo on the luggage carrier of a
proper size and weight, put it on the slats and distribute
the weight evenly. Then slide the crossrail, if equipped,
up against the rear of the load to keep it from moving.
You can then tie it down. Cargo containers must
be loaded on the crossrails only.
2-41
Page 132 of 480

Don’t exceed the maximum vehicle capacity when
loading your vehicle. For more information on vehicle
capacity and loading, seeLoading Your Vehicle on
page 4-31.
To prevent damage or loss of cargo as you’re driving,
check now and then to make sure the luggage
carrier and cargo are still securely fastened.
Loading things onto the luggage carrier can interfere
with the performance of your XM™ Satellite Radio
System, if equipped..
Your luggage carrier has release levers within the end
of each crossrail support.To adjust the crossrail(s), the sunroof stop (A), if
equipped, must be removed.
To remove the sunroof stop, do the following:
1. Find the tool (B) located in a bag in the glove box
labeled TOOL KIT-ACSRY.
2. Use the tool to remove the screw located in the
side rail assembly in front of the front crossrail.
3. Repeat for the other side.
4. Put the tool and the screws back in the plastic bag
in the glove box.
2-42
Page 133 of 480

To adjust the crossrails, lift the release levers on each
side to unlock them. Slide the crossrails forward or
backward, as needed, to accommodate loads of
various sizes.
After repositioning the crossrails, push the release lever
down. This will lock the crossrails in place.
Notice:Opening the sunroof when the luggage
rack crossrails are not in the full-rear position could
cause damage to the sunroof or luggage rack.
Verify the luggage rack crossrails are in the full-rear
position before opening the sunroof.
When you are done using the crossrails you must
replace the sunroof stop.
To replace the sunroof stop, do the following:
1. Put the crossrails in the full rear position.
2. Using the tool, put the screws back into each side
rail assembly. Make sure the screws are in the �rst
hole in front of the crossrail.Convenience Net
Your vehicle may have a convenience net. The
convenience net is designed to help keep small loads,
like grocery bags, from falling over. Install the
convenience net at the rear of your vehicle, just inside
the liftgate/tailgate opening.
Attach both the upper and lower hooks to the loops on
either side of the liftgate opening. The label on the
net should be in the upper left corner.
The convenience net has a maximum capacity of
100 lbs (45 kg). It is not designed to hold larger, heavier
loads. Store such loads on the �oor of your vehicle,
as far forward as you can.
When not in use, it is recommended that you take down
the rear convenience net to extend its life and retain
its elasticity, and to keep the rear exit clear. Store
the net in one of the storage compartments.
Cargo Cover
If your vehicle has a cargo cover, you can use it to
cover items in the rear of the vehicle. Remove the cover
from its pouch and place the loops found on each
corner of the cover, over the four pegs in each corner of
the rear if the vehicle. When it is not in use, fold up
the cover and return it to the pouch.
2-43
Page 134 of 480

Rear Convenience Center
{CAUTION:
If any removable convenience item is not
secured properly, it can move around in a
collision or sudden stop. People in the vehicle
could be injured. Be sure to secure any such
item properly.
Your vehicle may have a rear convenience center. The
rear convenience center can be used to organize
and store items in your vehicle.
The extended rear convenience center, without the
optional third row stowable seat, has a forward bin and
rear bin. The rear convenience center, with the optional
third row stowable seat, contains one storage bin.
To use the convenience center, remove the carpeted
mat and lift the handle(s) on the top of the lid to
open the storage bin.
The extended rear convenience center has a maximum
weight capacity of 400 lbs (181.6 kg) on top.
The shorter rear convenience center that comes with
the optional third row stowable seat has a maximum
weight capacity of 100 lbs (45.4 kg) on top.
Removing the Extended Rear
Convenience Center
1. Make sure that all items have been removed from the
top and the inside of the rear convenience center.
2. Remove the carpeted mat from the vehicle.
3. Lift the handle(s) on the top of the lid to open the
rear storage bin. The center lid will also need to be
opened.
4. Remove the two nuts from inside the rear storage
bin. The nuts are located in the bottom of the bin.
5. Lift the rear storage bin and remove it from the rear
of the vehicle.
6. Remove the two nuts inside the forward storage
bin. These nuts are located along the bottom of
the center divider wall.
7. Lift the forward storage bin and remove it from the
rear of the vehicle.
2-44
Page 135 of 480

Reinstalling the Extended Rear
Convenience Center
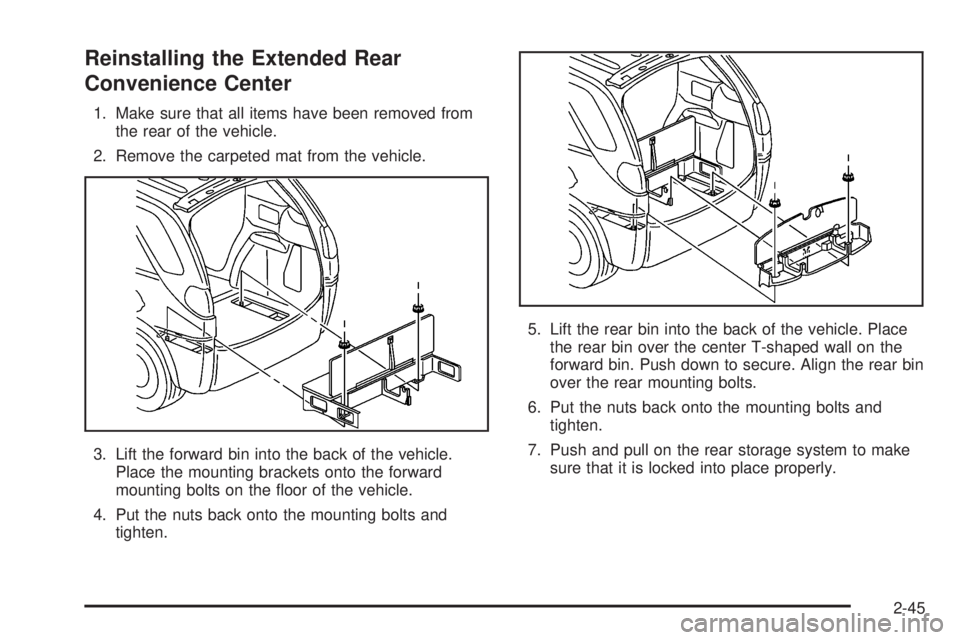
1. Make sure that all items have been removed from
the rear of the vehicle.
2. Remove the carpeted mat from the vehicle.
3. Lift the forward bin into the back of the vehicle.
Place the mounting brackets onto the forward
mounting bolts on the �oor of the vehicle.
4. Put the nuts back onto the mounting bolts and
tighten.5. Lift the rear bin into the back of the vehicle. Place
the rear bin over the center T-shaped wall on the
forward bin. Push down to secure. Align the rear bin
over the rear mounting bolts.
6. Put the nuts back onto the mounting bolts and
tighten.
7. Push and pull on the rear storage system to make
sure that it is locked into place properly.
2-45
Page 136 of 480

Removing the Rear Convenience
Center on Vehicles with the Third Row
Stowable Seat
1. Make sure that all items have been removed from
the top and the inside of the rear convenience
center.
2. Lift the handle(s) on the top of the lid to open the
storage bin.
3. Remove the two nuts from inside the storage bin.
The nuts are located in the bottom of the bin.
If you are only removing the convenience center
and not the stowable seat, you must replace these
nuts once the bin is removed to secure the seat.
4. Lift the storage bin and remove it from the rear of
the vehicle.
Reinstalling the Rear Convenience
Center on Vehicles with the Third Row
Stowable Seat
1. Make sure that all items have been removed from
the rear of the vehicle.
2. Lift the bin into the back of the vehicle. Align the bin
over the rear mounting bolts.
3. Put the nuts back onto the mounting bolts and
tighten.
4. Push and pull on the rear storage system to make
sure that it is locked into place properly.
2-46
Page 137 of 480

Sunroof
If the vehicle has a
sunroof, the switch to
operate it is located on the
headliner, between the
sun visors.
The sunroof switch will only work when the ignition is
ON or when the ignition is OFF and retained accessory
power (RAP) is active. SeeRetained Accessory
Power (RAP) on page 2-21.
Notice:Opening the sunroof when the luggage
rack crossrails are not in the full-rear position could
cause damage to the sunroof or luggage rack.
Verify the luggage rack crossrails are in the full-rear
position before opening the sunroof.
Press the rear of the switch to open the sunroof to the
vent position. The sunshade must be opened by hand.Press and release the rear of the switch a second time to
express-open the sunroof. The sunshade will open with
the sunroof. Press the switch in either direction to stop it
from moving. If the rear of the switch is pressed and held,
the express-open operation will be overridden.
To close the sunroof, press and hold the front of the
switch.
Vehicle Personalization
Memory Seat
If your vehicle has this
feature, the controls are
located on the driver’s door
panel and are used to
store and recall the driver’s
seat position and the
outside rearview mirror
position.
The settings for these features can be personalized for
both driver 1 and driver 2. Driver 1 and driver 2
correspond to the memory buttons labeled 1 and 2 on
the driver’s door.
2-47
Page 138 of 480

To store the memory settings, do the following:
1. Adjust the driver’s seat and the outside rearview
mirrors to the position you would like for driving.
2. Press and hold memory button 1 for more than
three seconds.
A double beep will sound when the memory seat and
mirror position have been stored.
To store the seat and outside rearview mirror positions
for a second driver, follow the previous steps, but
press button 2 instead.
To recall your stored positions, your vehicle must be in
PARK (P). Press and release the memory button (1 or 2)
corresponding to the desired driving position. The
seat and the outside rearview mirrors will move to the
position previously stored for the identi�ed driver.
You will hear one beep.To store an exit position for each driver, do the following:
1. Move the seat to the desired exit position.
2. Hold the button with the exit symbol, located below
the memory buttons, for more than three seconds.
The exit position stored will be for the most recently
selected driving position (1 or 2). A double beep
will sound when the exit position is stored.
To use the exit feature, your vehicle must be in PARK (P).
Press and release the button with the exit symbol and the
seat will move to the exit position stored for the most
recently selected driver. You will hear one beep.
To stop recall movement of the seat at any time, press
one of the three memory buttons or one of the power seat
controls located on the outboard side of the driver’s seat.
If your vehicle is equipped with a Driver Information
Center (DIC), you can use it to program certain functions
of the memory seats. SeeDIC Vehicle Personalization
on page 3-66.
2-48
Page 139 of 480

Instrument Panel Overview...............................3-4
Hazard Warning Flashers................................3-6
Other Warning Devices...................................3-6
Horn.............................................................3-6
Tilt Wheel.....................................................3-6
Turn Signal/Multifunction Lever.........................3-7
Turn and Lane-Change Signals........................3-7
Headlamp High/Low-Beam Changer..................3-8
Flash-to-Pass.................................................3-8
Windshield Wipers..........................................3-9
Windshield Washer.........................................3-9
Cruise Control..............................................3-10
Exterior Lamps.............................................3-14
Daytime Running Lamps (DRL).......................3-14
Automatic Headlamp System..........................3-15
Fog Lamps..................................................3-15
Interior Lamps..............................................3-16
Instrument Panel Brightness...........................3-16
Interior Lamps Control...................................3-16
Headlamp Exit Delay.....................................3-17
Entry Lighting...............................................3-17
Delayed Lighting...........................................3-18
Exit Lighting.................................................3-18
Perimeter Lighting.........................................3-19
Front Reading Lamps....................................3-19
Rear Reading Lamps....................................3-19
Cargo Lamp.................................................3-19Battery Run-Down Protection..........................3-20
Instrument Panel Switchbank..........................3-20
Head-Up Display (HUD).................................3-21
Ultrasonic Rear Parking Assist (URPA)............3-24
Accessory Power Outlets...............................3-26
Ashtrays and Cigarette Lighter........................3-27
Climate Controls............................................3-28
Climate Control System.................................3-28
Dual Climate Control System..........................3-30
Dual Automatic Climate Control System...........3-33
Outlet Adjustment.........................................3-36
Warning Lights, Gages, and Indicators............3-37
Instrument Panel Cluster................................3-38
Speedometer and Odometer...........................3-39
Trip Odometer..............................................3-39
Tachometer.................................................3-40
Safety Belt Reminder Light.............................3-41
Airbag Readiness Light..................................3-41
Passenger Airbag Status Indicator...................3-42
Brake System Warning Light..........................3-44
Anti-Lock Brake System Warning Light.............3-45
Traction Control System (TCS) Warning Light......3-45
Engine Coolant Temperature Gage..................3-46
Malfunction Indicator Lamp.............................3-46
Highbeam On Light.......................................3-49
Fuel Gage...................................................3-50
Section 3 Instrument Panel
3-1
Page 140 of 480

Message Center.............................................3-51
Passenger Seatbelt Reminder Message...........3-51
Service Traction System Warning Message......3-51
Traction Active Message................................3-52
Engine Coolant Temperature Warning
Message..................................................3-52
Charging System Indicator Message................3-53
Reduced Engine Power Message....................3-53
Low Oil Pressure Message............................3-54
Low Engine Oil Level Message.......................3-55
Change Engine Oil Message..........................3-55
Low Tire Message........................................3-56
Door Ajar Warning Message...........................3-56
Rear Hatch Ajar Warning Message..................3-56
Check Gas Cap Message..............................3-57
PASS-Key
®III Security Message....................3-57
All-Wheel Drive Disable Warning Message.......3-57
Low Washer Fluid Warning Message...............3-58
Low Fuel Warning Message...........................3-58
Low Brake Fluid Warning Message.................3-59
Service Vehicle Soon Message.......................3-59
Program Mode Message................................3-60
Remote Keyless Entry Transmitter Battery Low
Warning Message......................................3-60Parking Lamp Warning Message.....................3-61
Highbeam Out Warning Message....................3-61
Driver Information Center (DIC).........................3-62
DIC Controls and Displays.............................3-64
DIC Vehicle Personalization............................3-66
Audio System(s).............................................3-75
Setting the Time...........................................3-76
Radio with CD..............................................3-76
Radio with Cassette and CD..........................3-87
Radio with Six-Disc CD................................3-100
Rear Seat Entertainment System...................3-115
Navigation/Radio System..............................3-130
Rear Seat Audio (RSA)................................3-130
Theft-Deterrent Feature................................3-132
Audio Steering Wheel Controls......................3-133
Radio Reception.........................................3-134
Care of Your Cassette Tape Player...............3-134
Care of Your CDs and DVDs........................3-135
Care of Your CD and DVD Player.................3-135
Integrated Windshield Antenna......................3-135
XM™ Satellite Radio Antenna System............3-135
Section 3 Instrument Panel
3-2