clock setting BUICK REGAL 1996 Owners Manual
[x] Cancel search | Manufacturer: BUICK, Model Year: 1996, Model line: REGAL, Model: BUICK REGAL 1996Pages: 356, PDF Size: 17.97 MB
Page 130 of 356

Rear Window Defogger
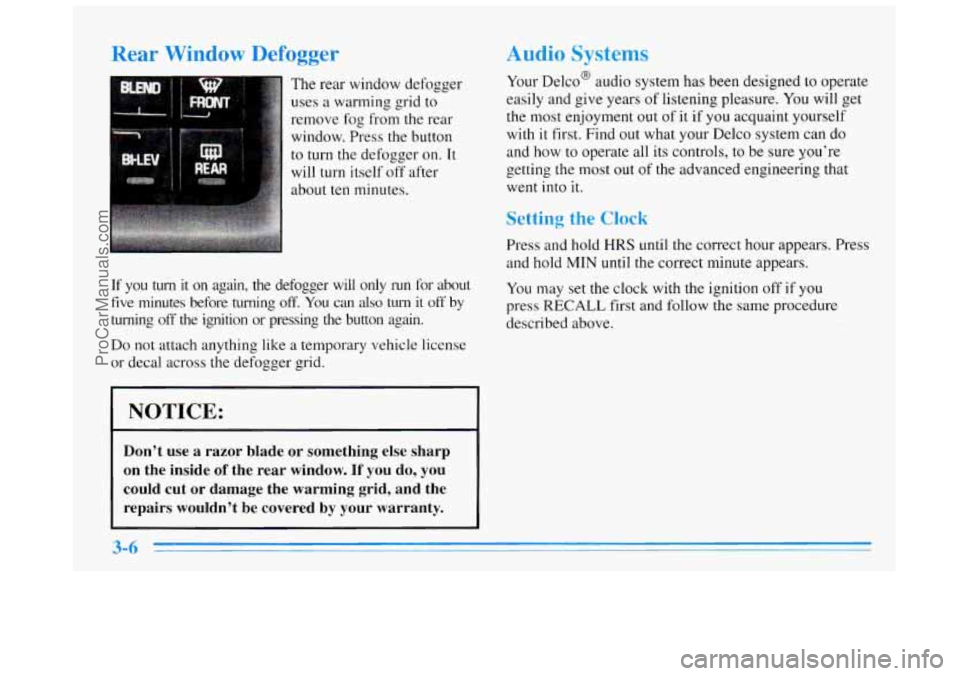
The rear window defogger
uses
a warming grid to
remove
fog from the rear
window. Press the button
to turn the defogger on. It
will turn itself off after
about
ten minutes.
If you turn it on again, the defogger will only run for about
five minutes before turning off. You can also turn it off by
turning off the ignition or pressing the button again.
Do not attach anything like a temporary vehicle license
or decal across
the defogger grid.
I NOTICE:
Don’t use a razor blade or something else sharp
on the inside
of the rear window. If you do, you
could cut or damage the warming grid, and the
repairs wouldn’t be covered by your warranty.
Audio Systems
Your Delco@ audio system has been designed to operate
easily and give years of listening pleasure. You will get
the most enjoyment out of
it if you acquaint yourself
with
it first. Find out what your Delco system can do
and how to operate all its controls, to be sure you’re
getting the most
out of the advanced engineering that
went into it.
Setting the Clock
Press and hold HRS until the correct hour appears. Press
and hold MIN until the correct minute appears.
You may set
the clock with the ignition off if you
press
RECALL first and follow the same procedure
described above.
ProCarManuals.com
Page 138 of 356

RECALL: Press this button briefly to recall the station
being played or the clock display. To change what is
normally shown on the display (station or time), press
the button until you see the display
you want, then hold
the button
until the display flashes. If you press the
button when the ignition is off, the clock will show for
a few seconds.
ung a :atlon
AM-FM: Press this button to select AM, FM1 or FM2.
The display shows your selection.
TUNE: Press the up or down arrows to choose radio
stations.
SEEK: Press the up or down arrows to go to the
next higher or lower station. The sound will be muted
while seeking.
SCAN: Press one of the SEEK arrows for two seconds
and
SCAN will appear on the display. Use SCAN to
listen to stations for a few seconds. The radio will go to
a station, stop
for a few seconds, then go on to the next
station. Press one of the SEEK arrows again to stop
scanning. The sound will be muted while scanning.
PUSHBUTTONS: The six numbered pushbuttons let
you return to your favorite stations. You can set up to
18 stations (six AM, six FM 1 and six FM2).
1. Press AM-FM to select the band.
2. Find the station you want by using TUNE or SEEK.
3. Press TONE to select the setting you prefer.
4. Press and hold one of the six numbered buttons.
5. The sound will mute. When it returns, release the
button. Whenever you press that numbered button, the
station you set will return and the TONE you selected
will be automatically selected for that button.
P SCAN: Press this button to listen to each of your
preset stations
for a few seconds. The radio will go to
the first preset station, stop for
a few seconds, then go
on to the next preset station. Press P
SCAN again to stop
scanning. If
a preset station has weak reception, the
radio will not stop at the preset station.
TREB: Press this knob lightly so it extends. Turn the
knob to increase
or decrease treble. The middle position
is a detent.
3-14
ProCarManuals.com
Page 141 of 356

RECALL: Press this button briefly to recall the station
being played or the clock display. To change what is
normally shown on the display (station or time), press
the button until you see
the display you want, then hold
the button until the display flashes. If
you press the
button when the ignition is off,
the clock will show for
a few seconds.
AM-FM: Press this button to select AM, FMl or FM2.
The display shows your selection.
TUNE: Press the up or down arrow to choose
radio stations.
SEEK: Press the up or down arrows to go to the
next higher or lower station. The sound will be muted
while seeking.
SCAN: Press one of the SEEK arrows for two seconds
and
SCAN will appear on the display. Use SCAN to
listen to stations for a few seconds. The radio will go
to
a station, stop for a few seconds, then go on to the next
station. Press one of the
SEEK arrows again to stop
scanning. The sound will be muted while scanning.
PUSHBUTTONS: The six numbered pushbuttons let
you return to your favorite stations.
You can set up to
18 stations (six AM, six FM1 and six FM2).
1. Press AM-FM to select the band.
2. Find the station you want by using TUNE or SEEK.
3. Press TONE to select the setting you prefer.
4. Press and hold one of the six numbered buttons.
5. The sound will mute. When it returns, release the
button. Whenever you press that numbered button, the
station
you set will return and the TONE you selected
will be automatically selected for that button.
P SCAN: Press this button to listen to each of your
preset stations for
a few seconds. The radio will go to
the first preset station, stop for
a few seconds, then go
on to the next preset station. Press P SCAN again to stop
scanning. If a preset station
has weak reception, the
radio will not stop at the preset station.
AUTO PRESET Press this button and the system will
seek and set the
12 strongest FM or the 6 strongest AM
stations on your preset buttons.
To return to the stations
you manually set, press AUTO PRESET again.
ProCarManuals.com
Page 346 of 356

Brake Adjustment
.................................. 6-29
Fluid
....................................... 6-27
Master Cylinder
.............................. 6-27
Parking
..................................... 2-1 8
PedalTravel
................................. 6-29
Replacing System Parts
........................ 6-30
System Warning Light
......................... 2-48
Trailer
...................................... 4-32
Transaxle Shift Interlock
....................... 2-22
Transaxle Shift Interlock Check
.................. 7-37
Wear
....................................... 6-29
Brakes, Anti-Lock
............................... 4-6
Braking
........................................ 4-5
Break-In, New Vehicle
........................... 2-9
Bulb Replacement
.............................. 6-3 1
Braking in Emergencies ........................... 4-8
BTSI
......................................... 2-22
BTSICheck
................................... 7-37
Canadian Roadside Assistance
.................... 8-4
Capacities and Specifications
...................... 6-6 I
Carbon Monoxide .................... 2-23,4-26, 4-32
Cassette Deck Service
........................... 7-36
Cassette Tape Player
................... 3-7,3-10, 3-16
Cassette Tape Player Care
........................ 3-25
CD Player Theft-Deterrent Feature
................. 3-2 1
Center Passenger Position ........................ 1-24
Certification Label
.............................. 4-27
Chains, Safety
................................. 4-32
Chains, Tire
................................... 6-42
Changing
a Flat Tire ............................. 5-22
Charging System Light
.......................... 2-47 Checking
Your Restraint Systems
.................. 1-50
Chemical Paint Spotting .......................... 6-49
Child Restraints
................................ 1-37
Securing
in a Rear Outside Seat Position ...... 1-39. 1-41
Securing in the Center Rear Seat Position .......... 1-43
Securing
in the Right Front Seat Position .......... 1-45
TopStrap
................................... 1-38
Where to Put
................................ 1-37
Cigarette Lighter
............................... 2-40
Circuit Breakers
and Fuses ....................... 6-53
Cleaner. Air
................................... 6-16
Cleaning ...................................... 6-42
Aluminum Wheels
............................ 6-48
Fabric
...................................... 6-43
Glass
....................................... 6-46
Inside of Your Buick
.......................... 6-42
Instrument Panel
............................. 6-45
Leather
..................................... 6-45
Outside
of Your Buick ......................... 6-47
Special Problems
............................. 6-44
Stains
...................................... 6-43
Tires
....................................... 6-48
Vinyl ....................................... 6-45
Wheels
..................................... 6-48
Windshield and Wiper Blades
................... 6-46
Clock. Setting the
................................ 3-6
Comfort Controls
................................ 3-1
Compact Disc Care
............................. 3-25
Compact: Disc Player ....................... 3- 13. 3-16
Compact Disc Player Errors
.................. 3- 15. 3-20
Compact Spare Tire
............................. 5-32
Console Storage
................................ 2-38
Control
of a Vehicle .............................. 4-5
Convenience Net
............................... 2-39
ProCarManuals.com