high beam BUICK REGAL 2011 Owner's Manual
[x] Cancel search | Manufacturer: BUICK, Model Year: 2011, Model line: REGAL, Model: BUICK REGAL 2011Pages: 368, PDF Size: 5.35 MB
Page 4 of 368
Black plate (4,1)Buick Regal Owner Manual - 2011
iv Introduction
WarningorCaution indicates a
hazard that could result in injury or
death.
{WARNING
These mean there is something
that could hurt you or other
people.
Notice: This means there is
something that could result in
property or vehicle damage. This
would not be covered by the
vehicle's warranty.
A circle with a slash through it is a
safety symbol which means “Do
Not,” “Do not do this,” or“Do not let
this happen.”
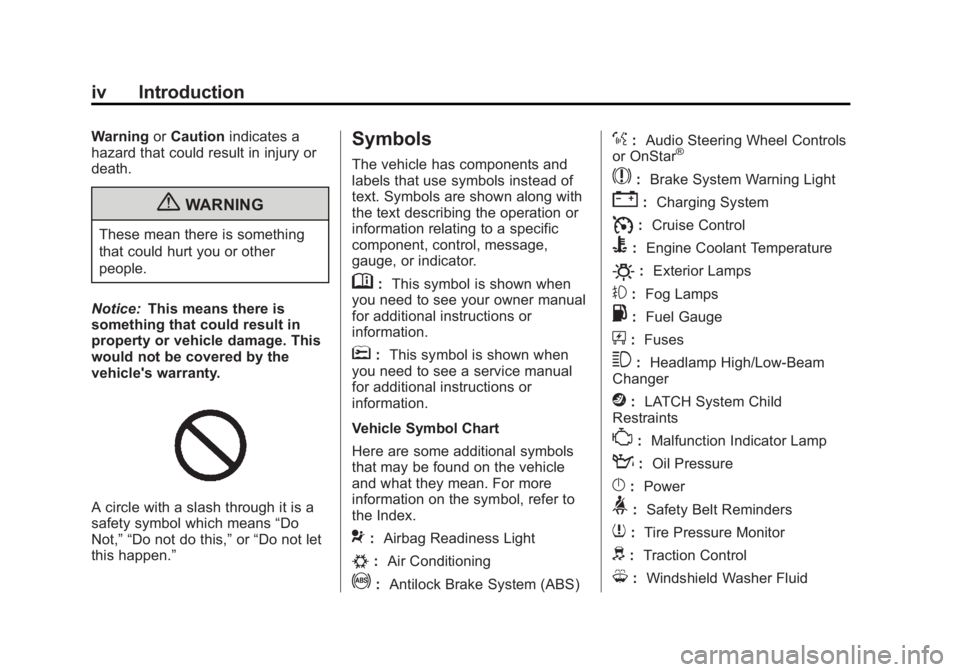
Symbols
The vehicle has components and
labels that use symbols instead of
text. Symbols are shown along with
the text describing the operation or
information relating to a specific
component, control, message,
gauge, or indicator.
M: This symbol is shown when
you need to see your owner manual
for additional instructions or
information.
*: This symbol is shown when
you need to see a service manual
for additional instructions or
information.
Vehicle Symbol Chart
Here are some additional symbols
that may be found on the vehicle
and what they mean. For more
information on the symbol, refer to
the Index.
9: Airbag Readiness Light
#:Air Conditioning
!:Antilock Brake System (ABS)
%:Audio Steering Wheel Controls
or OnStar®
$: Brake System Warning Light
":Charging System
I:Cruise Control
B: Engine Coolant Temperature
O:Exterior Lamps
#:Fog Lamps
.: Fuel Gauge
+:Fuses
3: Headlamp High/Low-Beam
Changer
j: LATCH System Child
Restraints
*: Malfunction Indicator Lamp
::Oil Pressure
}:Power
>:Safety Belt Reminders
7:Tire Pressure Monitor
d:Traction Control
M:Windshield Washer Fluid
Page 109 of 368
Black plate (1,1)Buick Regal Owner Manual - 2011
Instruments and Controls 5-1
Instruments and
Controls
Controls
Steering Wheel Adjustment . . . 5-2
Steering Wheel Controls . . . . . . 5-2
Horn . . . . . . . . . . . . . . . . . . . . . . . . . . 5-2
Windshield Wiper/Washer . . . . . 5-3
Compass . . . . . . . . . . . . . . . . . . . . . 5-4
Clock . . . . . . . . . . . . . . . . . . . . . . . . . 5-5
Power Outlets . . . . . . . . . . . . . . . . . 5-5
Warning Lights, Gauges, and
Indicators
Warning Lights, Gauges, andIndicators . . . . . . . . . . . . . . . . . . . . 5-7
Instrument Cluster . . . . . . . . . . . . 5-8
Speedometer . . . . . . . . . . . . . . . . . 5-9
Odometer . . . . . . . . . . . . . . . . . . . . . 5-9
Trip Odometer . . . . . . . . . . . . . . . . . 5-9
Tachometer . . . . . . . . . . . . . . . . . . . 5-9
Fuel Gauge . . . . . . . . . . . . . . . . . . . 5-9
Engine Coolant Temperature Gauge . . . . . . . . . . . . . . . . . . . . . . 5-10
Safety Belt Reminders . . . . . . . 5-11
Airbag Readiness Light . . . . . . 5-11 Passenger Airbag Status
Indicator . . . . . . . . . . . . . . . . . . . . 5-12
Charging System Light . . . . . . 5-13
Malfunction Indicator Lamp . . . . . . . . . . . . . 5-13
Brake System Warning Light . . . . . . . . . . . . . . . . . . . . . . . 5-16
Electric Parking Brake Light . . . . . . . . . . . . . . . . . . . . . . . 5-16
Antilock Brake System (ABS) Warning Light . . . . . . . . . . . . . . 5-17
Ultrasonic Parking Sensor Light . . . . . . . . . . . . . . . . . . . . . . . 5-17
Traction Off Light . . . . . . . . . . . . 5-18
StabiliTrak
®OFF Light . . . . . . . 5-18
Traction Control System (TCS)/StabiliTrak
®Light . . . . 5-18
Tire Pressure Light . . . . . . . . . . 5-19
Engine Oil Pressure Light . . . . 5-20
Low Fuel Warning Light . . . . . . 5-20
Security Light . . . . . . . . . . . . . . . . 5-21
High-Beam On Light . . . . . . . . . 5-21
Front Fog Lamp Light . . . . . . . . 5-21
Lamps On Reminder . . . . . . . . . 5-21
Cruise Control Light . . . . . . . . . 5-22
Door Ajar Light . . . . . . . . . . . . . . 5-22
Information Displays
Driver Information Center (DIC) . . . . . . . . . . . . . . . 5-22
Vehicle Messages
Vehicle Messages . . . . . . . . . . . 5-25
Battery Voltage and ChargingMessages . . . . . . . . . . . . . . . . . . 5-26
Brake System Messages . . . . 5-26
Compass Messages . . . . . . . . . 5-26
Door Ajar Messages . . . . . . . . . 5-27
Engine Cooling System Messages . . . . . . . . . . . . . . . . . . 5-27
Engine Oil Messages . . . . . . . . 5-28
Engine Power Messages . . . . 5-28
Fuel System Messages . . . . . . 5-28
Key and Lock Messages . . . . . 5-29
Object Detection System Messages . . . . . . . . . . . . . . . . . . 5-29
Ride Control System Messages . . . . . . . . . . . . . . . . . . 5-29
Anti-theft Alarm System Messages . . . . . . . . . . . . . . . . . . 5-29
Tire Messages . . . . . . . . . . . . . . . 5-30
Transmission Messages . . . . . 5-30
Window Messages . . . . . . . . . . . 5-31
Vehicle Personalization
Vehicle Personalization . . . . . . 5-31
Page 129 of 368

Black plate (21,1)Buick Regal Owner Manual - 2011
Instruments and Controls 5-21
Security Light
The immobilizer light should come
on briefly as the engine is started.
If it does not come on, have the
vehicle serviced by your dealer.
If the system is working normally,
the indicator light turns off.
This light comes on when the
ignition is turned from LOCK/OFF
to ON/RUN and stays on if the
vehicle is immobilized. This
happens when an incorrect key or
an unprogrammed key is used to
start the vehicle.
If the light stays on and the engine
does not start, there could be a
problem with the theft-deterrent
system. SeeVehicle Security on
page 2‑9 for more information.
High-Beam On Light
The high-beam on light comes on
when the high-beam headlamps are
in use.
SeeHeadlamp High/Low-Beam
Changer on page 6‑2 for more
information.
Front Fog Lamp Light
For vehicles with fog lamps, this
light comes on when the fog lamps
are in use. The light goes out when the fog
lamps are turned off. See
Fog
Lamps on page 6‑4 for more
information.
Lamps On Reminder
For vehicles with the lamps on
reminder light, it comes on when the
lights are in use.
Page 145 of 368
Black plate (1,1)Buick Regal Owner Manual - 2011
Lighting 6-1
Lighting
Exterior Lighting
Exterior Lamp Controls . . . . . . . . 6-1
Exterior Lamps OffReminder . . . . . . . . . . . . . . . . . . . . 6-2
Headlamp High/Low-Beam Changer . . . . . . . . . . . . . . . . . . . . . 6-2
Flash-to-Pass . . . . . . . . . . . . . . . . . 6-2
Daytime Running Lamps (DRL) . . . . . . . . . . . . . . . . 6-2
Automatic Headlamp System . . . . . . . . . . . . . . . . . . . . . . 6-3
Hazard Warning Flashers . . . . . 6-3
Turn and Lane-Change Signals . . . . . . . . . . . . . . . . . . . . . . 6-3
Fog Lamps . . . . . . . . . . . . . . . . . . . . 6-4
Interior Lighting
Instrument Panel Illumination Control . . . . . . . . . . . . . . . . . . . . . . 6-4
Dome Lamps . . . . . . . . . . . . . . . . . 6-5
Reading Lamps . . . . . . . . . . . . . . . 6-5
Lighting Features
Entry Lighting . . . . . . . . . . . . . . . . . 6-6
Exit Lighting . . . . . . . . . . . . . . . . . . . 6-6
Battery Power Protection . . . . . . 6-6
Exterior Lighting
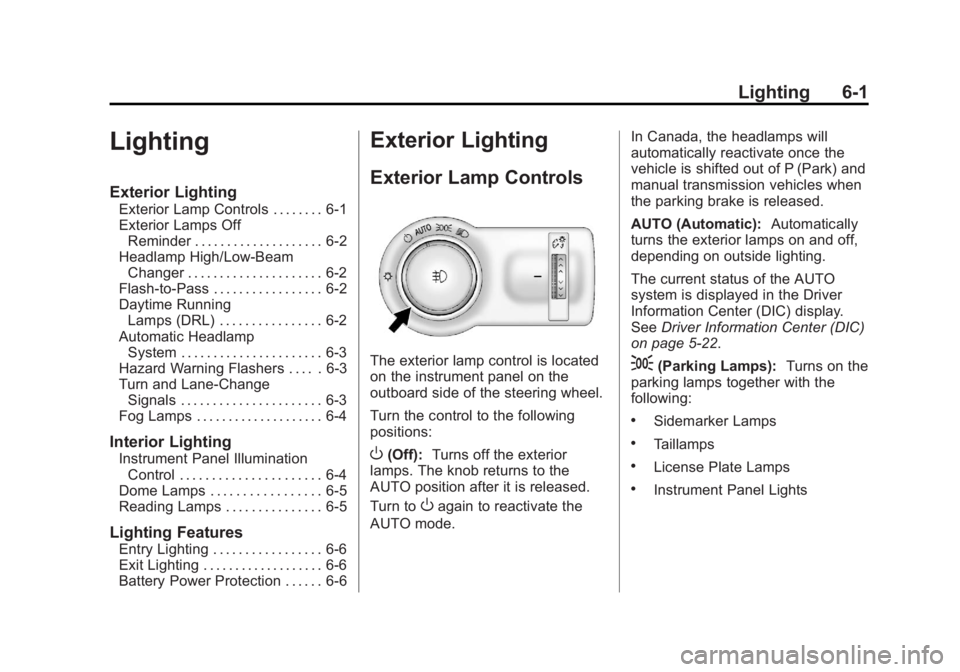
Exterior Lamp Controls
The exterior lamp control is located
on the instrument panel on the
outboard side of the steering wheel.
Turn the control to the following
positions:
O(Off): Turns off the exterior
lamps. The knob returns to the
AUTO position after it is released.
Turn to
Oagain to reactivate the
AUTO mode. In Canada, the headlamps will
automatically reactivate once the
vehicle is shifted out of P (Park) and
manual transmission vehicles when
the parking brake is released.
AUTO (Automatic):
Automatically
turns the exterior lamps on and off,
depending on outside lighting.
The current status of the AUTO
system is displayed in the Driver
Information Center (DIC) display.
See Driver Information Center (DIC)
on page 5‑22.
;(Parking Lamps): Turns on the
parking lamps together with the
following:
.Sidemarker Lamps
.Taillamps
.License Plate Lamps
.Instrument Panel Lights
Page 146 of 368

Black plate (2,1)Buick Regal Owner Manual - 2011
6-2 Lighting
2(Headlamps):Turns on the
headlamps together with the
following:
.Sidemarker Lamps
.Taillamps
.License Plate Lamps
.Instrument Panel Lights
.Parking Lamps
Exterior Lamps Off
Reminder
A warning chime sounds if the driver
door is opened while the ignition is
off and the exterior lamps are on.
Headlamp High/
Low-Beam Changer
2 3
Headlamp High/Low‐Beam
Changer: Push the turn signal/lane
change lever away from you and
release, to turn the high beams on.
To return to low beams, push the
lever again or pull it toward you and
release.
This indicator light turns on in the
instrument panel cluster when the
high‐beam headlamps are on.
Flash-to-Pass
To flash the high beams, pull the
turn signal/lane change lever toward
you, and release.
Daytime Running
Lamps (DRL)
Daytime Running Lamps (DRL) can
make it easier for others to see the
front of your vehicle during the day.
Fully functional daytime running
lamps are required on all vehicles
first sold in Canada. The DRL system turns on the
low-beam headlamps at a reduced
brightness. For vehicles with High
Intensity Discharge (HID)
headlamps, the dedicated DRL will
come on when all of the following
conditions are met:
.The engine is running.
.The exterior lamp band is
in AUTO.
.The light sensor determines it is
daytime.
When the DRL are on, the
low-beam headlamps will be on.
The taillamps, sidemarker lamps,
instrument panel lights, and other
lamps will not be on.
The DRL turn off when the
headlamps are turned to
Oor the
ignition is off.
Page 270 of 368
Black plate (30,1)Buick Regal Owner Manual - 2011
10-30 Vehicle Care
Wiper Blade Replacement
Windshield wiper blades should be
inspected for wear or cracking. See
Scheduled Maintenance on
page 11‑2for more information.
It is a good idea to clean or replace
the wiper blade assembly on a
regular basis or when worn. For
proper windshield wiper blade
length and type, see Maintenance
Replacement Parts on page 11‑8.
Notice: Allowing the wiper blade
arm to touch the windshield when
no wiper blade is installed could
damage the windshield. Any
damage that occurs would not be
covered by your warranty. Do not
allow the wiper blade arm to
touch the windshield.
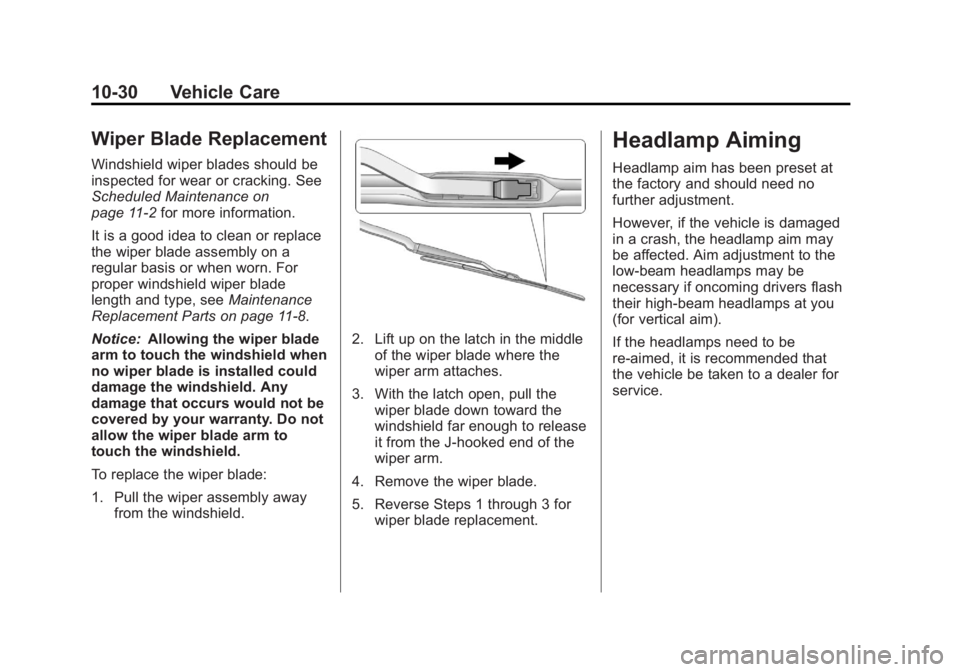
To replace the wiper blade:
1. Pull the wiper assembly away from the windshield.
2. Lift up on the latch in the middleof the wiper blade where the
wiper arm attaches.
3. With the latch open, pull the wiper blade down toward the
windshield far enough to release
it from the J-hooked end of the
wiper arm.
4. Remove the wiper blade.
5. Reverse Steps 1 through 3 for wiper blade replacement.
Headlamp Aiming
Headlamp aim has been preset at
the factory and should need no
further adjustment.
However, if the vehicle is damaged
in a crash, the headlamp aim may
be affected. Aim adjustment to the
low-beam headlamps may be
necessary if oncoming drivers flash
their high-beam headlamps at you
(for vertical aim).
If the headlamps need to be
re-aimed, it is recommended that
the vehicle be taken to a dealer for
service.
Page 271 of 368
Black plate (31,1)Buick Regal Owner Manual - 2011
Vehicle Care 10-31
Bulb Replacement
For the proper type of replacement
bulbs, seeReplacement Bulbs on
page 10‑34.
For any bulb‐changing procedure
not listed in this section, contact
your dealer.
Halogen Bulbs
{WARNING
Halogen bulbs have pressurized
gas inside and can burst if you
drop or scratch the bulb. You or
others could be injured. Be sure
to read and follow the instructions
on the bulb package.
Headlamps, Front Turn
Signal and Parking
Lamps
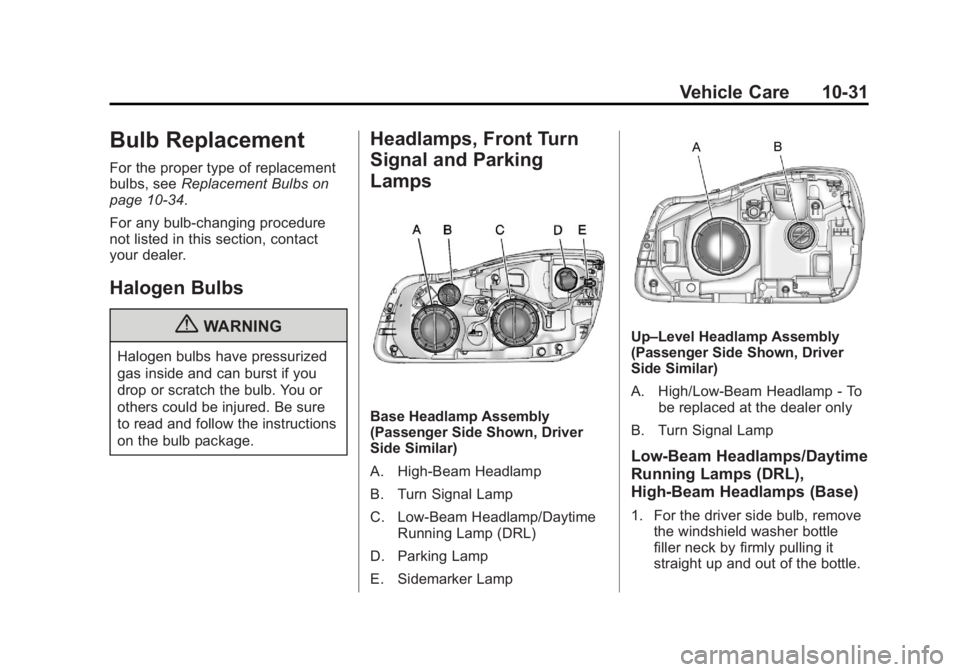
Base Headlamp Assembly
(Passenger Side Shown, Driver
Side Similar)
A. High‐Beam Headlamp
B. Turn Signal Lamp
C. Low‐Beam Headlamp/Daytime
Running Lamp (DRL)
D. Parking Lamp
E. Sidemarker Lamp
Up–Level Headlamp Assembly
(Passenger Side Shown, Driver
Side Similar)
A. High/Low‐Beam Headlamp ‐To
be replaced at the dealer only
B. Turn Signal Lamp
Low-Beam Headlamps/Daytime
Running Lamps (DRL),
High-Beam Headlamps (Base)
1. For the driver side bulb, remove the windshield washer bottle
filler neck by firmly pulling it
straight up and out of the bottle.
Page 272 of 368
Black plate (32,1)Buick Regal Owner Manual - 2011
10-32 Vehicle Care
2. Remove the outside cap for thelow-beam headlamp/DRL bulb
replacement from the back of the
headlamp assembly.
3. Remove the inside cap for the high-beam headlamp bulb
replacement from the back of the
headlamp assembly.
4. Disconnect the electrical connector.
5. Remove the bulb socket from the headlamp assembly.
6. Replace the bulb in the bulb socket.
7. Install the bulb socket in the headlamp assembly.
8. Reverse Steps 1 through 4 to reinstall the outside or inside cap
on the headlamp assembly.
High/Low‐Beam Headlamps
(Up-Level)
The high/low‐beam headlamps on
the up-level headlamp system are
High Intensity Discharge (HID) and
should be replaced at the dealer.
Front Turn Signal/Parking/Side
Marker Lamps (Base and
Up-Level)
To replace the front turn signal,
parking lamp, or sidemarker lamp:
1. For the driver side bulb, removethe windshield washer bottle
filler neck by firmly pulling it
straight up and out of the bottle.
2. Remove the bulb socket from the headlamp assembly by
turning it counterclockwise.
3. Remove the bulb from the socket.
4. Replace the bulb in the bulb socket.
5. Install the bulb socket in the headlamp assembly by turning it
clockwise. 6. For the driver side, reinstall the
windshield washer bottle filler
neck by firmly pushing it straight
into the bottle. Ensure that the
filler neck clip engages into the
underhood electrical center
retainer.
Fog Lamps
To replace the fog lamp bulb:
1. Locate the bulb assembly under
the front fascia.
2. Disconnect the electrical connector from the bulb
assembly.
3. Remove the bulb by turning it counterclockwise and pulling it
straight out of the assembly.
4. Install the new bulb by turning it clockwise into the assembly.
5. Reconnect the electrical connector to the bulb assembly.
Page 274 of 368
Black plate (34,1)Buick Regal Owner Manual - 2011
10-34 Vehicle Care
License Plate Lamp
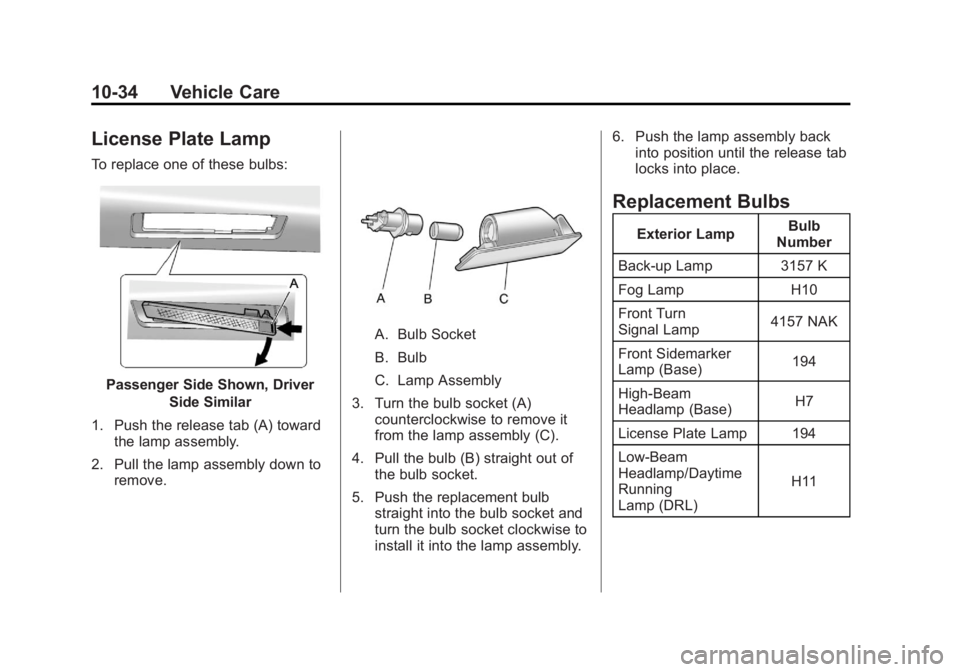
To replace one of these bulbs:
Passenger Side Shown, DriverSide Similar
1. Push the release tab (A) toward the lamp assembly.
2. Pull the lamp assembly down to remove.
A. Bulb Socket
B. Bulb
C. Lamp Assembly
3. Turn the bulb socket (A) counterclockwise to remove it
from the lamp assembly (C).
4. Pull the bulb (B) straight out of the bulb socket.
5. Push the replacement bulb straight into the bulb socket and
turn the bulb socket clockwise to
install it into the lamp assembly. 6. Push the lamp assembly back
into position until the release tab
locks into place.
Replacement Bulbs
Exterior Lamp Bulb
Number
Back-up Lamp 3157 K
Fog Lamp H10
Front Turn
Signal Lamp 4157 NAK
Front Sidemarker
Lamp (Base) 194
High‐Beam
Headlamp (Base) H7
License Plate Lamp 194
Low‐Beam
Headlamp/Daytime
Running
Lamp (DRL) H11
Page 278 of 368

Black plate (38,1)Buick Regal Owner Manual - 2011
10-38 Vehicle Care
Fuse
Number Usage
16 Vacuum Pump
17 Ignition, Airbag
18 Not Used
19 Not Used
20 Not Used
21 Rear Power
Windows
22 Antilock Brake
System Valve
23 Variable Effort
Steering
24 Front Power
Windows
25 Power Outlets
26 Antilock Brake
System Pump
27 Electric Parking
Brake
28 Heated Rear
Window Fuse
Number Usage
29 Left Hand Seat
Lumbar
30 Right Hand Seat
Lumbar
31 Not Used
32 Body Control
Module 6
33 Heated Front Seats
34 Sunroof
35 Infotainment System
36 Not Used
37 Right Hand
High‐Beam
Headlamp
38 Left Hand
High‐Beam
Headlamp
39 Not Used
40 Not Used
41 Vacuum Pump Fuse
Number Usage
42 Radiator Fan 1
43 Not Used
44 Headlamp Washer
System (if equipped)
45 Radiator Fan 2
46 Terminal 87, Main
Relay
47 Oxygen Sensor
48 Fog Lamps
49 Right Hand Low
Beam, High Intensity
Discharge
Headlamp
50 Left Hand Low
Beam, High Intensity
Discharge
Headlamp
51 Horn
52 Motor
Indicator Lamp