power steering BUICK REGAL 2016 User Guide
[x] Cancel search | Manufacturer: BUICK, Model Year: 2016, Model line: REGAL, Model: BUICK REGAL 2016Pages: 357, PDF Size: 5.37 MB
Page 176 of 357
Buick Regal Owner Manual (GMNA-Localizing-U.S./Canada/Mexico-
9159380) - 2016 - CRC - 2/23/16
Driving and Operating 175
Starting and
Operating
New Vehicle Break-In
Caution
The vehicle does not need an
elaborate break-in. But it will
perform better in the long run if
you follow these guidelines:. Do not drive at any one
constant speed, fast or slow,
for the first 805 km (500 mi).
Do not make full-throttle
starts. Avoid downshifting to
brake or slow the vehicle.
. Avoid making hard stops for
the first 322 km (200 mi) or
so. During this time the new
brake linings are not yet
broken in. Hard stops with
new linings can mean
premature wear and earlier
replacement. Follow this
(Continued)
Caution (Continued)
breaking-in guideline every
time you get new brake
linings.
Following break-in, engine speed
and load can be gradually
increased.
Ignition Positions (Key
Access)
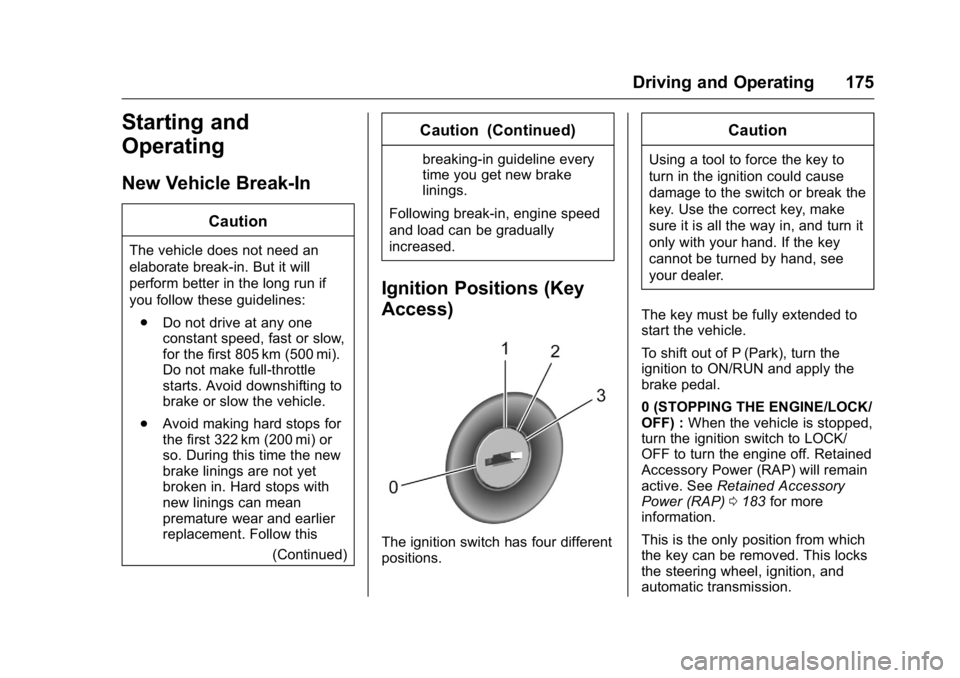
The ignition switch has four different
positions.
Caution
Using a tool to force the key to
turn in the ignition could cause
damage to the switch or break the
key. Use the correct key, make
sure it is all the way in, and turn it
only with your hand. If the key
cannot be turned by hand, see
your dealer.
The key must be fully extended to
start the vehicle.
To shift out of P (Park), turn the
ignition to ON/RUN and apply the
brake pedal.
0 (STOPPING THE ENGINE/LOCK/
OFF) : When the vehicle is stopped,
turn the ignition switch to LOCK/
OFF to turn the engine off. Retained
Accessory Power (RAP) will remain
active. See Retained Accessory
Power (RAP) 0183 for more
information.
This is the only position from which
the key can be removed. This locks
the steering wheel, ignition, and
automatic transmission.
Page 177 of 357
Buick Regal Owner Manual (GMNA-Localizing-U.S./Canada/Mexico-
9159380) - 2016 - CRC - 2/23/16
176 Driving and Operating
Do not turn the engine off when the
vehicle is moving. This will cause a
loss of power assist in the brake
and steering systems and disable
the airbags.
If the vehicle must be shut off in an
emergency:1. Brake using a firm and steady pressure. Do not pump the
brakes repeatedly. This may
deplete power assist, requiring
increased brake pedal force.
2. Shift the vehicle to (N) Neutral. This can be done while the
vehicle is moving. After shifting
to (N) Neutral, firmly apply the
brakes and steer the vehicle to
a safe location.
3. Come to a complete stop. Shift to P (Park). Turn the ignition to
LOCK/OFF.
4. Set the parking brake. See Parking Brake 0189.{Warning
Turning off the vehicle while
moving may cause loss of power
assist in the brake and steering
systems and disable the airbags.
While driving, only shut the
vehicle off in an emergency.
If the vehicle cannot be pulled over,
and must be shut off while driving,
turn the ignition to ACC/
ACCESSORY.
The ignition switch can bind in the
LOCK/OFF position with the wheels
turned off center. If this happens,
move the steering wheel from right
to left while turning the key to ACC/
ACCESSORY. If this does not work,
then the vehicle needs service.
1 (ACC/ACCESSORY) : This
position unlocks the steering wheel.
Some accessories can be used in
this position.
2 (ON/RUN) : The ignition switch
stays in this position when the
engine is running. This position can
be used to operate the electrical accessories, as well as to display
some warning and indicator lights.
This position can also be used for
service and diagnostics, and to
verify the proper operation of the
malfunction indicator lamp as may
be required for emission inspection
purposes.
The battery could be drained if the
key is left in the ON/RUN position
with the engine off. The vehicle
might not start if the battery is
allowed to drain for an extended
period of time.
3 (START) :
This position starts the
engine. When the engine starts,
release the key. The ignition switch
will return to ON/RUN for normal
driving.
If the ignition becomes difficult to
turn, see Keys026.
Page 178 of 357
Buick Regal Owner Manual (GMNA-Localizing-U.S./Canada/Mexico-
9159380) - 2016 - CRC - 2/23/16
Driving and Operating 177
Ignition Positions
(Keyless Access)
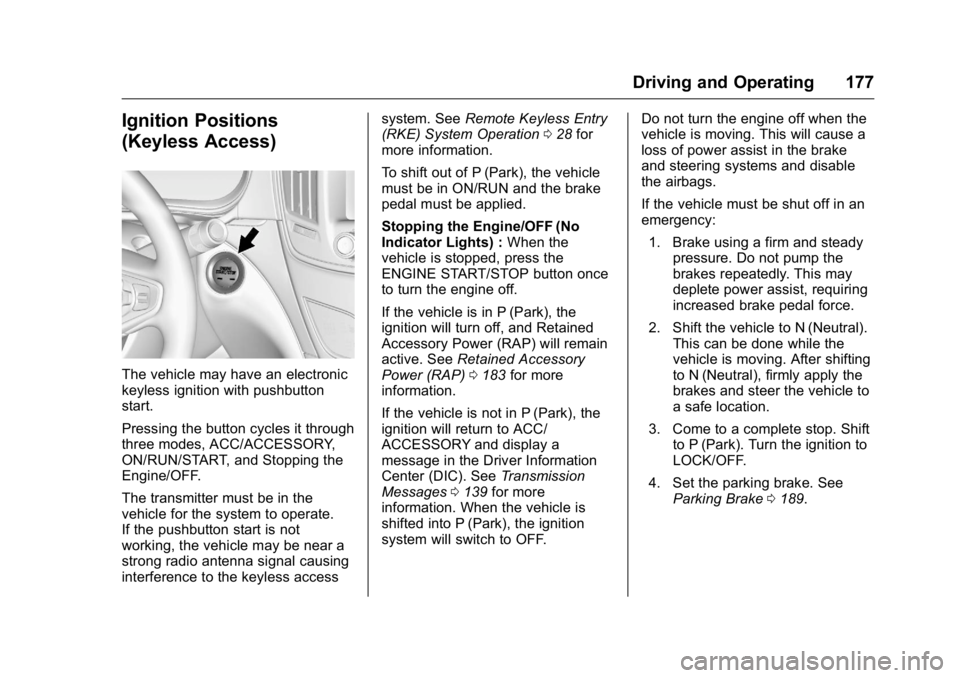
The vehicle may have an electronic
keyless ignition with pushbutton
start.
Pressing the button cycles it through
three modes, ACC/ACCESSORY,
ON/RUN/START, and Stopping the
Engine/OFF.
The transmitter must be in the
vehicle for the system to operate.
If the pushbutton start is not
working, the vehicle may be near a
strong radio antenna signal causing
interference to the keyless accesssystem. See
Remote Keyless Entry
(RKE) System Operation 028 for
more information.
To shift out of P (Park), the vehicle
must be in ON/RUN and the brake
pedal must be applied.
Stopping the Engine/OFF (No
Indicator Lights) : When the
vehicle is stopped, press the
ENGINE START/STOP button once
to turn the engine off.
If the vehicle is in P (Park), the
ignition will turn off, and Retained
Accessory Power (RAP) will remain
active. See Retained Accessory
Power (RAP) 0183 for more
information.
If the vehicle is not in P (Park), the
ignition will return to ACC/
ACCESSORY and display a
message in the Driver Information
Center (DIC). See Transmission
Messages 0139 for more
information. When the vehicle is
shifted into P (Park), the ignition
system will switch to OFF. Do not turn the engine off when the
vehicle is moving. This will cause a
loss of power assist in the brake
and steering systems and disable
the airbags.
If the vehicle must be shut off in an
emergency:
1. Brake using a firm and steady pressure. Do not pump the
brakes repeatedly. This may
deplete power assist, requiring
increased brake pedal force.
2. Shift the vehicle to N (Neutral). This can be done while the
vehicle is moving. After shifting
to N (Neutral), firmly apply the
brakes and steer the vehicle to
a safe location.
3. Come to a complete stop. Shift to P (Park). Turn the ignition to
LOCK/OFF.
4. Set the parking brake. See Parking Brake 0189.
Page 179 of 357
Buick Regal Owner Manual (GMNA-Localizing-U.S./Canada/Mexico-
9159380) - 2016 - CRC - 2/23/16
178 Driving and Operating
{Warning
Turning off the vehicle while
moving may cause loss of power
assist in the brake and steering
systems and disable the airbags.
While driving, only shut the
vehicle off in an emergency.
If the vehicle cannot be pulled over,
and must be shut off while driving,
press and hold the ENGINE START/
STOP button for longer than
two seconds, or press twice in
five seconds.
ACC/ACCESSORY (Amber
Indicator Light) : This mode allows
you to use some electrical
accessories when the engine is off.
With the ignition off, pressing the
button one time without the brake
pedal applied will place the ignition
system in ACC/ACCESSORY.
The ignition will switch from ACC/
ACCESSORY to OFF after
five minutes to prevent battery
run down. ON/RUN/START (Green Indicator
Light) :
This mode is for driving and
starting. With the ignition off, and
the brake pedal applied, pressing
the button once will place the
ignition system in ON/RUN/START.
Once engine cranking begins,
release the button. Engine cranking
will continue until the engine starts.
See Starting the Engine 0178 for
more information. The ignition will
then remain in ON/RUN.
Service Only Mode
This power mode is available for
service and diagnostics, and to
verify the proper operation of the
malfunction indicator lamp as may
be required for emission inspection
purposes. With the vehicle off, and
the brake pedal not applied,
pressing and holding the button for
more than five seconds will place
the vehicle in Service Only Mode.
The instruments and audio systems
will operate as they do in ON/RUN,
but the vehicle will not be able to be
driven. The engine will not start in
Service Only Mode. Push the button
again to turn the vehicle off.
Starting the Engine
Place the transmission in the
proper gear.
Caution
If you add electrical parts or
accessories, you could change
the way the engine operates. Any
resulting damage would not be
covered by the vehicle warranty.
See Add-On Electrical
Equipment 0218.
Move the shift lever to P (Park) or
N (Neutral). To restart the vehicle
when it is already moving, use
N (Neutral) only.
Caution
Do not try to shift to P (Park) if the
vehicle is moving. If you do, you
could damage the transmission.
Shift to P (Park) only when the
vehicle is stopped.
Page 195 of 357
Buick Regal Owner Manual (GMNA-Localizing-U.S./Canada/Mexico-
9159380) - 2016 - CRC - 2/23/16
194 Driving and Operating
GS :Use where personal
preference or road conditions
demand more control. This setting
provides responsive, controlled
steering and handling and also
modifies the All-Wheel Drive (AWD).
Press and release the GS button on
top of the center stack. The light on
the button comes on, and the
appropriate message displays on
the DIC. Press the button again.
The system returns to the Standard
mode and the appropriate message
displays on the DIC.
Selective Ride Control automatically
comes on in the Standard mode
when the vehicle is started. When
the Sport and GS modes are turned
off, the system returns to the
Standard mode.
Standard Mode
. The powertrain reacts normally
to the accelerator pedal.
. Power steering assistance is
normal.
Sport Mode
.The shock absorbers stiffen to
provide better contact with the
road surface.
. The powertrain reacts normally
to the accelerator pedal.
. Power steering assistance is
normal.
GS Mode
.Additional stiffness in the shock
absorbers for increased body
control.
. The powertrain reacts more
quickly to the accelerator pedal.
. Power steering assistance is
reduced.
Cruise Control
With cruise control the vehicle can
maintain a speed of about 40 km/h
(25 mph) or more without keeping
your foot on the accelerator. Cruise
control does not work at speeds
below 40 km/h (25 mph).
{Warning
Cruise control can be dangerous
where you cannot drive safely at
a steady speed. Do not use
cruise control on winding roads or
in heavy traffic.
Cruise control can be dangerous
on slippery roads. On such roads,
fast changes in tire traction can
cause excessive wheel slip, and
you could lose control. Do not use
cruise control on slippery roads.
Page 251 of 357
Buick Regal Owner Manual (GMNA-Localizing-U.S./Canada/Mexico-
9159380) - 2016 - CRC - 2/23/16
250 Vehicle Care
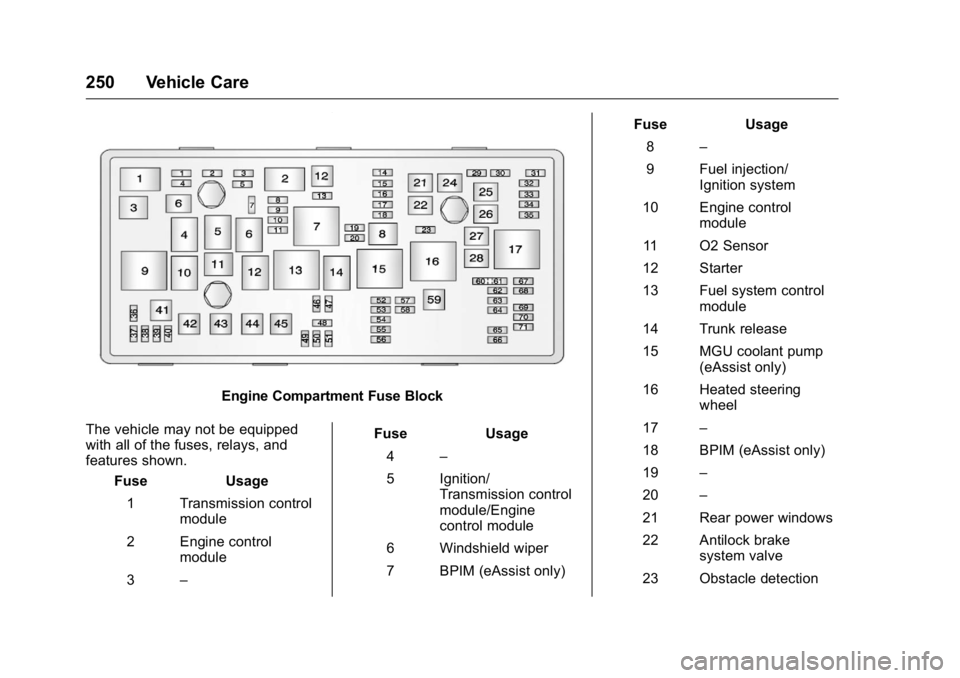
Engine Compartment Fuse Block
The vehicle may not be equipped
with all of the fuses, relays, and
features shown. Fuse Usage
1 Transmission control module
2 Engine control module
3 – Fuse Usage
4 –
5 Ignition/ Transmission control
module/Engine
control module
6 Windshield wiper
7 BPIM (eAssist only) Fuse Usage
8 –
9 Fuel injection/ Ignition system
10 Engine control module
11 O2 Sensor
12 Starter
13 Fuel system control module
14 Trunk release
15 MGU coolant pump (eAssist only)
16 Heated steering wheel
17 –
18 BPIM (eAssist only)
19 –
20 –
21 Rear power windows
22 Antilock brake system valve
23 Obstacle detection
Page 254 of 357
Buick Regal Owner Manual (GMNA-Localizing-U.S./Canada/Mexico-
9159380) - 2016 - CRC - 2/23/16
Vehicle Care 253
ItemUsage
2 Body control module 1
3 Body control module 5
4 Radio
5 Radio displays/ Parking assist/
Infotainment/Module
tunnel control
6 Instrument panel power outlet
7 Console power outlet
8 Body control module 3
9 Body control module 4
10 Body control module 8
11 Front HVAC blower
12 Right front seat
13 Left front seat Item
Usage
14 Diagnostic link connector
15 Airbag
16 Steering wheel controls
17 HVAC controller
18 Service fuse/ Logistics relay
19 Memory seats
20 Automatic occupant sensing
21 Instrument cluster
22 Discrete logic ignition switch/
Passive entry/
Passive start
23 Body control module 6
24 Body control module 2
25 OnStar
26 –Wheels and Tires
Tires
Every new GM vehicle has
high-quality tires made by a
leading tire manufacturer. See
the warranty manual for
information regarding the tire
warranty and where to get
service. For additional
information refer to the tire
manufacturer.
{Warning
.Poorly maintained and
improperly used tires are
dangerous.
.Overloading the tires can
cause overheating as a
result of too much
flexing. There could be a
blowout and a serious
crash. See Vehicle Load
Limits 0171.
(Continued)
Page 267 of 357
Buick Regal Owner Manual (GMNA-Localizing-U.S./Canada/Mexico-
9159380) - 2016 - CRC - 2/23/16
266 Vehicle Care
matched to the tire/wheel positions,
using a TPMS relearn tool, in the
following order: driver side front tire,
passenger side front tire, passenger
side rear tire, and driver side rear.
See your dealer for service or to
purchase a relearn tool. A TPMS
relearn tool can also be purchased.
See Tire Pressure Monitor
Sensor Activation Tool at
www.gmtoolsandequipment.com or
call 1-800-GM TOOLS
(1-800-468-6657).
There are two minutes to match the
first tire/wheel position, and
five minutes overall to match all four
tire/wheel positions. If it takes
longer, the matching process stops
and must be restarted.
The TPMS sensor matching
process is:1. Set the parking brake.
2. Turn the ignition to ON/RUN with the engine off or place the
vehicle power mode in ON/
RUN/START. See Ignition
Positions (Key Access) 0175
or Ignition Positions (Keyless
Access) 0177. 3. Make sure the Tire Pressure
info page option is turned on.
The info pages on the DIC can
be turned on and off through
the Settings menu. See Driver
Information Center (DIC) (Base
Level Cluster) 0125 orDriver
Information Center (DIC)
(Uplevel Cluster) 0127.
4. Use the DIC controls on the right side of the steering wheel
to scroll to the Tire Pressure
screen under the DIC
info page.
5. Press and hold the
V(Set/
Reset) button located in the
center of the DIC controls.
The horn sounds twice to
signal the receiver is in relearn
mode and the TIRE
LEARNING ACTIVE message
displays on the DIC screen.
6. Start with the driver side front tire.
7. Place the relearn tool against the tire sidewall, near the valve
stem. Then press the button to
activate the TPMS sensor. A horn chirp confirms that the
sensor identification code has
been matched to this tire and
wheel position.
8. Proceed to the passenger side front tire, and repeat the
procedure in Step 7.
9. Proceed to the passenger side rear tire, and repeat the
procedure in Step 7.
10. Proceed to the driver side rear tire, and repeat the procedure
in Step 7. The horn sounds two
times to indicate the sensor
identification code has been
matched to the driver side rear
tire, and the TPMS sensor
matching process is no longer
active. The TIRE LEARNING
ACTIVE message on the DIC
display screen goes off.
11. Turn the ignition to LOCK/OFF or press STOP to turn the
ignition off.
12. Set all four tires to the recommended air pressure
level as indicated on the Tire
and Loading Information label.
Page 300 of 357
Buick Regal Owner Manual (GMNA-Localizing-U.S./Canada/Mexico-
9159380) - 2016 - CRC - 2/23/16
Vehicle Care 299
Caution (Continued)
brushes. Damage could occur
and the repairs would not be
covered by the vehicle warranty.
Brake System
Visually inspect brake lines and
hoses for proper hook-up, binding,
leaks, cracks, chafing, etc. Inspect
disc brake pads for wear and rotors
for surface condition. Inspect drum
brake linings/shoes for wear or
cracks. Inspect all other brake parts.
Steering, Suspension, and
Chassis Components
Visually inspect steering,
suspension, and chassis
components for damaged, loose,
or missing parts or signs of wear at
least once a year.
Inspect power steering for proper
hook-up, binding, leaks, cracks,
chafing, etc.
Visually check constant velocity joint
boots and axle seals for leaks.
Body Component Lubrication
Lubricate all key lock cylinders,
hood hinges, liftgate hinges, and the
steel fuel door hinges, unless the
components are plastic. Applying
silicone grease on weatherstrips
with a clean cloth will make them
last longer, seal better, and not stick
or squeak.
Underbody Maintenance
At least twice a year, spring and fall,
use plain water to flush any
corrosive materials from the
underbody. Take care to thoroughly
clean any areas where mud and
other debris can collect.
Do not directly power wash the
transfer case and/or front/rear axle
output seals. High pressure water
can overcome the seals and
contaminate the fluid. Contaminated
fluid will decrease the life of the
transfer case and/or axles and
should be replaced.
Sheet Metal Damage
If the vehicle is damaged and
requires sheet metal repair or
replacement, make sure the body
repair shop applies anti-corrosion
material to parts repaired or
replaced to restore corrosion
protection.
Original manufacturer replacement
parts will provide the corrosion
protection while maintaining the
vehicle warranty.
Finish Damage
Quickly repair minor chips and
scratches with touch-up materials
available from your dealer to avoid
corrosion. Larger areas of finish
damage can be corrected in your
dealer's body and paint shop.
Chemical Paint Spotting
Airborne pollutants can fall upon
and attack painted vehicle surfaces
causing blotchy, ring-shaped
discolorations, and small, irregular
dark spots etched into the paint
surface. See“Finish Care”
previously in this section.
Page 355 of 357

Buick Regal Owner Manual (GMNA-Localizing-U.S./Canada/Mexico-
9159380) - 2016 - CRC - 2/23/16
354 Index
S
Safety Belts . . . . . . . . . . . . . . . . . . . . . 58Care . . . . . . . . . . . . . . . . . . . . . . . . . . . . 63
Extender . . . . . . . . . . . . . . . . . . . . . . . . 62
How to Wear Safety BeltsProperly . . . . . . . . . . . . . . . . . . . . . . . 59
Lap-Shoulder Belt . . . . . . . . . . . . . . 60
Reminders . . . . . . . . . . . . . . . . . . . . .113
Replacing after a Crash . . . . . . . . 63
Use During Pregnancy . . . . . . . . . . 62
Safety Defects Reporting Canadian Government . . . . . . . . 333
General Motors . . . . . . . . . . . . . . . 333
U.S. Government . . . . . . . . . . . . . 332
Safety Locks . . . . . . . . . . . . . . . . . . . . . 38
Safety System Check . . . . . . . . . . . . 63
Scheduling Appointments . . . . . . . 328
Sealant Kit, Tire . . . . . . . . . . . . . . . . 275
Seats Adjustment, Front . . . . . . . . . . . . . . . 51
Head Restraints . . . . . . . . . . . . . . . . 50
Heated Front . . . . . . . . . . . . . . . . . . . 55
Lumbar Adjustment, Front . . . . . . 52
Memory . . . . . . . . . . . . . . . . . . . . . . . . . 54
Power Adjustment, Front . . . . . . . 52
Rear . . . . . . . . . . . . . . . . . . . . . . . . . . . . 56
Reclining Seatbacks . . . . . . . . . . . . 52
Securing Child Restraints . . . . 89, 92 Security
Light . . . . . . . . . . . . . . . . . . . . . . . . . . 122
Messages . . . . . . . . . . . . . . . . . . . . 138
OnStar
®. . . . . . . . . . . . . . . . . . . . . . 337
Vehicle . . . . . . . . . . . . . . . . . . . . . . . . . 40
Vehicle Alarm . . . . . . . . . . . . . . . . . . . 40
Selective Ride Control . . . . . . . . . . 193
Service . . . . . . . . . . . . . . . . . . . . . . . . . 162
Accessories andModifications . . . . . . . . . . . . . . . . 221
Doing Your Own Work . . . . . . . . 221
Engine Soon Light . . . . . . . . . . . . .116
Maintenance Records . . . . . . . . 317
Maintenance, General
Information . . . . . . . . . . . . . . . . . . 304
Parts Identification Label . . . . . 318
Publications Ordering
Information . . . . . . . . . . . . . . . . . . 331
Scheduling Appointments . . . . . 328
Service Electric Parking Brake Light . . . . . . . . . . . . . . . . . . . . 118
Services Special Application . . . . . . . . . . . .311
Servicing the Airbag . . . . . . . . . . . . . 73
Shift Lock Control Function Check, Automatic
Transmission . . . . . . . . . . . . . . . . . . 243 Shifting
Into Park . . . . . . . . . . . . . . . . . . . . . . 183
Out of Park . . . . . . . . . . . . . . . . . . . 184
Side Blind Zone Alert (SBZA) . . . 210
Signals, Turn and Lane-Change . . . . . . . . . . . . . . . . . 152
Spare Tire
Compact . . . . . . . . . . . . . . . . . . . . . . 287
Special Application Services . . . . 311
Specifications and Capacities . . . . . . . . . . . . . . . . . . . . . 319
Speedometer . . . . . . . . . . . . . . . . . . . 110
StabiliTrak OFF Light . . . . . . . . . . . . . . . . . . . . . 120
Start Assist, Hills . . . . . . . . . . . . . . . 191
Start Vehicle, Remote . . . . . . . . . . . 34
Starter Switch Check . . . . . . . . . . . 243
Starting the Engine . . . . . . . . . . . . . 178
Starting the Vehicle Messages . . . . . . . . . . . . . . . . . . . . . 138
Steering . . . . . . . . . . . . . . . . . . . . . . . . 166
Heated Wheel . . . . . . . . . . . . . . . . . . 99
Wheel Adjustment . . . . . . . . . . . . . . 99
Wheel Controls . . . . . . . . . . . . . . . . . 99
Stoplamps and Back-up Lamps
Bulb Replacement . . . . . . . . . . . . 246
Storage Rear . . . . . . . . . . . . . . . . . . . . . . . . . . . . 96