Access BUICK REGAL 2018 Infotainment System Guide
[x] Cancel search | Manufacturer: BUICK, Model Year: 2018, Model line: REGAL, Model: BUICK REGAL 2018Pages: 76, PDF Size: 0.73 MB
Page 30 of 76
Buick Regal Infotainment System (GMNA-Localizing-2nd Timed Print-U.S./
Canada-11486031) - 2018 - crc - 3/22/18
Navigation 29
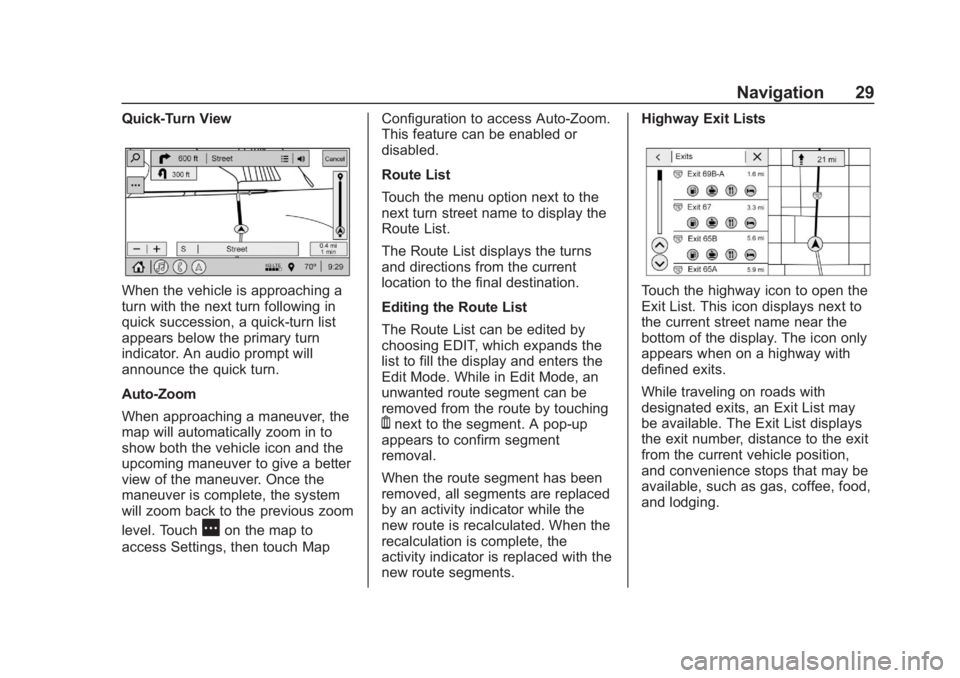
Quick-Turn View
When the vehicle is approaching a
turn with the next turn following in
quick succession, a quick-turn list
appears below the primary turn
indicator. An audio prompt will
announce the quick turn.
Auto-Zoom
When approaching a maneuver, the
map will automatically zoom in to
show both the vehicle icon and the
upcoming maneuver to give a better
view of the maneuver. Once the
maneuver is complete, the system
will zoom back to the previous zoom
level. Touch
Aon the map to
access Settings, then touch Map Configuration to access Auto-Zoom.
This feature can be enabled or
disabled.
Route List
Touch the menu option next to the
next turn street name to display the
Route List.
The Route List displays the turns
and directions from the current
location to the final destination.
Editing the Route List
The Route List can be edited by
choosing EDIT, which expands the
list to fill the display and enters the
Edit Mode. While in Edit Mode, an
unwanted route segment can be
removed from the route by touching
Ynext to the segment. A pop-up
appears to confirm segment
removal.
When the route segment has been
removed, all segments are replaced
by an activity indicator while the
new route is recalculated. When the
recalculation is complete, the
activity indicator is replaced with the
new route segments. Highway Exit Lists
Touch the highway icon to open the
Exit List. This icon displays next to
the current street name near the
bottom of the display. The icon only
appears when on a highway with
defined exits.
While traveling on roads with
designated exits, an Exit List may
be available. The Exit List displays
the exit number, distance to the exit
from the current vehicle position,
and convenience stops that may be
available, such as gas, coffee, food,
and lodging.
Page 32 of 76

Buick Regal Infotainment System (GMNA-Localizing-2nd Timed Print-U.S./
Canada-11486031) - 2018 - crc - 3/22/18
Navigation 31
If the system has determined that
the destination has been reached,
either because the arrival view
displayed or the destination has
been passed, the Resume Trip
option will not appear.
Favorites
The navigation favorites can have
contacts, addresses, or POIs that
have been saved through the
favorite icon on the details view.
Accessing Favorites
To manage favorites, touch the
Search icon on the Home Page.
Touch Favorites to access the
Favorites option.
In the Nav application, view the
Favorites list by touching
Hin the
search bar along the top of the Nav
map view. If the search bar is
closed, touch
}and selectH.
Saving Favorites
Favorites can be added from a
number of the system’ s applications.
Touch the favorites icon to save
content as a favorite. Renaming Navigation Favorites
1. Touch the Settings icon on the Home Page and touch the
System tab.
2. Touch Favorites to access the Manage Favorites option.
3. Touch a saved Navigation favorite to access the edit icon.
Touch the edit icon to rename
the favorite.
4. Touch Save to store the renamed favorite.
Recents
TouchGto access a list of recent
destinations.
Recenter Position Icon
Touch the Recenter Position arrow
in the middle of the map view to
reset the map to the current
location.
Last Parked Location
The Last Parked Location is the last
location the vehicle engine was
turned off. That location is displayed
in the first row of the Recents list. Touching the last Parked Location
shows the Address Details view to
either save the address or drive to
it. The Last Parked Location can be
deleted by entering the Edit display.
Once the Last Parked Location is
deleted, it no longer appears in the
Recents list, unless the vehicle is
started at that location again.
Show POI Icons
To see the POI categories, touch
Options, then touch Show on Map.
Up to eight categories of icons can
be selected.
Smart POI Icons on Map
Page 33 of 76
Buick Regal Infotainment System (GMNA-Localizing-2nd Timed Print-U.S./
Canada-11486031) - 2018 - crc - 3/22/18
32 Navigation
The smart POI icons such as fuel
stations and parking appear based
on time, location, driver search
behavior, driving conditions, and
vehicle conditions.
Touch a smart POI icon to open the
corresponding details:
.Left side: Name and address of
the POI.
. Right side:
c+ ETE
(Estimated Time Enroute.)
Smart Fuel Station Icons
Fuel station prices are shown if
available for nearby stations when
the vehicle is low on fuel.
Smart Parking Icons
When reaching a densely populated
destination and the system
determines that parking may be
limited, the system will attempt to
display nearby parking destinations
with pricing information, if available. Report an Issue Using POI Details
In the POI details page, a POI issue
can be reported if the data is not
accurate or the address is incorrect.
Touch Report an Issue near the
bottom of the display to access the
issue selection page. Touch one of
the predefined issues on the
selection page, then touch Send.
The system will send the
information for analysis.
Search
Touch Search on the infotainment
display to open the search display.
It has a search field entry box, quick
category icon shortcuts, recents
icon, favorites icon, and keyboard.
Auto Complete
Enter a partial location in the field
entry box on the search display.
Auto complete will attempt to
complete the destination based on
what is being entered. Touch the
suggested item to search.Search While in Motion with No
Front Seat Passenger Present
The search display will not allow
changes or text input with the
keyboard when the vehicle is in
motion. As a result, a display
showing three rows of the most
commonly used categories appears.
Touching the search box will
activate speech recognition.
Search While in Motion with Front
Seat Passenger Present
If the system detects that the front
seat passenger is present with both
driver and passenger seat belts
buckled, touching the search icon
will display an alert message that
allows the passenger to search for a
destination as if the vehicle were
stopped.
Connected Navigation
Connected Navigation is a
subscription service that enables
certain capabilities within the
navigation system, such as Traffic,
Smart Search/Routing, and
Predictive Navigation capabilities.
Page 34 of 76

Buick Regal Infotainment System (GMNA-Localizing-2nd Timed Print-U.S./
Canada-11486031) - 2018 - crc - 3/22/18
Navigation 33
The system will show an alert when
the subscription is expiring and will
ask to renew the plan.
OnStar System
With a connected plan, an OnStar
Advisor can download a destination
to the vehicle or into the built-in
navigation system.
Touch OnStar on the Home Page to
access the OnStar menu. Touch
Turn-by-Turn Directions icon while
on the OnStar menu.Turn-by-Turn Navigation
After touching the Turn-by-Turn
Directions icon, select destinations
from Recents or Favorites. To find
new locations, touch OnStar
Advisor, Home Directions, Place
Voice Search, or Address Voice
Search.
Lane Guidance
When available, the system will
show the best lane(s) to be in for
the next maneuver.
Cancel a Route
If a route is in progress using either
the vehicle navigation system or the
Turn-by-Turn route, and a new route
is requested, the current route in
progress will be canceled.
Global Positioning
System (GPS)
The position of the vehicle is
determined by using satellite
signals, various vehicle signals, and
map data.
At times, other interference such as
the satellite condition, road
configuration, condition of the
vehicle, and/or other circumstances
can affect the navigation system's
ability to determine the accurate
position of the vehicle.
The GPS shows the current position
of the vehicle using signals sent by
GPS satellites. When the vehicle is
Page 43 of 76
Buick Regal Infotainment System (GMNA-Localizing-2nd Timed Print-U.S./
Canada-11486031) - 2018 - crc - 3/22/18
42 Voice Recognition
There are no restrictions if the
number of files and albums is less
than 12,000. When the number of
files connected to the system is
between 12,000 and 24,000, the
content cannot be accessed directly
with one command like“Play
The restriction is that the command
“Play Song” must be spoken first;
the system will then ask for the song
name. The reply command would be
to say the name of the song to play.
Similar limits exist for album
content. If there are more than
12,000 albums, but less than
24,000, the content cannot be
accessed directly with one
command like, “Play
Album” must first be spoken; the
system will then ask for the album
name. The reply would be to say the
name of the album to play.
Once the number of files has
exceeded approximately 24,000,
there is no support for accessing the
songs directly through voice
commands. There will still be access to the media content by
using commands for playlists,
artists, and genres.
The access commands for playlists,
artists, and genres are prohibited
after the number of this type of
media exceeds 12,000.
The system will provide feedback
the first time voice recognition is
initiated if it has become apparent
that any of these limits are reached
during a device initializing process.
Voice recognition performance will
degrade to some extent based on
many factors when adding large
amounts of data to recognize. If this
is the case, perhaps accessing
songs through playlists or artist
name would work better.
Voice Recognition for
Navigation
“Navigation”
:Begin a dialog to
enter specific destination
information.
“Navigation Commands” :Begin a
dialog to enter specific destination
information. “Address”
:Begin a dialog to enter
a specific destination address,
which includes the entire address
consisting of the house number,
street name, city, state/province,
and country. Do not include the
ZIP code.
“Place of Interest” :Begin a dialog
to enter a destination Place of
Interest category or major
brand name.
The name must be precisely
spoken. Nicknames or short names
for the businesses will not likely be
found. Lesser known businesses
might have to be located by
category, such as fast food, hotels,
or banks.
“Navigate to Contact” :Begin a
dialog to enter a specific destination
contact name.
“Cancel Route” :End route
guidance.
“Take Me Home” :Create a route
to a stored home location.
Page 44 of 76
Buick Regal Infotainment System (GMNA-Localizing-2nd Timed Print-U.S./
Canada-11486031) - 2018 - crc - 3/22/18
Voice Recognition 43
Voice Recognition for the
Phone
“Call
call to a stored contact. The
command may include location if
the contact has location numbers
stored.
“Call
Work,” “On Mobile,” or“On
Other” :Initiate a call to a stored
contact and location at home, at
work, on mobile device, or on
another phone.
“Call
Initiate a call to a cell phone number
of seven digits, 10 digits, or three
digit emergency numbers.
“Pair Phone” :Begin the Bluetooth
pairing process. Follow the
instructions on the infotainment
display.
“Redial” :Initiate a call to the last
dialed number.
“Switch Phone” :Select a different
connected cell phone for outgoing
calls. “Voice Keypad”
:Begin a dialog to
enter special numbers like
international numbers. The numbers
can be entered in groups of digits
with each group of digits being
repeated back by the system. If the
group of digits is not correct, the
command “Delete”will remove the
last group of digits and allow them
to be re-entered. Once the entire
number has been entered, the
command “Call”will start dialing the
number.
Bluetooth Voice Recognition
Press and holdgon the steering
wheel controls for longer than
one second to access Bluetooth
Voice Recognition/Siri Eyes Free.
Bluetooth voice recognition is not
available during an active phone
projection session, such as Apple
CarPlay or Android Auto.
Page 45 of 76
Buick Regal Infotainment System (GMNA-Localizing-2nd Timed Print-U.S./
Canada-11486031) - 2018 - crc - 3/22/18
44 Phone
Phone
Bluetooth (Overview)
The Bluetooth-capable system can
interact with many mobile devices,
allowing:
.Placement and receipt of calls in
a hands-free mode.
. Sharing of the device’s address
book or contact list with the
vehicle.
To minimize driver distraction,
before driving, and with the vehicle
parked:
. Become familiar with the
features of the mobile device.
Organize the phone book and
contact lists clearly and delete
duplicate or rarely used entries.
If possible, program speed dial
or other shortcuts.
. Review the controls and
operation of the infotainment
system. .
Pair mobile device(s) to the
vehicle. The system may not
work with all mobile devices.
See “Pairing” later in this
section.
Vehicles with a Bluetooth system
can use a Bluetooth-capable mobile
device with a Hands-Free Profile to
make and receive phone calls. The
infotainment system and voice
recognition are used to control the
system. The system can be used
while the ignition is on or in ACC/
ACCESSORY. The range of the
Bluetooth system can be up to 9.1 m
(30 ft). Not all mobile devices
support all functions and not all
mobile devices work with the
Bluetooth system. See
my.buick.com for more information
about compatible mobile devices.
Controls
Use the controls on the center stack
and the steering wheel to operate
the Bluetooth system. Steering Wheel Controls
g:
Press to answer incoming calls
and start voice recognition on your
connected Bluetooth mobile device.
i: Press to end a call, decline a
call, or cancel an operation. Press
to mute or unmute the infotainment
system when not on a call.
Infotainment System Controls
For information about how to
navigate the menu system using the
infotainment controls, see Using the
System 05.
Audio System
When using the Bluetooth mobile
device system, sound comes
through the vehicle's front audio
system speakers and overrides the
audio system. The volume level
while on a mobile device call can be
adjusted by pressing the steering
wheel controls or the volume control
on the center stack. The adjusted
volume level remains in memory for
later calls. The volume cannot be
lowered beyond a certain level.
Page 47 of 76
Buick Regal Infotainment System (GMNA-Localizing-2nd Timed Print-U.S./
Canada-11486031) - 2018 - crc - 3/22/18
46 Phone
8. If the vehicle name does notappear on your cell phone,
there are a few ways to start
the pairing process over:
.Turn the cell phone off and
then back on.
. Go back to the beginning of
the Phone menus on the
infotainment display and
restart the pairing process.
. Reset the cell phone, but
this step should be done as
a last effort.
9. If the cell phone prompts to accept connection or allow
phone book download, touch
Always Accept and Allow. The
phone book may not be
available if not accepted.
10. Repeat Steps 1−8 to pair additional cell phones.
First to Connect Paired Phones
If multiple paired cell phones are
within range of the system, the
system connects to the paired cell
phone that is set as First to Connect. To enable a paired cell
phone as the First to Connect
phone:
1. Make sure the cell phone is turned on.
2. Touch Settings, then touch System.
3. Touch Phones to access all paired and all connected cell
phones and mobile devices.
4. Touch the information icon to the right of the cell phone to
open the cell phone’s
settings menu.
5. Touch the First to Connect option, to enable the setting for
that device.
Cell phones and mobile devices can
be added, removed, connected, and
disconnected. A sub-menu will
display whenever a request is made
to add or manage cell phones and
mobile devices. Secondary Phone
A cell phone can be enabled as a
Secondary Phone by touching the
information icon to the right of the
paired cell phone name to open the
phone settings menu. If a cell phone
is enabled as a Secondary Phone, it
can connect simultaneously
alongside another Bluetooth mobile
device. In doing so, the Secondary
Phone will be labeled as Incoming
Calls. This means the mobile device
can only receive calls. The Address
Book of a Secondary Phone will not
be available and hands-free
outgoing calls cannot be placed
using this cell phone.
If needed, touch the Secondary
Phone while in the Phones list to
swap it into the Outgoing and
Incoming role. This role makes it
possible to place outgoing calls from
the Contacts and Recents list.
Page 49 of 76
Buick Regal Infotainment System (GMNA-Localizing-2nd Timed Print-U.S./
Canada-11486031) - 2018 - crc - 3/22/18
48 Phone
The Contacts menu accesses the
phone book stored in the cell phone.
The Recents menu accesses the
recents call list from your cell
phone.
To make a call using the
Contacts menu:1. Touch the Phone icon on the Home Page.
2. Touch Contacts.
3. The Contacts list can be searched by using the first
character. Touch A-Z on the
infotainment display to scroll
through the list of names.
Touch the name to call.
4. Touch the desired contact number to call.
To make a call using the
Recents menu: 1. Touch Phone on the Home Page.
2. Touch Recents.
3. Touch the name or number to call.Making a Call Using the
Keypad
To make a call by dialing the
numbers:
1. Touch the Phone icon on the Home Page.
2. Touch Keypad and enter a phone number.
3. Touch
#on the infotainment
display to start dialing the
number.
Searching Contacts Using the
Keypad
To search for contacts using the
keypad:
1. Touch the Phone icon on the Home Page.
2. Touch Keypad and enter partial phone numbers or contact
names using the digits on the
keypad to search.
Results will show on the right
side of the display. Touch one
to place a call.
Accepting or Declining a Call
When an incoming call is received,
the infotainment system mutes and
a ring tone is heard in the vehicle.
Accepting a Call
There are two ways to accept a call:
.Press
gon the steering wheel
controls.
. Touch Answer on the
infotainment display.
Declining a Call
There are two ways to decline
a call:
. Press
ion the steering wheel
controls.
. Touch Ignore on the infotainment
display.
Call Waiting
Call waiting must be supported on
the Bluetooth cell phone and
enabled by the wireless service
carrier to work.
Page 52 of 76
Buick Regal Infotainment System (GMNA-Localizing-2nd Timed Print-U.S./
Canada-11486031) - 2018 - crc - 3/22/18
Settings 51
Settings
Certain settings can be managed in
the Owner Center sites when an
account is established, and may be
modified if other users have
accessed the vehicle or created
accounts. This may result in
changes to the security or
functionality of the infotainment
system. Some settings may also be
transferred to a new vehicle,
if equipped. For instructions, in the
U.S. see my.buick.com or in Canada
see mybuick.ca or monbuick.ca.
Refer to the User Terms and Privacy
Statement for important details. To
view, touch the Settings icon on the
Home Page of the infotainment
display.
The settings menu may be
organized into four categories.
Select the desired category by
touching System, Apps, Vehicle,
or Personal.To access the personalization
menus:
1. Touch Settings on the Home Page on the infotainment
display.
2. Touch the desired category to display a list of available
options.
3. Touch to select the desired feature setting.
4. Touch the options on the infotainment display to disable
or enable a feature.
5. Touch
zto go to the top level
of the Settings menu.
System
The menu may contain the
following:
Time / Date
Use the following features to set the
clock:
. Automatic Time and Date: Touch
Off or On to enable or disable
automatic update of the time and date. When this feature is on,
the time and date cannot be
manually set.
. Set Time: Touch to manually set
the time using the controls on
the infotainment display.
. Set Date: Touch to manually set
the date using the controls on
the infotainment display.
. Automatic Time Zone: Touch Off
or On to disable or enable
automatic update the time zone
based on vehicle location. When
this feature is on, the time zone
cannot be manually set.
. Select Time Zone: Touch to
manually set the time zone.
Touch a time zone from the list.
. 24-hour Format: Touch to specify
the clock format shown.
Touch Off or On to disable or
enable.
Language
This will set the display language
used on the infotainment display.
It may also use the selected