lock BUICK REGAL 2018 Owner's Manual
[x] Cancel search | Manufacturer: BUICK, Model Year: 2018, Model line: REGAL, Model: BUICK REGAL 2018Pages: 384, PDF Size: 5.67 MB
Page 4 of 384
Buick Regal Owner Manual (GMNA-Localizing-2nd Timed Print-U.S./Canada-
11486030) - 2018 - crc - 3/23/18
Introduction 3
{Danger
Danger indicates a hazard with a
high level of risk which will result
in serious injury or death.
{Warning
Warning indicates a hazard that
could result in injury or death.
Caution
Caution indicates a hazard that
could result in property or vehicle
damage.
A circle with a slash through it is a
safety symbol which means“Do
Not,” “Do not do this,” or“Do not let
this happen.”
Symbols
The vehicle has components and
labels that use symbols instead of
text. Symbols are shown along with
the text describing the operation or
information relating to a specific
component, control, message,
gauge, or indicator.
M: Shown when the owner ’s
manual has additional instructions
or information.
*: Shown when the service
manual has additional instructions
or information.
0: Shown when there is more
information on another page —
“see page.” Vehicle Symbol Chart
Here are some additional symbols
that may be found on the vehicle
and what they mean. See the
features in this manual for
information.
9:
Airbag Readiness Light
#:Air Conditioning
!:Antilock Brake System (ABS)
$:Brake System Warning Light
":Charging System
I: Cruise Control
`:Do Not Puncture
^:Do Not Service
B:Engine Coolant Temperature
O:Exterior Lamps
_: Flame/Fire Prohibited
.:Fuel Gauge
+: Fuses
3:Headlamp High/Low-Beam
Changer
j: ISOFIX/LATCH System Child
Restraints
Page 6 of 384
Buick Regal Owner Manual (GMNA-Localizing-2nd Timed Print-U.S./Canada-
11486030) - 2018 - crc - 3/23/18
In Brief 5
In Brief
Instrument Panel
Instrument Panel . . . . . . . . . . . . . . . . 6
Initial Drive Information
Initial Drive Information . . . . . . . . . . 8
Stop/Start System . . . . . . . . . . . . . . . 8
Remote Keyless Entry (RKE)System . . . . . . . . . . . . . . . . . . . . . . . . 8
Remote Vehicle Start . . . . . . . . . . . 9
Door Locks . . . . . . . . . . . . . . . . . . . . . 9
Liftgate . . . . . . . . . . . . . . . . . . . . . . . . 10
Windows . . . . . . . . . . . . . . . . . . . . . . . 10
Seat Adjustment . . . . . . . . . . . . . . . 11
Memory Features . . . . . . . . . . . . . . 14
Heated and Ventilated Seats . . . 15
Head Restraint Adjustment . . . . 15
Seat Belts . . . . . . . . . . . . . . . . . . . . . 15
Passenger Sensing System . . . 16
Mirror Adjustment . . . . . . . . . . . . . . 16
Steering Wheel Adjustment . . . . 17
Interior Lighting . . . . . . . . . . . . . . . . 17
Exterior Lighting . . . . . . . . . . . . . . . 18
Windshield Wiper/Washer . . . . . . 19
Climate Controls . . . . . . . . . . . . . . . 20
Transmission . . . . . . . . . . . . . . . . . . 21
Vehicle Features
Infotainment System . . . . . . . . . . . 21
Steering Wheel Controls . . . . . . . 21
Cruise Control . . . . . . . . . . . . . . . . . 22
Driver Information Center (DIC) . . . . . . . . . . . . . . . . . 22
Forward Collision Alert (FCA) System . . . . . . . . . . . . . . . . . . . . . . . 23
Forward Automatic Braking (FAB) . . . . . . . . . . . . . . . . 23
Front Pedestrian Braking (FPB) System . . . . . . . . . . . . . . . . . . . . . . . 23
Lane Keep Assist (LKA) . . . . . . . 23
Lane Change Alert (LCA) . . . . . . 23
Rear Vision Camera (RVC) . . . . 24
Rear Cross Traffic Alert (RCTA) System . . . . . . . . . . . . . . . . . . . . . . . 24
Parking Assist . . . . . . . . . . . . . . . . . 24
Power Outlets . . . . . . . . . . . . . . . . . 24
Universal Remote System . . . . . 25
Sunroof . . . . . . . . . . . . . . . . . . . . . . . . 25
Performance and Maintenance
Traction Control/Electronic Stability Control . . . . . . . . . . . . . . 26
Tire Pressure Monitor . . . . . . . . . . 26
Fuel (2.0L Turbo Engine) . . . . . . 27
Fuel (3.6L Engine) . . . . . . . . . . . . . 27
E85 or FlexFuel . . . . . . . . . . . . . . . . 27
Engine Oil Life System . . . . . . . . 27 Driving for Better Fuel
Economy . . . . . . . . . . . . . . . . . . . . . 28
Roadside Assistance Program . . . . . . . . . . . . . . . . . . . . . . 28
Page 8 of 384

Buick Regal Owner Manual (GMNA-Localizing-2nd Timed Print-U.S./Canada-
11486030) - 2018 - crc - 3/23/18
In Brief 7
1.Air Vents 0173.
2. Turn and Lane-Change Signals
0162.
3. Instrument Cluster 0124.
Driver Information Center (DIC)
Display. See Driver Information
Center (DIC) 0141.
4. Windshield Wiper/Washer
0118.
5. Hazard Warning Flashers
0162.
6. Light Sensor. See Automatic
Headlamp System 0160.
7. Infotainment 0167.
8. Traction Control/Electronic
Stability Control 0201.
9. Dual Automatic Climate Control
System 0168.
10. Transmitter Pocket. See Remote Keyless Entry (RKE)
System Operation 030.
11. Lane Keep Assist (LKA) 0225
(If Equipped). Parking Assist Button (If
Equipped). See
Driver
Assistance Systems 0213.
Selective Ride Control (GS
Models Only) 0203.
12. Wireless Charging 0121 (If
Equipped).
13. Shift Lever. See Automatic
Transmission 0194.
14. Electric Parking Brake 0198.
15. ENGINE START/STOP Button (Out of View). See Ignition
Positions 0187.
16. Steering Wheel Controls 0118.
Driver Information Center (DIC)
Controls. See Driver
Information Center (DIC) 0141.
17. Horn 0118.
18. Steering Wheel Adjustment
0118 (Out of View).
19. Cruise Control 0204 (If
Equipped).
Adaptive Cruise Control 0206
(If Equipped). Forward Collision Alert (FCA)
System
0217 (If Equipped).
Heated Steering Wheel 0118
(If Equipped).
20. Hood Release. See Hood
0 243.
21. Exterior Lamp Controls 0159.
Fog Lamps 0162.
22. Instrument Panel Fuse Block Cover. See Instrument Panel
Fuse Block 0272.
23. Data Link Connector (DLC) (Out of View). See Malfunction
Indicator Lamp (Check Engine
Light) 0133.
24. Head-Up Display (HUD) 0145
(If Equipped).
25. Instrument Panel Illumination
Control 0163.
Page 9 of 384
Buick Regal Owner Manual (GMNA-Localizing-2nd Timed Print-U.S./Canada-
11486030) - 2018 - crc - 3/23/18
8 In Brief
Initial Drive
Information
This section provides a brief
overview about some of the
important features that may or may
not be on your specific vehicle.
For more detailed information, refer
to each of the features which can be
found later in this owner’s manual.
Stop/Start System
The vehicle may be equipped with a
fuel saving Stop/Start system to
shut off the engine and help
conserve fuel.
When the brakes are applied and
the vehicle is at a complete stop,
the engine may turn off. When the
brake pedal is released or the
accelerator pedal is pushed, the
engine will restart.
SeeStarting the Engine 0188.
Remote Keyless Entry
(RKE) System
With Remote Start and Power
Liftgate Shown
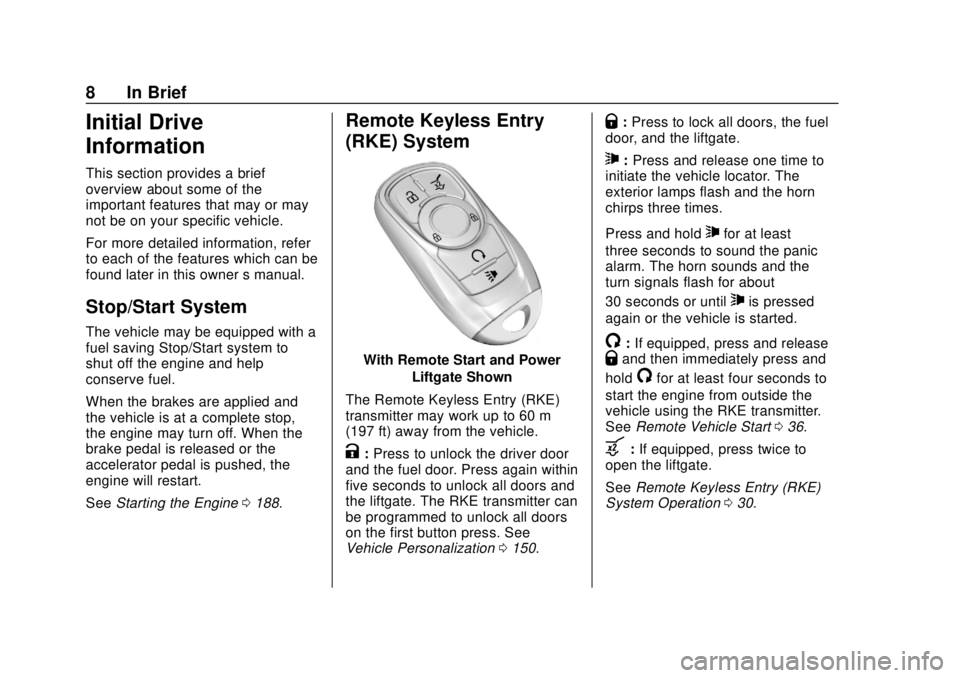
The Remote Keyless Entry (RKE)
transmitter may work up to 60 m
(197 ft) away from the vehicle.
K: Press to unlock the driver door
and the fuel door. Press again within
five seconds to unlock all doors and
the liftgate. The RKE transmitter can
be programmed to unlock all doors
on the first button press. See
Vehicle Personalization 0150.
Q:Press to lock all doors, the fuel
door, and the liftgate.
7: Press and release one time to
initiate the vehicle locator. The
exterior lamps flash and the horn
chirps three times.
Press and hold
7for at least
three seconds to sound the panic
alarm. The horn sounds and the
turn signals flash for about
30 seconds or until
7is pressed
again or the vehicle is started.
/: If equipped, press and releaseQand then immediately press and
hold
/for at least four seconds to
start the engine from outside the
vehicle using the RKE transmitter.
See Remote Vehicle Start 036.
b:If equipped, press twice to
open the liftgate.
See Remote Keyless Entry (RKE)
System Operation 030.
Page 10 of 384
Buick Regal Owner Manual (GMNA-Localizing-2nd Timed Print-U.S./Canada-
11486030) - 2018 - crc - 3/23/18
In Brief 9
Remote Vehicle Start
If equipped, the engine can be
started from outside of the vehicle.
Starting the Vehicle
1. Press and releaseQon the
RKE transmitter.
2. Immediately press and hold
/
for at least four seconds or until
the turn signal lamps flash.
Start the vehicle normally after
entering.
When the vehicle starts, the parking
lamps will turn on.
Remote start can be extended.
Canceling a Remote Start
To cancel a remote start, do one of
the following:
. Press and hold
/until the
parking lamps turn off.
. Turn on the hazard warning
flashers.
. Turn the vehicle on and then off.
See Remote Vehicle Start 036.
Door Locks
To lock or unlock the door from
outside the vehicle:
.
Press
QorKon the Remote
Keyless Entry (RKE) transmitter.
. Use Keyless Access.
. Use the key. The key lock
cylinder is covered with a cap.
See Door Locks 038.
From inside the vehicle pull once on
the door handle to unlock it. Pulling
the door handle again unlatches it.
Pushing down the manual lock knob
on the driver door will lock all doors.
Pushing down the manual lock knob
on a passenger door will lock that
door only.
See Door Locks 038.
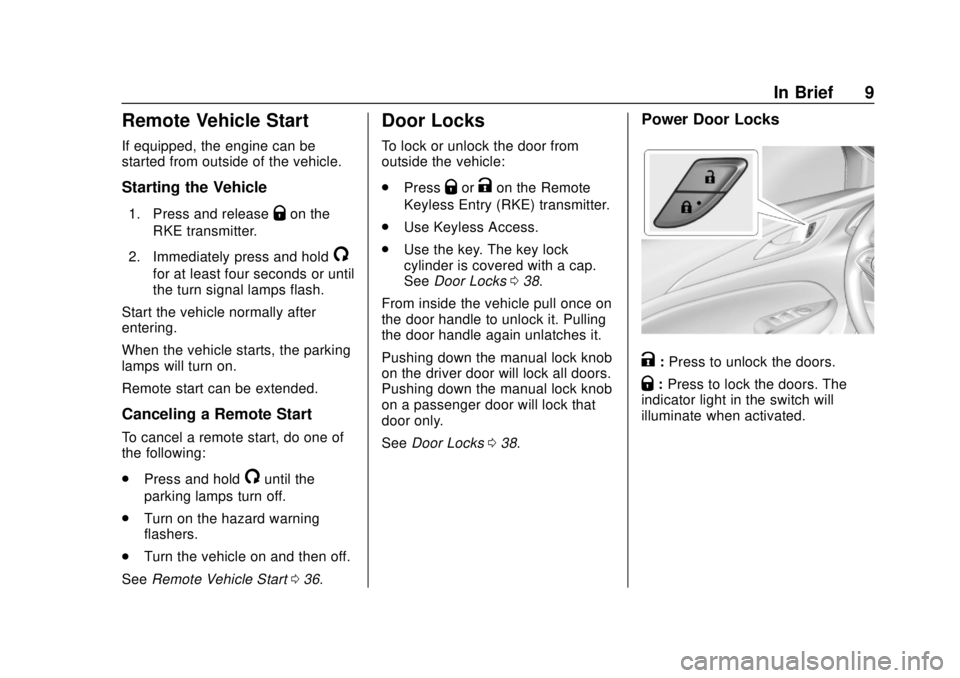
Power Door Locks
K:Press to unlock the doors.
Q: Press to lock the doors. The
indicator light in the switch will
illuminate when activated.
Page 11 of 384
Buick Regal Owner Manual (GMNA-Localizing-2nd Timed Print-U.S./Canada-
11486030) - 2018 - crc - 3/23/18
10 In Brief
Liftgate
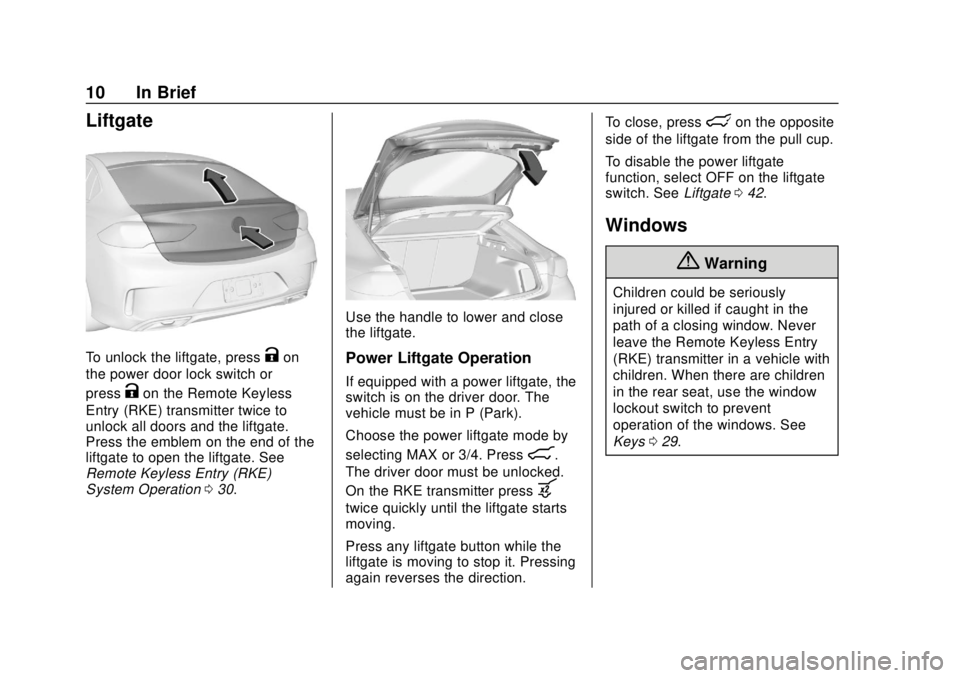
To unlock the liftgate, pressKon
the power door lock switch or
press
Kon the Remote Keyless
Entry (RKE) transmitter twice to
unlock all doors and the liftgate.
Press the emblem on the end of the
liftgate to open the liftgate. See
Remote Keyless Entry (RKE)
System Operation 030.
Use the handle to lower and close
the liftgate.
Power Liftgate Operation
If equipped with a power liftgate, the
switch is on the driver door. The
vehicle must be in P (Park).
Choose the power liftgate mode by
selecting MAX or 3/4. Press
8.
The driver door must be unlocked.
On the RKE transmitter press
b
twice quickly until the liftgate starts
moving.
Press any liftgate button while the
liftgate is moving to stop it. Pressing
again reverses the direction. To close, press
lon the opposite
side of the liftgate from the pull cup.
To disable the power liftgate
function, select OFF on the liftgate
switch. See Liftgate042.
Windows
{Warning
Children could be seriously
injured or killed if caught in the
path of a closing window. Never
leave the Remote Keyless Entry
(RKE) transmitter in a vehicle with
children. When there are children
in the rear seat, use the window
lockout switch to prevent
operation of the windows. See
Keys 029.
Page 12 of 384
Buick Regal Owner Manual (GMNA-Localizing-2nd Timed Print-U.S./Canada-
11486030) - 2018 - crc - 3/23/18
In Brief 11
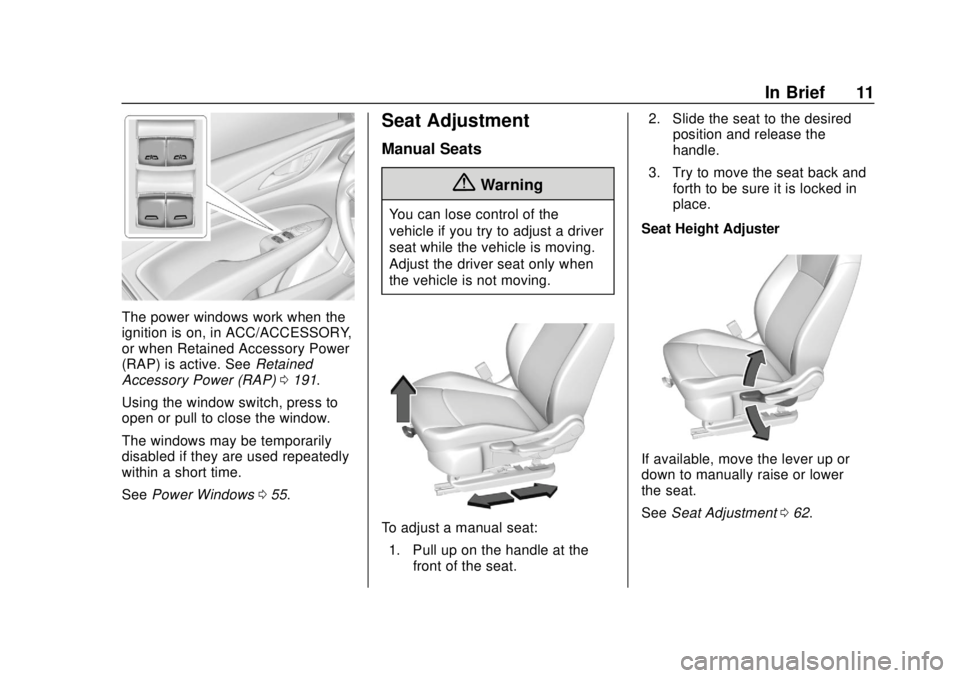
The power windows work when the
ignition is on, in ACC/ACCESSORY,
or when Retained Accessory Power
(RAP) is active. SeeRetained
Accessory Power (RAP) 0191.
Using the window switch, press to
open or pull to close the window.
The windows may be temporarily
disabled if they are used repeatedly
within a short time.
See Power Windows 055.
Seat Adjustment
Manual Seats
{Warning
You can lose control of the
vehicle if you try to adjust a driver
seat while the vehicle is moving.
Adjust the driver seat only when
the vehicle is not moving.
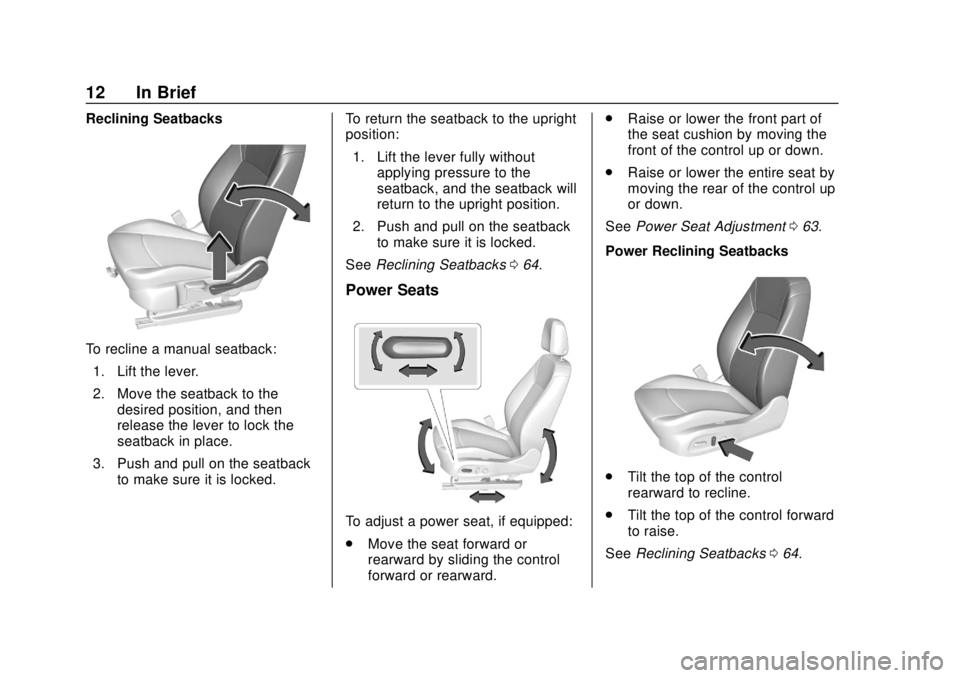
To adjust a manual seat:
1. Pull up on the handle at the front of the seat. 2. Slide the seat to the desired
position and release the
handle.
3. Try to move the seat back and forth to be sure it is locked in
place.
Seat Height Adjuster
If available, move the lever up or
down to manually raise or lower
the seat.
See Seat Adjustment 062.
Page 13 of 384
Buick Regal Owner Manual (GMNA-Localizing-2nd Timed Print-U.S./Canada-
11486030) - 2018 - crc - 3/23/18
12 In Brief
Reclining Seatbacks
To recline a manual seatback:1. Lift the lever.
2. Move the seatback to the desired position, and then
release the lever to lock the
seatback in place.
3. Push and pull on the seatback to make sure it is locked. To return the seatback to the upright
position:
1. Lift the lever fully without applying pressure to the
seatback, and the seatback will
return to the upright position.
2. Push and pull on the seatback to make sure it is locked.
See Reclining Seatbacks 064.
Power Seats
To adjust a power seat, if equipped:
.
Move the seat forward or
rearward by sliding the control
forward or rearward. .
Raise or lower the front part of
the seat cushion by moving the
front of the control up or down.
. Raise or lower the entire seat by
moving the rear of the control up
or down.
See Power Seat Adjustment 063.
Power Reclining Seatbacks
. Tilt the top of the control
rearward to recline.
. Tilt the top of the control forward
to raise.
See Reclining Seatbacks 064.
Page 14 of 384
Buick Regal Owner Manual (GMNA-Localizing-2nd Timed Print-U.S./Canada-
11486030) - 2018 - crc - 3/23/18
In Brief 13
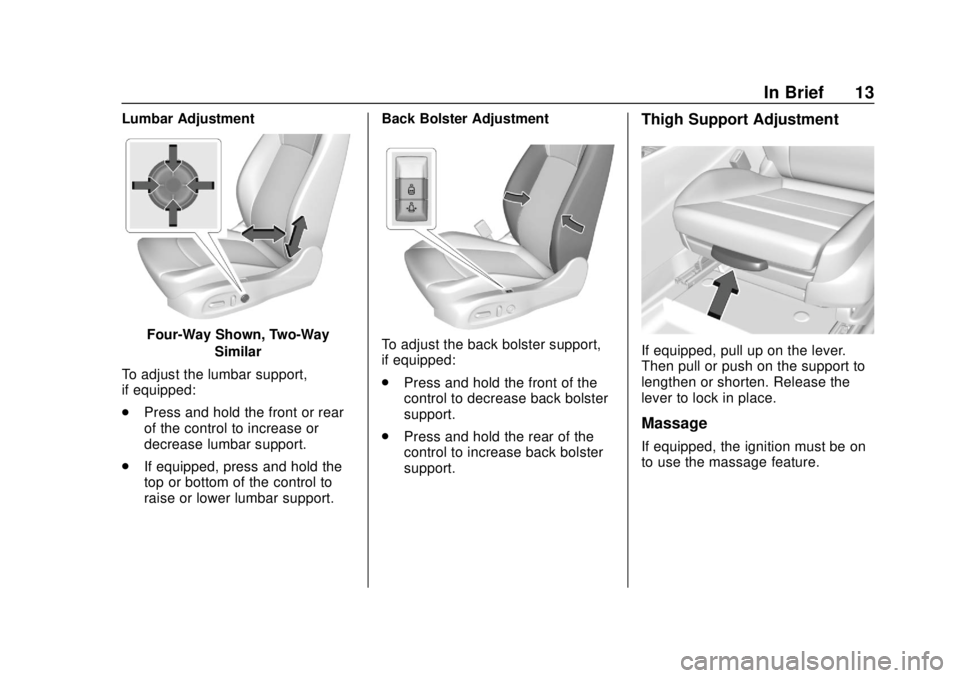
Lumbar Adjustment
Four-Way Shown, Two-WaySimilar
To adjust the lumbar support,
if equipped:
. Press and hold the front or rear
of the control to increase or
decrease lumbar support.
. If equipped, press and hold the
top or bottom of the control to
raise or lower lumbar support. Back Bolster AdjustmentTo adjust the back bolster support,
if equipped:
.
Press and hold the front of the
control to decrease back bolster
support.
. Press and hold the rear of the
control to increase back bolster
support.
Thigh Support Adjustment
If equipped, pull up on the lever.
Then pull or push on the support to
lengthen or shorten. Release the
lever to lock in place.
Massage
If equipped, the ignition must be on
to use the massage feature.
Page 18 of 384
Buick Regal Owner Manual (GMNA-Localizing-2nd Timed Print-U.S./Canada-
11486030) - 2018 - crc - 3/23/18
In Brief 17
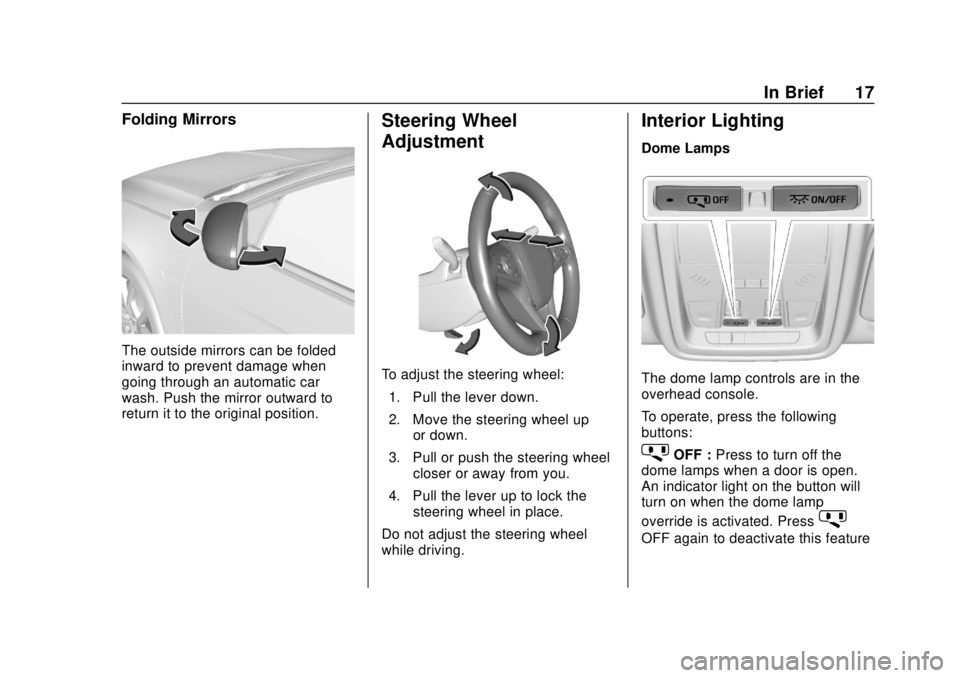
Folding Mirrors
The outside mirrors can be folded
inward to prevent damage when
going through an automatic car
wash. Push the mirror outward to
return it to the original position.
Steering Wheel
Adjustment
To adjust the steering wheel:1. Pull the lever down.
2. Move the steering wheel up or down.
3. Pull or push the steering wheel closer or away from you.
4. Pull the lever up to lock the steering wheel in place.
Do not adjust the steering wheel
while driving.
Interior Lighting
Dome Lamps
The dome lamp controls are in the
overhead console.
To operate, press the following
buttons:
jOFF : Press to turn off the
dome lamps when a door is open.
An indicator light on the button will
turn on when the dome lamp
override is activated. Press
j
OFF again to deactivate this feature