radio controls BUICK REGAL 2018 Owner's Manual
[x] Cancel search | Manufacturer: BUICK, Model Year: 2018, Model line: REGAL, Model: BUICK REGAL 2018Pages: 384, PDF Size: 5.67 MB
Page 22 of 384
Buick Regal Owner Manual (GMNA-Localizing-2nd Timed Print-U.S./Canada-
11486030) - 2018 - crc - 3/23/18
In Brief 21
SeeDual Automatic Climate Control
System 0168.
Transmission
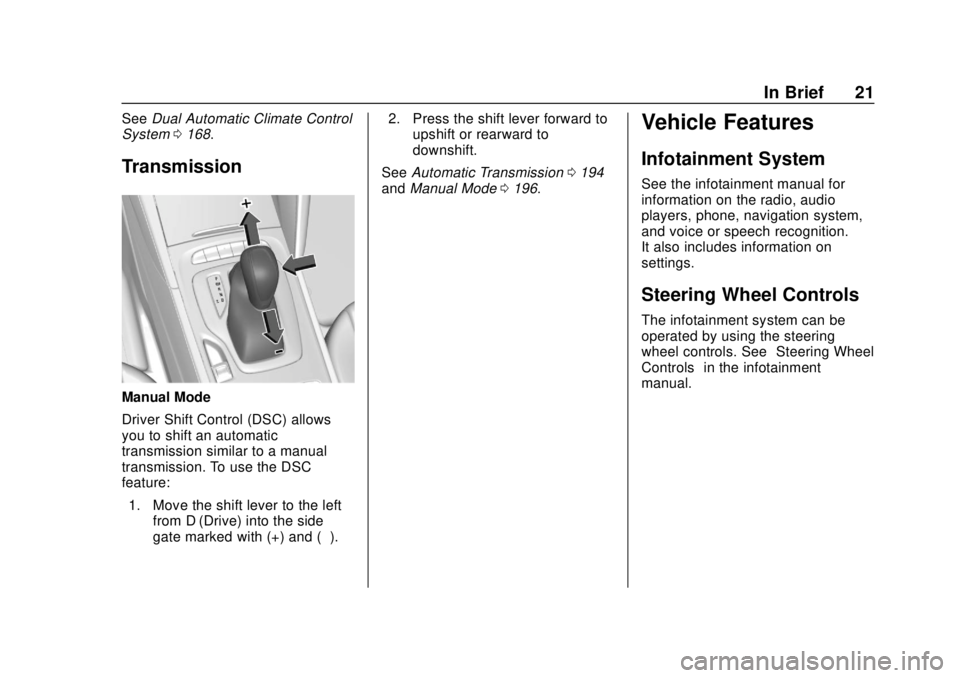
Manual Mode
Driver Shift Control (DSC) allows
you to shift an automatic
transmission similar to a manual
transmission. To use the DSC
feature:
1. Move the shift lever to the left from D (Drive) into the side
gate marked with (+) and (−). 2. Press the shift lever forward to
upshift or rearward to
downshift.
See Automatic Transmission 0194
and Manual Mode 0196.
Vehicle Features
Infotainment System
See the infotainment manual for
information on the radio, audio
players, phone, navigation system,
and voice or speech recognition.
It also includes information on
settings.
Steering Wheel Controls
The infotainment system can be
operated by using the steering
wheel controls. See “Steering Wheel
Controls” in the infotainment
manual.
Page 122 of 384
Buick Regal Owner Manual (GMNA-Localizing-2nd Timed Print-U.S./Canada-
11486030) - 2018 - crc - 3/23/18
Instruments and Controls 121
The vehicle may have accessory
power outlets:
.Below the climate controls.
. In the cargo area, if equipped.
Open the protective cover to use the
power outlet.
The outlet is powered when the
ignition is on or in ACC/
ACCESSORY, or until the driver
door is opened within 10 minutes of
turning off the vehicle. See Retained
Accessory Power (RAP) 0191.
Certain electrical accessories may
not be compatible with the
accessory power outlet and could
overload vehicle or adapter fuses.
If there is a problem, see your
dealer.
When adding electrical equipment,
be sure to follow the installation
instructions included with the
equipment. See Add-On Electrical
Equipment 0238.Caution
Hanging heavy equipment from
the power outlet can cause
damage not covered by the
vehicle warranty. The power
outlets are designed for
accessory power plugs only, such
as cell phone charge cords.
Wireless Charging
The vehicle may have a wireless
charging pocket outside the armrest
of the center console. The system
operates at 145 kHz and wirelessly
charges one Qi compatible
smartphone. The power output of
the system is capable of charging at
a rate up to 1 amp (5W), as
requested by the compatible
smartphone. See Radio Frequency
Statement 0356.
To check for smartphone
compatibility:
. In the U.S., see
www.my.buick.com/learn. .
In Canada, see
www.gmtotalconnect.ca.
. Or, see your dealer for details.
{Warning
Wireless charging can affect the
operation of an implanted
pacemaker or other medical
devices. If you have one, it is
recommended to consult with
your doctor before using the
wireless charging system.
The vehicle must be on or in ACC/
ACCESSORY, or Retained
Accessory Power (RAP) must be
active. The wireless charging
feature may not correctly indicate
charging when the vehicle is in RAP.
See Retained Accessory Power
(RAP) 0191.
The operating temperature is −20 °C
(−4 °F) to 60 °C (140 °F) for the
charging system and 0 °C (32 °F) to
35 °C (95 °F) for the compatible
smartphone.
Page 133 of 384
Buick Regal Owner Manual (GMNA-Localizing-2nd Timed Print-U.S./Canada-
11486030) - 2018 - crc - 3/23/18
132 Instruments and Controls
Passenger Airbag Status
Indicator
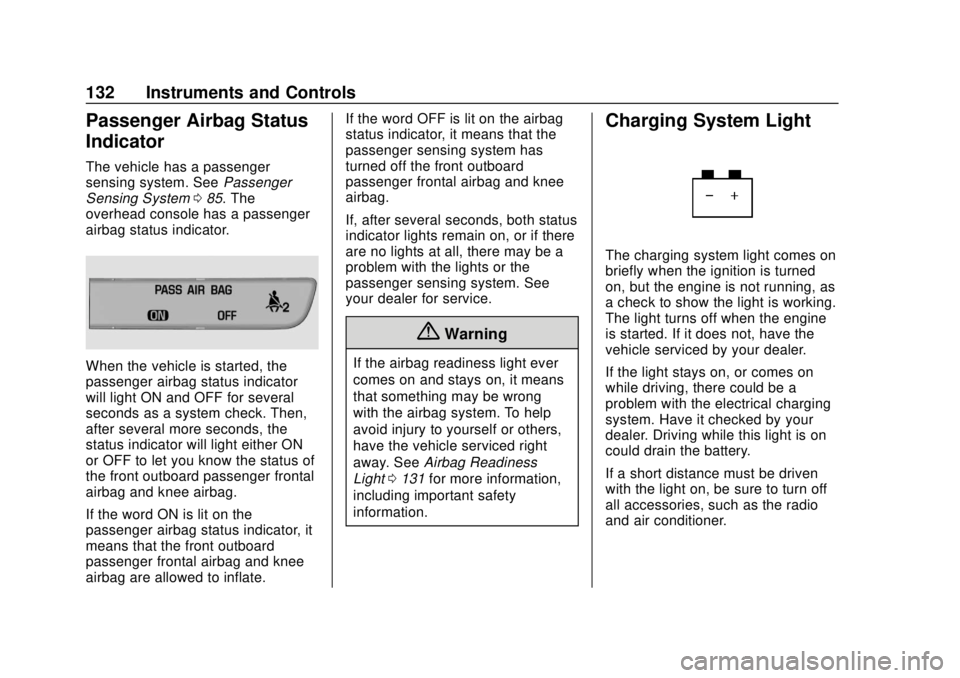
The vehicle has a passenger
sensing system. SeePassenger
Sensing System 085. The
overhead console has a passenger
airbag status indicator.
When the vehicle is started, the
passenger airbag status indicator
will light ON and OFF for several
seconds as a system check. Then,
after several more seconds, the
status indicator will light either ON
or OFF to let you know the status of
the front outboard passenger frontal
airbag and knee airbag.
If the word ON is lit on the
passenger airbag status indicator, it
means that the front outboard
passenger frontal airbag and knee
airbag are allowed to inflate. If the word OFF is lit on the airbag
status indicator, it means that the
passenger sensing system has
turned off the front outboard
passenger frontal airbag and knee
airbag.
If, after several seconds, both status
indicator lights remain on, or if there
are no lights at all, there may be a
problem with the lights or the
passenger sensing system. See
your dealer for service.
{Warning
If the airbag readiness light ever
comes on and stays on, it means
that something may be wrong
with the airbag system. To help
avoid injury to yourself or others,
have the vehicle serviced right
away. See
Airbag Readiness
Light 0131 for more information,
including important safety
information.
Charging System Light
The charging system light comes on
briefly when the ignition is turned
on, but the engine is not running, as
a check to show the light is working.
The light turns off when the engine
is started. If it does not, have the
vehicle serviced by your dealer.
If the light stays on, or comes on
while driving, there could be a
problem with the electrical charging
system. Have it checked by your
dealer. Driving while this light is on
could drain the battery.
If a short distance must be driven
with the light on, be sure to turn off
all accessories, such as the radio
and air conditioner.
Page 149 of 384
Buick Regal Owner Manual (GMNA-Localizing-2nd Timed Print-U.S./Canada-
11486030) - 2018 - crc - 3/23/18
148 Instruments and Controls
English
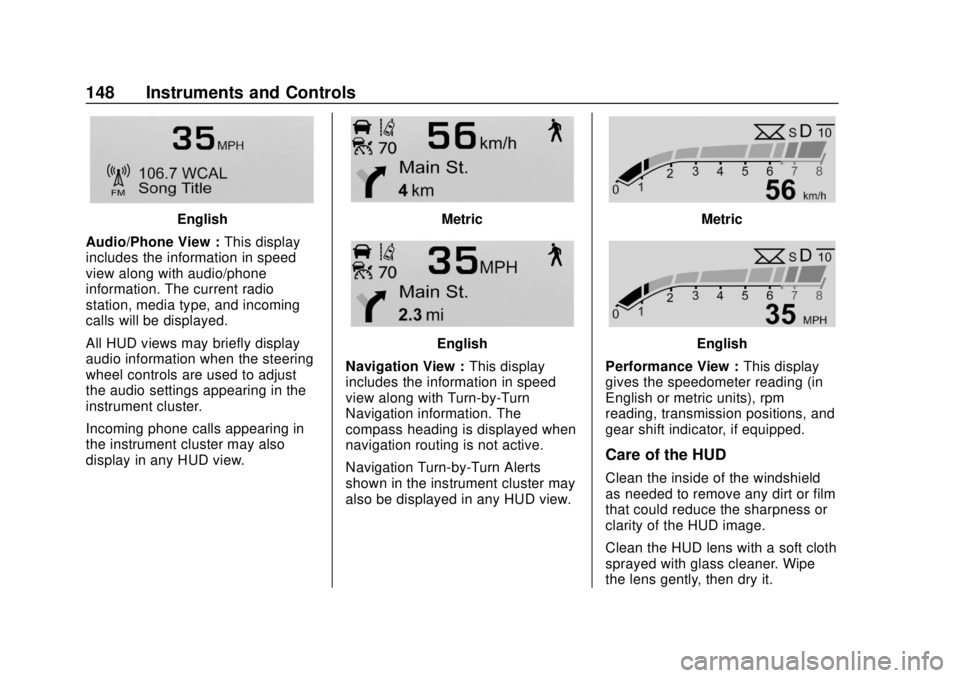
Audio/Phone View : This display
includes the information in speed
view along with audio/phone
information. The current radio
station, media type, and incoming
calls will be displayed.
All HUD views may briefly display
audio information when the steering
wheel controls are used to adjust
the audio settings appearing in the
instrument cluster.
Incoming phone calls appearing in
the instrument cluster may also
display in any HUD view.Metric
English
Navigation View : This display
includes the information in speed
view along with Turn-by-Turn
Navigation information. The
compass heading is displayed when
navigation routing is not active.
Navigation Turn-by-Turn Alerts
shown in the instrument cluster may
also be displayed in any HUD view.
Metric
English
Performance View : This display
gives the speedometer reading (in
English or metric units), rpm
reading, transmission positions, and
gear shift indicator, if equipped.
Care of the HUD
Clean the inside of the windshield
as needed to remove any dirt or film
that could reduce the sharpness or
clarity of the HUD image.
Clean the HUD lens with a soft cloth
sprayed with glass cleaner. Wipe
the lens gently, then dry it.
Page 156 of 384
Buick Regal Owner Manual (GMNA-Localizing-2nd Timed Print-U.S./Canada-
11486030) - 2018 - crc - 3/23/18
Instruments and Controls 155
Remote Left in Vehicle Alert
This feature sounds an alert when
the RKE transmitter is left in the
vehicle. This menu also enables the
Remote No Longer In Vehicle Alert.
Touch Off or On.
Teen Driver
See“Teen Driver” under“Settings”
in the infotainment manual.
Valet Mode
This will lock the infotainment
system and steering wheel controls.
It may also limit access to vehicle
storage locations, if equipped.
To enable valet mode:
1. Enter a four-digit code on the keypad.
2. Select Enter to go to the confirmation screen.
3. Re-enter the four-digit code.
Touch Lock or Unlock to lock or
unlock the system. Touch Back to
go back to the previous menu.
Universal Remote
System
See Radio Frequency Statement
0 356.
Universal Remote System
Programming
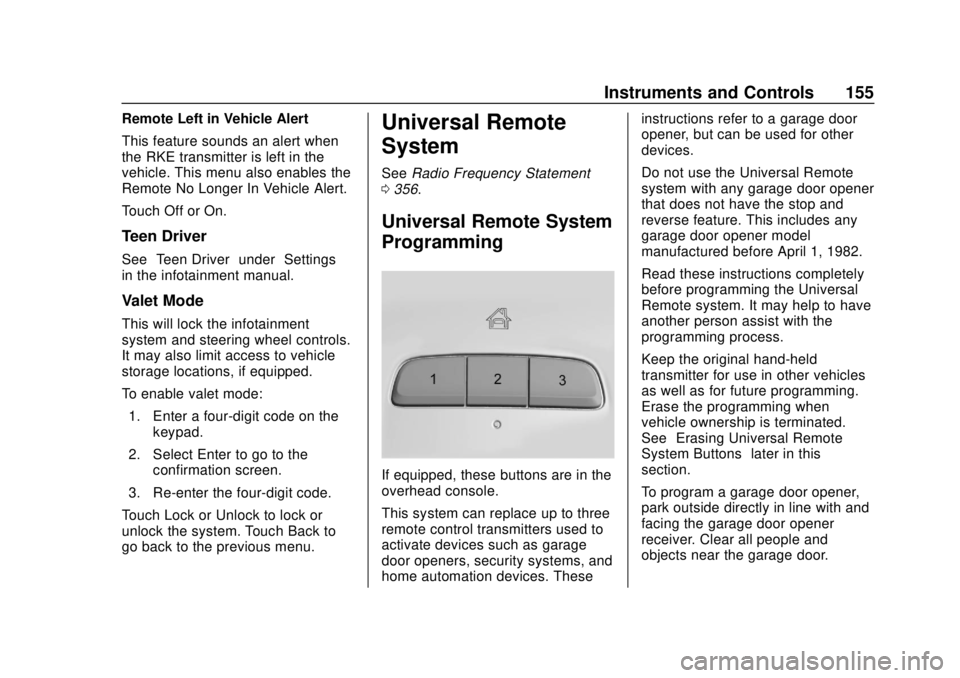
If equipped, these buttons are in the
overhead console.
This system can replace up to three
remote control transmitters used to
activate devices such as garage
door openers, security systems, and
home automation devices. These instructions refer to a garage door
opener, but can be used for other
devices.
Do not use the Universal Remote
system with any garage door opener
that does not have the stop and
reverse feature. This includes any
garage door opener model
manufactured before April 1, 1982.
Read these instructions completely
before programming the Universal
Remote system. It may help to have
another person assist with the
programming process.
Keep the original hand-held
transmitter for use in other vehicles
as well as for future programming.
Erase the programming when
vehicle ownership is terminated.
See
“Erasing Universal Remote
System Buttons” later in this
section.
To program a garage door opener,
park outside directly in line with and
facing the garage door opener
receiver. Clear all people and
objects near the garage door.
Page 157 of 384
Buick Regal Owner Manual (GMNA-Localizing-2nd Timed Print-U.S./Canada-
11486030) - 2018 - crc - 3/23/18
156 Instruments and Controls
Make sure the hand-held transmitter
has a new battery for quick and
accurate transmission of the
radio-frequency signal.
Programming the Universal
Remote System
For questions or programming help,
see www.homelink.com/gm or call
1-800-355-3515.
Programming involves
time-sensitive actions, and may time
out causing the procedure to be
repeated.
To program up to three devices:1. Hold the end of the hand-held transmitter about 3 to 8 cm (1
to 3 in) away from the
Universal Remote system
buttons with the indicator light
in view. The hand-held
transmitter was supplied by the
manufacturer of the garage
door opener receiver.
2. At the same time, press and hold both the hand-held
transmitter button and one of
the three Universal Remote system buttons to be used to
operate the garage door. Do
not release either button until
the indicator light changes from
a slow to a rapid flash. Then
release both buttons.
Some garage door openers
may require substitution of
Step 2 with the procedure
under
“Radio Signals for
Canada and Some Gate
Operators” later in this section.
3. Press and hold the newly programmed Universal Remote
system button for five seconds
while watching the indicator
light and garage door
activation.
.If the indicator light stays on
continuously or the garage
door moves when the
button is pressed, then
programming is complete.
There is no need to
complete Steps 4–6.
. If the indicator light does
not come on or the garage
door does not move, a second button press may
be required. For a second
time, press and hold the
newly programmed button
for five seconds. If the light
stays on or the garage door
moves, programming is
complete.
. If the indicator light blinks
rapidly for two seconds,
then changes to a solid light
and the garage door does
not move, continue with
programming Steps 4–6.
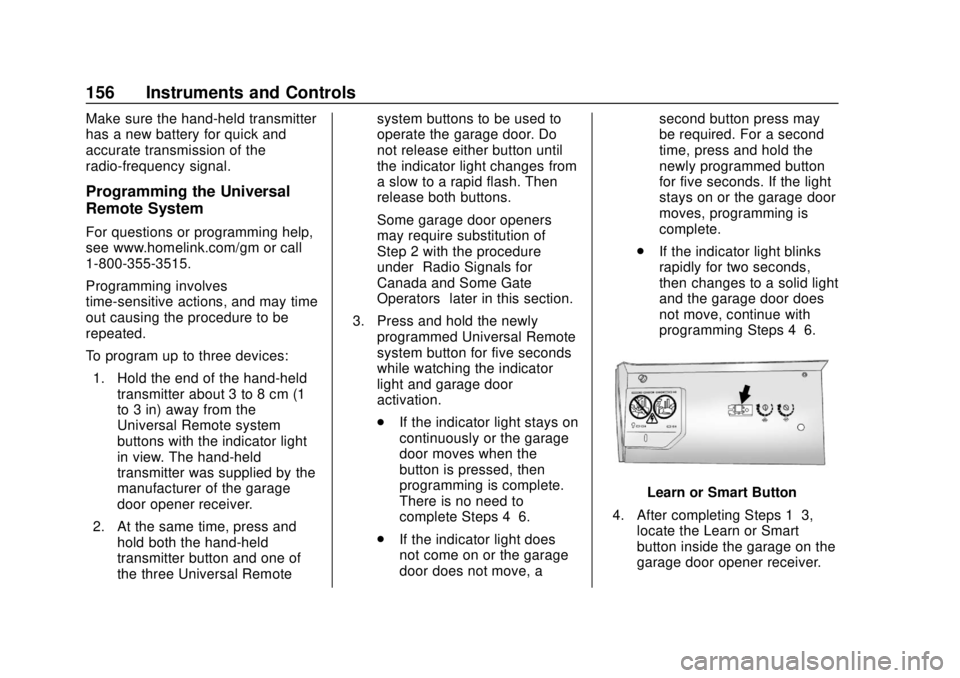
Learn or Smart Button
4. After completing Steps 1–3, locate the Learn or Smart
button inside the garage on the
garage door opener receiver.
Page 158 of 384
Buick Regal Owner Manual (GMNA-Localizing-2nd Timed Print-U.S./Canada-
11486030) - 2018 - crc - 3/23/18
Instruments and Controls 157
The name and color of the
button may vary by
manufacturer.
5. Press and release the Learn or Smart button. Step 6 must be
completed within 30 seconds of
pressing this button.
6. Inside the vehicle, press and hold the newly programmed
Universal Remote system
button for two seconds and
then release it. If the garage
door does not move or the
lamp on the garage door
opener receiver does not flash,
press and hold the same
button a second time for
two seconds, then release it.
Again, if the door does not
move or the garage door lamp
does not flash, press and hold
the same button a third time for
two seconds, then release it.
The Universal Remote system
should now activate the
garage door. Repeat the process for
programming the two remaining
buttons.
Radio Signals for Canada and
Some Gate Operators
For questions or programming help,
see www.homelink.com/gm or call
1-800-355-3515.
Canadian radio-frequency laws and
some U.S. gate operators require
transmitter signals to time out or quit
after several seconds of
transmission. This may not be long
enough for the Universal Remote
system to pick up the signal during
programming.
If the programming did not work,
replace Step 2 under
“Programming
the Universal Remote System” with
the following:
Press and hold the Universal
Remote system button while
pressing and releasing the
hand-held transmitter button every
two seconds until the signal has
been successfully accepted by the
Universal Remote system. The
Universal Remote system indicator light will flash slowly at first and then
rapidly. Proceed with Step 3 under
“Programming the Universal Remote
System”
to complete.
Universal Remote System
Operation
Using the Universal Remote
System
Press and hold the appropriate
Universal Remote system button for
at least one-half second. The
indicator light will come on while the
signal is being transmitted.
Erasing Universal Remote
System Buttons
Erase all programmed buttons when
vehicle ownership is terminated.
To erase:
1. Press and hold the two outside buttons until the indicator light
begins to flash. This should
take about 10 seconds.
2. Release both buttons.
Page 173 of 384

Buick Regal Owner Manual (GMNA-Localizing-2nd Timed Print-U.S./Canada-
11486030) - 2018 - crc - 3/23/18
172 Climate Controls
Rear Window Defogger
K:Press to turn the rear window
defogger on or off. An indicator light
on the control comes on to show
that the rear window defogger is on.
The rear window defogger only
works when the engine is running.
It turns off when the ignition is
turned off or in ACC/ACCESSORY.
The rear window defogger can be
set to automatic operation. See
“Climate and Air Quality” under
Vehicle Personalization 0150.
When Auto Rear Defog is selected,
the rear window defogger turns on
automatically when the interior
temperature is cold and the outside
temperature is about 4 °C (40 °F)
and below. The auto rear defogger
turns off automatically after about
10 minutes, or after five minutes if
the outside temperature is not
as cold.
The upper gridlines on the rear
window are antenna lines and are
not intended to heat when the
defogger is activated. The heated outside mirrors turn on
when the rear window defogger
control is on and help to clear fog or
frost from the surface of the mirror.
See
Heated Mirrors 053.
Caution
Do not try to clear frost or other
material from the inside of the
front windshield and rear window
with a razor blade or anything
else that is sharp. This may
damage the rear window
defogger grid and affect the
radio's ability to pick up stations
clearly. The repairs would not be
covered by the vehicle warranty.
Heated and Ventilated Seats
LorM:If equipped, pressLorMto heat the driver or passenger seat.
{orC:If equipped, press{orCto ventilate the driver or
passenger seat. See Heated and
Ventilated Seats 015. Remote Start Climate Control
Operation :
If equipped with remote
start, the climate control system
may run when the vehicle is started
remotely. If equipped with heated or
ventilated seats, they may come on
during a remote start.
See Remote Vehicle Start 036 and
Heated and Ventilated Seats 015.
Sensors
The solar sensor, on top of the
instrument panel near the
windshield, monitors the solar heat.
Do not cover the solar sensor or the
system will not work properly.
The climate control system uses the
sensor information to adjust the
temperature, fan speed,
recirculation, and air delivery mode
for best comfort.
Do not cover the sensor; otherwise
the automatic climate control system
may not work properly.
Page 287 of 384

Buick Regal Owner Manual (GMNA-Localizing-2nd Timed Print-U.S./Canada-
11486030) - 2018 - crc - 3/23/18
286 Vehicle Care
could prevent the TPMS from
functioning properly. SeeBuying
New Tires 0289.
. Operating electronic devices or
being near facilities using radio
wave frequencies similar to the
TPMS could cause the TPMS
sensors to malfunction.
If the TPMS is not functioning
properly it cannot detect or signal a
low tire pressure condition. See
your dealer for service if the TPMS
malfunction light and DIC message
comes on and stays on.
TPMS Sensor Matching
Process
Each TPMS sensor has a unique
identification code. The identification
code needs to be matched to a new
tire/wheel position after rotating the
vehicle’s tires or replacing one or
more of the TPMS sensors. The
TPMS sensor matching process
should also be performed after
replacing a spare tire with a road
tire containing the TPMS sensor.
The malfunction light and the DIC
message should go off at the next ignition cycle. The sensors are
matched to the tire/wheel positions,
using a TPMS relearn tool, in the
following order: driver side front tire,
passenger side front tire, passenger
side rear tire, and driver side rear.
See your dealer for service or to
purchase a relearn tool. A TPMS
relearn tool can also be purchased.
See Tire Pressure Monitor Sensor
Activation Tool at
www.gmtoolsandequipment.com or
call 1-800-GM TOOLS
(1-800-468-6657).
There are two minutes to match the
first tire/wheel position, and
five minutes overall to match all four
tire/wheel positions. If it takes
longer, the matching process stops
and must be restarted.
The TPMS sensor matching
process is:
1. Set the parking brake.
2. Place the vehicle in Service Mode. See Ignition Positions
0 187. 3. Make sure the Tire Pressure
info page option is turned on.
The info pages on the DIC can
be turned on and off through
the Options menu. See Driver
Information Center (DIC) 0141.
4. Use the DIC controls on the right side of the steering wheel
to scroll to the Tire Pressure
screen under the DIC
info page.
5. Press and hold
Vin the center
of the DIC controls.
The horn sounds twice to
signal the receiver is in relearn
mode and the TIRE
LEARNING ACTIVE message
displays on the DIC screen.
6. Start with the driver side front tire.
7. Place the relearn tool against the tire sidewall, near the valve
stem. Then press the button to
activate the TPMS sensor.
A horn chirp confirms that the
sensor identification code has
been matched to this tire and
wheel position.
Page 376 of 384

Buick Regal Owner Manual (GMNA-Localizing-2nd Timed Print-U.S./Canada-
11486030) - 2018 - crc - 3/23/18
Index 375
Driving (cont'd)Drunk . . . . . . . . . . . . . . . . . . . . . . . . . 177
For Better Fuel Economy . . . . . . . 28
Hill and Mountain Roads . . . . . . 180
If the Vehicle is Stuck . . . . . . . . . 182
Loss of Control . . . . . . . . . . . . . . . 179
Off-Road Recovery . . . . . . . . . . . 179
Vehicle Load Limits . . . . . . . . . . . 183
Wet Roads . . . . . . . . . . . . . . . . . . . 180
Winter . . . . . . . . . . . . . . . . . . . . . . . . 181
Dual Automatic Climate Control System . . . . . . . . . . . . . . . . 168
E
Electric Parking Brake . . . . . . . . . . 198
Electric Parking Brake Light . . . . 135
Electrical Equipment,Add-On . . . . . . . . . . . . . . . . . . . . . . . 238
Electrical System
Engine Compartment FuseBlock . . . . . . . . . . . . . . . . . . . . . . . . 268
Fuses and Circuit Breakers . . . 268
Instrument Panel Fuse Block . . . . . . . . . . . . . . . . . . . . . . . . 272
Overload . . . . . . . . . . . . . . . . . . . . . 267
Emergency OnStar . . . . . . . . . . . . . . . . . . . . . . . 361 Engine
Air Cleaner/Filter . . . . . . . . . . . . . 251
Check Light (Malfunction
Indicator) . . . . . . . . . . . . . . . . . . . . 133
Compartment Overview . . . . . . . 244
Coolant Temperature Gauge . . . . . . . . . . . . . . . . . . . . . . 130
Coolant Temperature Warning Light . . . . . . . . . . . . . . . 138
Cooling System . . . . . . . . . . . . . . . 252
Drive Belt Routing . . . . . . . . . . . . 345
Exhaust . . . . . . . . . . . . . . . . . . . . . . 193
Heater . . . . . . . . . . . . . . . . . . . . . . . . 190
Oil Life System . . . . . . . . . . . . . . . 249
Oil Pressure Light . . . . . . . . . . . . 139
Overheating . . . . . . . . . . . . . . . . . . 256
Power Messages . . . . . . . . . . . . . 149
Running While Parked . . . . . . . . 194
Starting . . . . . . . . . . . . . . . . . . . . . . . 188
Entry Lighting . . . . . . . . . . . . . . . . . . . 164
Equipment, Towing . . . . . . . . . . . . . 237
Event Data Recorders . . . . . . . . . . 358
Exit Lighting . . . . . . . . . . . . . . . . . . . . 164
Extended Parking . . . . . . . . . . . . . . . 193
Extender, Seat Belt . . . . . . . . . . . . . . 77
Exterior Lamp Controls . . . . . . . . . 159 Exterior Lamps Off Reminder . . . 160
Exterior Lighting Battery
Saver . . . . . . . . . . . . . . . . . . . . . . . . . 165
F
FeaturesMemory . . . . . . . . . . . . . . . . . . . . . . . . . 14
Filter, Engine Air Cleaner . . . . . . . . . . . 251
Flash-to-Pass . . . . . . . . . . . . . . . . . . . 160
Flashers, Hazard Warning . . . . . . 162
Flat Tire . . . . . . . . . . . . . . . . . . . . . . . . 294 Changing . . . . . . . . . . . . . . . . . . . . . 309
Floor Mats . . . . . . . . . . . . . . . . . . . . . . 329
Fluid Automatic Transmission . . . . . . 250
Brakes . . . . . . . . . . . . . . . . . . . . . . . . 259
Washer . . . . . . . . . . . . . . . . . . . . . . . 257
Fog Lamps . . . . . . . . . . . . . . . . . . . . . 162 Bulb Replacement . . . . . . . . . . . . 266
Folding Mirrors . . . . . . . . . . . . . . . . . . 53
Forward Automatic Braking . . . . . 219
Forward Collision Alert
(FCA) System . . . . . . . . . . . . . . . . . 217
Frequency Statement Radio . . . . . . . . . . . . . . . . . . . . . . . . . 356
Front Fog Lamp Light . . . . . . . . . . . . . . . . . . . . . . . . . . 140