272 BUICK REGAL 2020 User Guide
[x] Cancel search | Manufacturer: BUICK, Model Year: 2020, Model line: REGAL, Model: BUICK REGAL 2020Pages: 378, PDF Size: 6.91 MB
Page 291 of 378

Buick Regal Owner Manual (GMNA-Localizing-U.S./Canada-13557849) -
2020 - CRC - 6/25/19
290 Vehicle Care
Do not pinch the power plug
cord in the door or window.
8. Start the vehicle. The vehicle must be running while using
the air compressor.
9. Press the on/off button (7) to turn the tire sealant and
compressor kit on.
The compressor will inject
sealant and air into the tire.
The pressure gauge (3) will
initially show a high pressure
while the compressor pushes
the sealant into the tire. Once
the sealant is completely
dispersed into the tire, the
pressure will quickly drop and
start to rise again as the tire
inflates with air only.
10. Inflate the tire to the recommended inflation
pressure using the pressure
gauge (3). The recommended
inflation pressure can be found
on the Tire and Loading
Information label. See Tire
Pressure 0272. The pressure gauge (3) may
read higher than the actual tire
pressure while the compressor
is on. Turn the compressor off
to get an accurate pressure
reading. The compressor may
be turned on/off until the
correct pressure is reached.
Caution
If the recommended pressure
cannot be reached after
approximately 10 minutes, the
vehicle should not be driven
farther. The tire is too severely
damaged and the tire sealant and
compressor kit cannot inflate the
tire. Remove the power plug from
the accessory power outlet and
unscrew the inflating hose from
the tire valve. See
Roadside
Assistance Program 0344.
11. Press the on/off button (7) to turn the tire sealant and
compressor kit off. The tire is not sealed and will
continue to leak air until the
vehicle is driven and the
sealant is distributed in the tire.
Therefore, Steps 12–14 must
be done immediately after
Step 11.
Be careful while handling the
tire sealant and compressor kit
as it could be warm after
usage.
12. Unplug the power plug (5) from the accessory power outlet in
the vehicle.
13. Turn the sealant/air hose (6) counterclockwise to remove it
from the tire valve stem.
14. Replace the tire valve stem cap.
15. Immediately drive the vehicle 8 km (5 mi) but not longer than
10 minutes to distribute the
sealant in the tire.
Page 293 of 378
Buick Regal Owner Manual (GMNA-Localizing-U.S./Canada-13557849) -
2020 - CRC - 6/25/19
292 Vehicle Care
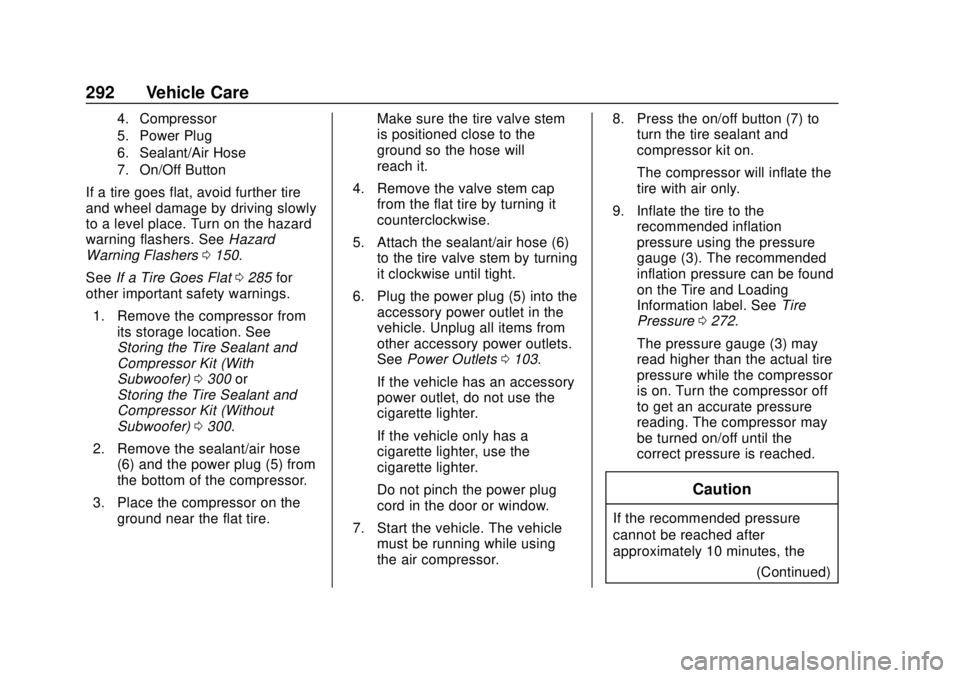
4. Compressor
5. Power Plug
6. Sealant/Air Hose
7. On/Off Button
If a tire goes flat, avoid further tire
and wheel damage by driving slowly
to a level place. Turn on the hazard
warning flashers. SeeHazard
Warning Flashers 0150.
See If a Tire Goes Flat 0285 for
other important safety warnings.
1. Remove the compressor from its storage location. See
Storing the Tire Sealant and
Compressor Kit (With
Subwoofer) 0300 or
Storing the Tire Sealant and
Compressor Kit (Without
Subwoofer) 0300.
2. Remove the sealant/air hose (6) and the power plug (5) from
the bottom of the compressor.
3. Place the compressor on the ground near the flat tire. Make sure the tire valve stem
is positioned close to the
ground so the hose will
reach it.
4. Remove the valve stem cap from the flat tire by turning it
counterclockwise.
5. Attach the sealant/air hose (6) to the tire valve stem by turning
it clockwise until tight.
6. Plug the power plug (5) into the accessory power outlet in the
vehicle. Unplug all items from
other accessory power outlets.
See Power Outlets 0103.
If the vehicle has an accessory
power outlet, do not use the
cigarette lighter.
If the vehicle only has a
cigarette lighter, use the
cigarette lighter.
Do not pinch the power plug
cord in the door or window.
7. Start the vehicle. The vehicle must be running while using
the air compressor. 8. Press the on/off button (7) to
turn the tire sealant and
compressor kit on.
The compressor will inflate the
tire with air only.
9. Inflate the tire to the recommended inflation
pressure using the pressure
gauge (3). The recommended
inflation pressure can be found
on the Tire and Loading
Information label. See Tire
Pressure 0272.
The pressure gauge (3) may
read higher than the actual tire
pressure while the compressor
is on. Turn the compressor off
to get an accurate pressure
reading. The compressor may
be turned on/off until the
correct pressure is reached.
Caution
If the recommended pressure
cannot be reached after
approximately 10 minutes, the (Continued)
Page 297 of 378
Buick Regal Owner Manual (GMNA-Localizing-U.S./Canada-13557849) -
2020 - CRC - 6/25/19
296 Vehicle Care
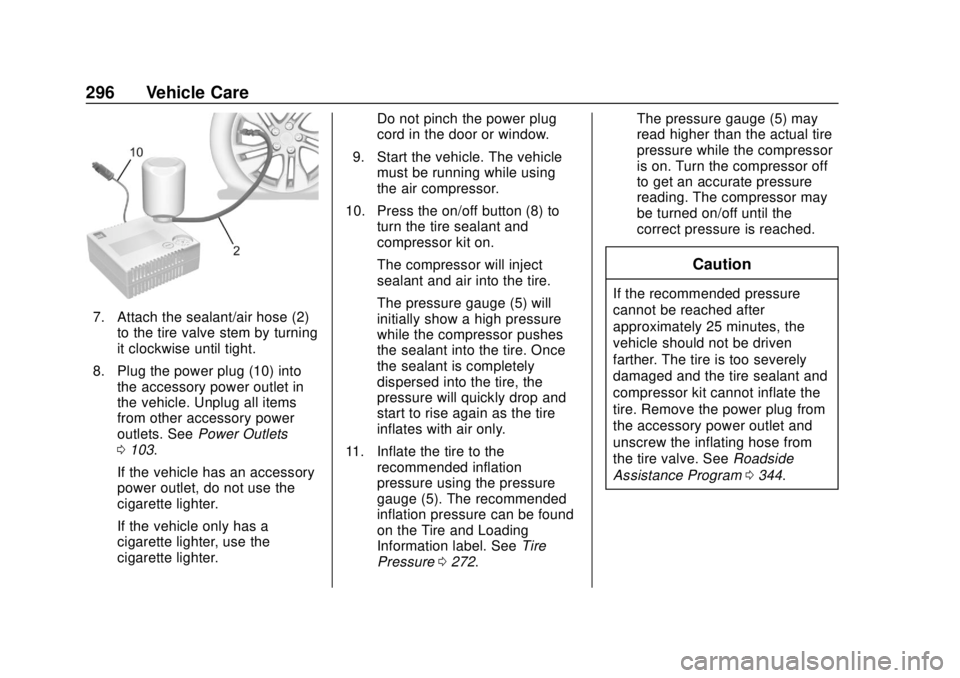
7. Attach the sealant/air hose (2)to the tire valve stem by turning
it clockwise until tight.
8. Plug the power plug (10) into the accessory power outlet in
the vehicle. Unplug all items
from other accessory power
outlets. See Power Outlets
0 103.
If the vehicle has an accessory
power outlet, do not use the
cigarette lighter.
If the vehicle only has a
cigarette lighter, use the
cigarette lighter. Do not pinch the power plug
cord in the door or window.
9. Start the vehicle. The vehicle must be running while using
the air compressor.
10. Press the on/off button (8) to turn the tire sealant and
compressor kit on.
The compressor will inject
sealant and air into the tire.
The pressure gauge (5) will
initially show a high pressure
while the compressor pushes
the sealant into the tire. Once
the sealant is completely
dispersed into the tire, the
pressure will quickly drop and
start to rise again as the tire
inflates with air only.
11. Inflate the tire to the recommended inflation
pressure using the pressure
gauge (5). The recommended
inflation pressure can be found
on the Tire and Loading
Information label. See Tire
Pressure 0272. The pressure gauge (5) may
read higher than the actual tire
pressure while the compressor
is on. Turn the compressor off
to get an accurate pressure
reading. The compressor may
be turned on/off until the
correct pressure is reached.
Caution
If the recommended pressure
cannot be reached after
approximately 25 minutes, the
vehicle should not be driven
farther. The tire is too severely
damaged and the tire sealant and
compressor kit cannot inflate the
tire. Remove the power plug from
the accessory power outlet and
unscrew the inflating hose from
the tire valve. See
Roadside
Assistance Program 0344.
Page 300 of 378

Buick Regal Owner Manual (GMNA-Localizing-U.S./Canada-13557849) -
2020 - CRC - 6/25/19
Vehicle Care 299
2. Remove the air only hose (11)and the power plug (10) from
the bottom of the compressor.
3. Place the compressor on the ground near the flat tire.
Make sure the tire valve stem
is positioned close to the
ground so the hose will
reach it.
4. Remove the valve stem cap from the flat tire by turning it
counterclockwise.
5. Attach the air only hose (11) to the tire valve stem by turning it
clockwise until tight.
6. Plug the power plug (10) into the accessory power outlet in
the vehicle. Unplug all items
from other accessory power
outlets. See Power Outlets
0 103.
If the vehicle has an accessory
power outlet, do not use the
cigarette lighter.
If the vehicle only has a
cigarette lighter, use the
cigarette lighter. Do not pinch the power plug
cord in the door or window.
7. Start the vehicle. The vehicle must be running while using
the air compressor.
8. Press the on/off button (8) to turn the tire sealant and
compressor kit on.
The compressor will inflate the
tire with air only.
9. Inflate the tire to the recommended inflation
pressure using the pressure
gauge (5). The recommended
inflation pressure can be found
on the Tire and Loading
Information label. See Tire
Pressure 0272.
The pressure gauge (5) may
read higher than the actual tire
pressure while the compressor
is on. Turn the compressor off
to get an accurate pressure
reading. The compressor may
be turned on/off until the
correct pressure is reached.Caution
If the recommended pressure
cannot be reached after
approximately 25 minutes, the
vehicle should not be driven
farther. The tire is too severely
damaged and the tire sealant and
compressor kit cannot inflate the
tire. Remove the power plug from
the accessory power outlet and
unscrew the inflating hose from
the tire valve. See Roadside
Assistance Program 0344.
10. Press the on/off button (8) to turn the tire sealant and
compressor kit off.
Be careful while handling the
compressor as it could be
warm after usage.
11. Unplug the power plug (10) from the accessory power
outlet in the vehicle.
12. Turn the air only hose (11) counterclockwise to remove it
from the tire valve stem.
Page 325 of 378
Buick Regal Owner Manual (GMNA-Localizing-U.S./Canada-13557849) -
2020 - CRC - 6/25/19
324 Service and Maintenance
Maintenance
Schedule
Owner Checks and Services
At Each Fuel Stop
.Check the engine oil level. See
Engine Oil 0238.
Once a Month
. Check the tire inflation
pressures. See Tire Pressure
0 272.
. Inspect the tires for wear. See
Tire Inspection 0278.
. Check the windshield washer
fluid level. See Washer Fluid
0 248.
Engine Oil Change
When the CHANGE ENGINE OIL
SOON message displays, have the
engine oil and filter changed within
the next 1 000 km/600 mi. If driven
under the best conditions, the
engine oil life system may not
indicate the need for vehicle service
for up to a year. The engine oil and filter must be changed at least once
a year and the oil life system must
be reset. Your trained dealer
technician can perform this work.
If the engine oil life system is reset
accidentally, service the vehicle
within 5 000 km/3,000 mi since the
last service. Reset the oil life
system when the oil is changed.
See
Engine Oil Life System 0240.
Air Conditioning Desiccant
(Replace Every Seven Years)
The air conditioning system requires
maintenance every seven years.
This service requires replacement of
the desiccant to help the longevity
and efficient operation of the air
conditioning system. This service
can be complex. See your dealer.
Tire Rotation and Required
Services Every 12 000 km/
7,500 mi
Rotate the tires, if recommended for
the vehicle, and perform the
following services. See Tire
Rotation 0279. .
Check engine oil level and oil
life percentage. If needed,
change engine oil and filter, and
reset oil life system. See Engine
Oil 0238 and
Engine Oil Life System 0240.
. Check engine coolant level. See
Cooling System 0243.
. Check windshield washer fluid
level. See Washer Fluid 0248.
. Check tire inflation pressures.
See Tire Pressure 0272.
. Inspect tire wear. See Tire
Inspection 0278.
. Visually check for fluid leaks.
. Inspect engine air cleaner filter.
See Engine Air Cleaner/Filter
0 242.
. Inspect brake system. See
Exterior Care 0313.
. Visually inspect steering,
suspension, and chassis
components for damage,
including cracks or tears in the
rubber boots, loose or missing
Page 375 of 378

Buick Regal Owner Manual (GMNA-Localizing-U.S./Canada-13557849) -
2020 - CRC - 6/25/19
374 Index
Speedometer . . . . . . . . . . . . . . . . . . . 113
StabiliTrakOFF Light . . . . . . . . . . . . . . . . . . . . . 124
Start Assist, Hill . . . . . . . . . . . . . . . . . 190
Start Vehicle, Remote . . . . . . . . . . . 15
Starter Switch Check . . . . . . . . . . . 252
Starting the Engine . . . . . . . . . . . . . 177
Steering . . . . . . . . . . . . . . . . . . . . . . . . 166 Heated Wheel . . . . . . . . . . . . . . . . 100
Wheel Adjustment . . . . . . . . . . . . 100
Wheel Controls . . . . . . . . . . . . . . . 100
Stop/Start System . . . . . . . . . . . . . . 178
Stoplamps and Back-up Lamps Bulb Replacement . . . . . . . . . . . . 257
Storage Areas Armrest . . . . . . . . . . . . . . . . . . . . . . . . . 95
Cargo Cover . . . . . . . . . . . . . . . . . . . . 96
Convenience Net . . . . . . . . . . . . . . . 97
Front . . . . . . . . . . . . . . . . . . . . . . . . . . . 95
Glove Box . . . . . . . . . . . . . . . . . . . . . . 94
Roof Rack System . . . . . . . . . . . . . . 98
Sunglasses . . . . . . . . . . . . . . . . . . . . . 95
Storage Compartments . . . . . . . . . . 94
Storing the Tire Sealant and Compressor Kit . . . . . . . . . . . . . . . 300
Struts Gas . . . . . . . . . . . . . . . . . . . . . . . . . . . 254 Stuck Vehicle . . . . . . . . . . . . . . . . . . . 171
Sun Visors . . . . . . . . . . . . . . . . . . . . . . . 35
Sunglass Storage . . . . . . . . . . . . . . . . 95
Sunroof . . . . . . . . . . . . . . . . . . . . . . . . . . 35
Symbols . . . . . . . . . . . . . . . . . . . . . . . . . . 3
System
Forward Collision
Alert (FCA) . . . . . . . . . . . . . . . . . . 207
Infotainment . . . . . . . . . . . . . 155, 353
Roof Rack . . . . . . . . . . . . . . . . . . . . . . 98
Systems
Driver Assistance . . . . . . . . . . . . . 203
T
Tachometer . . . . . . . . . . . . . . . . . . . . . 113
TaillampsBulb Replacement . . . . . . . . . . . . 257
Text Telephone (TTY) Users . . . . 343
Theft-Deterrent Systems . . . . . . . . . 30 Immobilizer . . . . . . . . . . . . . . . . . . . . . 30
Thigh Support Adjustment . . . . . . . 43
Time . . . . . . . . . . . . . . . . . . . . . . . . . . . . 102
Tires . . . . . . . . . . . . . . . . . . . . . . . . . . . . 265
All-Season . . . . . . . . . . . . . . . . . . . . 266
Buying New Tires . . . . . . . . . . . . . 280
Chains . . . . . . . . . . . . . . . . . . . . . . . . 285
Changing . . . . . . . . . . . . . . . . . . . . . 301
Compact Spare . . . . . . . . . . . . . . . 305 Tires (cont'd)
Designations . . . . . . . . . . . . . . . . . 269
Different Size . . . . . . . . . . . . . . . . . 282
If a Tire Goes Flat . . . . . . . . . . . . 285
Inspection . . . . . . . . . . . . . . . . . . . . 278
Low Profile . . . . . . . . . . . . . . . . . . . 266
Pressure . . . . . . . . . . . . . . . . . 272, 273
Pressure Light . . . . . . . . . . . . . . . . 125
Pressure Monitor Operation . . 275
Pressure Monitor System . . . . . 274
Rotation . . . . . . . . . . . . . . . . . . . . . . 279
Sealant and
Compressor Kit . . . . . . . . 287, 293
Sealant and Compressor
Kit, Storing . . . . . . . . . . . . . . . . . . 300
Sidewall Labeling . . . . . . . . . . . . . 267
Terminology and Definitions . . 269
Uniform Tire Quality Grading . . . . . . . . . . . . . . . . . . . . . 282
Wheel Alignment and Tire Balance . . . . . . . . . . . . . . . . . . . . . 284
Wheel Replacement . . . . . . . . . . 284
When It Is Time for New Tires . . . . . . . . . . . . . . . . . . . . . . . . 280
Winter . . . . . . . . . . . . . . . . . . . . . . . . 266
Top Tier Fuel . . . . . . . . . . . . . . . . . . . 217
Page 376 of 378

Buick Regal Owner Manual (GMNA-Localizing-U.S./Canada-13557849) -
2020 - CRC - 6/25/19
Index 375
TowingDriving Characteristics . . . . . . . . 221
Equipment . . . . . . . . . . . . . . . . . . . . 227
General Information . . . . . . . . . . 221
Recreational Vehicle . . . . . . . . . . 310
Trailer . . . . . . . . . . . . . . . . . . . . . . . . 225
Vehicle . . . . . . . . . . . . . . . . . . . . . . . 309
Traction Control System(TCS)/StabiliTrak Light . . . . . . 125
Off Light . . . . . . . . . . . . . . . . . . . . . . 124
Selective Ride Control . . . . . . . . 192
Traction Control/Electronic Stability Control . . . . . . . . . . . . . . . 191
Trailer Towing . . . . . . . . . . . . . . . . . . . . . . . . 225
Transmission Automatic . . . . . . . . . . . . . . . . . . . . . 184
Fluid, Automatic . . . . . . . . . . . . . . 241
Transportation Program, Courtesy . . . . . . . . . . . . . . . . . . . . . . 346
Turn and Lane-Change Signals . . . . . . . . . . . . . . . . . . . . . . . . 150
Turn Signal Bulb Replacement . . . . . . . . . . . . 257U
Uniform Tire Quality Grading . . . 282
Universal Remote System . . . . . . 143
Operation . . . . . . . . . . . . . . . . . . . . . 146
Programming . . . . . . . . . . . . . . . . . 143
Using This Manual . . . . . . . . . . . . . . . . 2
V
Vehicle Alarm System . . . . . . . . . . . . . . . . . . 29
Canadian Owners . . . . . . . . . . . . . . . 2
Control . . . . . . . . . . . . . . . . . . . . . . . 166
Identification Number (VIN) . . . 336
Load Limits . . . . . . . . . . . . . . . . . . . 171
Messages . . . . . . . . . . . . . . . . . . . . 137
Personalization . . . . . . . . . . . . . . . 138
Remote Start . . . . . . . . . . . . . . . . . . . 15
Security . . . . . . . . . . . . . . . . . . . . . . . . 29
Speed Messages . . . . . . . . . . . . . 138
Towing . . . . . . . . . . . . . . . . . . . . . . . . 309
Vehicle Ahead Indicator . . . . . . . . 123
Vehicle Care Storing the Tire Sealantand Compressor Kit . . . . . . . . . 300
Tire Pressure . . . . . . . . . . . . . . . . . 272 Vehicle Data Recording and
Privacy . . . . . . . . . . . . . . . . . . . . . . . . 352
Ventilation, Air . . . . . . . . . . . . . . . . . . 161
Visors . . . . . . . . . . . . . . . . . . . . . . . . . . . 35
Voltmeter Gauge . . . . . . . . . . . . . . . 116
W
Warning Brake System Light . . . . . . . . . . . 121
Caution and Danger . . . . . . . . . . . . . 3
Warning Lights, Gauges, and Indicators . . . . . . . . . . . . . . . . . . . . . 106
Warnings Hazard Flashers . . . . . . . . . . . . . . 150
Washer Fluid . . . . . . . . . . . . . . . . . . . 248
Wheels Alignment and Tire Balance . . 284
Different Size . . . . . . . . . . . . . . . . . 282
Replacement . . . . . . . . . . . . . . . . . 284
When It Is Time for New Tires . . . . . . . . . . . . . . . . . . . . . . . . . . 280
Where to Put the Restraint . . . . . . 77
Windows . . . . . . . . . . . . . . . . . . . . . . . . 33 Power . . . . . . . . . . . . . . . . . . . . . . . . . . 33