instrument cluster BUICK REGAL SPORTBACK 2019 Get To Know Guide
[x] Cancel search | Manufacturer: BUICK, Model Year: 2019, Model line: REGAL SPORTBACK, Model: BUICK REGAL SPORTBACK 2019Pages: 20, PDF Size: 3.51 MB
Page 3 of 20
3
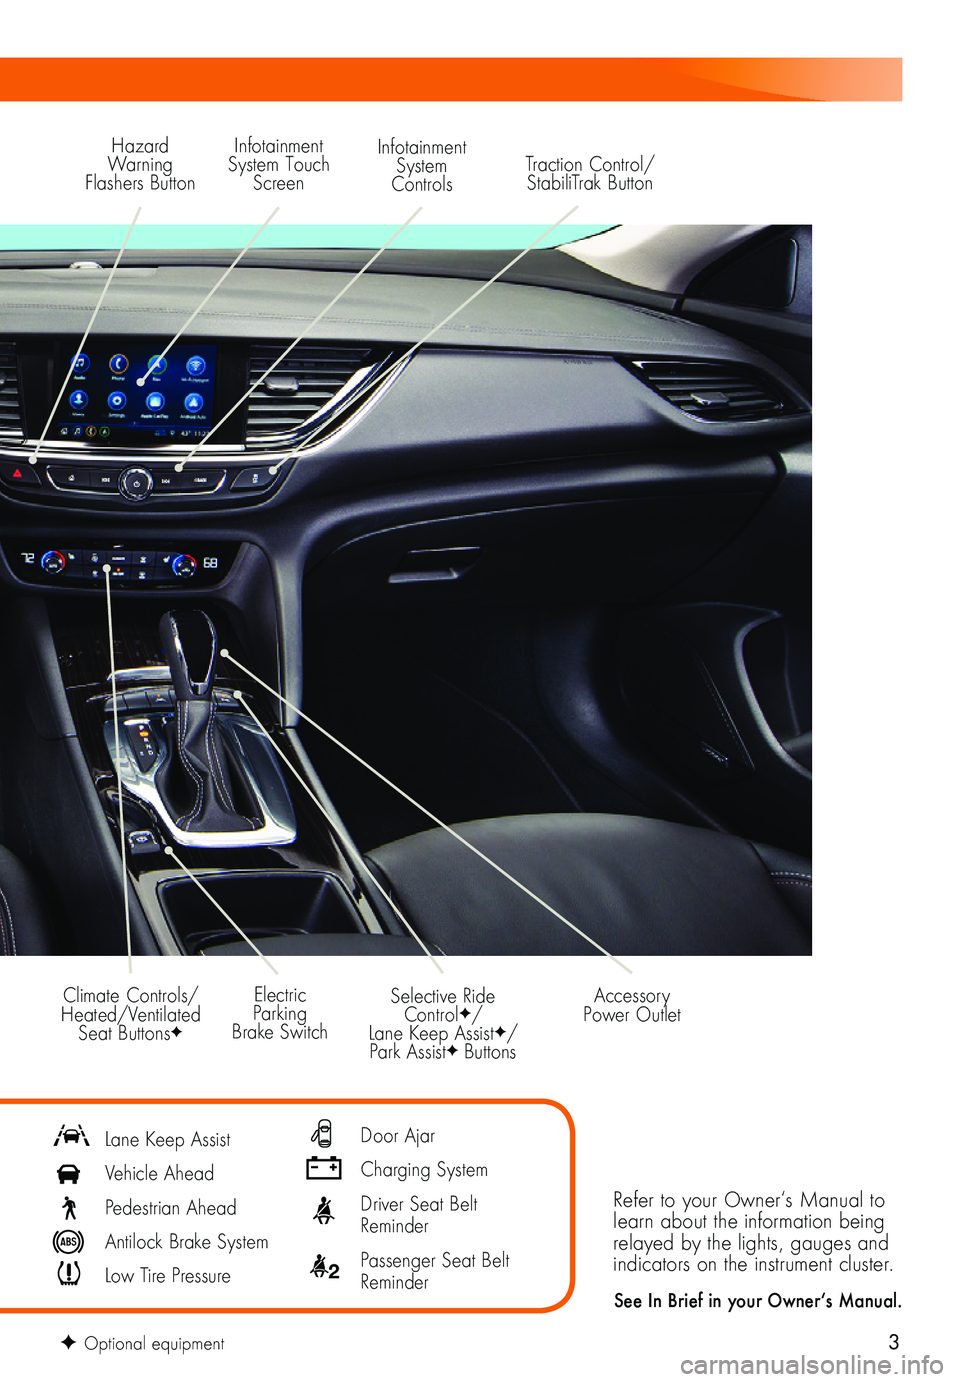
Refer to your Owner‘s Manual to learn about the information being relayed by the lights, gauges and indicators on the instrument cluster.
See In Brief in your Owner‘s Manual.
Hazard Warning Flashers Button
Infotainment System Touch Screen
Infotainment System ControlsTraction Control/StabiliTrak Button
Selective Ride ControlF/ Lane Keep AssistF/Park AssistF Buttons
Electric Parking Brake Switch
Accessory Power OutletClimate Controls/ Heated/Ventilated Seat ButtonsF
Lane Keep Assist
Vehicle Ahead
Pedestrian Ahead
Antilock Brake System
Low Tire Pressure
Door Ajar
Charging System
Driver Seat Belt Reminder
2 Passenger Seat Belt Reminder
F Optional equipment
Page 7 of 20
7
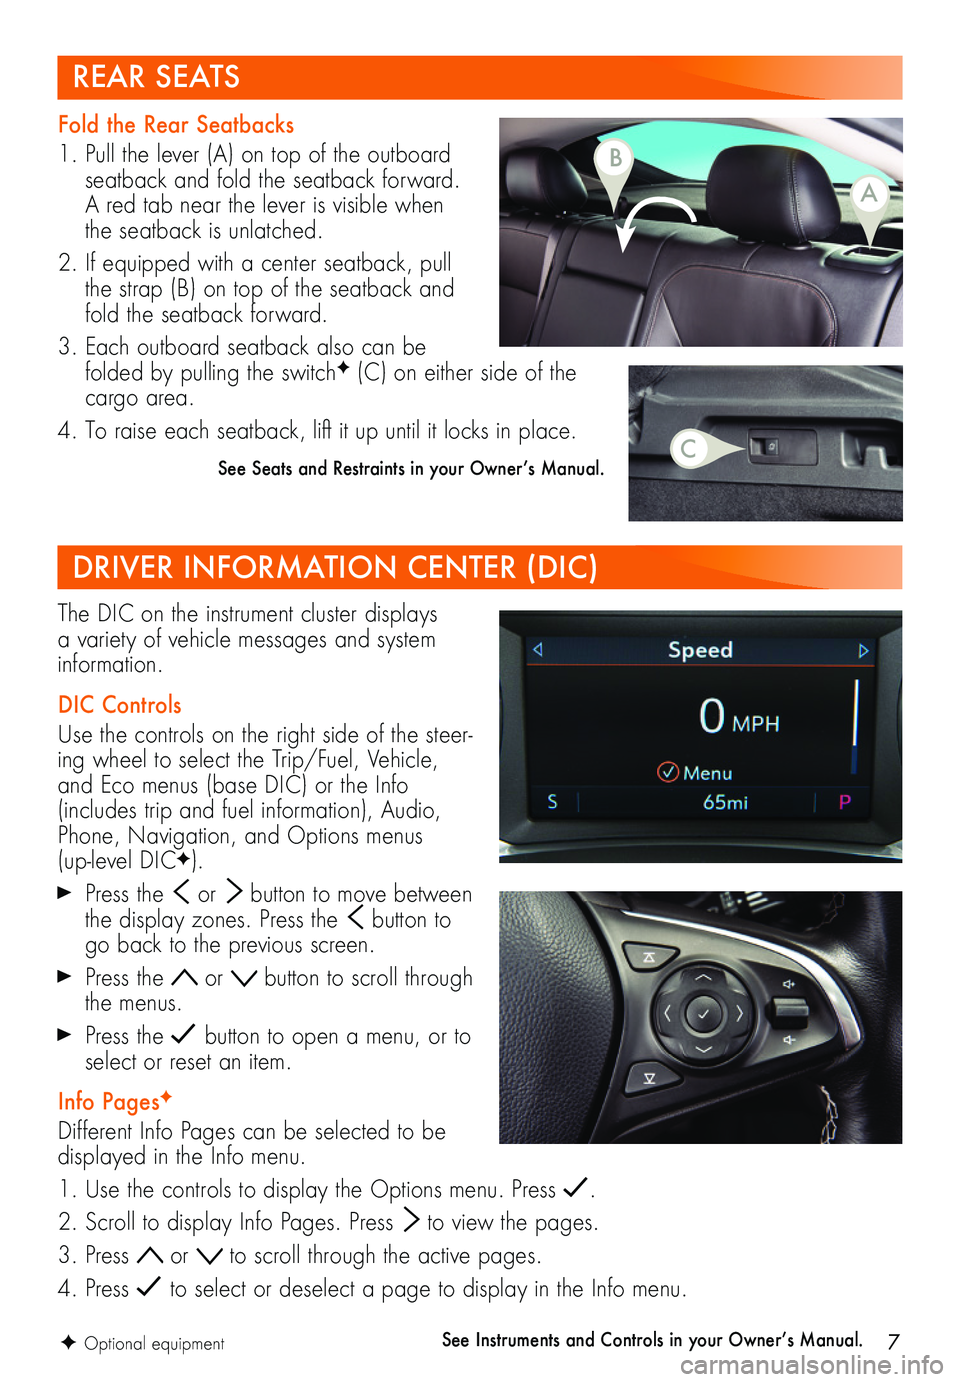
The DIC on the instrument cluster displays a variety of vehicle messages and system information.
DIC Controls
Use the controls on the right side of the steer-ing wheel to select the Trip/Fuel, Vehicle, and Eco menus (base DIC) or the Info (includes trip and fuel information), Audio, Phone, Navigation, and Options menus (up-level DICF).
Press the or button to move between the display zones. Press the button to go back to the previous screen.
Press the or button to scroll through the menus.
Press the button to open a menu, or to select or reset an item.
Info PagesF
Different Info Pages can be selected to be displayed in the Info menu.
1. Use the controls to display the Options menu. Press .
2. Scroll to display Info Pages. Press to view the pages.
3. Press or to scroll through the active pages.
4. Press to select or deselect a page to display in the Info menu.
See Instruments and Controls in your Owner’s Manual.F Optional equipment
DRIVER INFORMATION CENTER (DIC)
REAR SEATS
Fold the Rear Seatbacks
1. Pull the lever (A) on top of the outboard seatback and fold the seatback forward. A red tab near the lever is visible when the seatback is unlatched.
2. If equipped with a center seatback, pull the strap (B) on top of the seatback and fold the seatback forward.
3. Each outboard seatback also can be folded by pulling the switchF (C) on either side of the cargo area.
4. To raise each seatback, lift it up until it locks in place.
See Seats and Restraints in your Owner’s Manual. C
B
A
Page 16 of 20
16
DRIVER ASSISTANCE SYSTEMS
Safety or driver assistance features are no substitute for the driver’s responsibility to operate the vehicle in a safe manner. The driver should remain attentive to traffic, surroundings and road conditions at all times. Read your Owner’s Manual for important feature limitations and information.
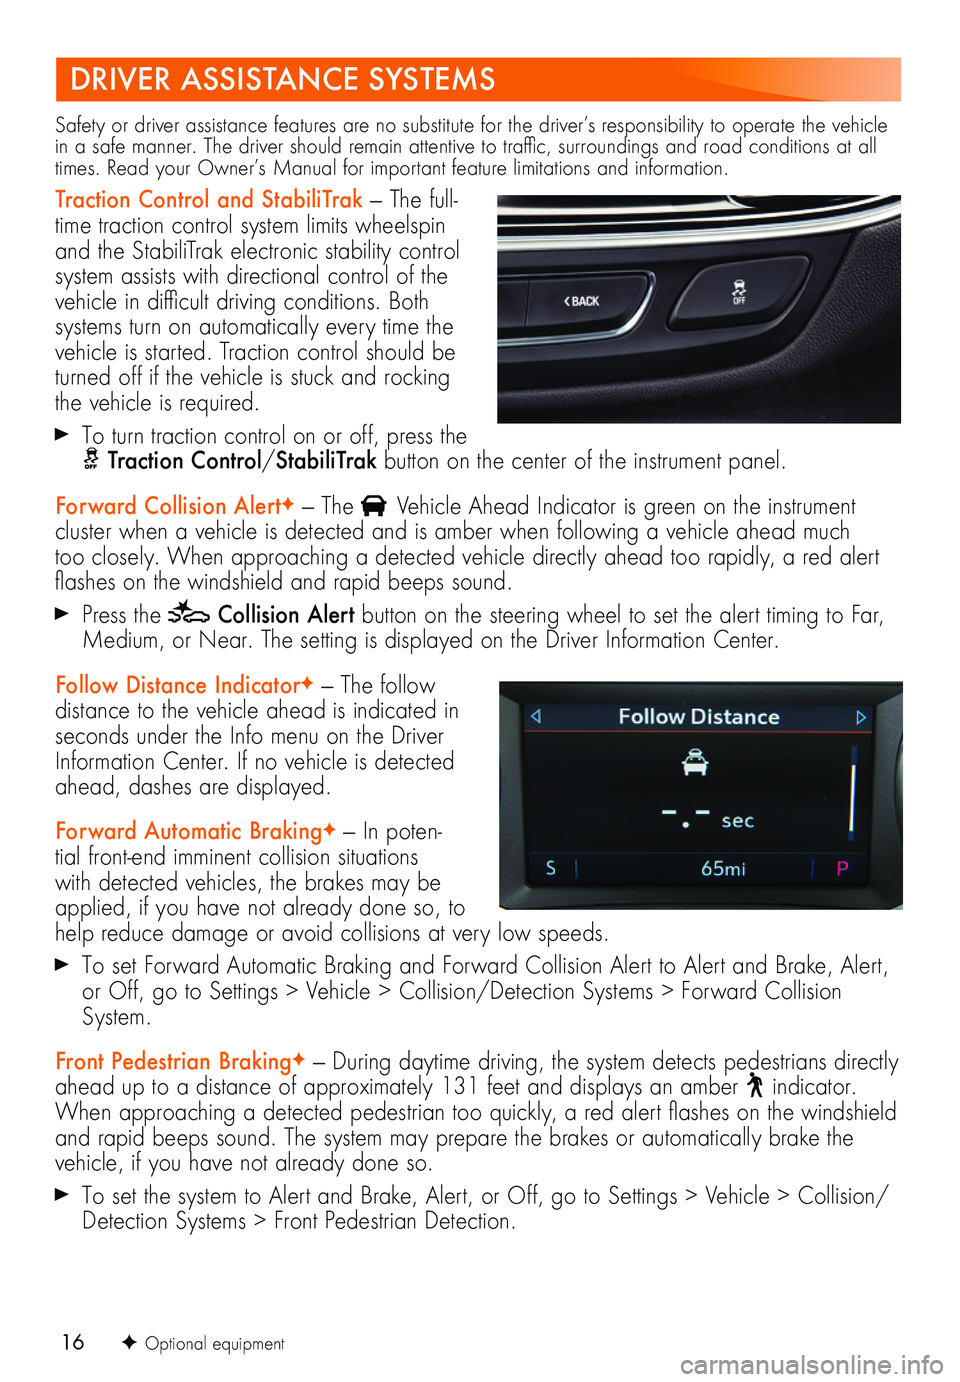
Traction Control and StabiliTrak — The full-time traction control system limits wheelspin and the StabiliTrak electronic stability control system assists with directional control of the vehicle in difficult driving conditions. Both systems turn on automatically every time the vehicle is started. Traction control should be turned off if the vehicle is stuck and rocking the vehicle is required.
To turn traction control on or off, press the Traction Control/StabiliTrak button on the center of the instrument panel.
Forward Collision AlertF — The Vehicle Ahead Indicator is green on the instrument cluster when a vehicle is detected and is amber when following a vehicle ahead much too closely. When approaching a detected vehicle directly ahead too rapidly, a red alert flashes on the windshield and rapid beeps sound.
Press the Collision Alert button on the steering wheel to set the alert timing to Far, Medium, or Near. The setting is displayed on the Driver Information Center.
Follow Distance IndicatorF — The follow distance to the vehicle ahead is indicated in seconds under the Info menu on the Driver Information Center. If no vehicle is detected ahead, dashes are displayed.
Forward Automatic BrakingF — In poten-tial front-end imminent collision situations with detected vehicles, the brakes may be applied, if you have not already done so, to help reduce damage or avoid collisions at very low speeds.
To set Forward Automatic Braking and Forward Collision Alert to Alert and Brake, Alert, or Off, go to Settings > Vehicle > Collision/Detection Systems > Forward Collision System.
Front Pedestrian BrakingF — During daytime driving, the system detects pedestrians directly ahead up to a distance of approximately 131 feet and displays an amber indicator. When approaching a detected pedestrian too quickly, a red alert flashes on the windshield and rapid beeps sound. The system may prepare the brakes or automatically brake the vehicle, if you have not already done so.
To set the system to Alert and Brake, Alert, or Off, go to Settings > Vehicle > Collision/Detection Systems > Front Pedestrian Detection.
F Optional equipment
Page 17 of 20
17F Optional equipment
Lane Change Alert with Side Blind Zone AlertF — While driving, the system displays a
warning symbol on the left or right side mirror when a vehicle is detected in that side blind zone area or rapidly approaching that area. The warning symbol flashes if a turn
signal is activated when a vehicle has been detected on the same side.
To turn the system on or off, go to Settings > Vehicle > Collision/Detection Systems > Lane Change Alert.
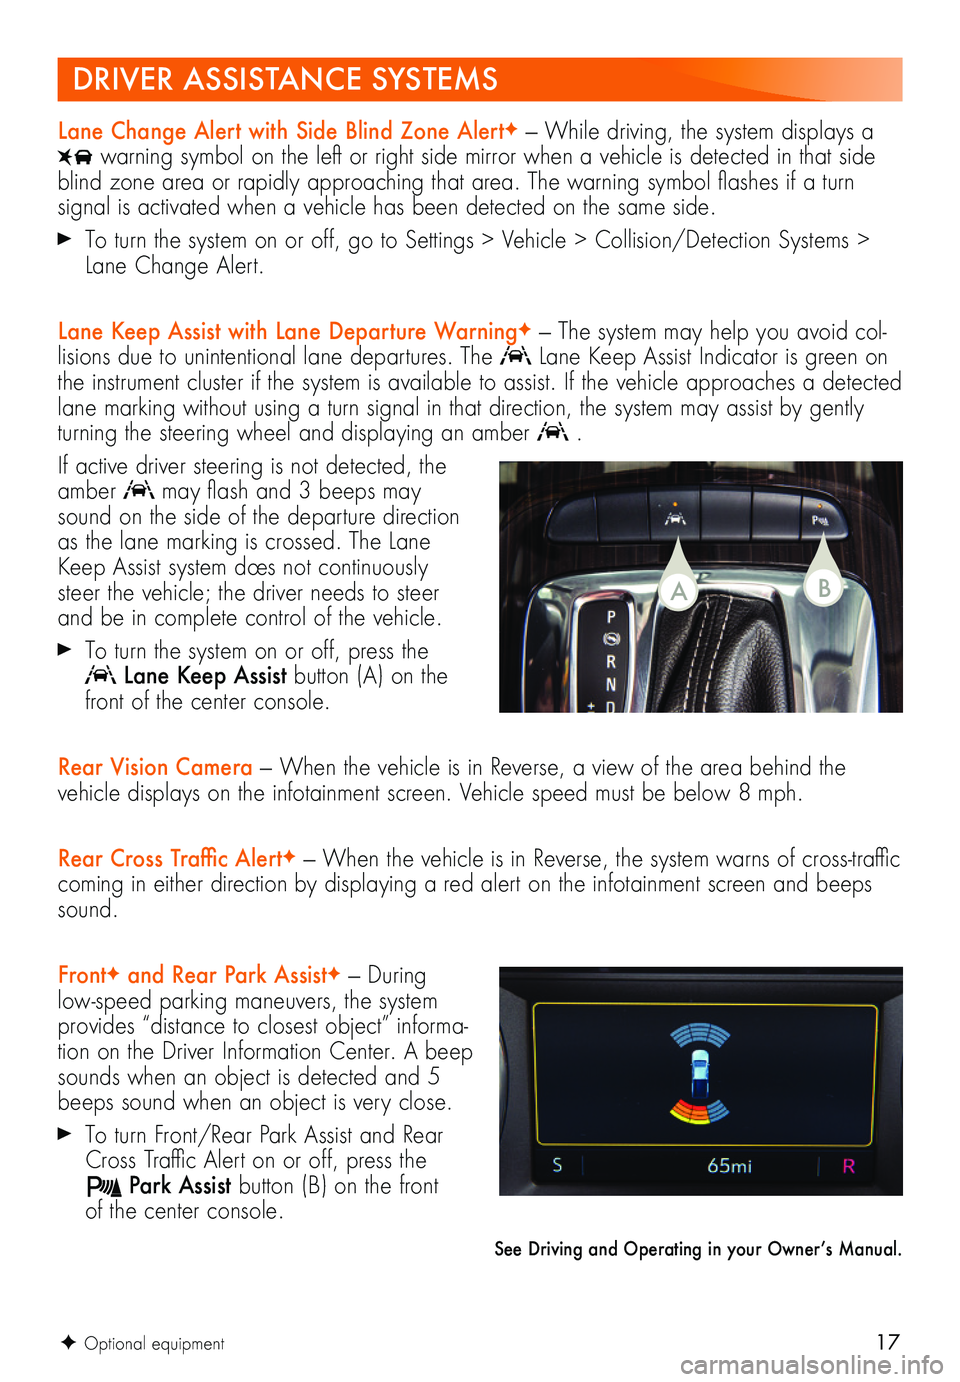
Lane Keep Assist with Lane Departure WarningF — The system may help you avoid col-lisions due to unintentional lane departures. The Lane Keep Assist Indicator is green on the instrument cluster if the system is available to assist. If the vehicle approaches a detected lane marking without using a turn signal in that direction, the system may assist by gently turning the steering wheel and displaying an amber .
If active driver steering is not detected, the amber may flash and 3 beeps may sound on the side of the departure direction as the lane marking is crossed. The Lane Keep Assist system does not continuously steer the vehicle; the driver needs to steer and be in complete control of the vehicle.
To turn the system on or off, press the
Lane Keep Assist button (A) on the front of the center console.
Rear Vision Camera — When the vehicle is in Reverse, a view of the area behind the vehicle displays on the infotainment screen. Vehicle speed must be below 8 mph.
Rear Cross Traffic AlertF — When the vehicle is in Reverse, the system warns of cross-traffic coming in either direction by displaying a red alert on the infotainment screen and beeps sound.
FrontF and Rear Park AssistF — During low-speed parking maneuvers, the system provides “distance to closest object” informa-tion on the Driver Information Center. A beep sounds when an object is detected and 5 beeps sound when an object is very close.
To turn Front/Rear Park Assist and Rear Cross Traffic Alert on or off, press the
Park Assist button (B) on the front of the center console.
See Driving and Operating in your Owner’s Manual.
DRIVER ASSISTANCE SYSTEMS
BA
Page 18 of 20
18F Optional equipment
CRUISE CONTROL
Setting Cruise Control1. Press the On/Off button. The Cruise Control symbol will illuminate in white on the instrument cluster.
2. When traveling at the desired speed, press down the SET– switch to set the speed. The symbol will illuminate in green on the instrument cluster.
Adjusting Cruise Control
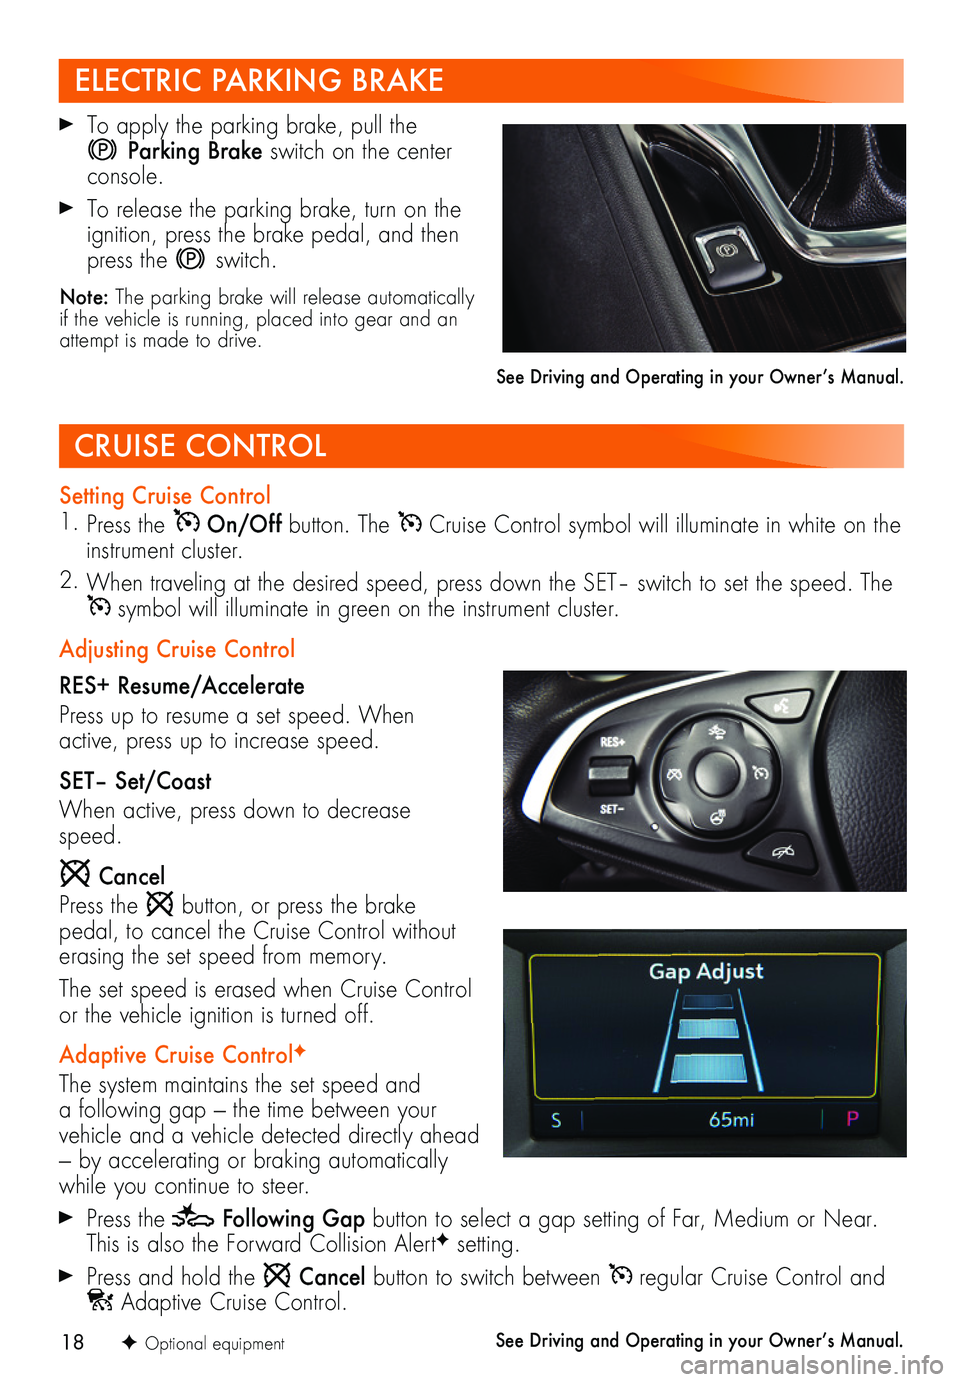
RES+ Resume/Accelerate
Press up to resume a set speed. When active, press up to increase speed.
SET– Set/Coast
When active, press down to decrease speed.
Cancel
Press the button, or press the brake pedal, to cancel the Cruise Control without erasing the set speed from memory.
The set speed is erased when Cruise Control or the vehicle ignition is turned off.
Adaptive Cruise ControlF
The system maintains the set speed and a following gap — the time between your
vehicle and a vehicle detected directly ahead — by accelerating or braking automatically while you continue to steer.
Press the Following Gap button to select a gap setting of Far, Medium or Near. This is also the Forward Collision AlertF setting.
Press and hold the Cancel button to switch between regular Cruise Control and Adaptive Cruise Control.
See Driving and Operating in your Owner’s Manual.
To apply the parking brake, pull the
Parking Brake switch on the center console.
To release the parking brake, turn on the ignition, press the brake pedal, and then press the switch.
Note: The parking brake will release automatically if the vehicle is running, placed into gear and an attempt is made to drive.
See Driving and Operating in your Owner’s Manual.
ELECTRIC PARKING BRAKE
Page 19 of 20
19
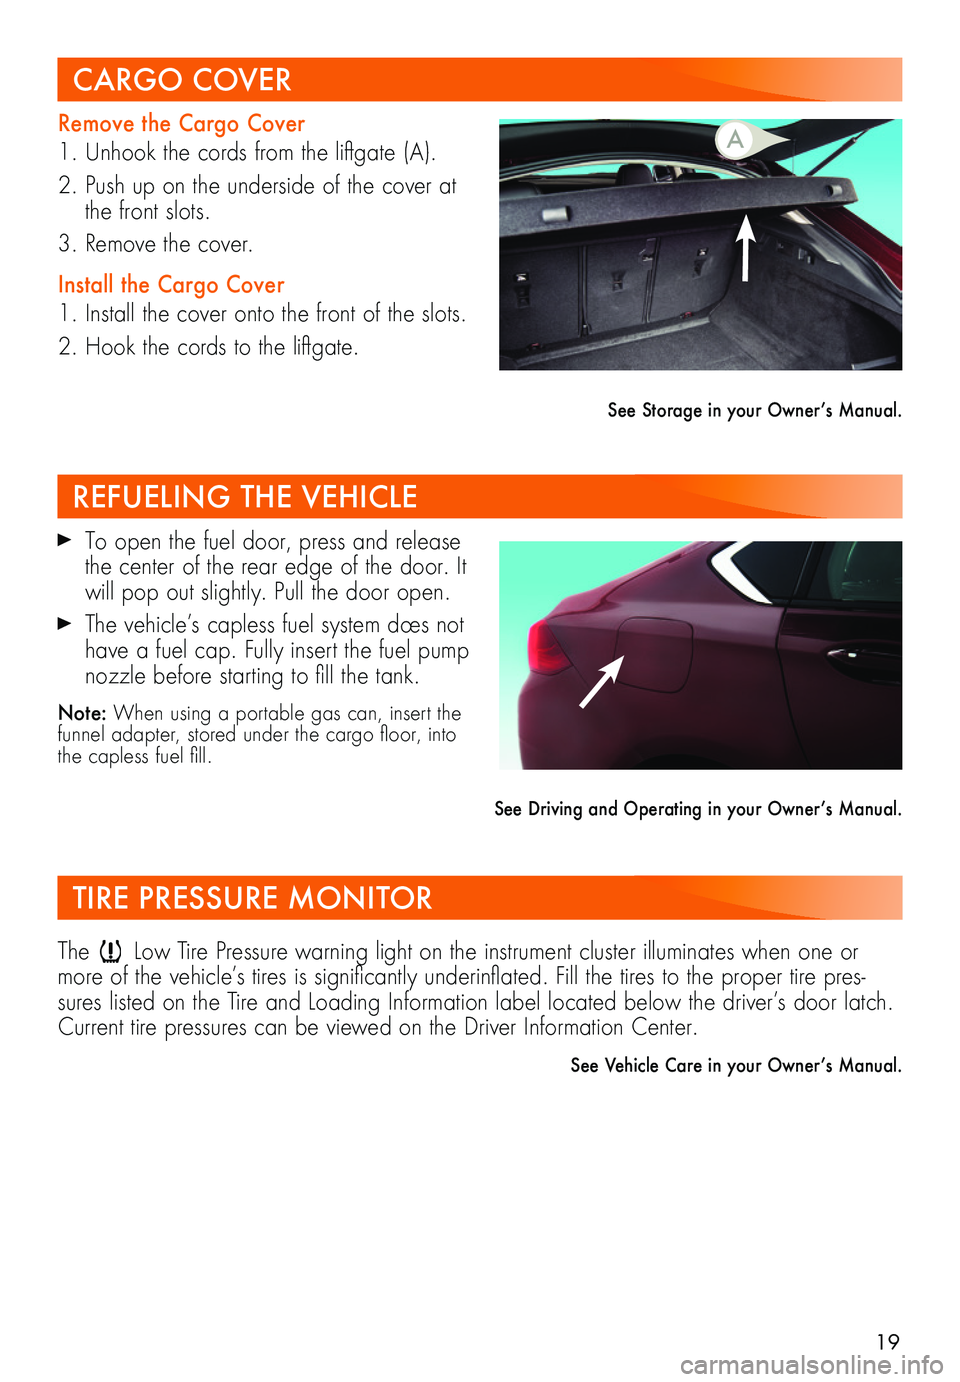
Remove the Cargo Cover
1. Unhook the cords from the liftgate (A).
2. Push up on the underside of the cover at the front slots.
3. Remove the cover.
Install the Cargo Cover
1. Install the cover onto the front of the slots.
2. Hook the cords to the liftgate.
See Storage in your Owner’s Manual.
CARGO COVER
REFUELING THE VEHICLE
TIRE PRESSURE MONITOR
To open the fuel door, press and release the center of the rear edge of the door. It will pop out slightly. Pull the door open.
The vehicle’s capless fuel system does not have a fuel cap. Fully insert the fuel pump nozzle before starting to fill the tank.
Note: When using a portable gas can, insert the funnel adapter, stored under the cargo floor, into the capless fuel fill.
See Driving and Operating in your Owner’s Manual.
The Low Tire Pressure warning light on the instrument cluster illuminates when one or more of the vehicle’s tires is significantly underinflated. Fill the tires to the proper tire pres-sures listed on the Tire and Loading Information label located below the driver’s door latch. Current tire pressures can be viewed on the Driver Information Center.
See Vehicle Care in your Owner’s Manual.
A