ECO mode BUICK REGAL SPORTBACK 2019 Owner's Manual
[x] Cancel search | Manufacturer: BUICK, Model Year: 2019, Model line: REGAL SPORTBACK, Model: BUICK REGAL SPORTBACK 2019Pages: 391, PDF Size: 5.95 MB
Page 3 of 391
Buick Regal Owner Manual (GMNA-Localizing-U.S./Canada-12163021) -
2019 - CRC - 11/14/18
2 Introduction
Introduction
The names, logos, emblems,
slogans, vehicle model names, and
vehicle body designs appearing in
this manual including, but not limited
to, GM, the GM logo, BUICK, the
BUICK Emblem, and REGAL are
trademarks and/or service marks of
General Motors LLC, its
subsidiaries, affiliates, or licensors.For vehicles first sold in Canada,
substitute the name
“General
Motors of Canada Company” for
Buick Motor Division wherever it
appears in this manual.
This manual describes features that
may or may not be on the vehicle
because of optional equipment that
was not purchased on the vehicle,
model variants, country
specifications, features/applications
that may not be available in your
region, or changes subsequent to
the printing of this owner ’s manual.
Refer to the purchase
documentation relating to your
specific vehicle to confirm the
features.
Keep this manual in the vehicle for
quick reference.
Canadian Vehicle Owners
A French language manual can be
obtained from your dealer, at
www.helminc.com, or from:
Propriétaires Canadiens
On peut obtenir un exemplaire de
ce guide en français auprès du
concessionnaire ou à l'adresse
suivante:
Helm, Incorporated
Attention: Customer Service
47911 Halyard Drive
Plymouth, MI 48170
USA
Using this Manual
To quickly locate information about
the vehicle, use the Index in the
back of the manual. It is an
alphabetical list of what is in the
manual and the page number where
it can be found.
Litho in U.S.A.
Part No. 84221878 B Second Printing©2018 General Motors LLC. All Rights Reserved.
Page 21 of 391
Buick Regal Owner Manual (GMNA-Localizing-U.S./Canada-12163021) -
2019 - CRC - 11/14/18
20 In Brief
8. A/C (Air Conditioning)
9. On/Off (Power)
See Dual Automatic Climate Control
System 0171.
Transmission
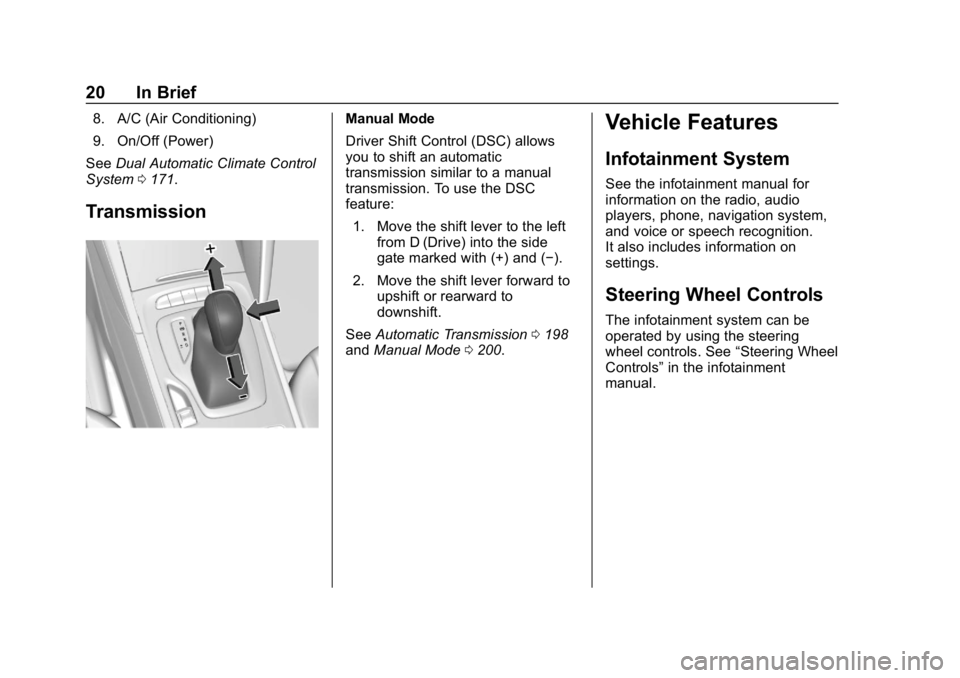
Manual Mode
Driver Shift Control (DSC) allows
you to shift an automatic
transmission similar to a manual
transmission. To use the DSC
feature:
1. Move the shift lever to the left from D (Drive) into the side
gate marked with (+) and (−).
2. Move the shift lever forward to upshift or rearward to
downshift.
See Automatic Transmission 0198
and Manual Mode 0200.Vehicle Features
Infotainment System
See the infotainment manual for
information on the radio, audio
players, phone, navigation system,
and voice or speech recognition.
It also includes information on
settings.
Steering Wheel Controls
The infotainment system can be
operated by using the steering
wheel controls. See “Steering Wheel
Controls” in the infotainment
manual.
Page 25 of 391
Buick Regal Owner Manual (GMNA-Localizing-U.S./Canada-12163021) -
2019 - CRC - 11/14/18
24 In Brief
SeePower Outlets 0119.
Universal Remote System
If available, this system provides a
way to replace up to three remote
control transmitters used to activate
devices such as garage door
openers, security systems, and
home automation devices.
Read the instructions completely
before attempting to program the
Universal Remote system. Because
of the steps involved, it may be
helpful to have another person available to assist you with
programming the Universal Remote
system.
See
Universal Remote System
0 158.
Sunroof
If equipped, the sunroof only
operates when the ignition is on or
in ACC/ACCESSORY, or when
Retained Accessory Power (RAP) is
active. See Retained Accessory
Power (RAP) 0195.
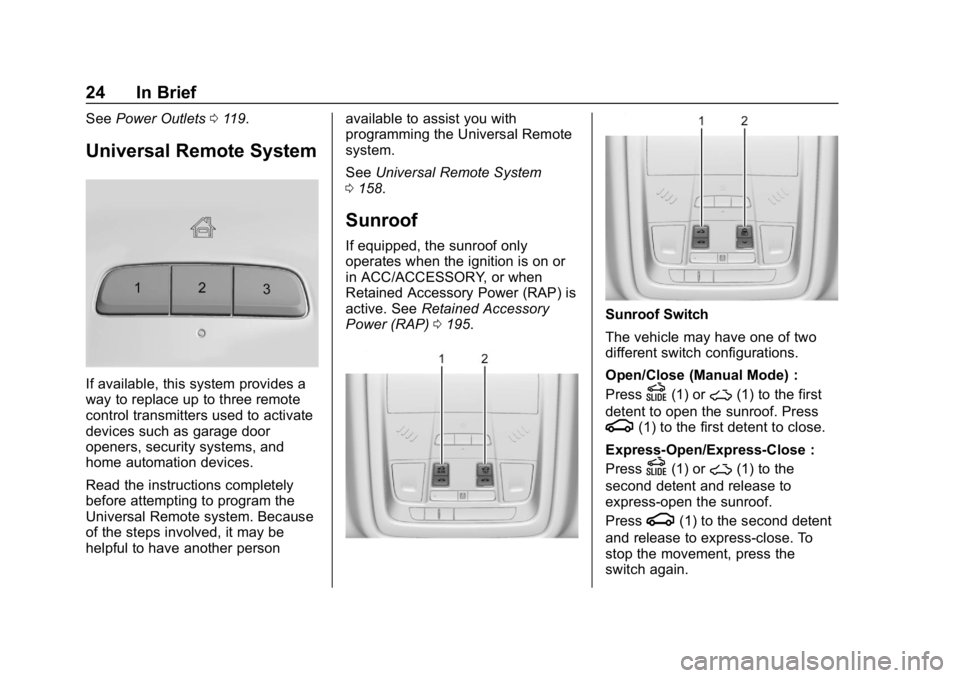
Sunroof Switch
The vehicle may have one of two
different switch configurations.
Open/Close (Manual Mode) :
Press
D(1) or~(1) to the first
detent to open the sunroof. Press
g(1) to the first detent to close.
Express-Open/Express-Close :
Press
D(1) or~(1) to the
second detent and release to
express-open the sunroof.
Press
g(1) to the second detent
and release to express-close. To
stop the movement, press the
switch again.
Page 34 of 391
Buick Regal Owner Manual (GMNA-Localizing-U.S./Canada-12163021) -
2019 - CRC - 11/14/18
Keys, Doors, and Windows 33
Programming Transmitters to
the Vehicle
Only RKE transmitters programmed
to the vehicle will work. If a
transmitter is lost or stolen, a
replacement can be purchased and
programmed through your dealer.
The vehicle can be reprogrammed
so that lost or stolen RKE
transmitters no longer work. Any
remaining RKE transmitters will
need to be reprogrammed. Each
vehicle can have up to eight
transmitters matched to it.
Programming with Recognized
Transmitters
A new RKE transmitter can be
programmed to the vehicle when
there are two recognized RKE
transmitters. To program, the vehicle
must be off and all of the RKE
transmitters, both currently
recognized and new, must be
with you.
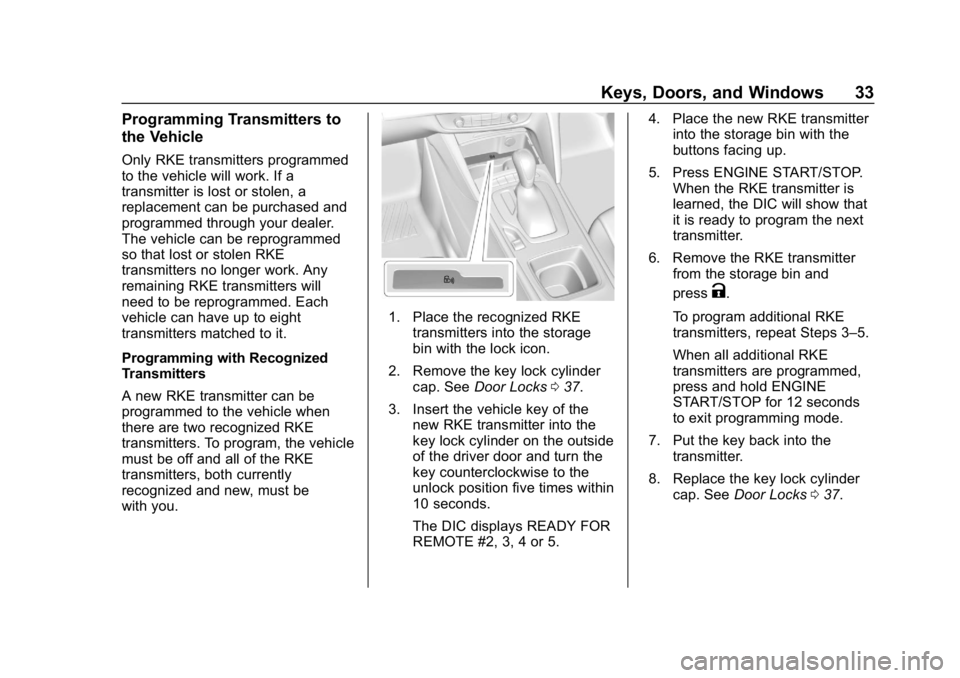
1. Place the recognized RKEtransmitters into the storage
bin with the lock icon.
2. Remove the key lock cylinder cap. See Door Locks 037.
3. Insert the vehicle key of the new RKE transmitter into the
key lock cylinder on the outside
of the driver door and turn the
key counterclockwise to the
unlock position five times within
10 seconds.
The DIC displays READY FOR
REMOTE #2, 3, 4 or 5. 4. Place the new RKE transmitter
into the storage bin with the
buttons facing up.
5. Press ENGINE START/STOP. When the RKE transmitter is
learned, the DIC will show that
it is ready to program the next
transmitter.
6. Remove the RKE transmitter from the storage bin and
press
K.
To program additional RKE
transmitters, repeat Steps 3–5.
When all additional RKE
transmitters are programmed,
press and hold ENGINE
START/STOP for 12 seconds
to exit programming mode.
7. Put the key back into the transmitter.
8. Replace the key lock cylinder cap. See Door Locks 037.
Page 35 of 391
Buick Regal Owner Manual (GMNA-Localizing-U.S./Canada-12163021) -
2019 - CRC - 11/14/18
34 Keys, Doors, and Windows
Programming without Recognized
Transmitters
If there are no currently recognized
RKE transmitters available, follow
this procedure to program up to
eight RKE transmitters. This
procedure will take approximately
30 minutes to complete. The vehicle
must be off and all of the RKE
transmitters you wish to program
must be with you.1. Remove the key lock cylinder cap. See Door Locks 037.
2. Insert the vehicle key of the RKE transmitter into the key
lock cylinder on the outside of
the driver door and turn the key
to the unlock position,
counterclockwise, five times
within 10 seconds.
The DIC displays REMOTE
LEARN PENDING,
PLEASE WAIT.
3. Wait for 10 minutes until the DIC displays PRESS ENGINE
START BUTTON TO LEARN
and then press ENGINE
START/STOP. The DIC will again display
REMOTE LEARN PENDING,
PLEASE WAIT.
4. Repeat Step 2 two additional times. After the third time all
previously known RKE
transmitters will no longer work
with the vehicle. Remaining
RKE transmitters can be
relearned during the next
steps.
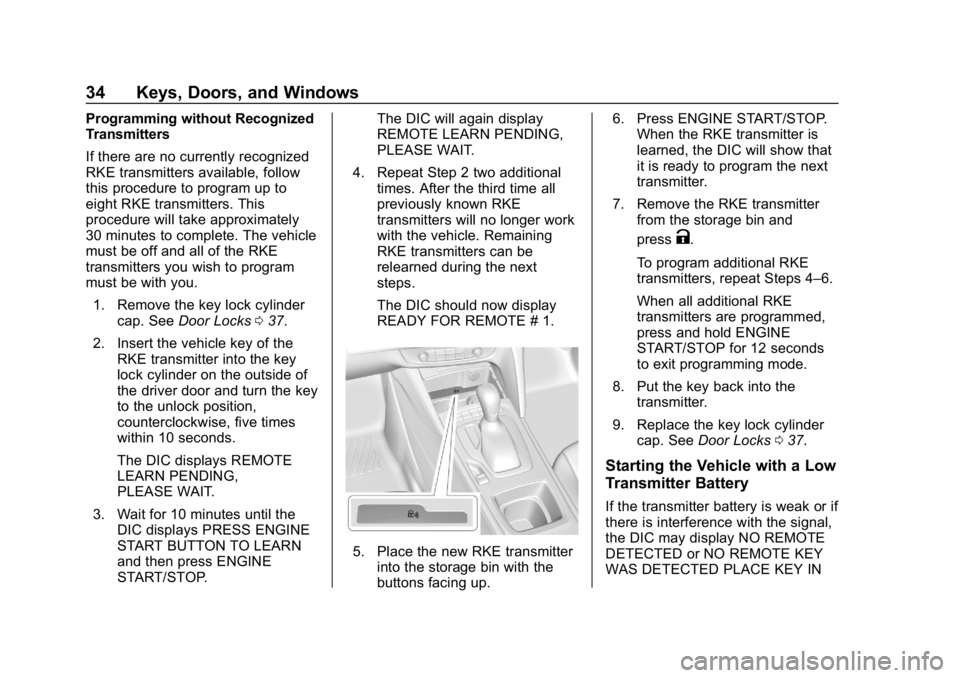
The DIC should now display
READY FOR REMOTE # 1.
5. Place the new RKE transmitterinto the storage bin with the
buttons facing up. 6. Press ENGINE START/STOP.
When the RKE transmitter is
learned, the DIC will show that
it is ready to program the next
transmitter.
7. Remove the RKE transmitter from the storage bin and
press
K.
To program additional RKE
transmitters, repeat Steps 4–6.
When all additional RKE
transmitters are programmed,
press and hold ENGINE
START/STOP for 12 seconds
to exit programming mode.
8. Put the key back into the transmitter.
9. Replace the key lock cylinder cap. See Door Locks 037.
Starting the Vehicle with a Low
Transmitter Battery
If the transmitter battery is weak or if
there is interference with the signal,
the DIC may display NO REMOTE
DETECTED or NO REMOTE KEY
WAS DETECTED PLACE KEY IN
Page 46 of 391
Buick Regal Owner Manual (GMNA-Localizing-U.S./Canada-12163021) -
2019 - CRC - 11/14/18
Keys, Doors, and Windows 45
liftgate or a possible support strut
failure. A repetitive chime will sound
while the falling liftgate detection
feature is operating. Remove any
excess weight. If the liftgate
continues to automatically close
after opening, see your dealer for
service before using the power
liftgate.
Interfering with the power liftgate
motion or manually closing the
liftgate too quickly after power
opening may resemble a support
strut failure. This could also activate
the falling liftgate detection feature.
Allow the liftgate to complete its
operation and wait a few seconds
before manually closing the liftgate.
Obstacle Detection Features
If the liftgate encounters an obstacle
during a power open or close cycle,
the liftgate will automatically reverse
direction and move a short distance
away from the obstacle. After
removing the obstruction, the power
liftgate can be used again. If the
liftgate encounters multiple
obstacles on the same power cycle,the power function will deactivate.
After removing the obstructions,
manually close the liftgate. This will
allow normal power operation
functions to resume.
If the vehicle is locked while the
liftgate is closing, and an obstacle is
encountered that prevents the
liftgate from completely closing, the
horn will sound as an alert that the
liftgate did not close.
Pinch sensors are on the side
edges of the liftgate. If an object is
caught between the liftgate and the
vehicle and presses against a
sensor, the liftgate will reverse
direction and open fully. The liftgate
will remain open until it is activated
again or closed manually.Setting the 3/4 Mode
To change the position the liftgate
stops at when opening:
1. Select MAX or 3/4 mode and power open the liftgate. 2. Stop the liftgate movement at
the desired height by pressing
any liftgate switch. Manually
adjust the liftgate position if
needed.
3. Press and hold
|under the
open liftgate until the turn
signals flash and a beep
sounds. This indicates the
setting has been recorded.
The liftgate cannot be set below a
minimum programmable height.
If there is no light flash or sound,
then the height adjustment may be
too low.
Manual Operation
Select OFF to manually operate the
liftgate. See “Manual Liftgate” at the
beginning of this section.
Caution
Attempting to move the liftgate
too quickly and with excessive
force may result in damage to the
vehicle.
Page 56 of 391
Buick Regal Owner Manual (GMNA-Localizing-U.S./Canada-12163021) -
2019 - CRC - 11/14/18
Keys, Doors, and Windows 55
Sun Visors
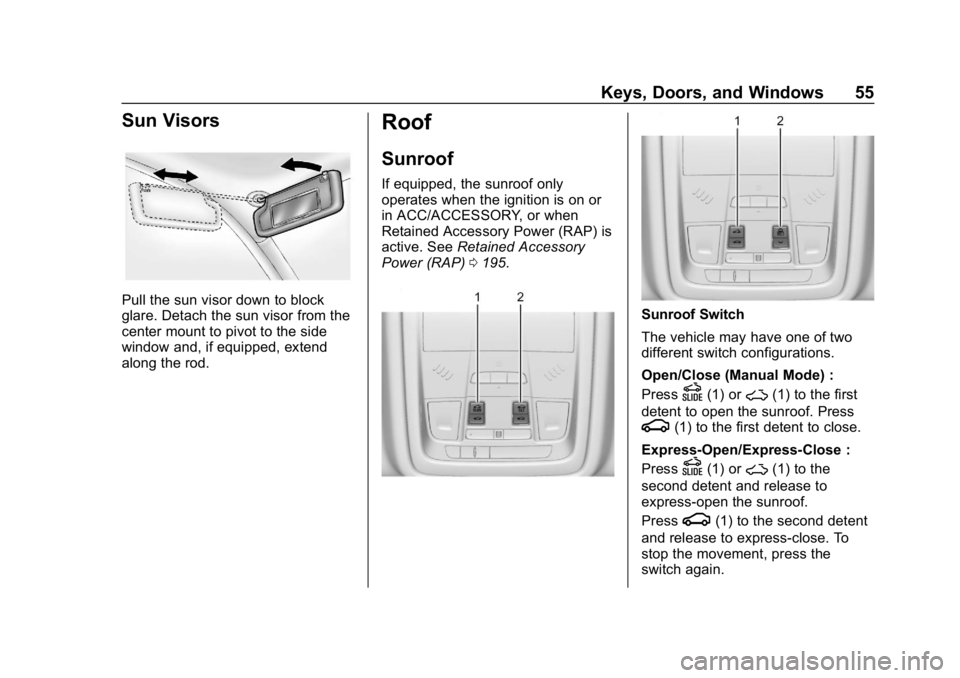
Pull the sun visor down to block
glare. Detach the sun visor from the
center mount to pivot to the side
window and, if equipped, extend
along the rod.
Roof
Sunroof
If equipped, the sunroof only
operates when the ignition is on or
in ACC/ACCESSORY, or when
Retained Accessory Power (RAP) is
active. SeeRetained Accessory
Power (RAP) 0195.
Sunroof Switch
The vehicle may have one of two
different switch configurations.
Open/Close (Manual Mode) :
Press
D(1) or~(1) to the first
detent to open the sunroof. Press
g(1) to the first detent to close.
Express-Open/Express-Close :
Press
D(1) or~(1) to the
second detent and release to
express-open the sunroof.
Press
g(1) to the second detent
and release to express-close. To
stop the movement, press the
switch again.
Page 83 of 391
Buick Regal Owner Manual (GMNA-Localizing-U.S./Canada-12163021) -
2019 - CRC - 11/14/18
82 Seats and Restraints
A seat-mounted side impact airbag
is designed to inflate on the side of
the vehicle that is struck.
Roof-rail airbags are designed to
inflate in moderate to severe side
crashes depending on the location
of the impact. In addition, these
roof-rail airbags are designed to
inflate during a rollover or in a
severe frontal impact. Roof-rail
airbags are not designed to inflate in
rear impacts. Both roof-rail airbags
will inflate when either side of the
vehicle is struck, if the sensing
system predicts that the vehicle is
about to roll over on its side, or in a
severe frontal impact.
In any particular crash, no one can
say whether an airbag should have
inflated simply because of the
vehicle damage or repair costs.
What Makes an Airbag
Inflate?
In a deployment event, the sensing
system sends an electrical signal
triggering a release of gas from the
inflator. Gas from the inflator fills theairbag causing the bag to break out
of the cover. The inflator, the airbag,
and related hardware are all part of
the airbag module.
For airbag locations, see
Where Are
the Airbags? 079.
How Does an Airbag
Restrain?
In moderate to severe frontal or
near frontal collisions, even belted
occupants can contact the steering
wheel or the instrument panel. In
moderate to severe side collisions,
even belted occupants can contact
the inside of the vehicle.
Airbags supplement the protection
provided by seat belts by
distributing the force of the impact
more evenly over the
occupant's body.
Rollover capable roof-rail airbags
are designed to help contain the
head and chest of occupants in the
outboard seating positions in the
first and second rows. The rollover
capable roof-rail airbags are
designed to help reduce the risk of full or partial ejection in rollover
events, although no system can
prevent all such ejections.
But airbags would not help in many
types of collisions, primarily
because the occupant's motion is
not toward those airbags. See
When
Should an Airbag Inflate? 081.
Airbags should never be regarded
as anything more than a supplement
to seat belts.
What Will You See after
an Airbag Inflates?
After frontal, knee, and
seat-mounted side impact airbags
inflate, they quickly deflate, so
quickly that some people may not
even realize the airbags inflated.
Roof-rail airbags may still be at least
partially inflated for some time after
they inflate. Some components of
the airbag module may be hot for
several minutes. For location of the
airbags, see Where Are the
Airbags? 079.
Page 130 of 391
Buick Regal Owner Manual (GMNA-Localizing-U.S./Canada-12163021) -
2019 - CRC - 11/14/18
Instruments and Controls 129
.Navigation
. Options
Audio
Press
Vto select the Audio app,
then press
Tto enter the Audio
menu. In the Audio menu browse for
music, select from the favorites,
or change the audio source.
Phone
Press
Vto select the Phone app,
then press
Tto enter the Phone
menu. In the Phone menu, if there is
no active phone call, view recent
calls, scroll through contacts,
or select from the favorites. If there
is an active call, mute or unmute the
phone or switch to handset or
handsfree operation.
Navigation
Press
Vto select the Navigation
app, then press
Tto enter the
Navigation menu. If there is no
active route, press
Vto access
Recents or Favorites list. If there is an active route, press
Vto cancel
route guidance, mute/unmute voice
guidance, or access Recents or
Favorites list.
Options
Press
Vto select the Options app.
Use
yorzto scroll through items
in the Options menu.
Units : Press
Twhile Units is
displayed to enter the Units menu.
Choose English or metric units by
pressing
Vwhile the desired item is
highlighted.
Display Themes : Press
Twhile
Display Themes is displayed to
enter the menu. Choose Sport or
Touring by pressing
Vwhile the
desired item is highlighted.
Pocket Gauges : Press
Twhile
Pocket Gauges is displayed to enter
the menu and select gauges that
can be displayed on the left or right
of the display area. If equipped,
choose oil temperature, battery
voltage, fuel range, or fuel economy. Head-up Display (HUD) Rotation :
This feature allows for adjusting the
angle of the HUD image. Press
V
on the steering wheel controls while
Head-up Display Rotation is
highlighted to enter Adjust Mode.
Press
yorzto adjust the angle
of the HUD display. Press
SorTto
highlight OK, then press
Vto save
the setting. To cancel the setting,
select Cancel. The vehicle must be
in P (Park).
Info Pages : Press
Twhile Info
Pages is displayed to enter the Info
Pages menu and select the items to
be displayed in the Info App. See
Driver Information Center (DIC)
0 144.
Speed Warning : The Speed
Warning display allows the driver to
set a speed that they do not want to
exceed. To set the Speed Warning,
press
Twhen Speed Warning is
displayed. Scroll to Set Speed and
press
T. PressVto set the speed.
Once the speed is set, this feature
can be turned off by pressing
V
Page 136 of 391
Buick Regal Owner Manual (GMNA-Localizing-U.S./Canada-12163021) -
2019 - CRC - 11/14/18
Instruments and Controls 135
If the word OFF is lit on the airbag
status indicator, it means that the
passenger sensing system has
turned off the front outboard
passenger frontal airbag and knee
airbag.
If, after several seconds, both status
indicator lights remain on, or if there
are no lights at all, there may be a
problem with the lights or the
passenger sensing system. See
your dealer for service.
{Warning
If the airbag readiness light ever
comes on and stays on, it means
that something may be wrong
with the airbag system. To help
avoid injury to yourself or others,
have the vehicle serviced right
away. SeeAirbag Readiness
Light 0134 for more information,
including important safety
information.
Charging System Light
The charging system light comes on
briefly when the ignition is turned
on, but the engine is not running, as
a check to show the light is working.
The light turns off when the engine
is started. If it does not, have the
vehicle serviced by your dealer.
If the light stays on, or comes on
while driving, there could be a
problem with the electrical charging
system. Have it checked by your
dealer. Driving while this light is on
could drain the battery.
If a short distance must be driven
with the light on, be sure to turn off
all accessories, such as the radio
and air conditioner.
Malfunction Indicator
Lamp (Check Engine
Light)
This light is part of the vehicle’s
emission control on-board
diagnostic system. If this light is on
while the engine is running, a
malfunction has been detected and
the vehicle may require service. The
light should come on to show that it
is working when the ignition is in
Service Mode. See Ignition
Positions 0190.
Malfunctions are often indicated by
the system before any problem is
noticeable. Being aware of the light
and seeking service promptly when
it comes on may prevent damage.